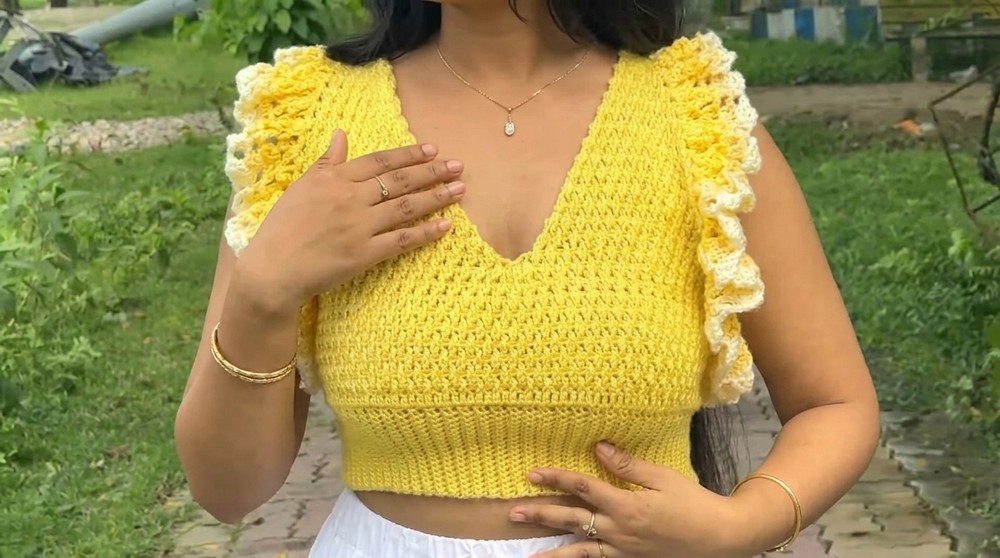
Create your own stylish look with this FREE Crochet Ruffle Sleeve Crop Top Pattern ideal for casual outings and adding a unique handmade touch to your wardrobe.
Finding a stylish top that’s both unique and comfortable can feel impossible, yet a Free Crochet Ruffle Sleeve Crop Top pattern offers the perfect solution by letting you create a piece that’s fun, flirty, and wearable. Ideal for brunches, beach strolls, or layering over high-waist skirts, this crop top combines airy ruffle sleeves with a modern, flattering fit.
How to Crochet Free Ruffle Sleeve Crop Top That Turns Heads
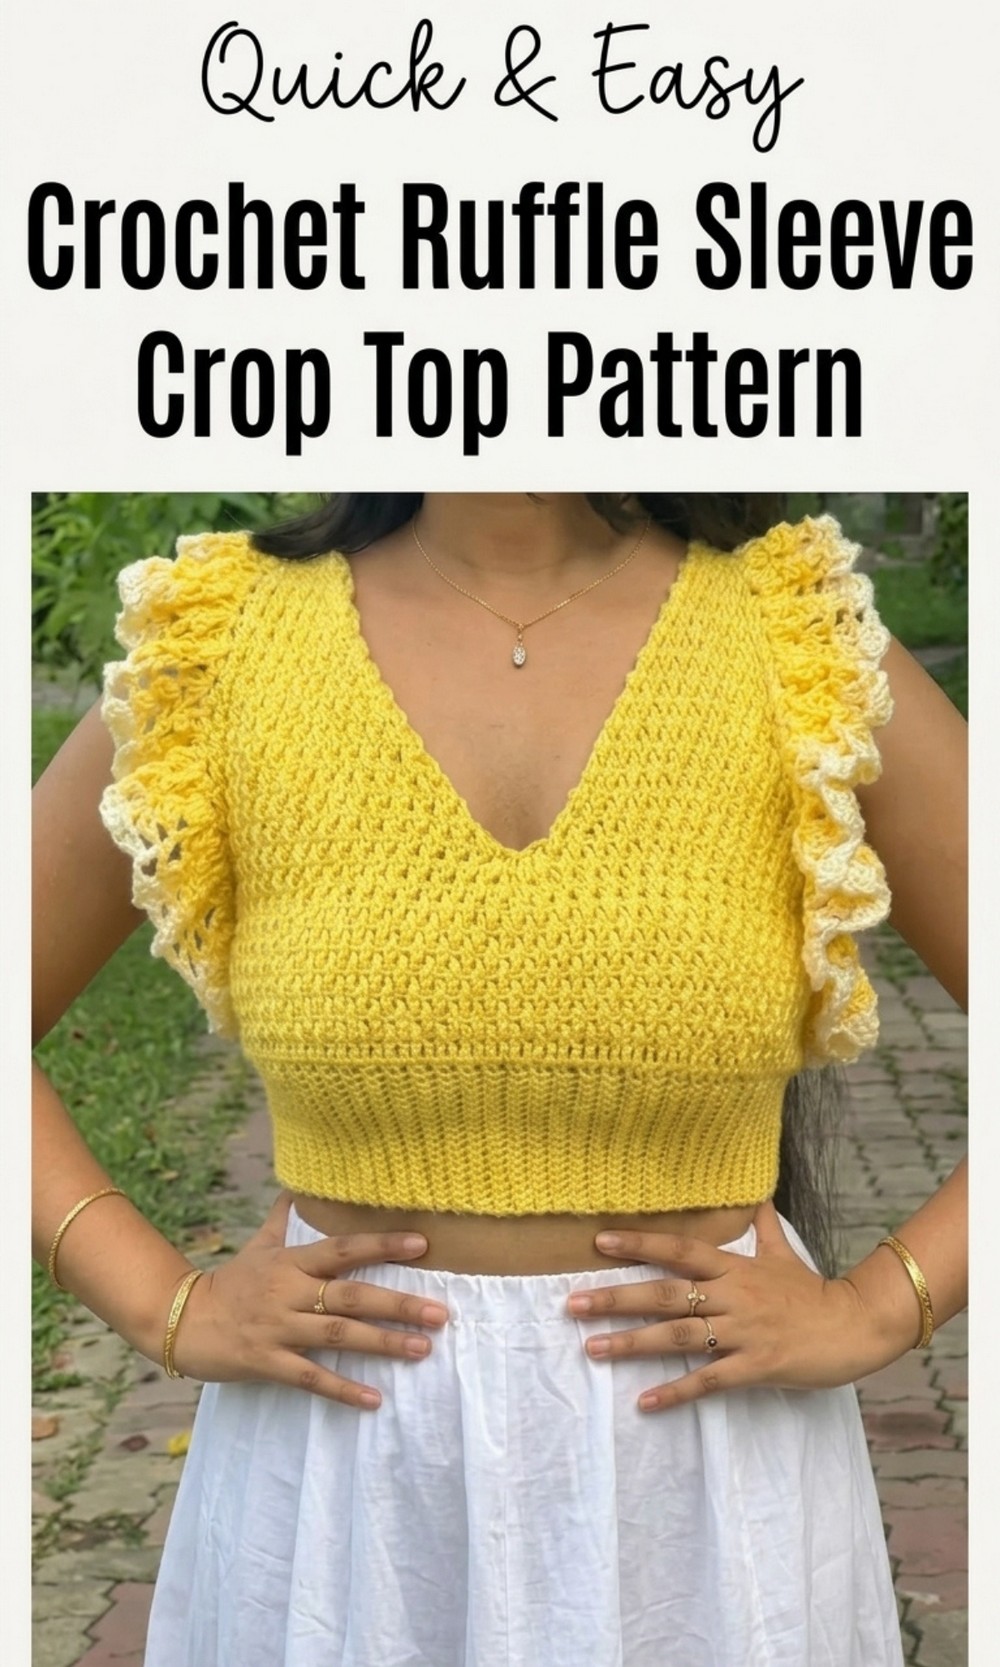
Making it yourself lets you choose yarn colors and textures to match your personal style, turning every top into a one-of-a-kind piece. Beyond fashion, crocheting this top is calming and satisfying, sparking creativity and focus. Pair it with denim shorts, flowy skirts, or casual dresses for versatile styling options. Comfortable, chic, and playful, it becomes an effortless go-to for casual hangouts, summer outings, or even semi-formal occasions.
Ruffle Sleeve Crochet Top Pattern
Materials
Yarn:
- Type: Lightweight yarn (DK or #3). Cotton, acrylic, or any lightweight yarn works well for a summer top.
- Amount: Approximately 200–300 g, depending on size and sleeve ruffle rows.
- Color: Use one solid color or an ombre transition for the sleeves as an accent.
Hook:
- Hook Size: 4 mm or size recommended on the yarn label.
Notions:
- Measuring tape.
- Scissors.
- Yarn needle.
- Stitch markers (optional).
Gauge
- Straight single crochet rows: 14 stitches × 15 rows = 4 x 4 inches (10 x 10 cm).
- Maintain even tension to ensure the correct fit—adjust hook size as needed to achieve gauge.
Finished Size
- Small to Medium Size:
- Underbust circumference: Approx. 26–34 inches (adjustable by adding more rows for your underbust).
- Body length: Approx. 12 inches.
- For Large Size: Adjust by chaining 22 chains (instead of 18) and adding rows for additional width or height.
Special Techniques
Back Loop Only (BLO) Single Crochet:
- Insert the hook into the back loop (BLO) of each stitch—the loop furthest from you.
- Yarn over, pull through the loop, yarn over again, and pull through both loops to complete the stitch.
Front Post Double Crochet (FPdc):
- Yarn over, insert the hook around the post of the stitch (front to back) in the previous row.
- Yarn over, pull through the post, yarn over, pull through 2 loops, and repeat to complete the stitch.
Pattern Instructions
Step 1: Underbust Band
- Foundation Chain:
- For small/medium size, chain 18.
- For large size, chain 22.
- This chain determines the length of the garment (top to waist). Adjust by increasing or decreasing the number of chains for desired length.
- Row 1: Chain 1 (turning chain), work 1 single crochet (sc) into the second chain from the hook and into each chain across.
- Row 2: Chain 1, turn. Work 1 BLO single crochet into each stitch across.
- Repeat Row 2: Continue working BLO sc until the length equals your underbust measurement (e.g., for small: 26–34 inches). Regularly measure to ensure the band fits snugly but comfortably.
- Join the Band:
- Fold the band in half, aligning the short edges.
- Slip stitch the front loop of one edge to the back loop of the other edge to form a tube.
- Fasten off and weave in any loose ends.

Step 2: Start the Body
- Attach Yarn to the Band: Start with a slip knot and join yarn at any stitch of the underbust band seam using a slip stitch.
- Round 1: Work 1 sc into each stitch around the top edge of the underbust band. Slip stitch to the first sc to close the round.
- Round 2 (Double Crochet Round):
- Chain 3 (counts as the first dc). Work 1 double crochet (dc) into each stitch around. Slip stitch to the top of the chain-3 to join.
- Round 3 (Single Crochet): Work 1 sc into each stitch from the previous round. Slip stitch to the first sc.
Step 3: Body Alpine Stitch Pattern
- Round 4 (Alpine Stitch Round):
- Chain 3 (counts as the first dc).
- Alternate 1 FPdc into the post of the dc below with 1 regular dc into the next stitch.
- Repeat 1 FPdc, 1 dc around. Slip stitch to the top of the chain-3 to join.
- Round 5:
- Chain 3, turn. Alternate by reversing placements: 1 regular dc on top of FPdc, and 1 FPdc on top of regular dc from the previous round.
- Repeat around and slip stitch to join.
- Continue Alternating: Repeat this alpine stitch pattern (Rounds 4-5) until the body reaches the desired length. End with a sc round to finish.
- For small/medium size: Approx. 10 rounds of alpine stitch.

Step 4: Forming the Neckline (V-Neck)
- Locate Center of Front: Count stitches to mark the midpoint along the front edge. Use stitch markers to divide the body into two equal panels.
- First Panel:
- Attach yarn at the left edge of the marked middle.
- Work the alpine stitch pattern up to the side edge to form a triangle shape that tapers at the top.
- Decrease rows:
- On each row, decrease by skipping the first and last stitch, while maintaining the alternating FPdc/dc pattern in the middle.
- Continue until you have 6 stitches left.
- Create the Band: Once 6 stitches remain, work straight sc rows over them until the band reaches the back edge of the top. Secure the band to the back with slip stitches.
- Second Panel: Repeat steps for the second side to complete the neckline and back band.
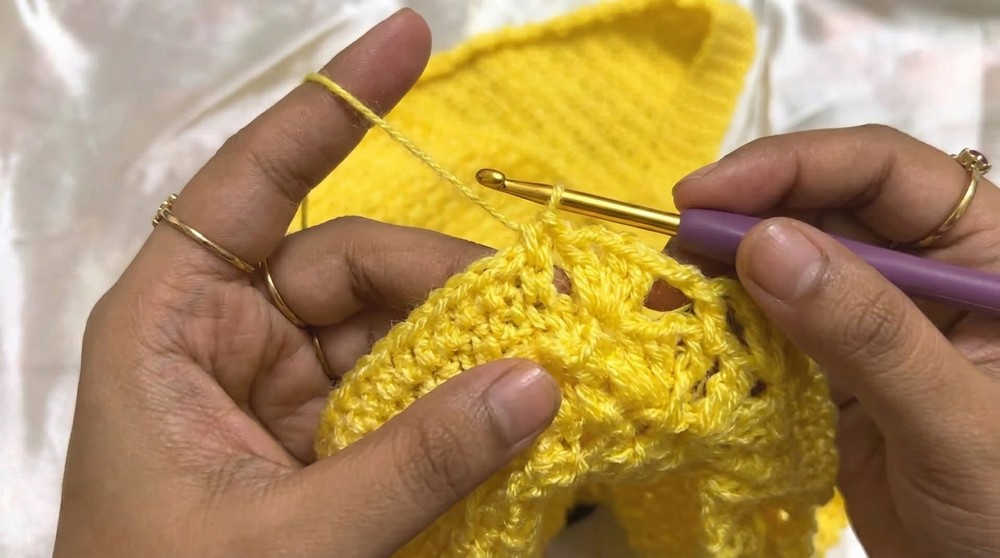
Step 5: Ruffle Sleeves
- Attach Yarn to the Armhole: Join yarn at any point along the armhole with a slip stitch.
- Round 1 (Shell Pattern):
- Chain 3, work 2 double crochet, chain 2, and 2 double crochet into the same stitch (forms a shell).
- Chain 2, work 1 double crochet into the next stitch.
- Repeat shell, chain 2, 1 dc around the armhole. Slip stitch to join.
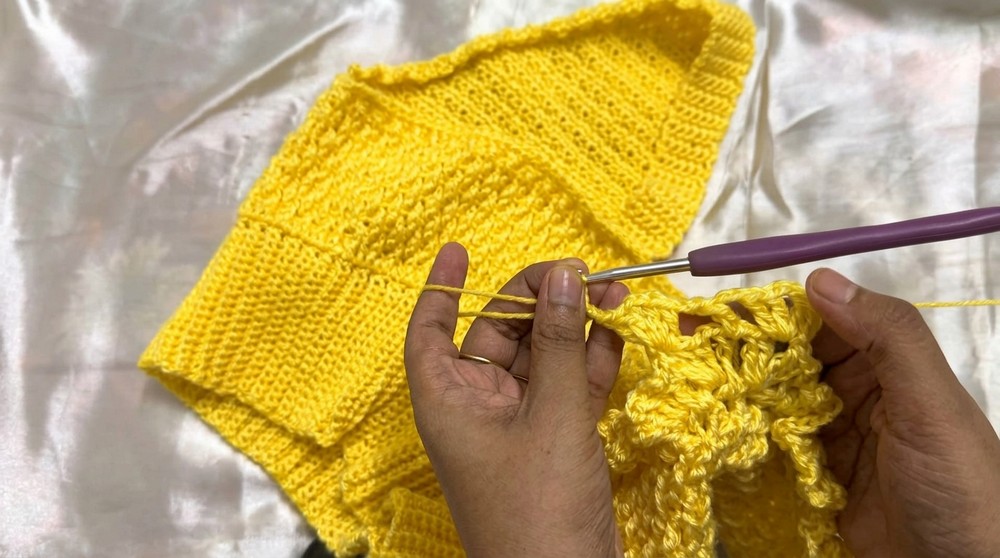
- Round 2:
- Slip stitch into the first chain-2 space of the previous round.
- Work 2 double crochet, chain 2, and 2 double crochet into each shell chain-2 space. Continue shell pattern around.
- Add More Ruffle Rows (Optional): Repeat the shell pattern for 2–3 more rows for fuller sleeves.
- Finish Sleeves: Fasten off and weave in any loose ends.
Tips & Customization Ideas
- Sleeve Size: Add more ruffle rows to create dramatic, flowy sleeves or reduce rows for a subtle flutter sleeve.
- Color Customization: Use multiple yarn colors or create an ombre effect on sleeves for a unique touch.
- Length Variations: Extend the body or neckline panel rows for more coverage or a dress-style top.
Finishing
- Weave in all loose ends using a yarn needle.
- Block the top gently to even out the alpine stitch texture and shape the fabric.

Conclusion
This cropped ruffle sleeve top blends beautifully textured stitches with playful accents, making it perfect for casual or special occasions. Its easily customizable design ensures it can be modified for any size or style preference.