Show your style with this Free Crochet Striped Headband Pattern and make a colorful, trendy accessory perfect for daily wear or gifting.
Sometimes, it’s the simplest projects that bring the most joy and utility to our daily lives. The Free Crochet Striped Headband Pattern is a perfect example an easy-to-make accessory that blends comfort and beauty effortlessly. Ideal for keeping hair tame during active days or adding a subtle yet stylish touch to your outfit, this headband is as practical as it is versatile.
Free Crochet Striped Headband Pattern You’ll Love to Wear

Its striped pattern allows endless possibilities for playing with colors, making it a delightful way to add personality to your wardrobe. Whether crocheted in soft pastels or bold, vibrant tones, the outcome will always be a striking and unique piece. Perfect for yoga sessions, cozy evenings, or a practical everyday outfit, this crochet accessory isn’t just a project, it’s a functional and stylish statement piece that celebrates creativity and conscious crocheting. The headband’s adjustability, combined with the freedom to use any yarn type even leftover or scrap yarn adds to its charm and eco-friendly appeal.
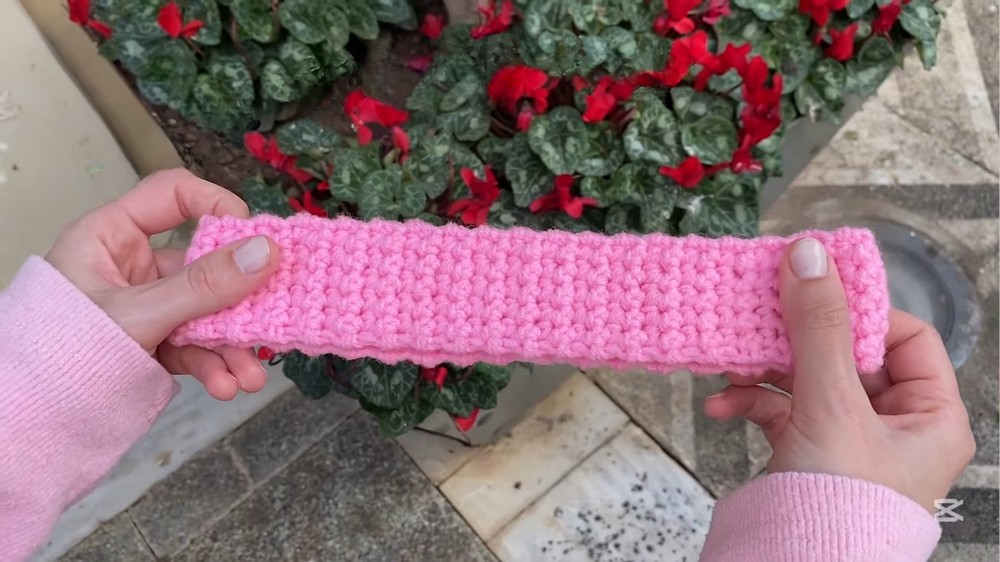
Crochet Headband Pattern
Skill Level
- Intermediate (single crochet, slip stitch, working into loops, and finishing techniques).
Finished Size
- The width and circumference of the headband will depend on the number of chains and rows you complete. The length should match the circumference of your head (headband fits snugly due to slight stretch in yarn).
Materials
- Yarn:
- Size 2 acrylic yarn (100% acrylic, held double to make size 4).
You can substitute with size 4 yarn directly if preferred. - Option to change colors or use different fibers (cotton for less stretch).
- Size 2 acrylic yarn (100% acrylic, held double to make size 4).
- Hook:
- 6 mm crochet hook (adjust based on your yarn thickness).
- Notions:
- Scissors
- Yarn needle: For weaving in loose ends securely.
- Optional:
- Stitch markers: For marking sides and corners to prevent skipping stitches.
- Measuring tape: To ensure accurate size and fit while crocheting.
Gauge
- Not critical for this project. Simply check the width and length as you work to ensure a proper fit.
Abbreviations (US Crochet Terminology):
| Abbreviation | Definition |
|---|---|
| ch | chain |
| sc | single crochet |
| sl st | slip stitch |
| st(s) | stitch(es) |
| yo | yarn over |
Special Notes
- Working with Double Strands: Use two strands held together if using thinner yarn to mimic size 4 yarn. Ensure both strands are consistently worked to avoid uneven tension.
- Flat Edges: Avoid chaining 1 between rows for a smoother edge.
- Stretch Consideration: Acrylic yarn stretches slightly (ensure snug fit). Cotton yarn will stretch less.
Pattern Instructions
1. Foundation Chain
- Create Slip Knot:
- Hold yarn, form a loop, insert hook, and pull through for a tight slip knot.
- Chain 7 (or adjust based on desired width). Ensure to work loosely for easy stitching.
Example for Chains:
ch 1, ch 2, ch 3… ch 7.
2. Row 1
- Skip the first chain closest to the hook.
- Insert hook into the second chain from the hook, and work 1 sc as follows:
- Insert hook, yarn over, pull through loop (2 loops on hook).
- Yarn over again, pull through both loops on hook. (1 sc made).
- Continue working 1 sc into each chain until the end of the row.
- Total sc: 6 sc (from 7 chains).

- Total sc: 6 sc (from 7 chains).
3. Row 2 (and Following Rows)
- Turn Work: Flip your work and start crocheting into the stitches from the previous row.
- Insert hook into the first stitch (ensure it’s the corner stitch).
- Work 1 sc in each stitch across the row. Continue to ensure there are 6 sc per row.
Tip: Count your stitches at the end of each row to avoid skipping or adding stitches.

4. Optional: Back Loops Only (Ridge Look)
- To create a ridged texture, work 1 sc into the back loop only of each stitch.
This technique is optional and creates a structured ribbing effect.
5. Continue Crocheting Rows
- Repeat Row 2 until the headband reaches the desired length (matching your head circumference).
- Test the fit periodically as acrylic yarn stretches slightly.
- Avoid overly loose fit to prevent slipping.
Example: Most headbands require approximately 40-50 rows, depending on head size and yarn stretch.
6. Joining Both Ends (Slip Stitch Method)
- Align Edges:
- Fold the headband to align both ends evenly, ensuring stitches are not twisted.
- Join with Slip Stitches:
- Insert your hook into the first stitch of the last row and into the first stitch of the foundation chain.
- Yarn over, pull through both stitches and through the loop on your hook (sl st completed).
- Continue working sl st evenly into each matching pair of stitches across the row until both edges are joined.
- Fasten Off:
- Chain 1, cut yarn, and pull through tightly to secure the join.
7. Finishing
- Weaving in Ends:
- Use a yarn needle to weave in loose ends securely.
- Work through several stitches at the back to hide ends and prevent unraveling.
- Optional Stretch Test:
- Slightly stretch the headband to ensure join is secure and elasticity maintained.

- Slightly stretch the headband to ensure join is secure and elasticity maintained.
Conclusion
This crochet headband is a versatile and quick project suitable for gifting or personal use. Its seamless, flat edges and customizable texture options make it a beginner-friendly introduction to working flat.
Pattern Corrections
- Double-check stitch counts at the end of each row (maintain 6 sc per row).
- Ensure edges are evenly aligned when slip stitching to avoid uneven joins.
Tips
- Yarn Choice:
- Acrylic yarn stretches slightly, making it ideal for snug fits. Switch to cotton yarn for a firmer, less stretchy finish.
- Customization:
- Experiment with ribbed (back-loop-only) texture for added style.
- Add color changes (striped patterns) for unique designs.
- Tension:
- Maintain consistent tension to ensure the headband fits smoothly around your head.