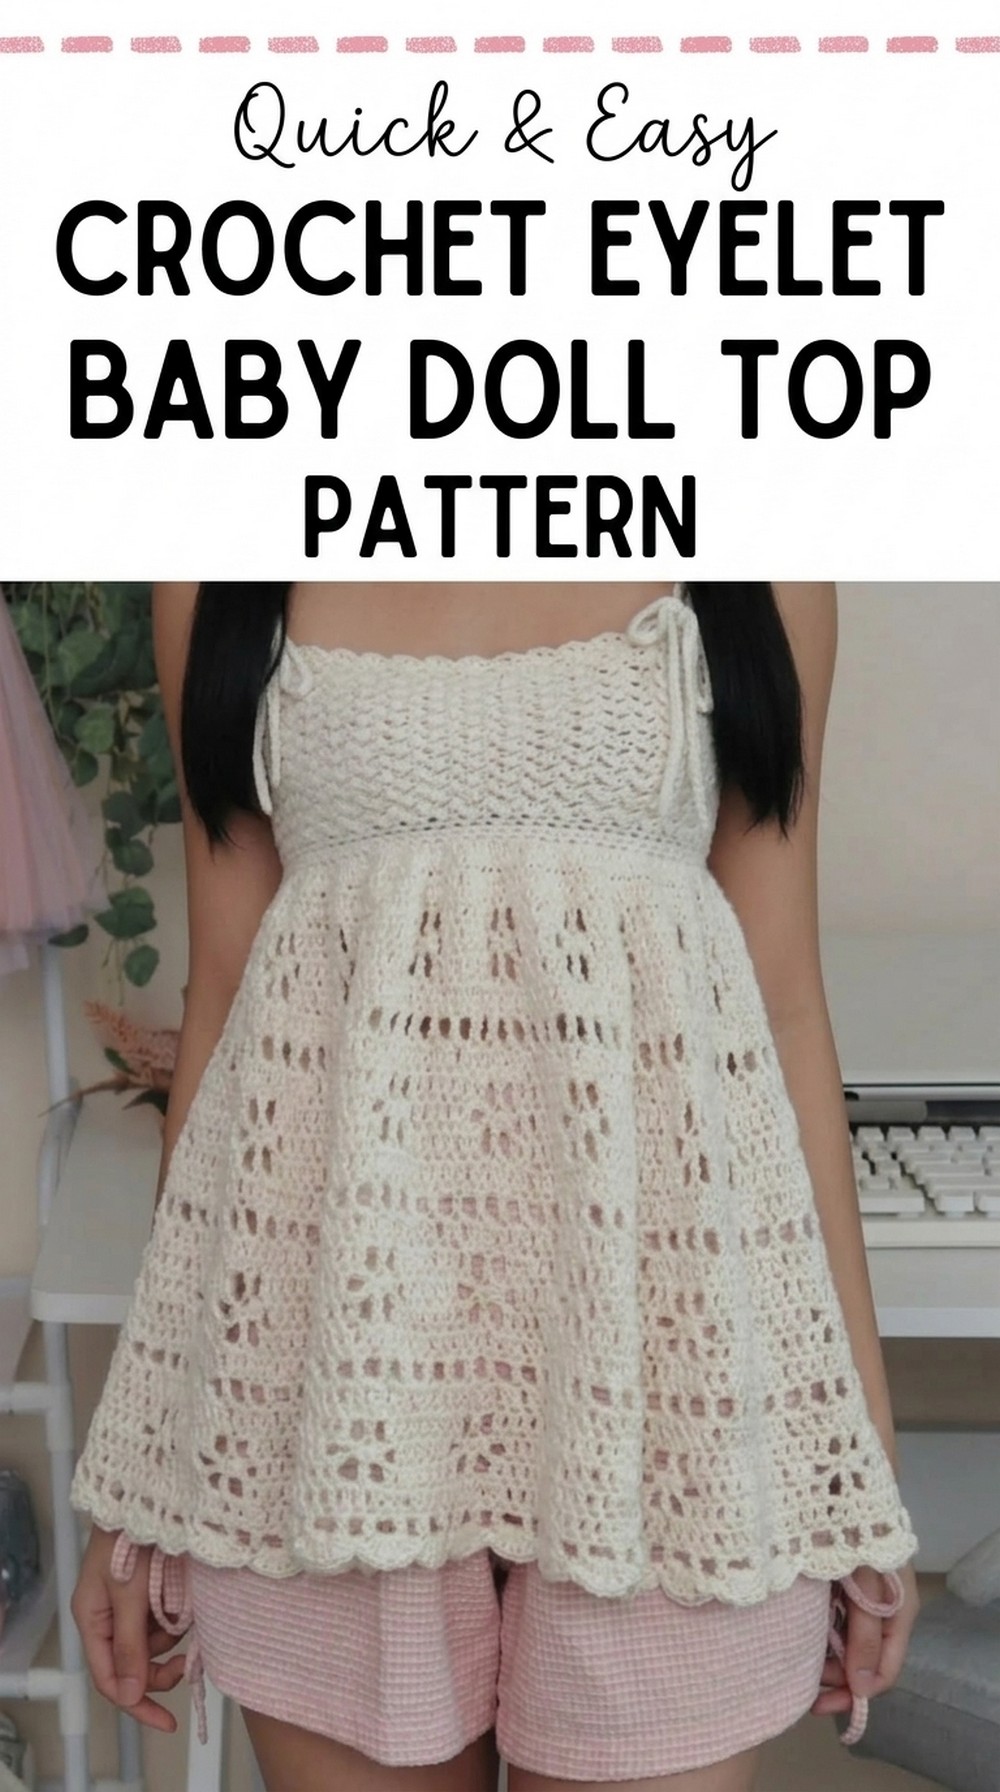
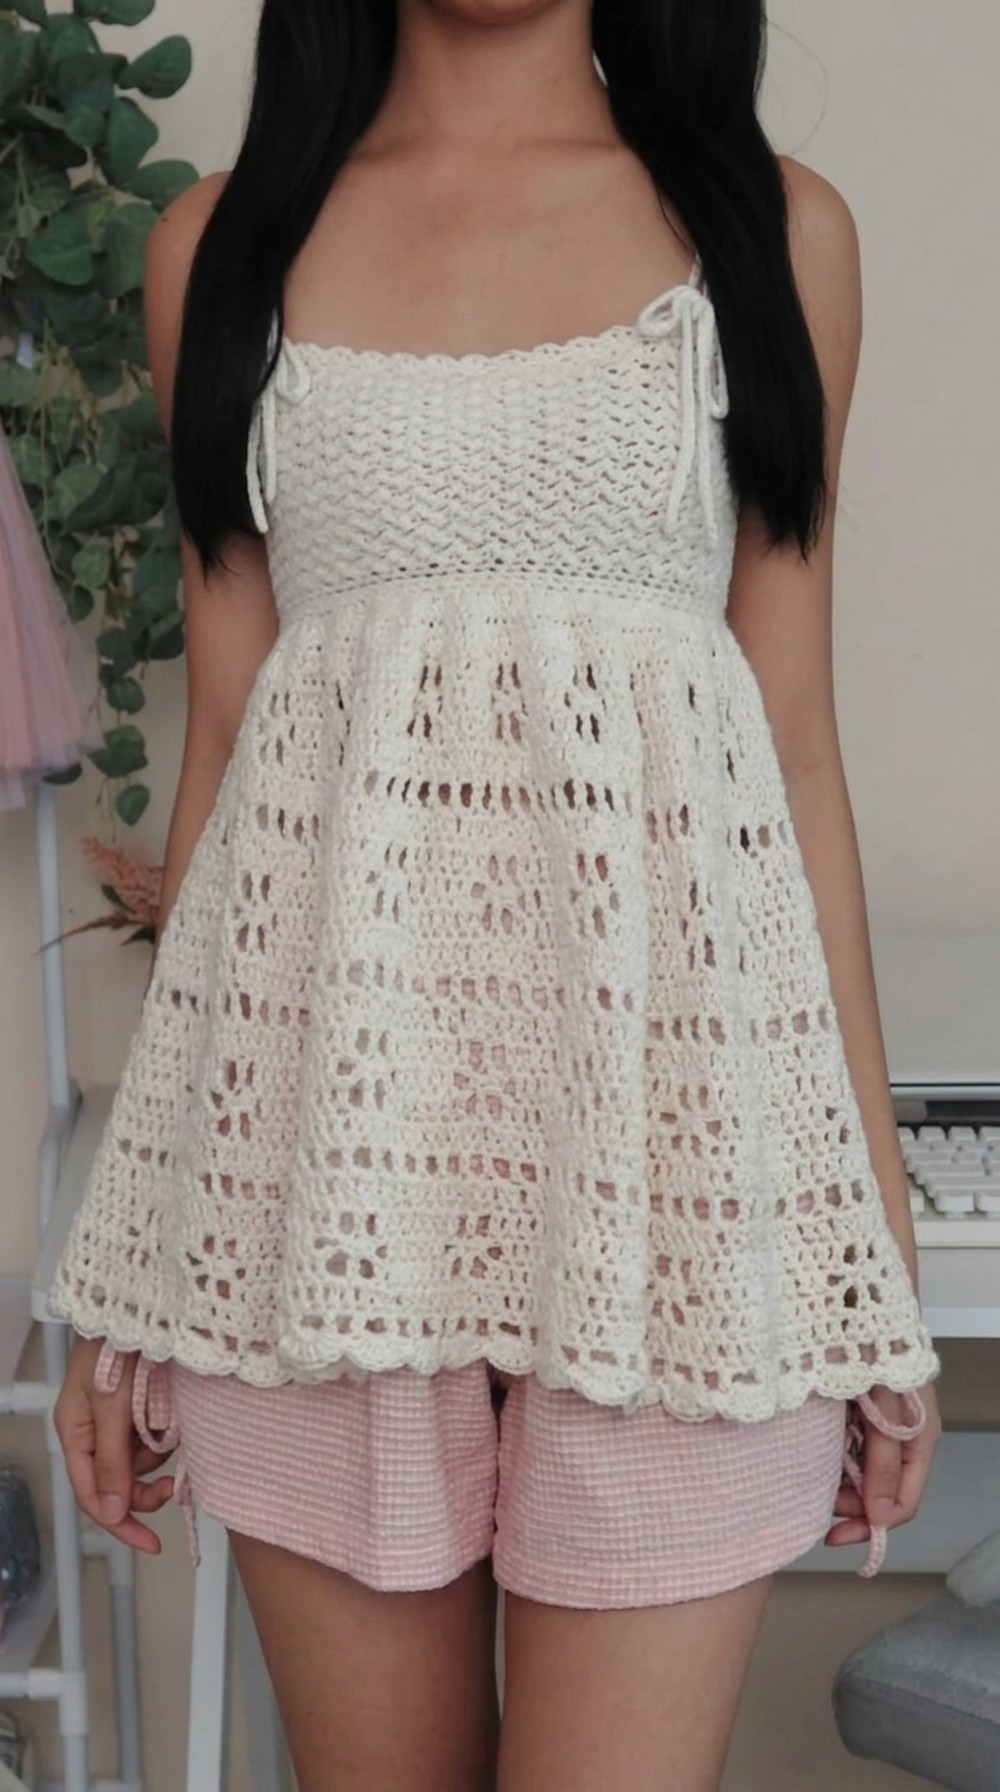
Dress your little one in style with this free crochet eyelet baby doll top pattern, a charming outfit that’s light, soft, and perfect for any special occasion.
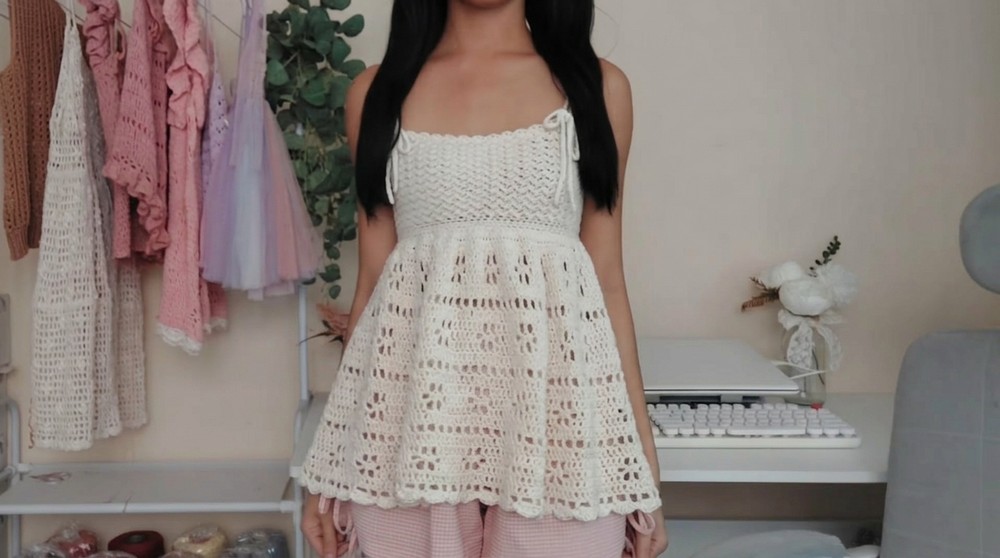
A soft and stylish baby garment can hold more warmth and meaning than any store-bought option. The free crochet eyelet baby doll top captures this sentiment through its airy texture and graceful appearance. Decorated with delicate eyelets, it offers a light and breezy look that is both adorable and practical for little ones. Its flowing shape adds a gentle charm, making it perfect for sunny days or layering in cooler weather.
Free Crochet Baby Doll Top Pattern That’s Full of Grace
The beauty of this top shines through its simple yet elegant design, turning it into a piece that stands out for any occasion. Whether worn casually or during special moments, it offers comfort and timeless appeal. The softness and thoughtful details make it a heartfelt addition to a baby’s wardrobe, showcasing care and love in every stitch. It’s more than just an outfit, it’s a wearable treasure that brings joy to both the maker and the wearer.
Crochet Eyelet Baby Doll Top Pattern
Skill Level
Advanced Beginner – Requires working with basic stitches, slip stitch joins, and handling customization for different sizes.
Materials
- Yarn:
- Belle Basic Cotton Yarn in Shade Pearl or any size 2 sports weight yarn.
- You can also use size 1 or size 3 yarn, but avoid heavier yarns (size 4 or higher) as it can make the top too heavy.
- Hook Sizes:
- Small Hook: Recommended hook size for your yarn (used for the bust panel).
- Foundation Hook: 1 mm larger than your small hook (ensures the foundation chain isn’t too tight).
- Large Hook: 2 mm larger than your small hook (used for the lower panel).
- Additional Tools:
- Elastic Garter: Equal to bust circumference with 6 cm allowance.
- Scissors: For trimming yarn and garter.
- Tape Measure: To get accurate measurements.
- Stitch Markers: To mark stitch placement for straps and joining points.
- Darning Needle: For weaving in ends and securing the garter.
Gauge
Gauge may vary depending on the yarn and hook used—measurements are adjusted according to individual size.
Special Notes
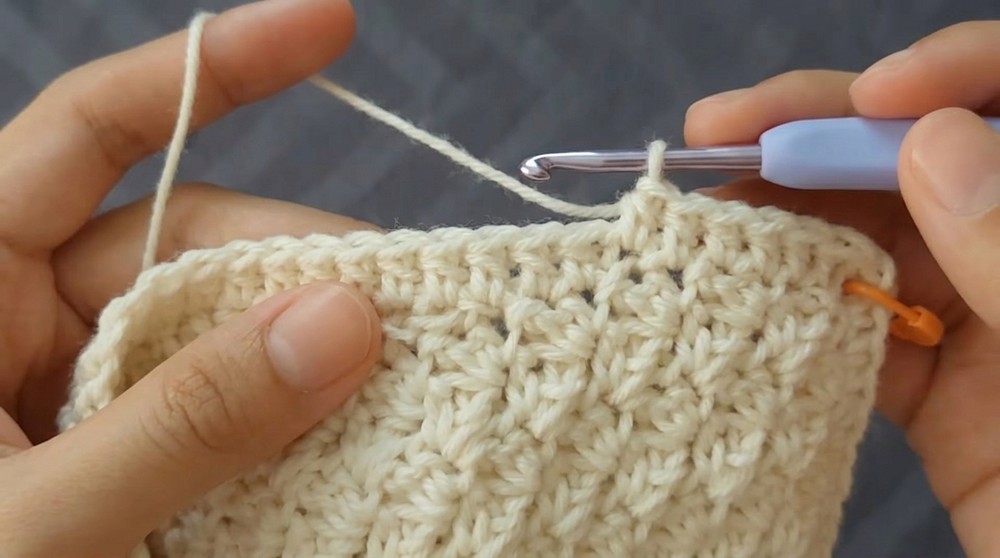
- The Bust Panel uses a simple alternating stitch pattern of single crochet (sc) and double crochet (dc).
- Lower Panel features a flower-style eyelet design with increases and chain spaces for a visually appealing drape.
- The project is made-to-measure, allowing perfect customization for any size or preferred fit.
- The detachable straps can be adjusted, tied into bows, or removed.
Pattern Instructions
Bust Panel
Step 1: Measurements
- Measure the distance from your upper bust to your underbust.
- Subtract 1 cm from the measured length to create a better fit, accounting for the fabric’s stretch.
Step 2: Foundation Chain
- Use the foundation hook to create a multiple of 2 chains that matches (or is close to) your bust length.
- Example: 24 chains for a sample size.
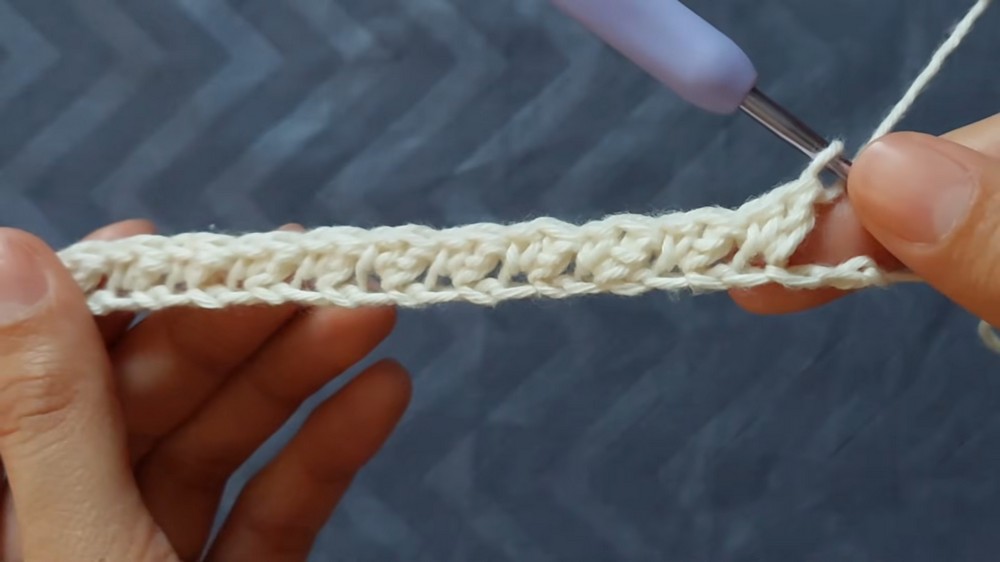
Step 3: Row 1
- Switch to the small hook for a neater body.
- For a clean edge, work into the back bumps of the chain:
- Sc into the second chain from your hook.
- Dc into the same chain.
- Skip 1 chain, then sc and dc into the next chain.
- Repeat the pattern (skip 1, sc + dc) until you have 2 chains left.
- Skip 1 chain, then sc into the final chain to complete the row.
Step 4: Row 2
- Ch 1 and turn your work.
- Sc into the first stitch, followed by dc in the same stitch.
- Skip the next stitch, then sc + dc into the next stitch.
- Repeat the pattern (skip 1, sc + dc) until 2 stitches remain.
- Skip 1, then sc into the last stitch.
Step 5: Repeat
- Repeat Row 2 until the bust panel measures your entire bust circumference.
- Ensure the total number of rows is a multiple of 4 for later attachment to the bottom panel.
Step 6: Joining the Bust Panel
- Fold the panel with the right sides facing each other.
- Slip stitch along the edge to join:
- Insert the hook into the first stitch on both sides.
- Yarn over and pull through all loops.
- Chain 1, skip 1 stitch, and repeat until the edge is complete.
- Turn the panel inside-out for a seamless join.
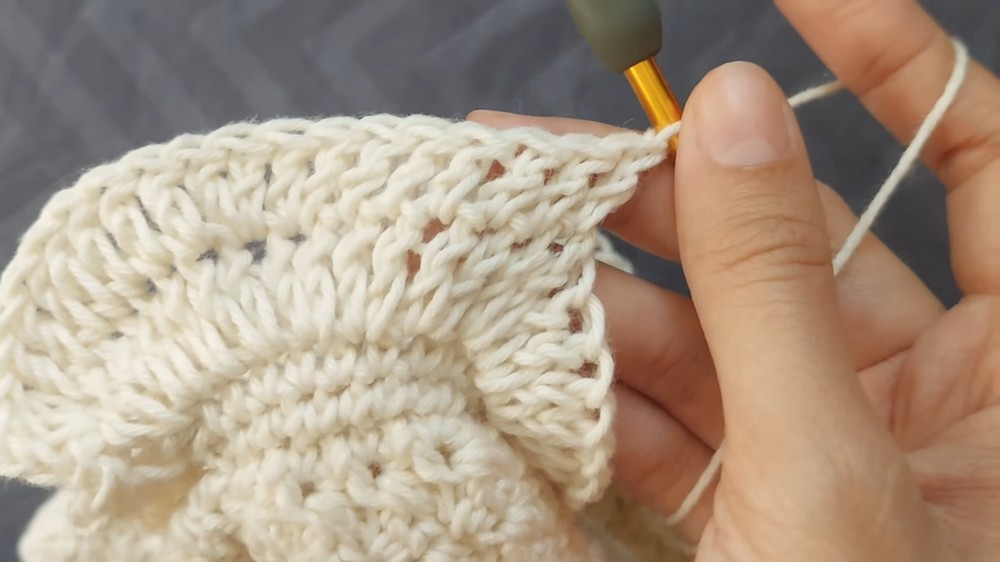
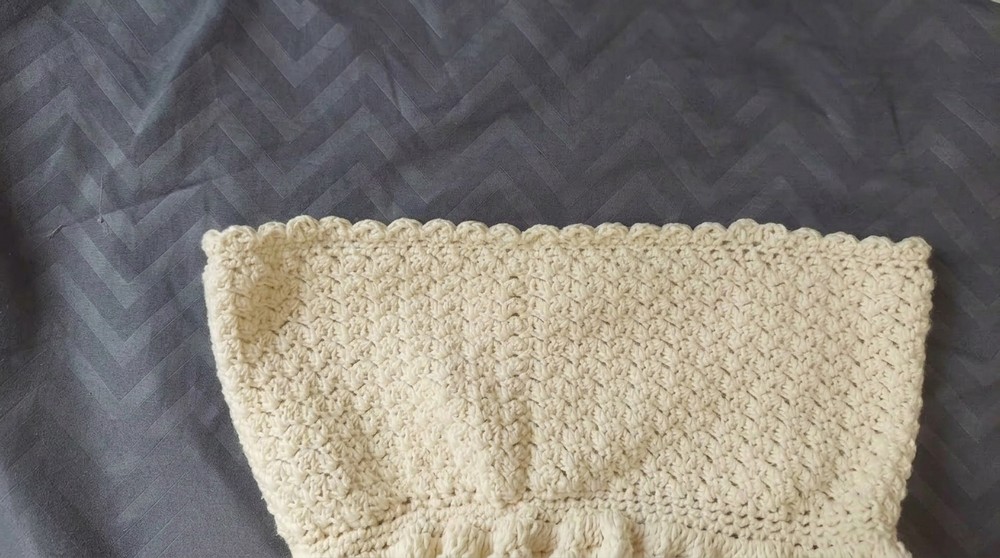
Bust Panel Edging
- Work sc into each row along the side of the panel:
- Insert the hook into the side of a row, work 1 sc.
- Repeat for every row.
- Join with a slip stitch into the first stitch.
- Try it on to ensure the panel fits snugly, but is not tight. Adjust if needed.
Garter for Bust Panel
- Measure the Garter:
- Cut the garter to match your bust circumference, adding 6 cm allowance for tying and adjustments.
- Secure the garter to the project:
- Place the garter between the yarn and loop, then chain 1.
- Work sc into the back loops of each stitch while encasing the garter.
- Join the row with a slip stitch, then tie and adjust the garter to fit snugly before trimming and sewing the ends.
Lower Panel
- Round 1:
- Using the large hook, chain 1, sc into the first stitch + ch 1 (acts as the first stitch).
- Work 2 dc into each stitch around, then join with a slip stitch.
- Round 2:
- Begin with chain 1, sc in the first stitch + ch 1.
- Work the following repeat:
- 2 dc in the next 2 stitches, then 1 dc in the next 6 stitches.
Eyelet Flower Pattern
- Round 3:
- Chain 1 and form 2 petals with chain spaces and alternating double crochets.
- Create a spacer of 7 dc between each flower.
- Round 4 to 5:
- Add more flowers by reducing the gap between petals (e.g., 5 dc spacer in Round 4).
- Repeat Rounds 3-7:
- Alternate between forming petals and filling spaces until the panel reaches the desired skirt/drape length.
- Ensure the final flower row ends at an appropriate length.
Finishing and Edging
- For Lower Panel Edging:
- Work a 5 dc shell into each space, followed by a slip stitch into the next space. Repeat around.
- Join with a slip stitch and weave in the ends.
- For Top Panel Edging:
- Work single crochet rows around the upper bust using a similar method as the lower panel.
- Straps:
- Chain to your desired strap length.
- Work slip stitches along the chains for strength.
- Attach straps securely to marked V stitch points.
Final Words
Your Eyelet Baby Doll Top is now ready! This project combines elegance and versatility, ensuring you have a handmade top that’s stylish, multifunctional, and perfectly fit for your size. Whether worn as a blouse or skirt, its timeless design adapts to any wardrobe.
Tips for Success
- Adjust Garter and Straps: Test the fit before finalizing knots or sewing for ultimate comfort.
- Use Contrasting Colors: For added flair, create the flowers in alternating shades.
- Practice Slip Stitches: These ensure clean joins for a seamless look.