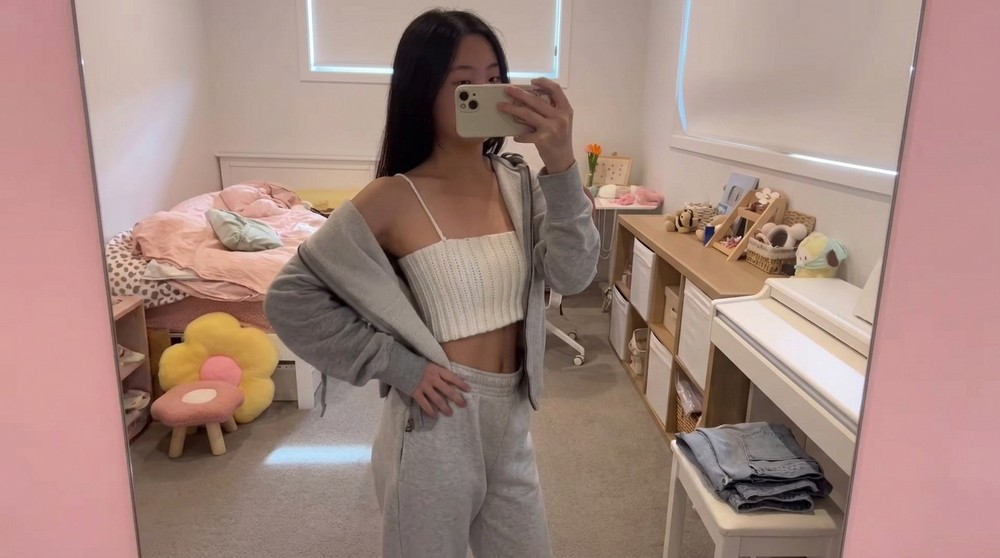
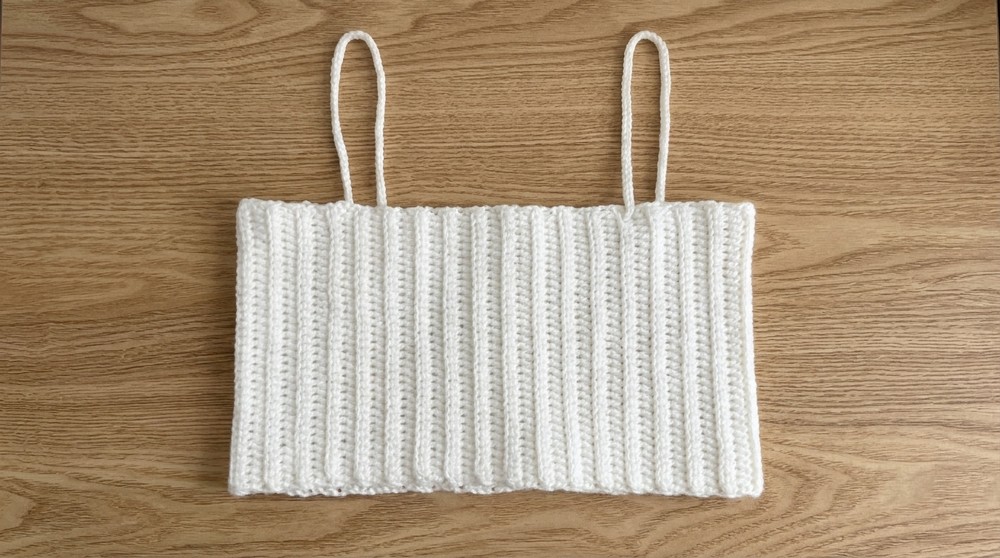
Create a trendy and stylish crochet ribbed crop top that’s perfect for any season, easy to pair with outfits, and customizable in your favorite colors.
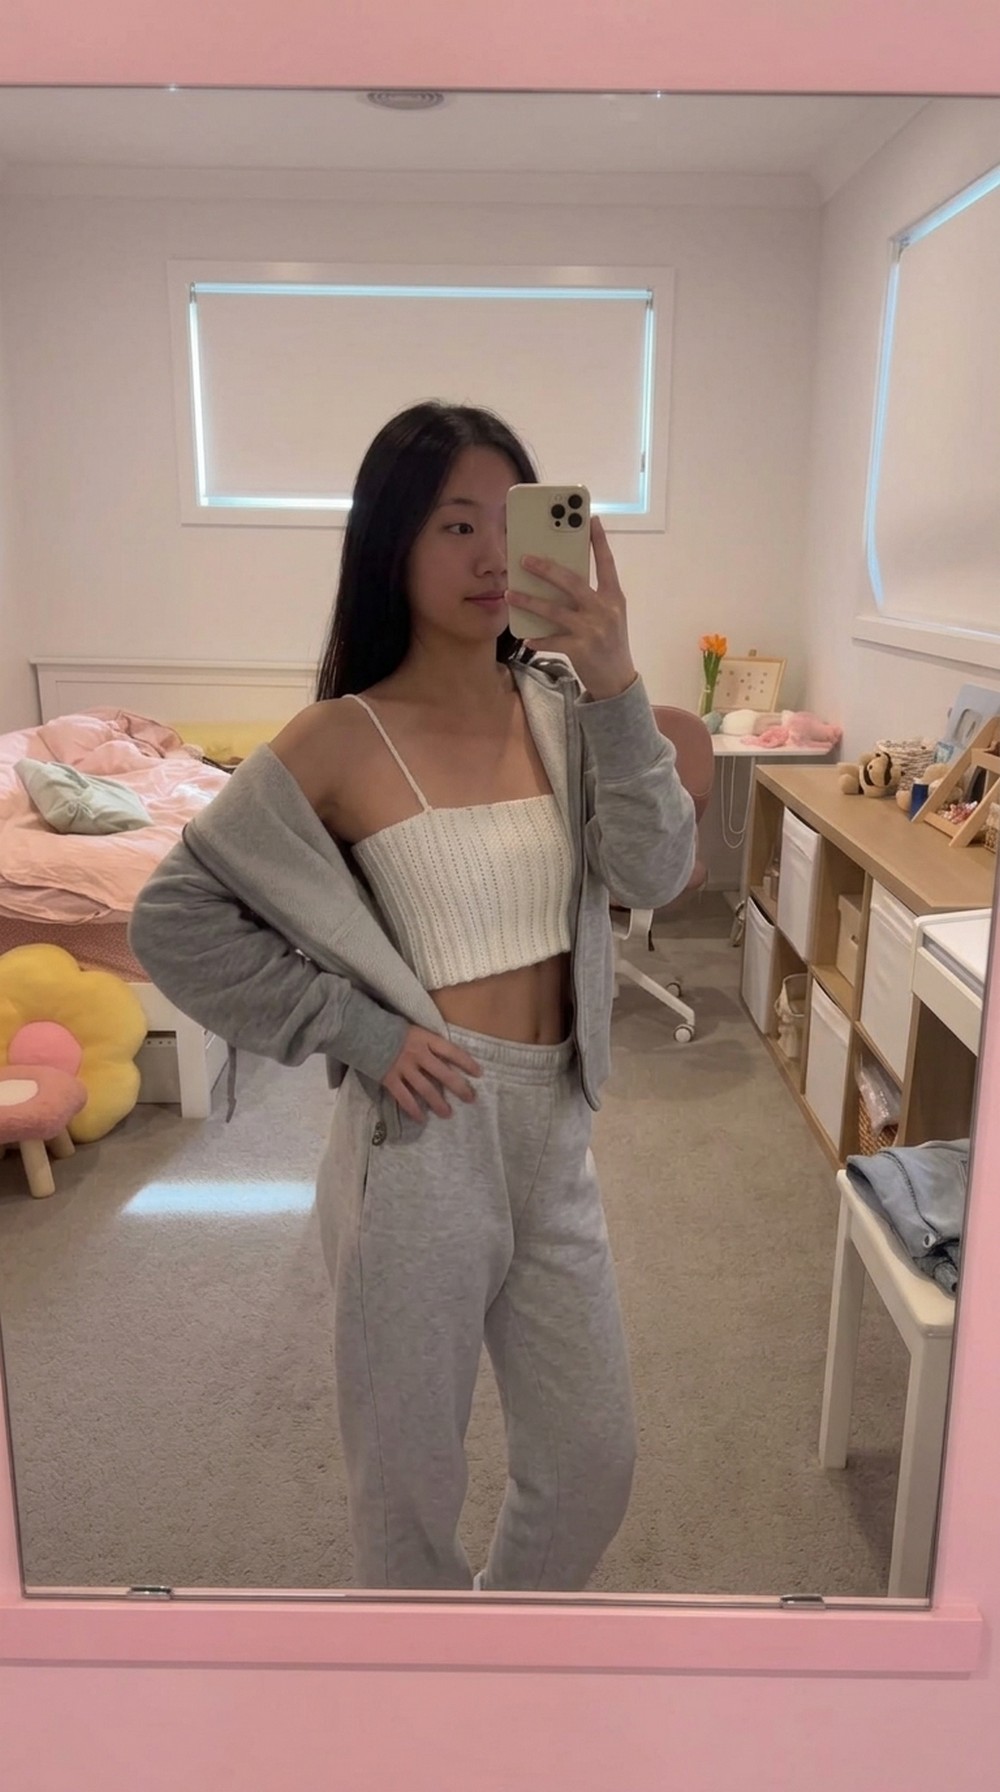
A beautiful and comfy piece of clothing that’s perfect for sunny days, casual outings, or layering in cooler weather—it’s all crafted with love and creativity! A crochet ribbed crop top pattern brings together a wonderful mix of style and charm, giving you a lightweight, breathable, and trendy outfit choice. Its ribbed texture adds a unique, eye-catching detail that enhances the overall look, making it both elegant and versatile.
Free Crochet Ribbed Crop Top Pattern for Summer Fun
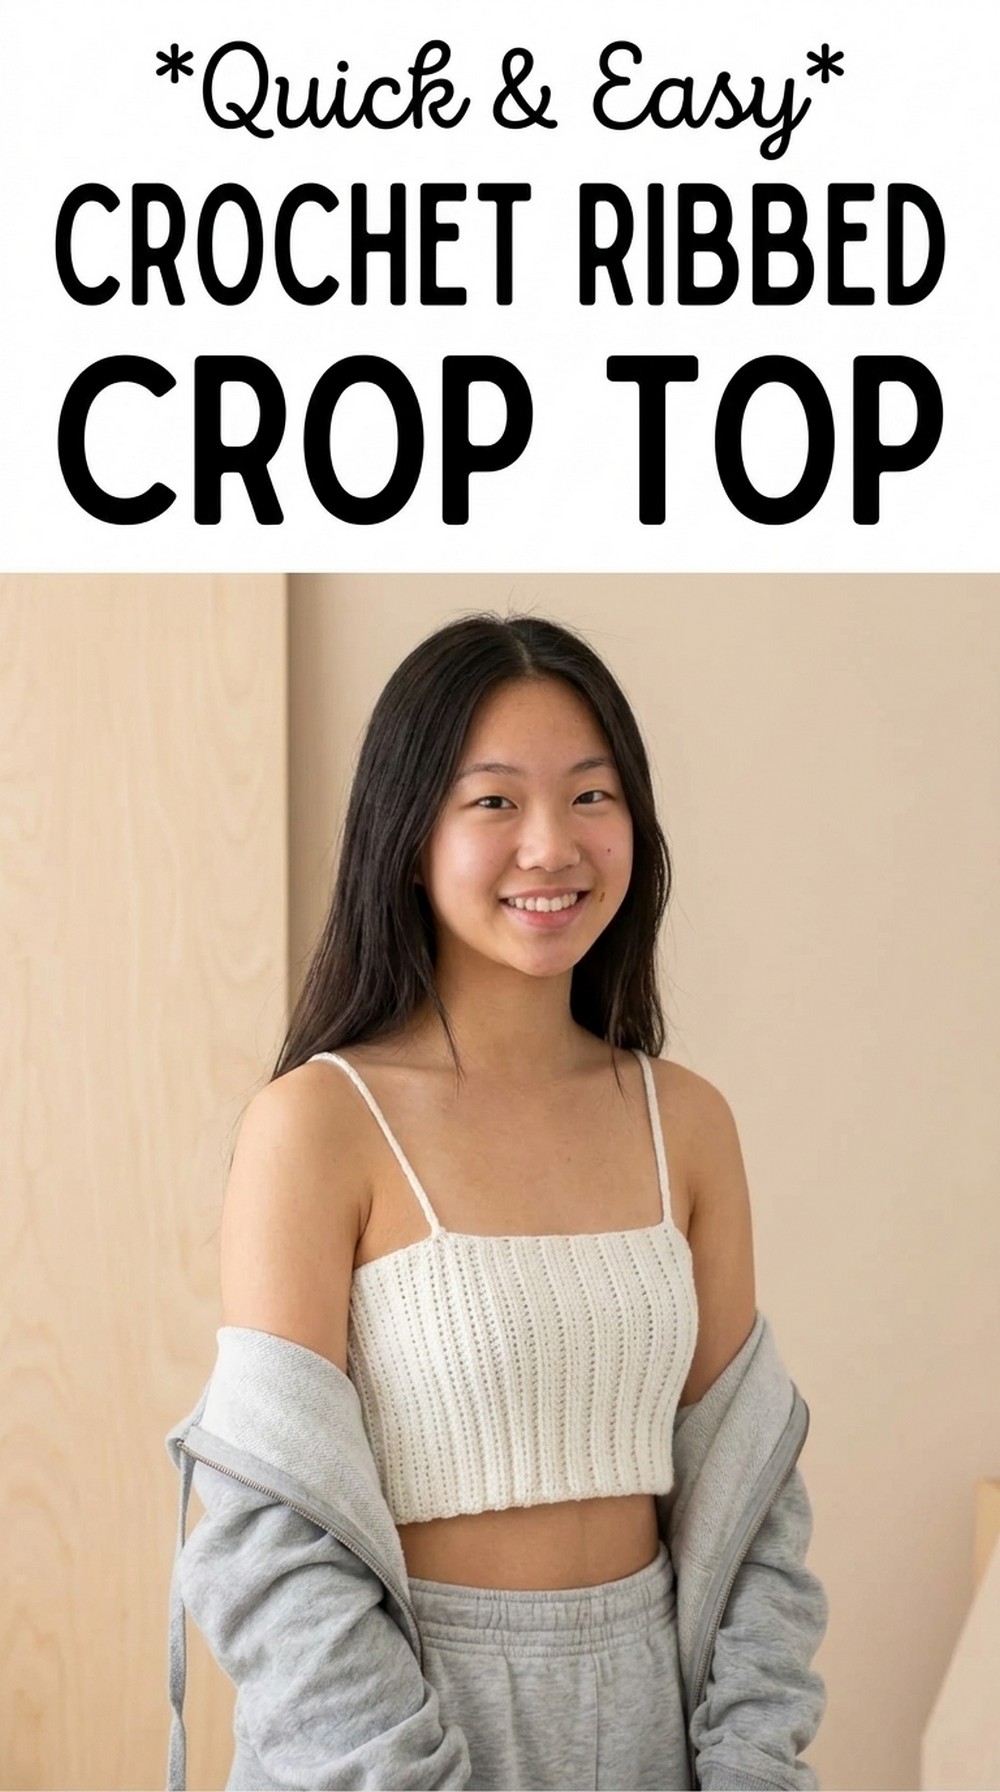
The cropped length is super flattering and pairs effortlessly with high-waisted jeans, skirts, or shorts, making it great for all types of occasions. Whether you’re dressing up for a casual hangout or looking for a stylish beach outfit, this top steals the show every time. The best part? You can make it in any color to match your preferences, giving you a custom-made wardrobe piece that’s fun to wear and easy to love.
Free Crochet Ribbed Crop Top Pattern
Skill Level
- Beginner-Friendly.
- Familiarity with basic stitches like chains and half double crochet (hdc).
Finished Size
- The design is customizable. The finished measurements depend on your preferred fit and the number of foundation chains you begin with:
- Width: Adjusted according to your body size.
- Height: Determined by the number of rows crocheted.
Materials Needed
- Yarn:
- Size 4 (Worsted weight) yarn: Suggested – 100% acrylic yarn for stretchability.
- Approximately 200–300 grams depending on size (for a cropped top).
- Hook:
- 4.0 mm crochet hook (or size recommended based on your yarn).
- Other Supplies:
- Darning Needle: For weaving in ends.
- Stitch Marker: To mark the first stitch in each row.
- Scissors.
Gauge
- 10 cm x 10 cm (4 in x 4 in):
- 14 hdc stitches and 10 rows.
- Remember to measure after completing a swatch before beginning your project. Adjust hook size if necessary.
Pattern Abbreviations (US Terminology)
- ch: Chain.
- hdc: Half double crochet.
- sl st: Slip Stitch.
- st(s): Stitch(es).
- bl-hdc: Back Loop Half Double Crochet.
- Foundation Chain: Row of beginning chains, forming the bottom edge.
Special Techniques
- Back Loop Half Double Crochet (bl-hdc):
- Crochet in the back loop only for a ribbing texture.
- Slip Stitch Seam:
- Used for connecting panel edges invisibly.
- Straps Attachment:
- Made by chaining and slip stitching for sturdy and clean strap lines.
- Weaving in Ends:
- Use a darning needle to hide yarn tails seamlessly.
Pattern Instructions
Part 1: Foundation Chain
- Create a Slip Knot:
- Wrap the yarn around two fingers to create a loop.
- Pull the tail through the loop using your hook.

- Chain Your Foundation Chain:
- Ch a number that equals your desired top width:
- For cropped tops: Chain ~46–70 based on body size and snug fit.
- Add 2 extra chains to the foundation chain for height.
- Ch a number that equals your desired top width:
- Check Width:
- Lay the chain flat and measure against your body (around your midsection to ensure a perfect fit). Adjust length, adding or removing chains as necessary.
Part 2: First Row
- Row 1 (hdc into Foundation Chain):
- Work into the third chain from the hook (this excludes 2 chains for height).
- Yarn over, insert hook into the chain’s back bump.
- Yarn over, pull up a loop (3 loops on hook).
- Yarn over again and pull through all 3 loops.
- Continue across the row: Work 1 hdc in each chain. After finishing, your row stitch count will match the foundation chain (e.g., 46 sts).
- Mark the First Stitch:
- Use a stitch marker to mark the beginning of the row.
- Turn Your Work:
- At the end of the row, ch 2 and turn your work.
Part 3: Main Body Panel
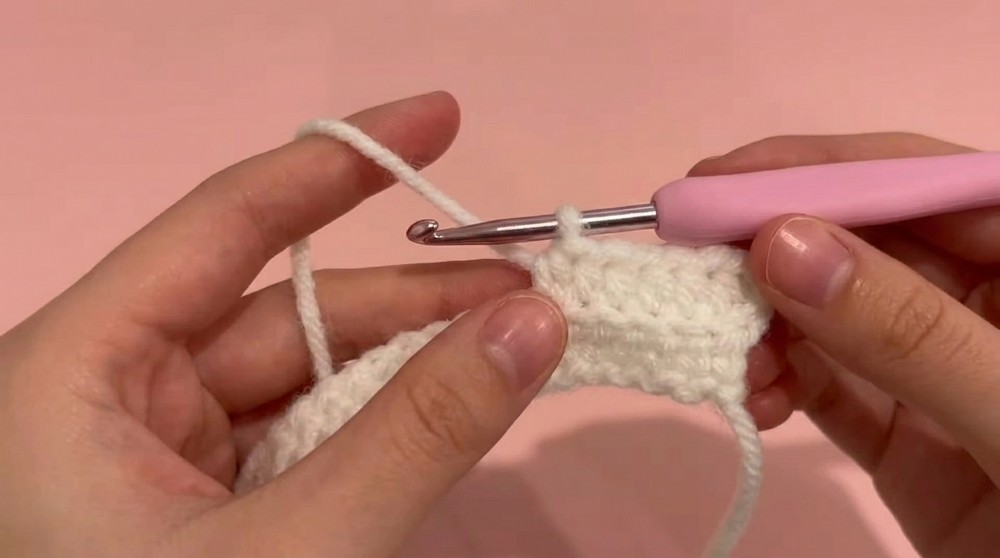
- Back Loop HDC (Ribbed Texture):
- Starting from Row 2 onward, every stitch will be worked into the back loop of each stitch:
- Yarn over, insert hook into the back loop only of the stitch (ignore front loop).
- Complete the hdc as normal.
- Continue along the row, working 1 bl-hdc into each stitch.
- Starting from Row 2 onward, every stitch will be worked into the back loop of each stitch:
- Repeat Row 2 for all subsequent rows:
- Ch 2 at the start of each row to give height.
- Turn your work after each row.
- Continue Rows Until Desired Length:
- Repeat rows until your panel can wrap around your body completely. The piece should form a rectangle that fits snugly around you.
- Most makers find ~60–72 rows sufficient for a snug fit (depending on yarn stretch and desired fit).
Part 4: Seaming the Body
- Fold the Panel in Half:
- Align the first row and the last row to create a tube shape (wrong sides facing inward).
- Slip Stitch Seam:
- Work a sl st into the last row and corresponding chains from the foundation row.
- Insert hook into the back loop of the final row stitch and into the foundation chain stitch. Yarn over and pull through all loops.
- Continue slip stitching across to seal the seam.
- Fasten Off:
- After completing the seam, chain 1, cut the yarn, and pull the tail through to secure.
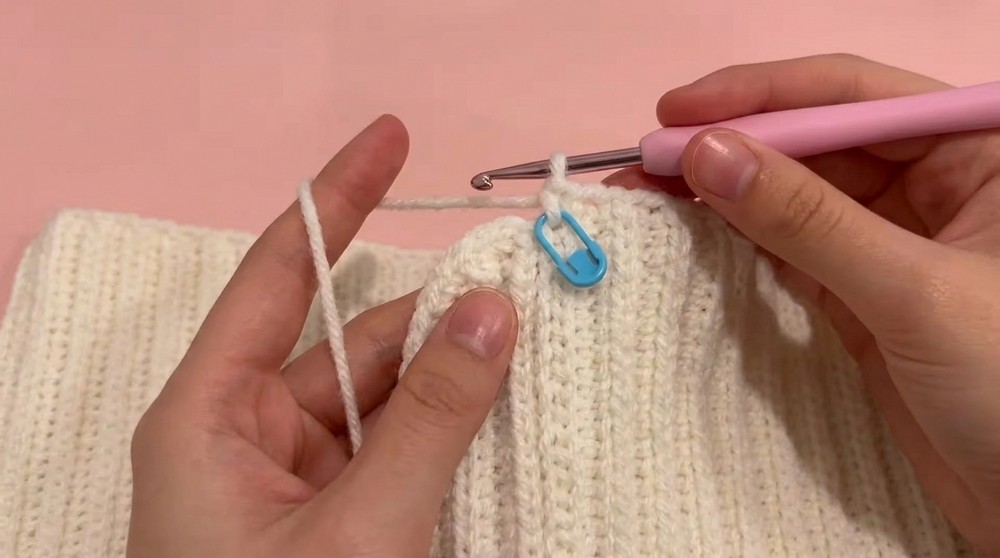
Part 5: Straps
- Determine Strap Placement:
- Use stitch markers to mark the front and back positions for straps.
- Typically, straps are positioned about 3–4 inches in from the corner edges.
- Create Each Strap:
- Attach yarn at the marked front position.
- Chain the length of the strap (e.g., 13 inches for a cropped top).
- Sl st into the corresponding back position (to connect the strap).
- Repeat for Second Strap.
Part 6: Finishing
- Weaving In Ends:
- Thread a darning needle and weave in any visible yarn tails into the stitches to secure the work.
- Blocking (Optional):
- Lightly block the top by dampening and reshaping it flat. This smooths stitches and ensures uniform edges.
Customization Ideas
- Strap Styling:
- Add thicker straps or use decorative stitches like shells or picots.
- Color Blocking:
- Use multiple colors for stripes or alternate rows for a fun effect.
- Size Adjustments:
- Increase chain length for wider tops or reduce rows for shorter cropped designs.
- Increase chain length for wider tops or reduce rows for shorter cropped designs.
Important Remarks
- Stretchability: Acrylic yarn stretches slightly, so aim for a snug fit while crocheting.
- Testing Fit: Lay the fabric against your body periodically to ensure the panel wraps around comfortably.
Conclusion
Congratulations on completing your Summer Spaghetti Strap Top! The simple ribbed texture and classic shape make this top versatile for casual summer days or stylish layering pieces. With endless customization possibilities, this basic project can be adapted for different sizes, colors, and styles. Wear your handmade creation proudly.