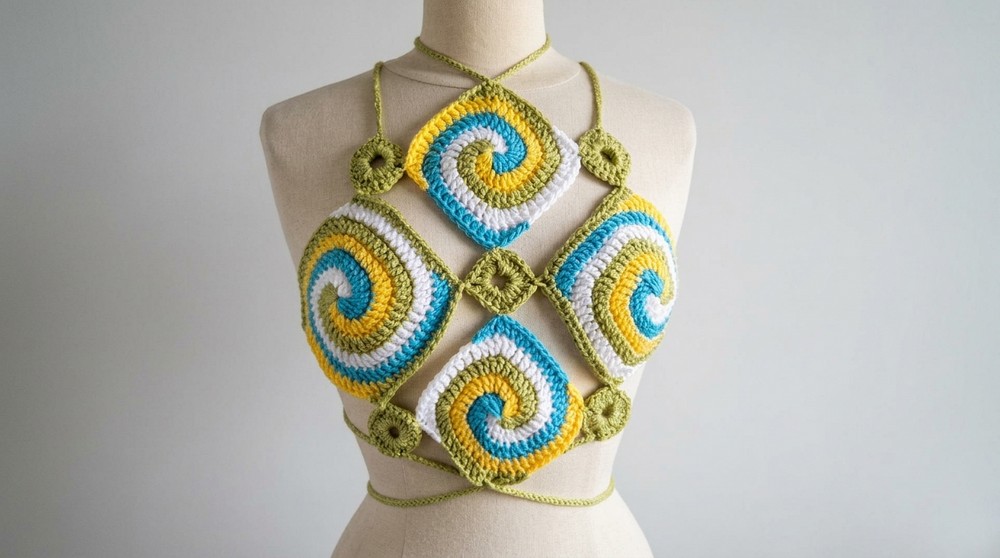
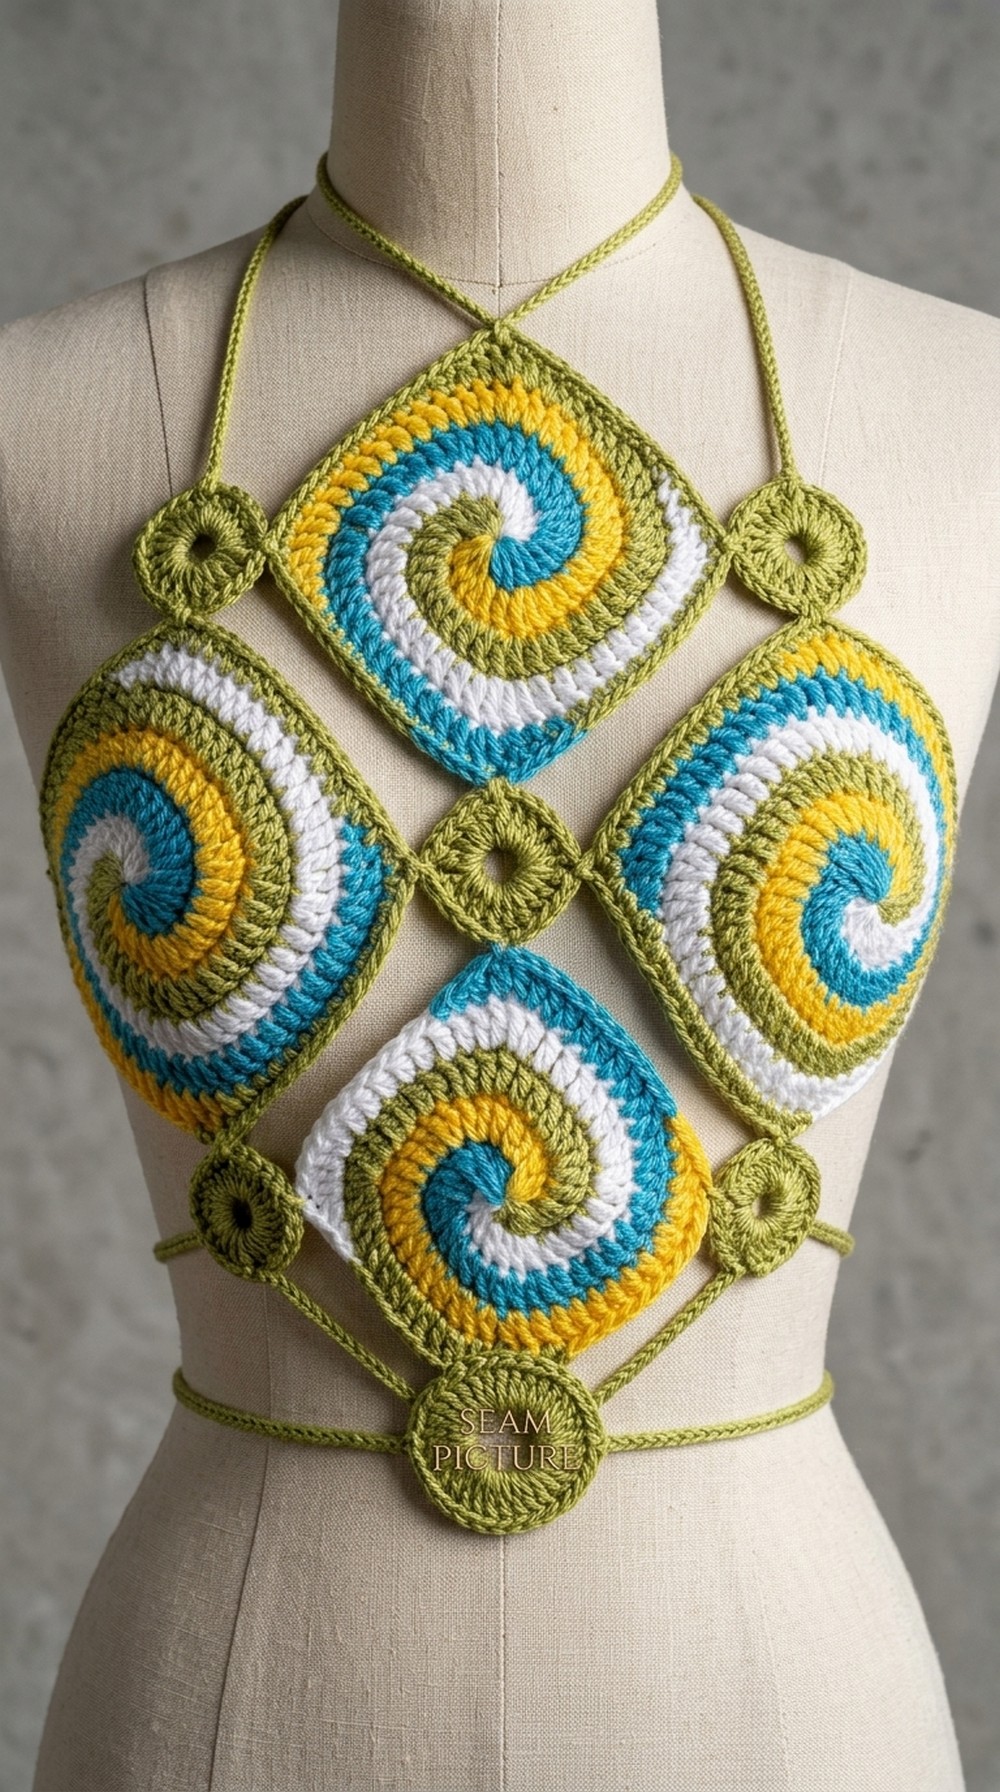
Try this easy crochet swirl halter top pattern, perfect for summer, featuring a comfortable fit and a unique style that’s great for warm, sunny days.
This halter top is stylish, light, and perfect for warm sunny days. Its unique swirl design catches the eye and adds a playful yet trendy touch to your outfit. It features a comfortable tie-up halter style that makes it easy to wear and adjust for the perfect fit. The bright, airy texture makes it great for summer outings, beach days, or casual gatherings with friends.
Free Crochet Swirl Halter Top Pattern Perfect for Any Bust Size
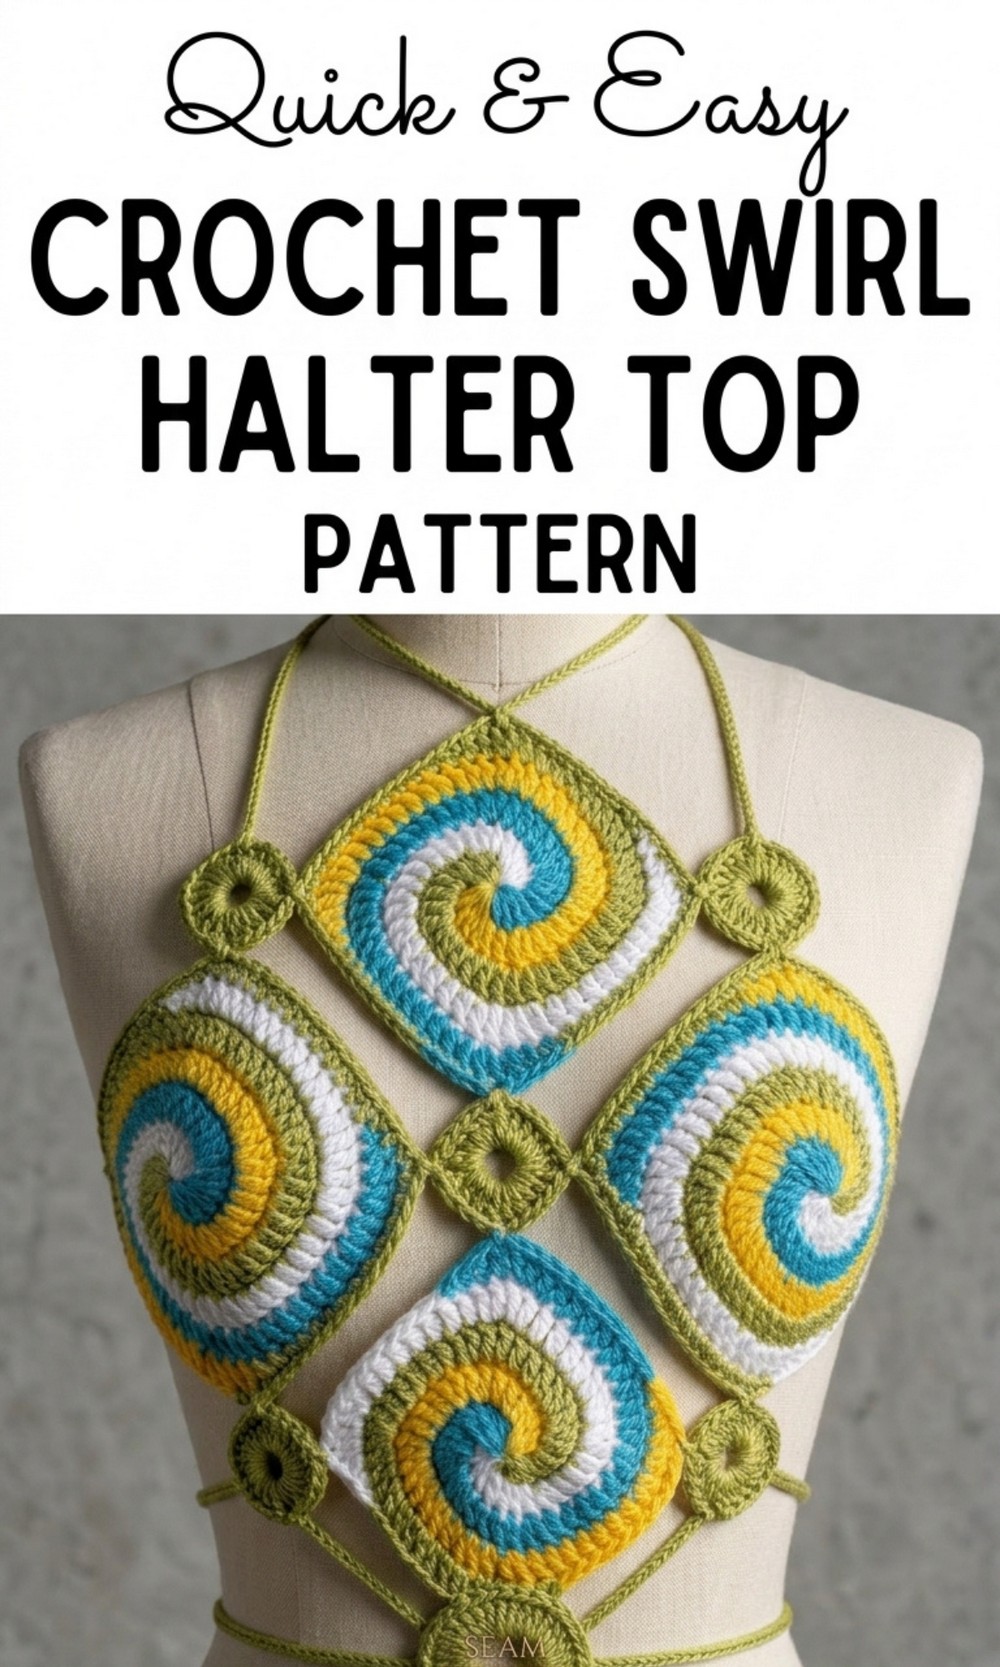
The top can be made in any color combination, making it a personal and unique wardrobe piece. Its soft and breathable fabric ensures comfort throughout the day, while its distinctive appearance makes it stand out in any crowd. This halter top is a perfect mix of fashion and comfort, bringing style into every occasion it’s worn on. Perfect for anyone looking for something lightweight, versatile, and beautiful.
Step-by-Step Crochet Pattern for a Spiral Square Summer Top
Materials Needed
- Yarn
- Use four colors of lightweight or medium-weight yarn (e.g., cotton or acrylic). Select colors that complement one another for the spiral squares.
- Crochet Hook
- Use a size suitable for your yarn, typically 4mm (G-6) or 4.5mm (7) hook. Adjust the size to match your gauge.
- Scissors
- To cut yarn tails after fastening off.
- Tapestry Needle
- For weaving in ends and sewing squares together.
- Stitch Markers (Optional)
- To mark rows, corners, or stitches for easy reference.
Gauge
- One large spiral square should measure approximately 6″ x 6″ (15cm x 15cm), depending on yarn and hook size.
- Gauge is flexible as you can add or reduce rows to match your desired size.
Special Techniques
- Slip Stitch (sl st): Used to join stitches and fasten off.
- Single Crochet (SC): A basic stitch to anchor and join pieces.
- Half Double Crochet (HDC): Adds texture and structure to the squares and straps.
- Double Crochet (DC): Used for creating the spiral square and body of the piece.
- Changing Colors: Ensure you create a secure chain loop when switching yarn colors.
Pattern Instructions
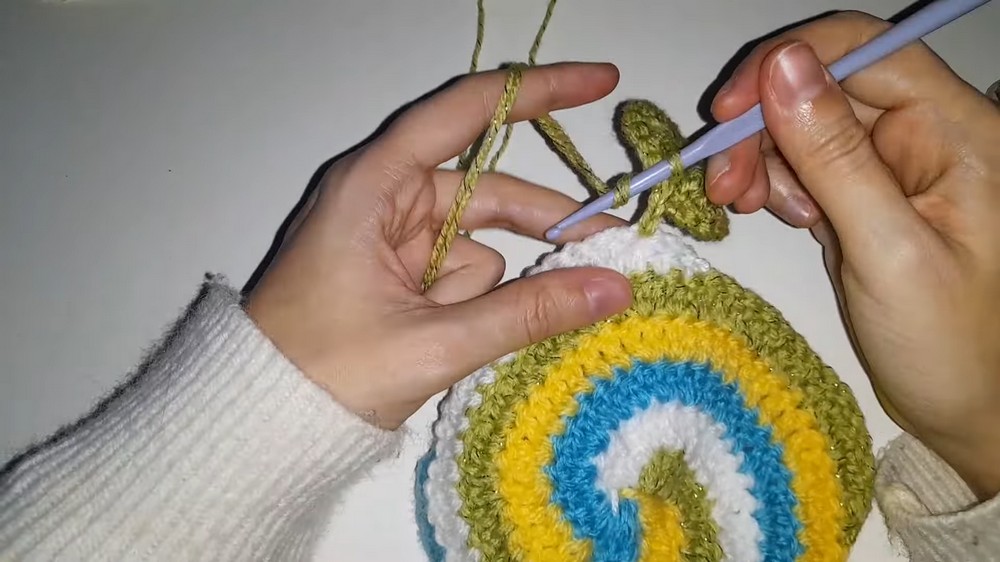
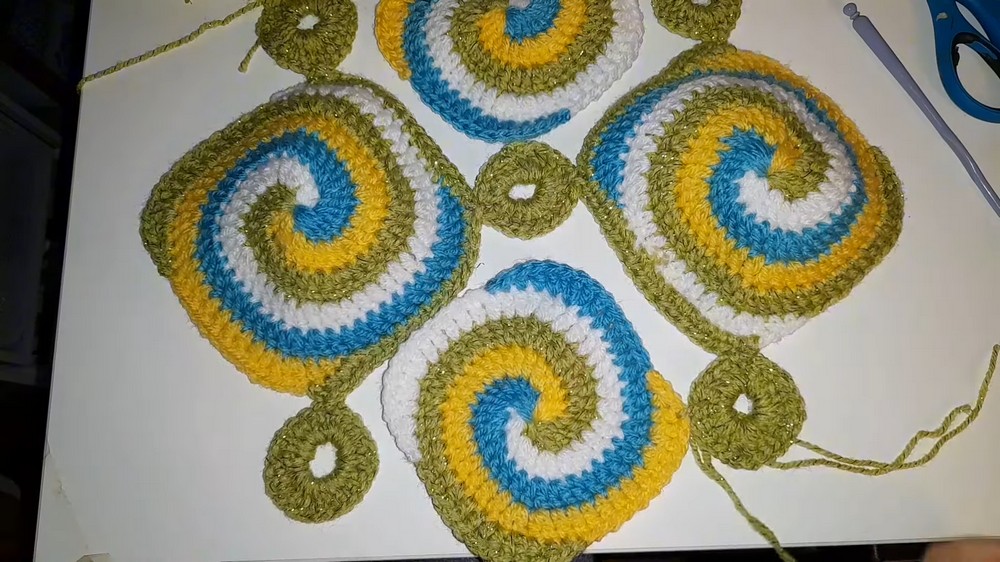
Step 1: Create Spiral Squares
Each top requires:
- 2 Large Spiral Squares (for the bust)
- 2 Medium Spiral Squares (with one less row than the large ones).
- 5 Small Squares (for decoration and attaching between larger pieces).
Instructions for Large Spiral Squares:
- Create the Circle Base:
- Chain 4 and join with a slip stitch (sl st) to form a ring.
- Make 1 single crochet (SC), 1 half double crochet (HDC), and 2 double crochets (DC) into the center of the ring using the first color.
- Switch Colors:
- Chain 1 to secure the new color (this does not count as a stitch).
- Repeat the same pattern for the next color: 1 SC, 1 HDC, 2 DC into the ring.
- Leave a loose loop for each color when switching yarn.
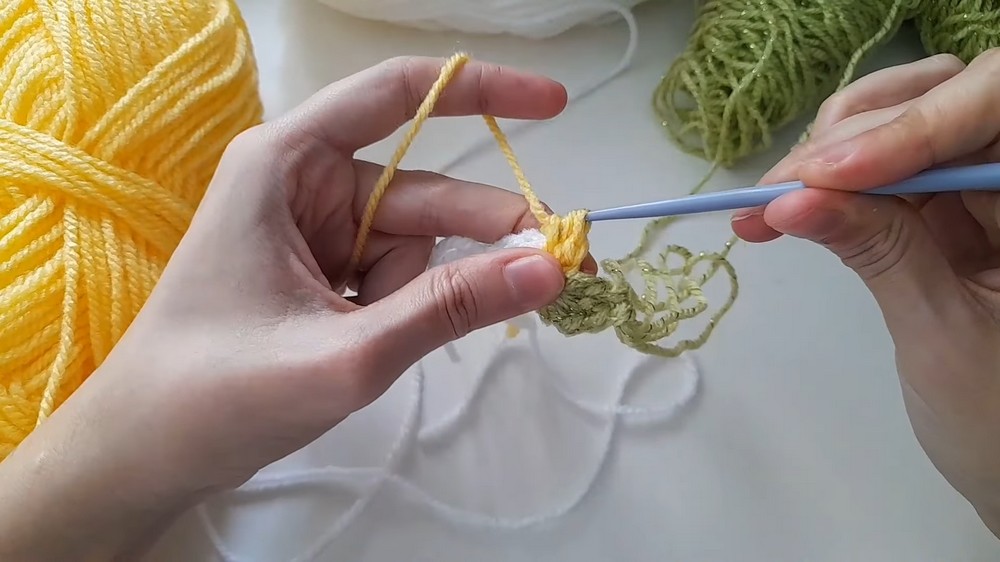
- Repeat for All Four Colors:
- Work the same stitches in the ring using all four colors. By the end, each color should have 4 stitches.
- Begin Row Increases for Square:
- Continuing with one color, make 2 DC in the first stitch, 1 DC in the next stitches, and 2 DC in the second-to-last stitch of that color section. Ignore the last stitch (left as a loop).
- Repeat the same for all four colors, creating corners and expanding the square.
- Complete Rows Until Desired Size:
- Add more rows with the same pattern:
- 2 DC in the first and second-to-last stitches of each color section.
- 1 DC in all stitches in between.
- Continue until your square matches the size for your bust. For most standard sizes, stop when each color has 9 DC in the middle rows.
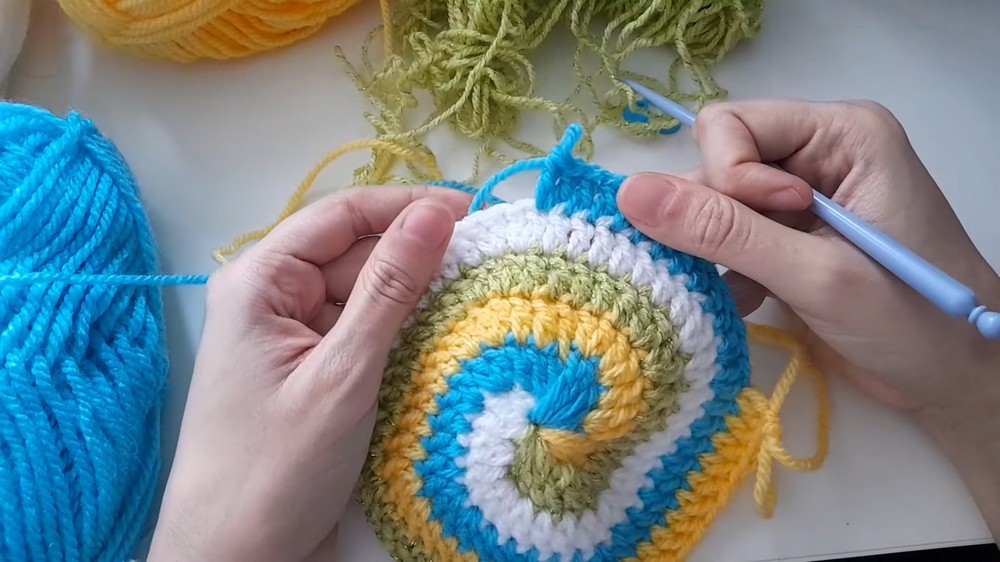
- Add more rows with the same pattern:
- Finishing the Square:
- On the final row of each color section, work as follows:
- Make 2 DC, 1 DC, 1 HDC, 1 SC, and finally a sl st to smooth the edge.
- Secure and fasten off.
- On the final row of each color section, work as follows:
Instructions for Medium Spiral Squares:
- Follow the same pattern but reduce the total number of rows by 1 compared to the large squares.
Instructions for Small Squares:
- Chain 10 & Create a Circle:
- Chain 10 and join with a slip stitch to form a ring.
- Chain 10 and join with a slip stitch to form a ring.
- Double Crochet ‘Sides’:
- Chain 3, then make 4 DC into the ring.
- Chain 1, make 5 DC into the ring. Repeat this two more times to create four sides of the square.
- Complete Small Squares:
- Fasten off and repeat the pattern until you have 5 squares.
Step 2: Assemble the Squares
- Lay Out the Squares:
- Arrange the 2 large squares as the main bust pieces.
- Place the 2 medium squares on either side.
- Use the 5 small squares as connectors between larger pieces.
- Join Squares:
- Use HDC stitches to attach small squares to the corners of the large and medium squares.
- For corners, insert your hook into the corresponding corners of two pieces and work HDC stitches evenly across the edges.
- Make sure to rotate and align the pieces symmetrically.
- Mirror Assembly for Both Large Squares:
- Repeat the assembly steps for the second large square, ensuring symmetry.
- Repeat the assembly steps for the second large square, ensuring symmetry.
Step 3: Add Straps
- Neck Straps:
- Make chains measuring 35cm (13.8″).
- Work slip stitches back along the chain for a neat strap design. Attach the neck straps to the top two corners of the bust squares.
- Shoulder Straps:
- Make chains measuring 180cm (70.8″). These straps will wrap around the shoulders and tie around the waist.
- Back Straps:
- Make chains measuring 40cm (15.8″) for the back. Attach to the lower corners of the large squares.
Finishing the Top
- Block the Top:
- Block all squares and the final assembled piece to ensure a uniform size and shape. Use a damp towel or steamer for best results.
- Weave in Ends:
- Use a tapestry needle to neatly weave in any loose ends.
- Add Optional Charms:
- Use beads or small charms to personalize the top further.
- Use beads or small charms to personalize the top further.
Final Words and Tips
- Customization Ideas:
- For a bolder design, incorporate gradient or variegated yarn in the spiral squares.
- Add extra rows to make the top longer or skip rows for a cropped version.
- Maintenance:
- Hand wash the top in cold water and lay it flat to dry. This will help maintain its shape and prevent yarn wear.
- Important Notes:
- Ensure proper alignment when joining squares to avoid asymmetry.
- Use stitch markers to mark starting and corner points while assembling.