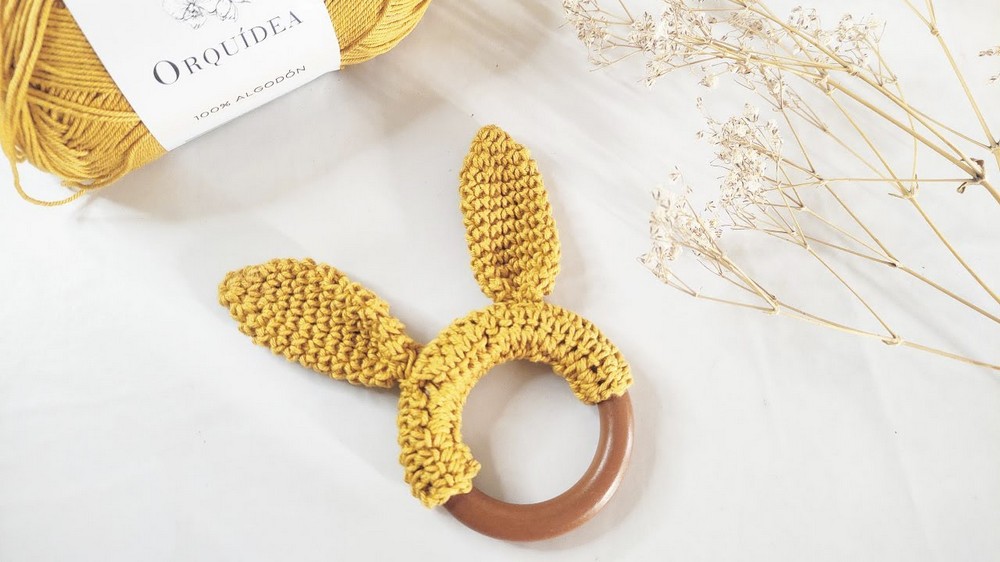
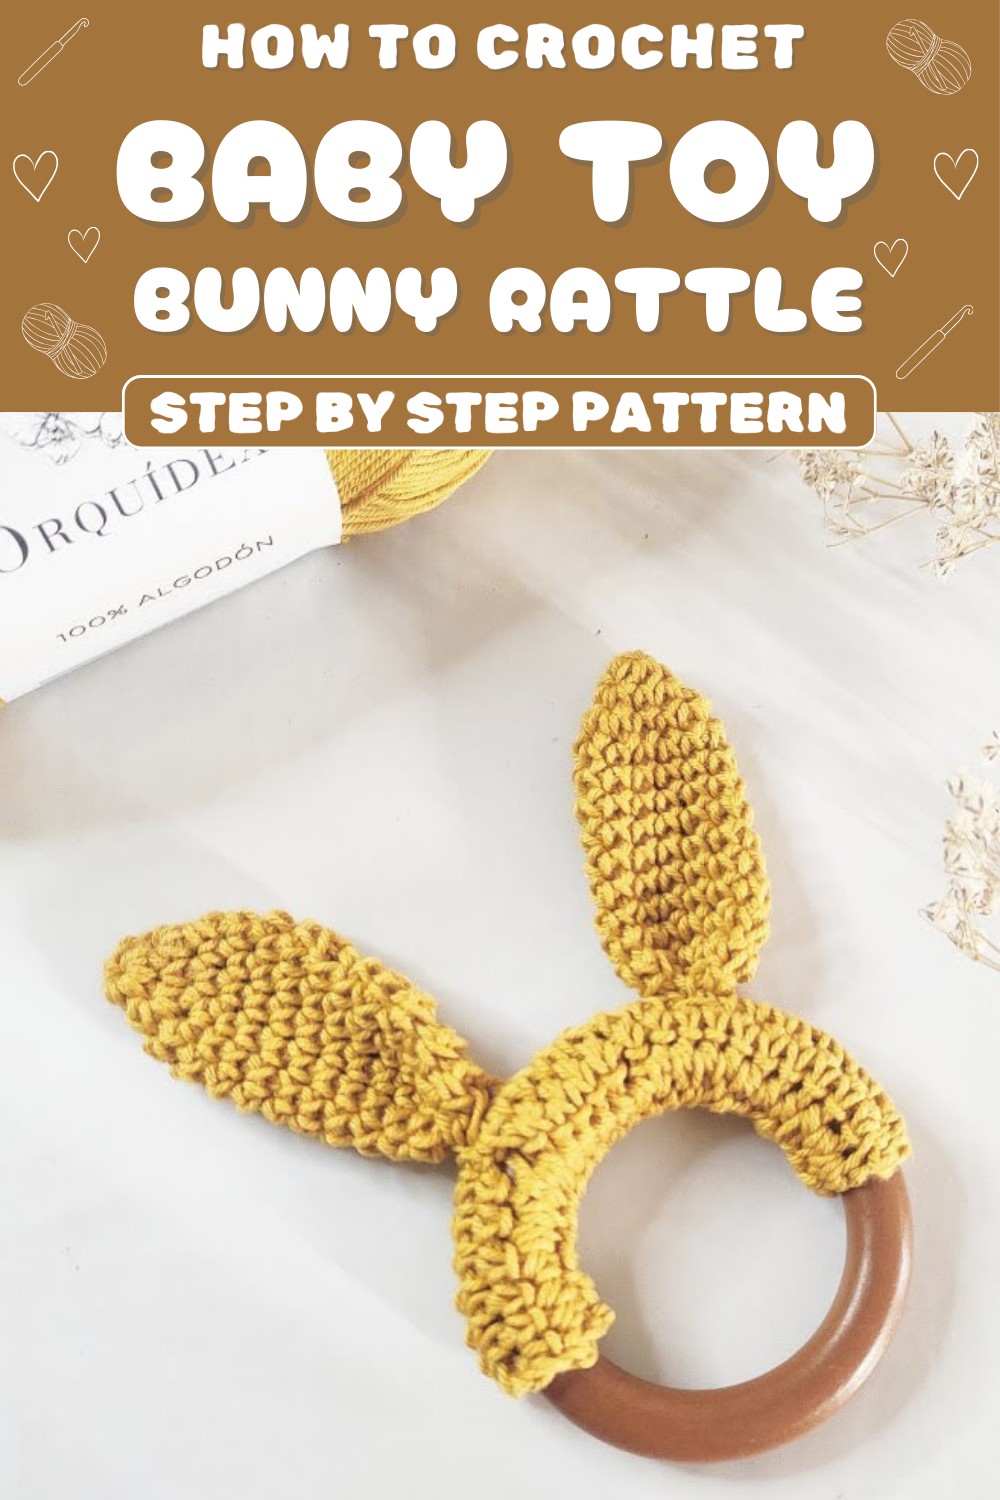
Try this adorable crochet bunny rattle pattern that is soft, that’s perfect for keeping little ones happy while adding charm to their playtime.
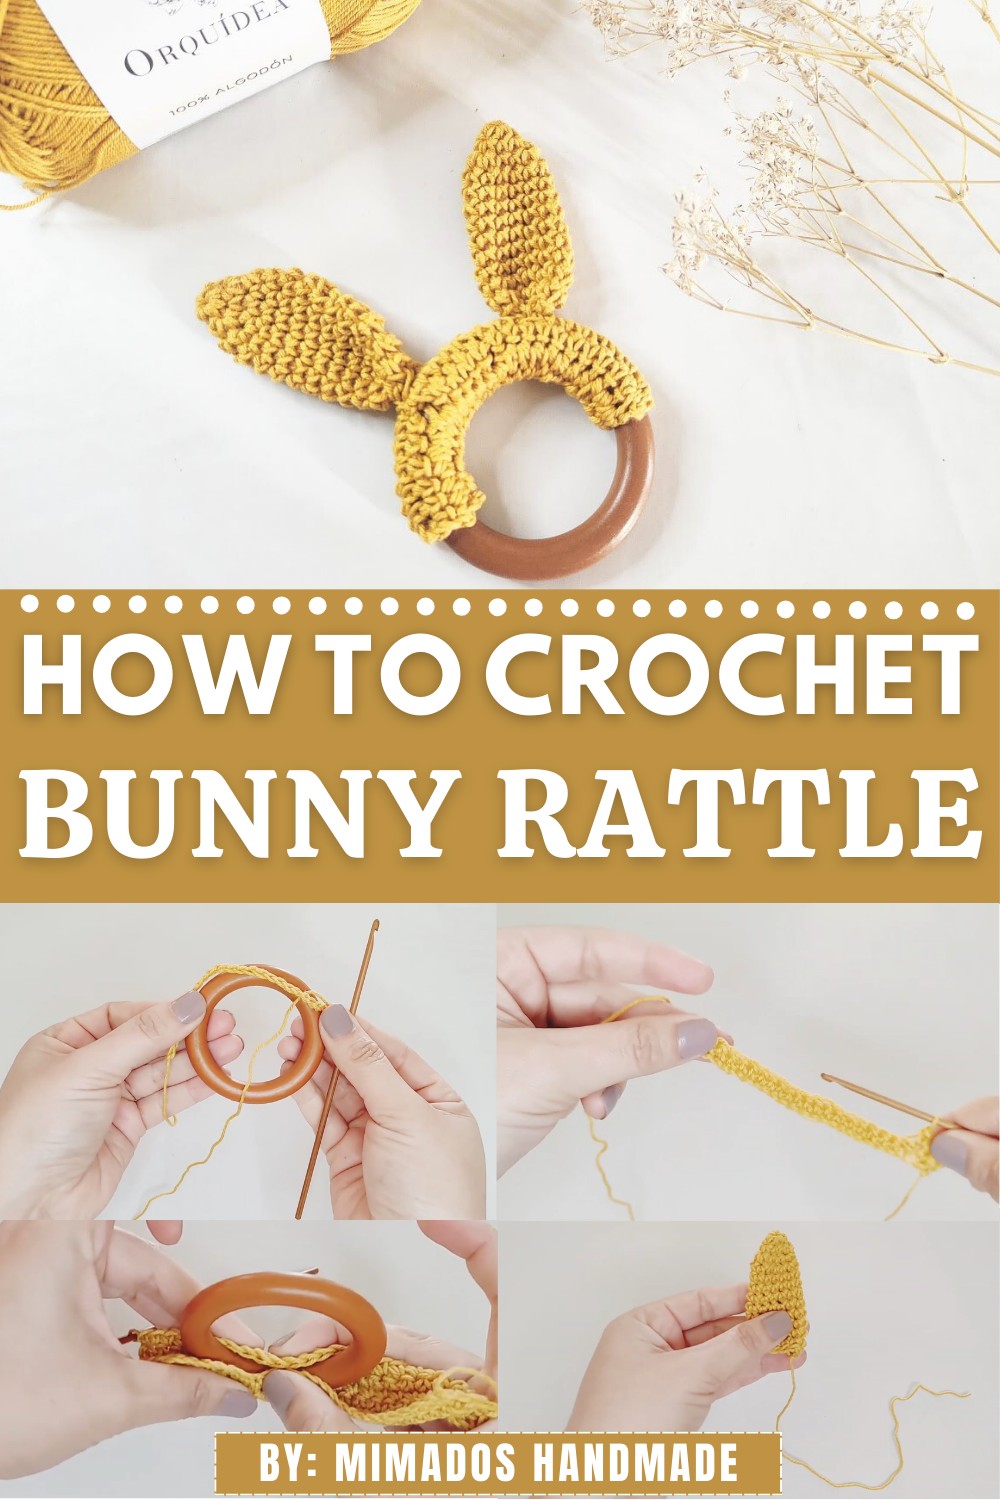
Soft, adorable toys are always a joy for little ones, and a crochet bunny rattle pattern adds even more charm to their playtime. These delightful creations feature a cute bunny design with gentle rattling sounds, perfect for entertaining babies and toddlers.
Easy Crochet Bunny Rattle Pattern for Your Little Star
The bunny’s cute ears, happy face, and bright colors make it a heartwarming gift for any child. Not only are they fun, but these rattles are also a keepsake that parents cherish for years. A crochet bunny rattle is truly a blend of beauty and practicality!
Important Notes:
- Gauge: This project doesn’t require strict gauge but ensure your stitches are uniform and cover the ring snugly.
- Begin with a secure Magic Ring to ensure a firm and clean start for the ears.
- This project offers flexibility in customization (colors, ring type, size).
- Always weave in loose ends securely for safety, especially for baby toys.
Materials Needed:
- Yarn: Cotton yarn, recommended for a 3.0 mm crochet hook.
- Using cotton ensures it is soft, durable, and ideal for baby projects.
- Hook: US Size D/3 (3.0 mm) wooden or any preferred crochet hook.
- Ring: Wooden or acrylic ring measuring 65 mm in diameter (adjustable based on preference).
- Additional Supplies:
- Scissors
- Tapestry Needle (for sewing)
- Measuring Tape (for accuracy)
Abbreviations:
(US Crochet Terminology)
- ch: Chain
- sc: Single Crochet
- sl st: Slip Stitch
- yo: Yarn Over
Pattern Instructions
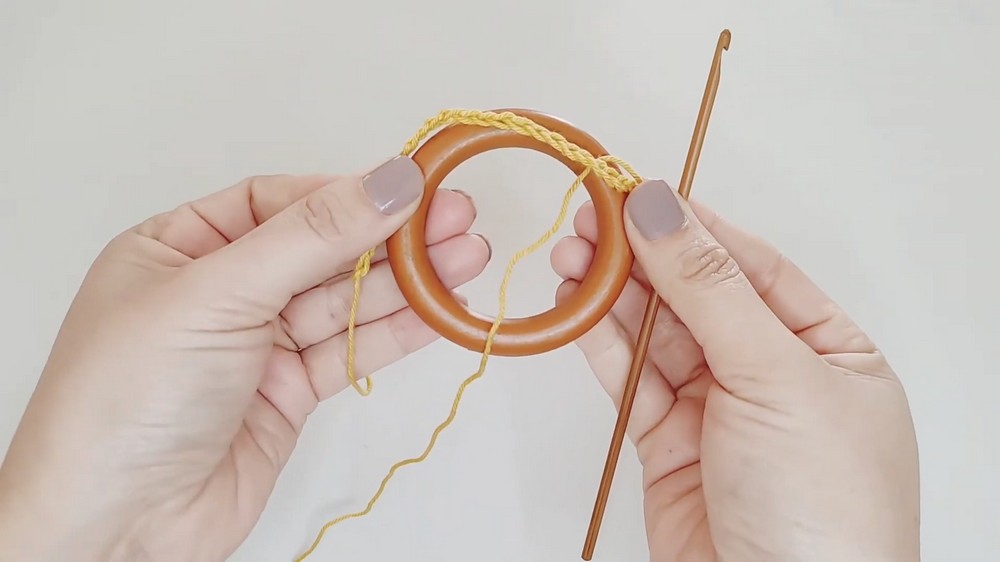
Step 1: Covering the Wooden/Acrylic Ring
- Foundation Chains:
- Attach yarn to your hook with a slip knot.
- Ch 25 or enough chains to cover half of your ring tightly. Adjust the chain count for a larger or smaller ring.
- Row 1:
- Place your finger on the last chain as a marker.
- Ch 2 (acts as turning stitches).
- Begin sc into the stitch where you marked. Work 25 sc across.
- Rows 2-6:
- Ch 2, turn your work, and work 25 sc evenly across the row.
- Complete a total of 6 rows of sc.
- Adjust Length:
- Check if the strip completely covers half your ring snugly. Add rows if it feels loose; subtract rows if too tight.

- Check if the strip completely covers half your ring snugly. Add rows if it feels loose; subtract rows if too tight.
- Fasten Off:
- Cut the yarn, leaving an approximate 12-inch tail for sewing.
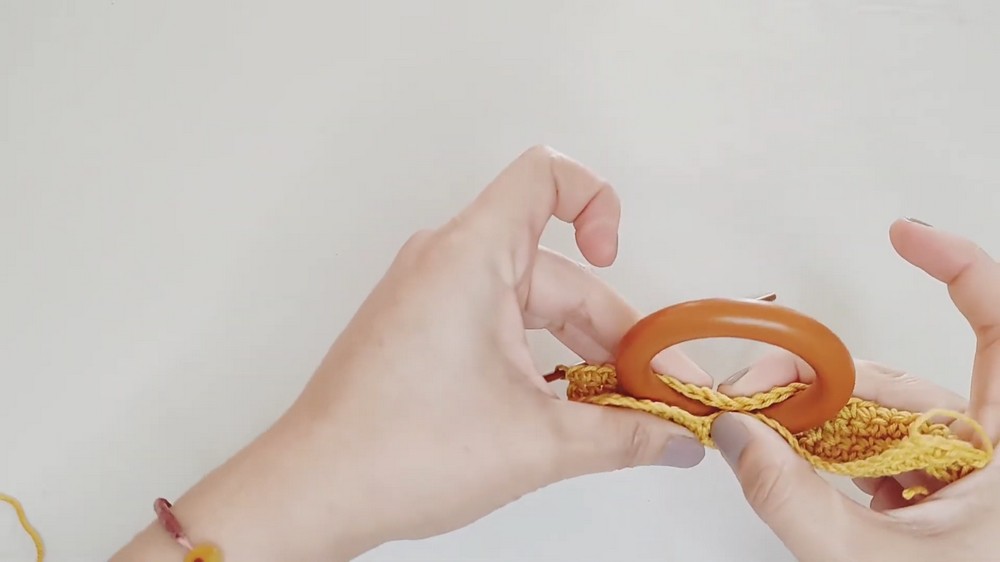
- Sewing the Ring Cover:
- Wrap the strip tightly around the wooden or acrylic ring. Use the yarn tail and your tapestry needle to securely sew the edges together.
- Ensure stitches are tight so the cover doesn’t shift or move over time.
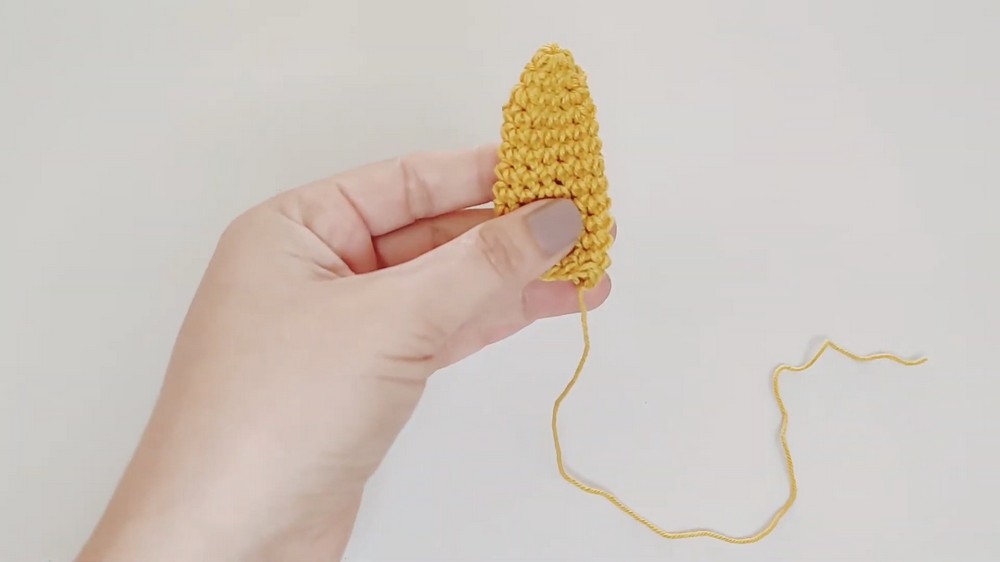
Step 2: Creating the Ears
Ear Construction (Make Two in Total)
- Magic Ring Setup:
- Form a magic ring with your yarn.
- Insert the hook into the center of the loop, grab the yarn, and pull through.
- Round 1:
- Ch 1, then work 6 sc into the magic ring.
- Pull the short thread to close the ring tightly.
- Join to the first sc with a sl st to close the round.
- Round 2:
- Ch 1, then:
- Sc in next st,
- Increase (2 sc in next st). Repeat this sequence across the round.
- You’ll have 9 sc at the end of Round 2.
- Ch 1, then:
- Round 3:
- Ch 1, then:
- Sc in next 2 sts,
- Increase (2 sc in next st). Repeat this pattern across the round.
- You’ll have 12 sc at the end of Round 3.
- Ch 1, then:
- Rounds 4-13 (Shape the Ear):
- Ch 1, work 12 sc, one at each st, with no increases.
- Repeat for 10 rows to build the elongated shape of the ear.
- Fasten Off:
- After Round 13, cut the yarn, leaving a 6-inch tail for sewing.
Step 3: Attaching the Ears
- Preparation:
- Fold each ear slightly at its base to form a curved shape.
- Sewing Ears:
- Position the ears evenly (about midway) on the ring, ensuring symmetry.
- Use the yarn tails to securely sew the ears onto the ring, working along the folded base to maintain their curved shape.
- Final Adjustments:
- Tidy up loose threads by weaving them into the base of the ears securely. Trim excess yarn.
Customization Ideas
- Color Variations:
- Use pastel cotton yarns for baby-friendly aesthetics.
- Try alternating colors for the ears and ring cover for additional contrast.
- Ring Sizing:
- Adjust chain count and row numbers based on the diameter of the ring you are using.
- Adding Embellishments:
- Sew small appliques (flowers, hearts) onto the ears for decorative flair.
- Personalization:
- Embroider initials or designs using a contrasting cotton thread.
- Embroider initials or designs using a contrasting cotton thread.
Tips for Success
- Avoid Loose Edges: When sewing the cover onto the ring, pull the stitches tight to prevent shifting during use.
- Ears Symmetry: Ensure both ears are sewn symmetrically to maintain a balanced look.
- Safety First: Trim all loose ends securely, and avoid embellishments that could be hazardous for babies.
Conclusion
This crochet baby toy with ears is a perfect handcrafted gift for babies! The minimalist design made with soft cotton yarn ensures it is safe and durable. This versatile pattern allows you to customize based on color preferences and size requirements, making it not only practical but also entirely unique to every crocheter’s touch.
Important Remarks on Final Look
- The completed toy features:
- A snugly covered ring with a visually textured crochet strip.
- Adorable floppy ears at symmetrical placements.
Its simplicity paired with soft materials makes this toy both elegant and functional!
Pattern Variation
Color
- Try using variegated or speckled cotton yarn for a playful look.
- Alternate stripes of color for the ring cover or ears.
Size
- For larger toys, use a thicker yarn (e.g., bulky weight) and a larger hook (e.g., size 5.0 mm). Adjust chain numbers as needed to fit the increase.
- For smaller toys, opt for thinner yarn (e.g., size 2 lightweight) and a smaller hook (e.g., size 2.5 mm).