Make your summer look stand out with a Free Crochet Bikini Top Pattern to design a stylish top perfect for beach wear and fun outdoor days.
Fun & Creative Free Crochet Bikini Top Pattern for Beach Lovers
With this “Free Crochet Bikini Top Pattern,” you can create a beautiful and lightweight piece perfect for beach days, pool parties, or warm vacations. This crochet pattern is easy to follow and uses simple stitches like single crochet, double crochet, and half double crochet, so even beginners can enjoy making it. 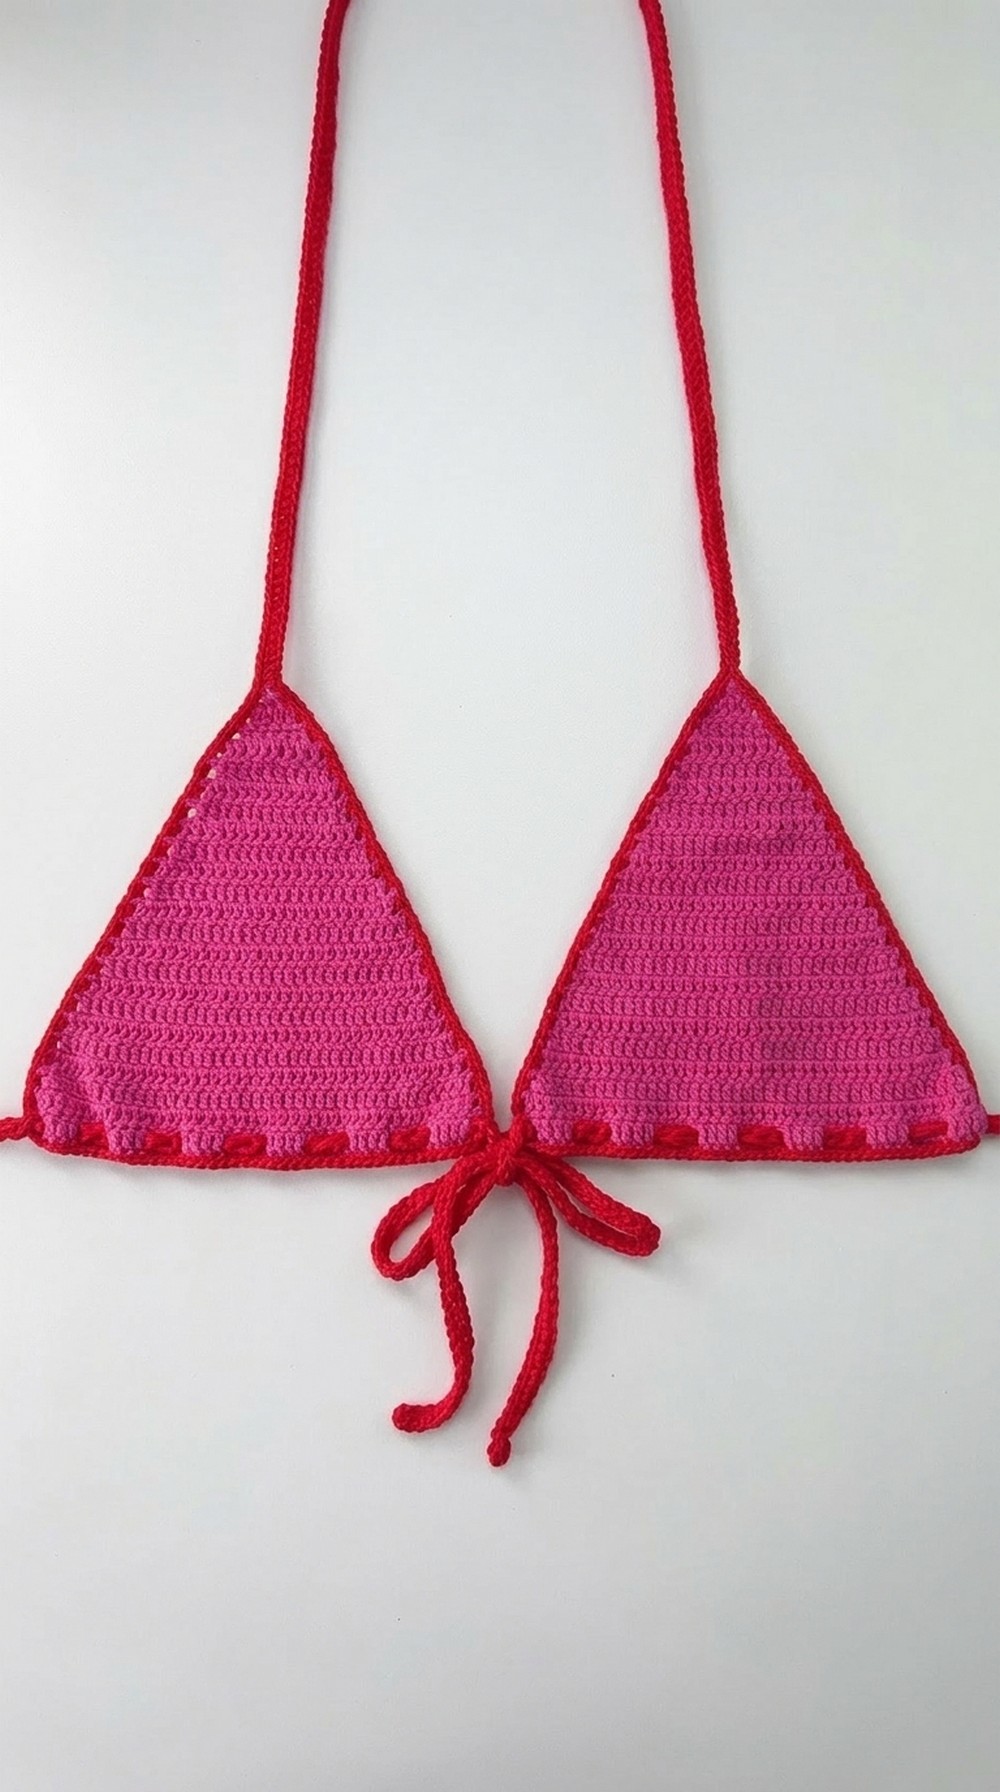
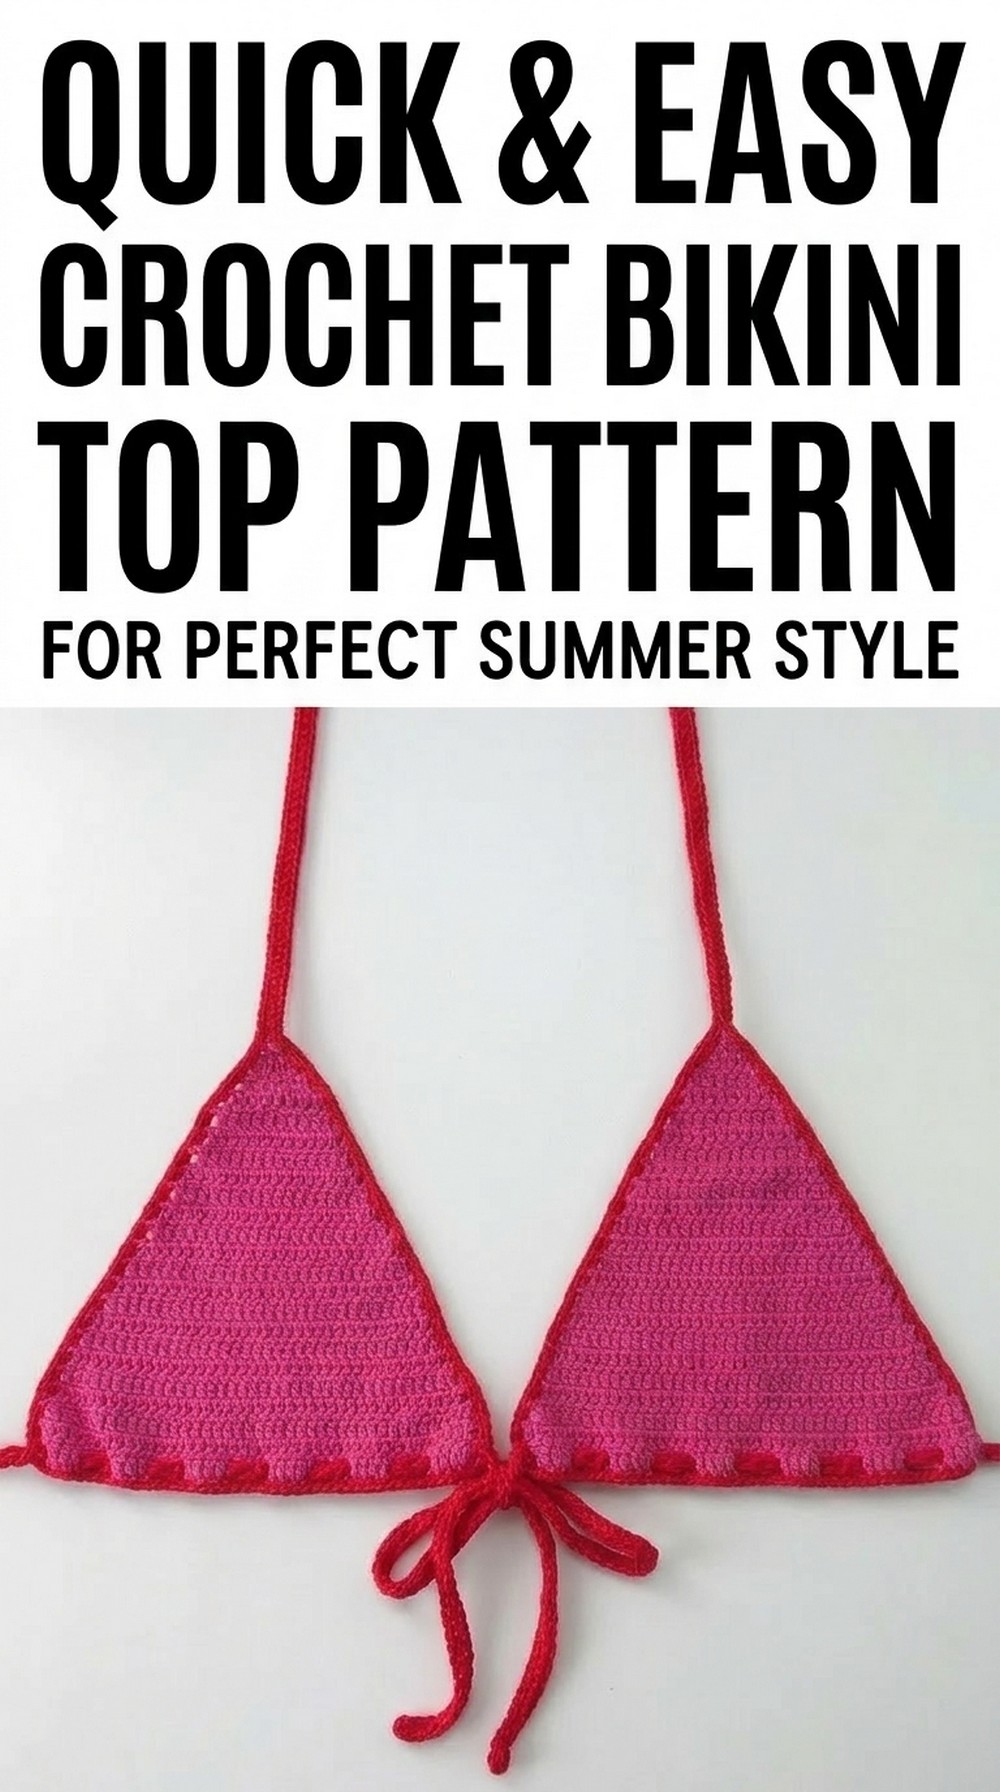
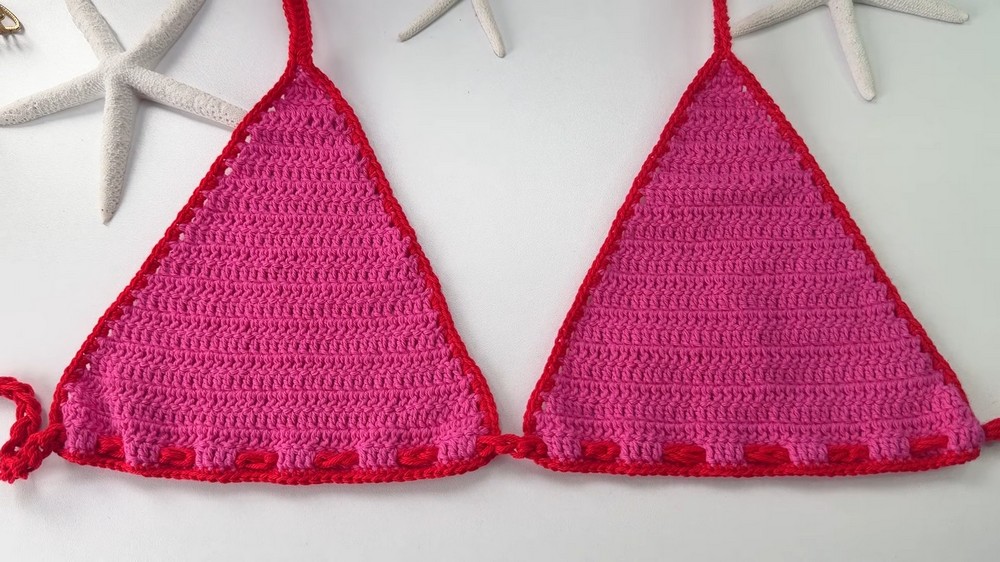
The bikini top is designed with triangle cups that give it a cute and trendy look, and the ties for the neck and back make it fully adjustable to fit different sizes comfortably.
Crocheted with soft cotton yarn, the top feels smooth and breathable, making it ideal for sunny weather. . This is a great project to show off your creativity and have fun while making something useful and unique.
Bright Crochet Bikini Top Pattern
1. Materials
- Yarn used in the video
- Brand: Katia Memphis
- Fiber: 100% cotton
- Weight: Light cotton suitable for summer garments
- Skein size: 100 g ≈ 240 m
- Hook for cups and edging
- 2 mm crochet hook
- Hook for back tie
- 4.5 mm crochet hook
- Yarn color A (for cups and edging)
- Yarn color B (for the lacing/back tie, used triple strand)
- Scissors
- Yarn needle for weaving in ends
- Stitch markers (optional, but useful)
You may substitute any similar cotton yarn. Choose a hook that gives you a firm but flexible fabric.
2. Gauge
The designer gives us a practical gauge reference through her finished cup:
- For her size, 23 rows of double crochet with increases
- Height: approximately 20 cm
- Width: approximately 20 cm (a little more than 20 cm)
Because this is a small garment that is tied and easily adjustable, exact gauge is not critical. However:
- If your cup is much smaller than 20 cm tall after 23 rows, you may need a larger hook or more rows.
- If your cup is much larger, you may need a smaller hook or fewer rows.
3. Finished Size (as in the video)
For the size shown in the transcription:
- Each cup:
- Height: about 20 cm
- Width at base: about 20 cm or slightly more
- Number of rows: 23 rows of double crochet with increases at each side
- Neck tie (for one cup):
- Foundation chains: 110 chains
- Then 1 half double crochet (hdc) in each chain
- Back tie (threaded under both cups):
- Foundation chains: 142 chains, worked with triple strand and 4.5 mm hook
You can adjust the number of rows and chains for a larger or smaller size.
4. Abbreviations (US Terms)
- ch = chain
- sl st = slip stitch
- sc = single crochet
- hdc = half double crochet
- dc = double crochet
- st(s) = stitch(es)
All instructions are given in US crochet terms.
5. Special Techniques
5.1 Working Double Crochet with Increases at Both Ends
- At the beginning of each row:
- ch 3 (counts as 1 dc)
- Turn
- dc in the same stitch as the ch 3 (this creates an increase at the start)
- At the end of each row:
- Work dc across until 1 stitch remains
- In the last stitch, make 2 dc (this creates an increase at the end)
This repeated increase at both sides forms a triangle shaped cup.
5.2 Creating a Triple Strand from One Ball of Yarn
- Pull out a length of yarn from the ball
- Fold the yarn once, then fold again, so you have three strands held together
- The long free end continues to feed from the ball as you crochet
- Always grab all three strands together when working your stitches
This is used for the back tie to make it thicker and sturdier.
6. Pattern Instructions
6.1 Triangle Cup (Make 2)
Hook: 2 mm
Yarn: Single strand of Katia Memphis or similar
- Foundation chain
- Make a slip knot.
- ch 4.
- The first chain will not count as a stitch.
- You will work into the 4th chain from the hook.
- Row 1
- In the 4th ch from the hook:
- dc 3 times in the same chain.
- You now have 4 dc total:
- 1 dc from the turning chains (ch 3)
- plus 3 dc worked into that chain.
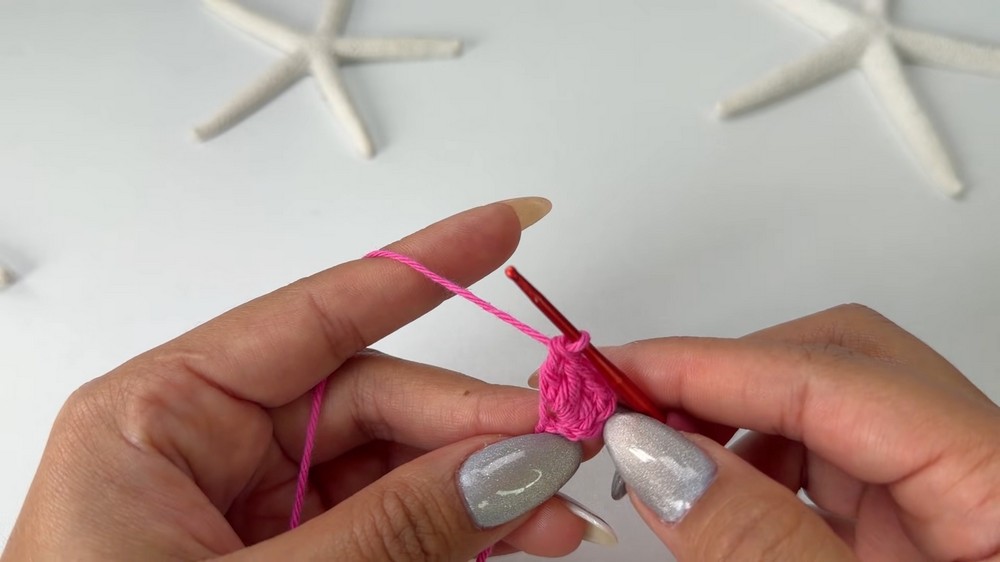
- In the 4th ch from the hook:
- Row 2
- ch 3, turn. The ch 3 counts as the first dc.
- dc in the same first st (increase at the beginning).
- dc in each of the next 2 sts.
- In the last st: 2 dc (increase at the end).
- Row 3 and onwards
- Repeat this method on every row:
- ch 3, turn.
- dc in the same first st (increase).
- dc in each st across, until 1 st remains.
- In the last st: 2 dc (increase).
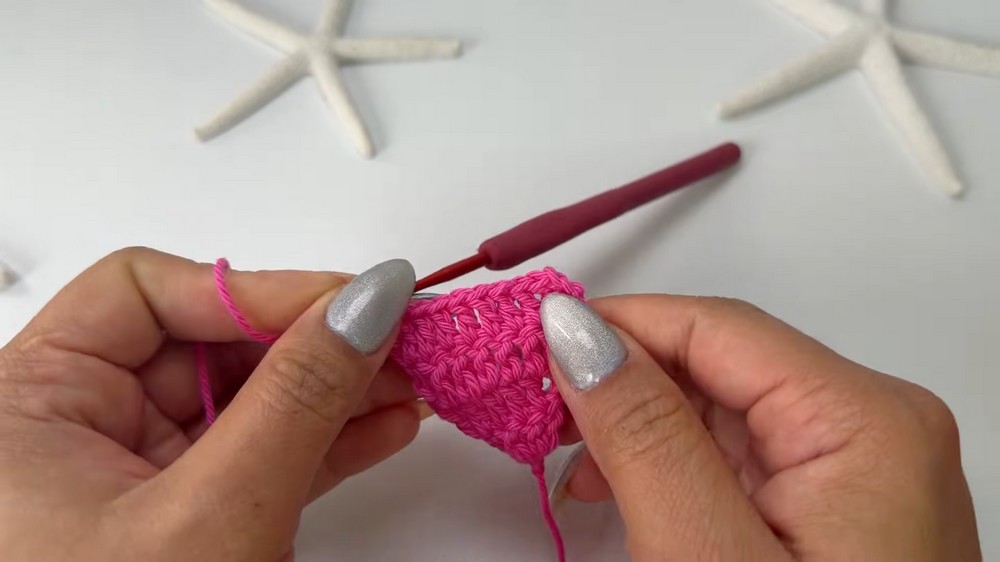
- Continue this pattern: 1 increase at the start and 1 increase at the end of every row.
- Repeat this method on every row:
- Length of cup
- Work until you reach the desired size for your cup.
- In the video, for the shown size:
- 23 rows total
- Approximately 20 cm height
- Approximately 20+ cm width at the base
- Fasten off
- When the cup reaches the desired size:
- ch 1, cut the yarn
- Pull the end through to secure
- Make a tiny knot if desired and weave in the end partly as shown.
- When the cup reaches the desired size:
- Repeat
- Make a second cup following the same steps.
6.2 Edging Around the Cup and Neck Tie
Now you will work around the sides and top of one cup with another color (or the same color if you prefer).
Hook: 2 mm
Yarn: Color A or changed color as in the video
- Join new color at the side of the cup
- Make a slip knot in the new color.
- Insert hook into the first available side space at the bottom side of the cup.
- Place the slip knot on the hook, pull through, ch 1 to secure.
- Work sc up the side of the cup
- Along the side edge, between each row’s side “space”:
- Work 2 sc in each side space of dc.
- Continue working 2 sc in each side space until you reach the top center point of the triangle.
- Along the side edge, between each row’s side “space”:
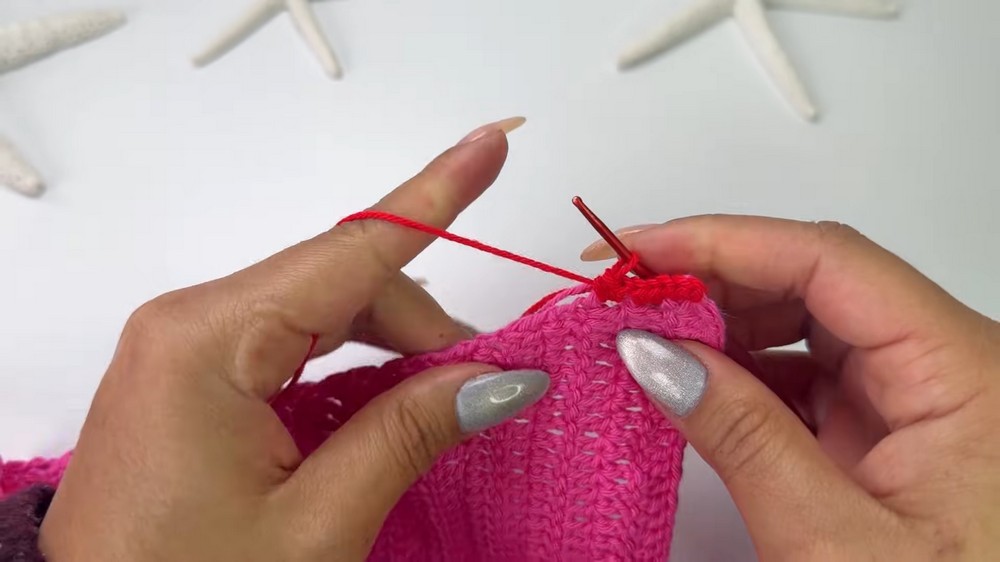
- Start the neck tie at the top tip
- At the very top point of the cup:
- Work 1 sc in the top point.
- From that sc, begin the neck tie:
- ch 110 (or as long as you need to comfortably tie behind your neck).

- ch 110 (or as long as you need to comfortably tie behind your neck).
- At the very top point of the cup:
- Work back along the neck tie
- Yarn over, skip 2 chains from the hook.
- In the 3rd chain from the hook:
- hdc.
- Work 1 hdc in each chain all the way back down the neck tie.
- You now return to the top of the cup where you began the tie.
- Secure the neck tie and work down the other side
- At the top point again:
- Work 1 sc into the same space to secure.
- Then work down the other side of the cup:
- 2 sc in each side space of dc rows, same as the first side.
- At the top point again:
- Optional bottom edge of the cup
- At the bottom of the cup, you may either:
- Stop here, leaving the bottom edge without sc (it already looks neat), or
- Work 1 sc in each dc across the bottom edge for a more finished look.
- When you finish the bottom edge:
- Join with a sl st at the last stitch or corner.
- Cut yarn, pull through, and weave in ends.
- At the bottom of the cup, you may either:
- Repeat for the second cup
- Repeat the same edging and neck tie steps for the other cup.
6.3 Back Tie (Lacing Under the Cups)
This tie is worked with triple strand and a larger hook, then woven through the bases of both cups.
Hook: 4.5 mm
Yarn: Color B, triple strand
- Prepare the triple strand
- Pull out a section of yarn from the ball.
- Fold it so you have three strands together.
- Hold the three strands as one and place a slip knot on your hook.
- Foundation chain
- ch 142 (or long enough to go under both cups and still have long ends to tie at the back).
- Before fastening off
- Do not cut the yarn yet.
- First, weave this chain through the base of the cups.
- Thread the chain through the cup bases
- Take one cup.
- Starting a little in from one side (for example skip the first base stitch), insert the chain through every 3–4 stitches across the base of the cup:
- Insert under the base, pull the chain up, then down again into the next selected stitch, creating a woven lacing effect.
- Continue this across the entire base of the first cup.
- Take the second cup.
- Make sure the right side is facing the same direction.
- Start weaving the chain at a symmetrical point so that the cups line up evenly.
- Weave the chain through every 3–4 stitches across the base of the second cup, just as you did with the first.
- Adjust and secure ends
- Once the chain is fully threaded under both cups, check that both sides are even in length.
- When you are satisfied:
- Tie a small knot at each end of the chain to secure the triple strands.
- Trim the ends neatly, leaving a bit of yarn so it does not slip out.
Now you have a long back tie that can be tightened and tied behind the back.
7. Tips and Customization Ideas
- Size adjustment for cups
- For larger bust: add more rows to each cup until the height and width are comfortable.
- For smaller bust: work fewer rows.
- You may also choose a slightly larger hook if you need more stretch.
- Neck tie length
- For a longer neck tie, simply add more chains than 110.
- For a shorter tie, use fewer chains.
- Back tie length
- If you need more length around the chest or want extra long ends, increase from 142 chains to 160 or more.
- Color changes
- Use one color for cups and another for edging and ties, as in the video.
- You may also stripe the cups by changing colors every few rows of dc.
- Edge options
- Instead of simple sc, you can add a decorative shell or picot edge around the cups once you are comfortable with the basic version.
- Support
- For more support, use a slightly smaller hook for the cups to make a tighter fabric.
- You can also add a row or two of tighter stitches (sc or hdc) across the bottom for more structure.
8. Final Look and Important Remarks
- The finished top consists of two triangle cups, each with a neat single crochet border and a half double crochet neck tie attached at the top of each cup.
- A thick, triple strand back tie is woven under the bases of both cups, allowing you to pull and tie the top securely at the back.
- The cotton yarn and tight stitches create a fabric that is suitable for summer wear, beachwear, or layering under a shirt.
- The texture is clean and defined because the yarn is well twisted; this gives the top a polished, high quality look.
9. Conclusion
This crochet top is simple, stylish, and accessible even to beginners. It uses only basic stitches: chains, single crochet, double crochet, and half double crochet. The repeated increases at the start and end of each row form a clear triangle shape, and the ties allow for easy adjustment to different body sizes. With small changes to the number of rows and chains, you can customize the fit, length, and style. This makes it a fun and rewarding project for anyone who wants to create a handmade summer top.