Turn ordinary yarn into a heartwarming baby cardigan with this free crochet pattern, the perfect mix of cuteness and coziness for tiny outfits.
Warm Up Your Skills with This Free Crochet Baby Cardigan Pattern
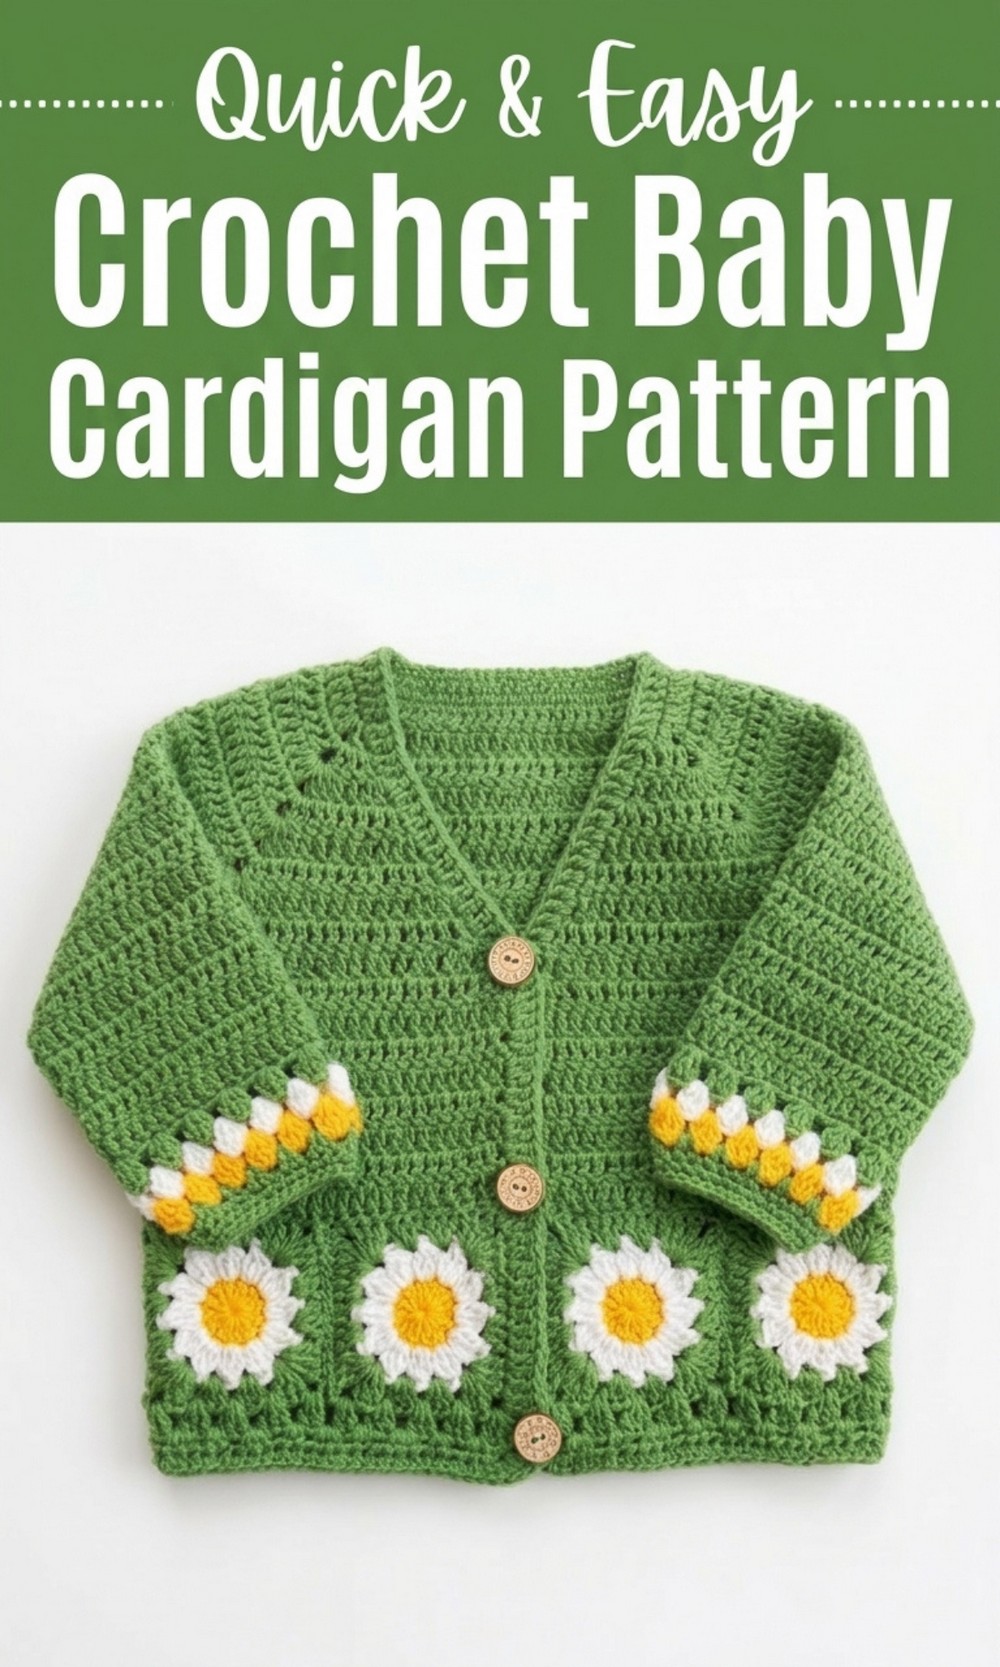
A crochet baby cardigan is a cute and heartwarming item that anyone can make with a little practice. This “Free Crochet Baby Cardigan Pattern” is perfect for beginners and experts alike. It is soft, lightweight, and designed to keep babies comfortable while giving them an adorable look. This cardigan has a beautiful V neck design with delicate daisy motifs, making it stylish and unique. You can crochet it using your favorite colors to suit a baby boy or girl or even make it unisex.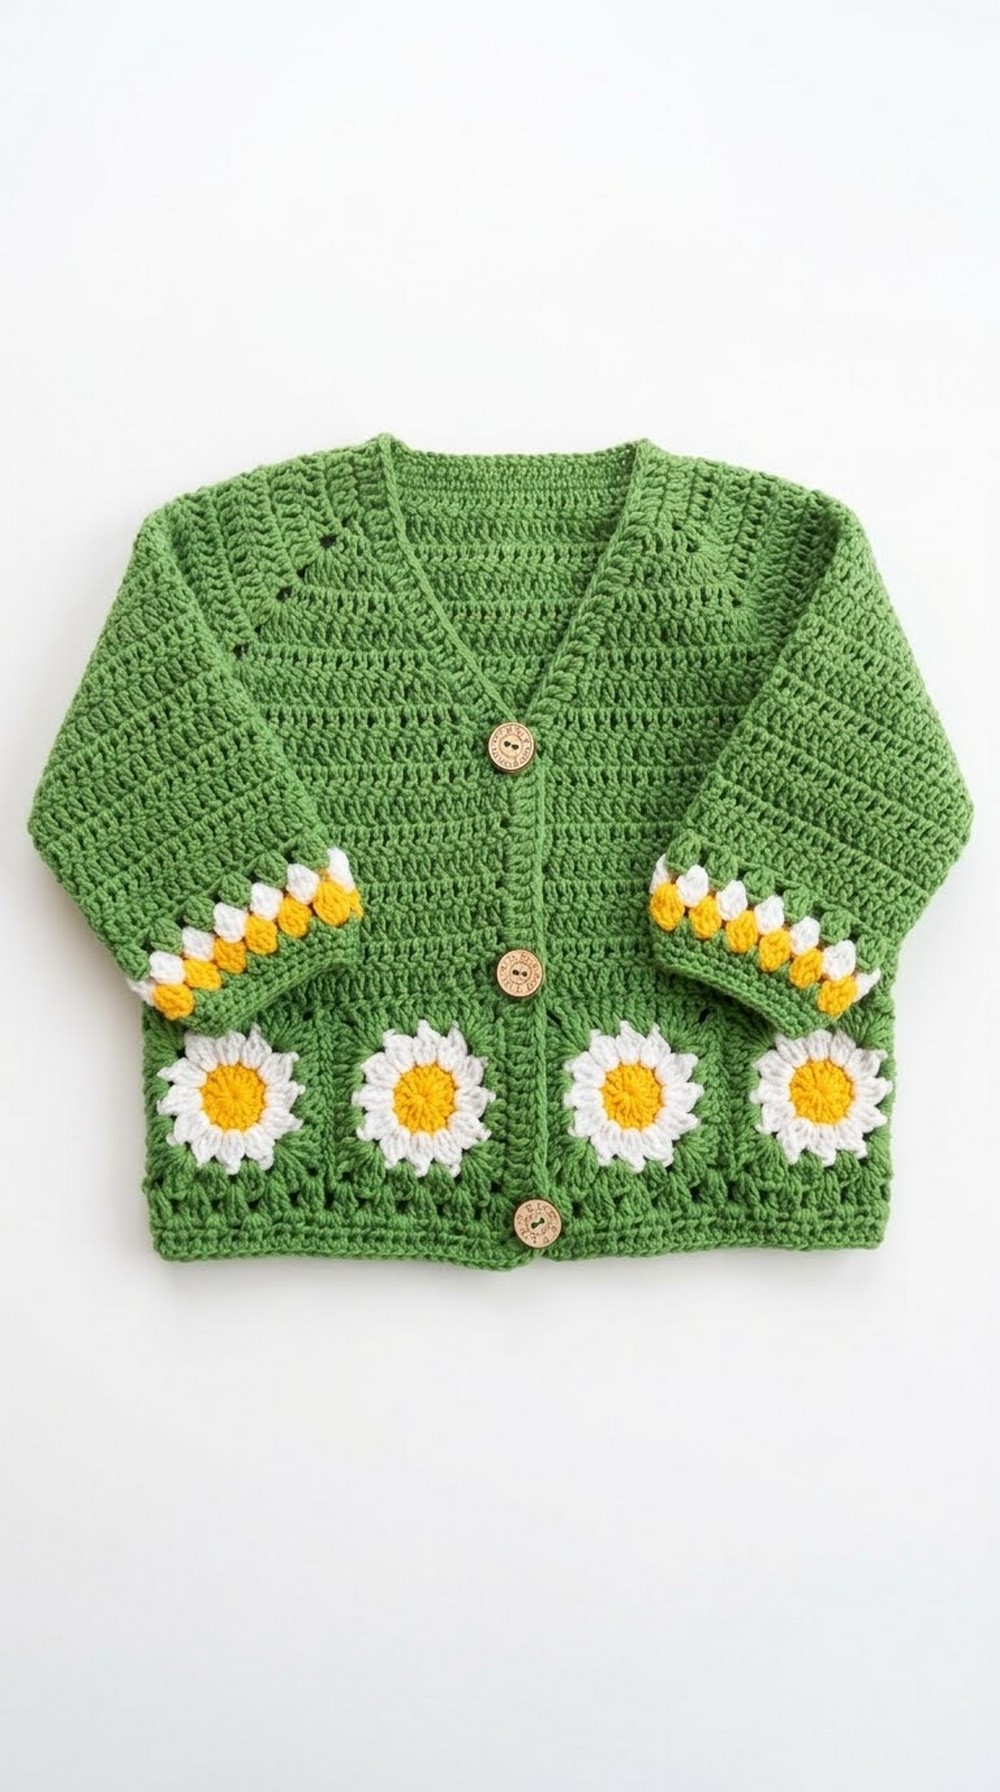 This pattern is great for creating a thoughtful gift for baby showers or birthdays. It is also a handy piece for layering in colder months or as a light cover in spring and summer. The cardigan features soft stitches, cute buttons, and a snug fit, ensuring it is both practical and cozy. Make memories with this special crochet project today.
1. Finished Size
The sample in the video is designed for approximately 0–6 months.
Approximate finished measurements (after light blocking):
- Chest width (underarm to underarm, laid flat): 27–28 cm
- Body length (from shoulder to hem): 30 cm
- Sleeve length (from neckline to wrist): 28–29 cm
- Hem ribbing height (motif band + borders): about 16–17 cm total
These measurements assume you are using a similar yarn and hook and crocheting with average tension.
2. Materials
- Yarn
- Main yarn: Spagetti Yarn Slim Cotton Plus (DK/worsted‑like cotton blend)
- Color A (main body color): approx. 2–3 balls (for size 0–6 months)
- Color B (daisy center – yellow): small amount
- Color C (daisy petals and contrast motif rows – white)
- Color D (motif border and cardigan border – green or your chosen contrast color)
- You may substitute any similar weight cotton/acrylic blend.
- Main yarn: Spagetti Yarn Slim Cotton Plus (DK/worsted‑like cotton blend)
- Hook
- 3.5 mm crochet hook (main hook used in the video)
- You may need to adjust hook size to match gauge.
- Notions
- Yarn needle (for weaving in ends and sewing motifs)
- Scissors
- Stitch markers (optional, for marking corners and buttonholes)
- 3 small buttons (to suit buttonholes, about 10–12 mm)
3. Gauge
Worked in double crochet (dc / ikili trabzan) with Slim Cotton Plus and 3.5 mm hook:
- Approx. 18–19 sts and 10 rows = 10 cm x 10 cm in double crochet, after light blocking.
The designer also explains:
- If your yarn and hook are thinner than hers, the cardigan will come out smaller.
- If your yarn and hook are thicker, it will come out larger.
To match her size as closely as possible, use a similar yarn and hook and check your gauge.
4. Construction Overview
- Top‑down yoke (raglan style)
- Started with a foundation chain.
- Yoke is shaped with increases at 4 “corners” (between fronts, sleeves, back).
- At the same time, V‑neck shaping is worked with extra increases on the front edges.
- Separate sleeves and body
- Fronts and back are continued straight down.
- Sleeves are worked in the round after body is separated.
- Body
- Once yoke depth is reached and front edges meet for the V‑neck, increases stop.
- Body is worked straight down in rows.
- Motifs and lower band
- Daisy square motifs are made separately.
- Motifs are sewn together into a strip, then sewn to the lower edge of the cardigan.
- Green borders are then added.
- Sleeves
- Sleeves are worked in dc, then a decorative band is added near the cuff.
- Button band and finishing
- Button band and buttonholes are added on one front edge, and buttons sewn on the other.
- All ends are woven in, and the cardigan can be lightly blocked.
5. Abbreviations (US Terms)
All instructions use US crochet terms.
- ch – chain
- sc – single crochet
- hdc – half double crochet
- dc – double crochet
- sl st – slip stitch
- st(s) – stitch(es)
- sp – space
- sk – skip
- rep – repeat
- inc – increase
- RS – right side
- WS – wrong side
6. Special Techniques
6.1 Magic ring (sihirli halka)
- Wrap yarn around your finger to form a loop.
- Insert hook into loop, pull up a loop, ch 1 (or ch 3 if starting with dc).
- Work sts into the loop.
- Pull the tail to close the loop.
6.2 Raglan corner increase
You will use two different corner styles in the yoke:
- Type A corner:
dc, ch 2, dcin corner space - Type B corner:
2 dc, ch 2, 2 dcin corner space
These are alternated in rows as instructed.
6.3 Front‑edge increase for the V‑neck
On certain rows, the first and last dc groups of the row are increased to shape the V.
7. Pattern Instructions
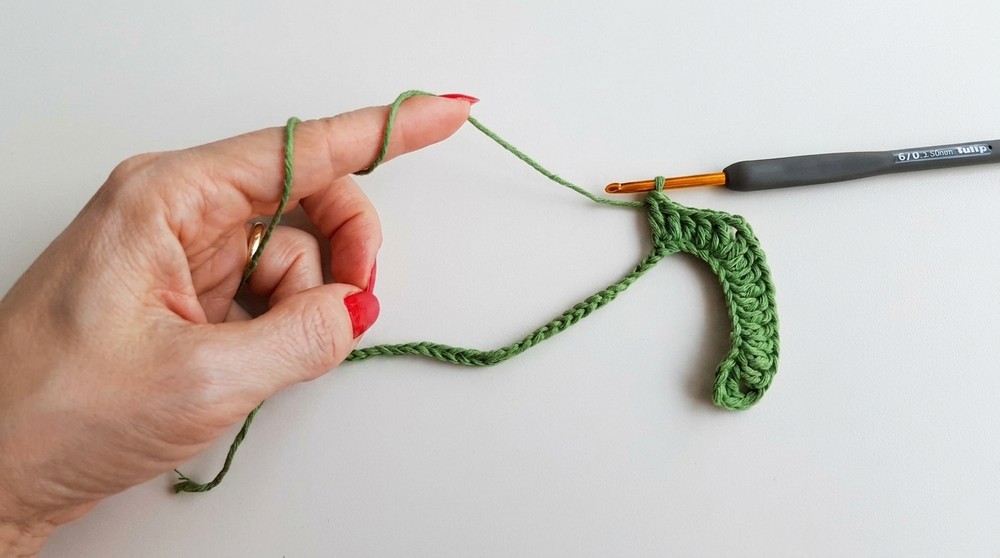
7.1 Yoke – Foundation and First Row
Yarn: Main color (Color A)
Hook: 3.5 mm
- Ch 44.
- Row 1 (RS):
- Sk first 3 ch (counts as 1 dc).
- Dc in next ch (this is Front 1).
- Front 1 currently has 2 dc (the turning chain + 1 dc).
- Ch 2 (corner 1).
- In same ch, dc once more (this completes the first corner at the junction of Front 1 and Sleeve 1).
- Sleeve 1: dc in next 9 ch (total 10 dc for Sleeve 1 including the corner dc).
- Ch 2.
- In same ch, dc (corner 2 – Sleeve 1 to Back).
- Back: dc in next 21 ch (you will see 22 dc in total in the back section because of the corner dc).
- Ch 2.
- In same ch, dc (corner 3 – Back to Sleeve 2).
- Sleeve 2: dc in next 9 ch (total 10 dc for Sleeve 2).
- Ch 2.
- In same ch, dc (corner 4 – Sleeve 2 to Front 2).
- Dc in remaining last ch (this is the rest of Front 2).
Starting stitch counts after Row 1 (approximate, based on the description):
- Front 1: 2 dc
- Sleeve 1: 10 dc
- Back: 22 dc
- Sleeve 2: 10 dc
- Front 2: 2 dc
The designer specifically notes these as: fronts with 2 dc, sleeves with 10 dc, back with 22 dc.
7.2 Yoke – Increasing Rows (Raglan + V‑neck shaping)
From now on, you will:
- Increase in all four corners every row.
- Also increase at front edges to shape the V‑neck until the V meets.
The pattern alternates the corner styles per row.
The designer describes the pattern as alternating:
- One row:
dc, ch 2, dcin corners. - Next row:
2 dc, ch 2, 2 dcin corners.
She also increases at the front edges: extra dc at the first and last stitches of certain rows.
Because the video pattern uses a visual rhythm (1–2–1–2 in how many dc are placed in the corners), here is a written guideline you can follow:
Row 2 (RS)
- Ch 2, turn.
- Front edge increase:
- Dc into the first dc of the row (not the ch‑2), dc in each dc to the first corner.
- Dc into the first dc of the row (not the ch‑2), dc in each dc to the first corner.
- At each corner: work Type A corner:
dc, ch 2, dc. - Dc in each st across sleeves and back as you pass each section.
- At the last corner, after the final
dc, ch 2, dc, dc in each st across until last dc. - Front edge increase at the end: work 2 dc into the last dc of the row.
Row 3 (WS)
- Ch 2, turn.
- Front edge increase at beginning: 2 dc into the first dc of the row.
- Dc in each dc to first corner.
- At each corner: work Type B corner:
2 dc, ch 2, 2 dc. - Dc across each section as before.
- At the end, dc in each dc until last dc, then 2 dc into the last dc.
Subsequent Yoke Rows
Continue in this logic:
- Even rows: Corners =
dc, ch 2, dc(Type A). - Odd rows: Corners =
2 dc, ch 2, 2 dc(Type B). - Always dc in each st between corners.
- Continue to increase at the front edges (first and last dc) to maintain the V‑shape, as the designer shows.
- Work until you have 9 visible rows of yoke increases (she shows counting 9 rows).
After these 9 rows, measure the yoke:
- When the front V edges come close to meeting at the center with a slight overlap and the yoke depth matches the size you want, you are ready to separate the sleeves.
Note: The designer shows approx. 9 rows for size 0–6 months.
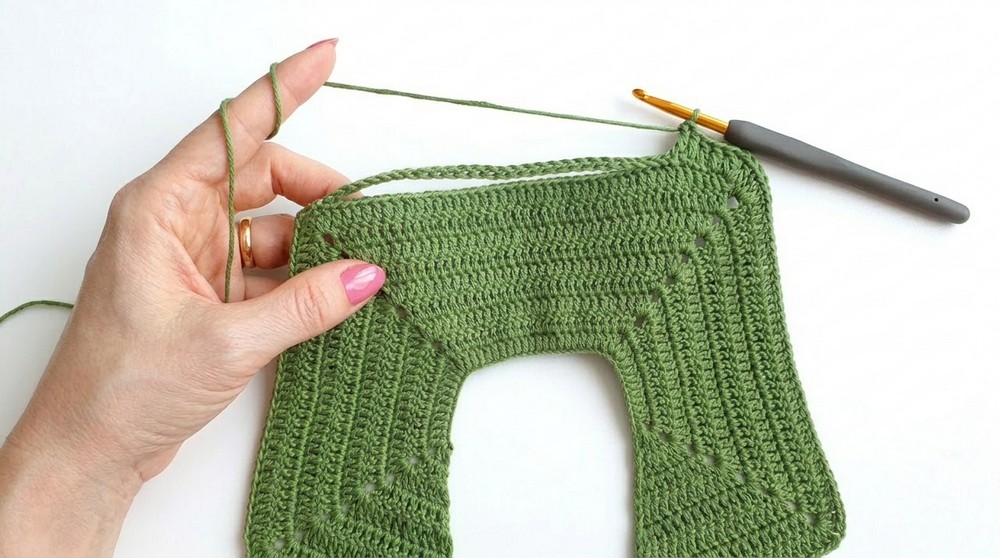
7.3 Joining Underarms and Separating Sleeves
On the final increase row of the yoke:
- Work across the first front and sleeve until you reach the corner.
- At the corner:
- Work 1 dc into the corner space.
- Ch 4 (this chain forms the underarm bridge – for larger sizes you can use more chains).
- Fold the sleeve half so that the lower corner of the sleeve meets the body.
- Skip the entire sleeve section, and work 1 dc into the next corner on the body (this joins the front to the back across the underarm).
- Work across the back in dc to the next corner.
- At the next sleeve corner:
- Dc in corner space, ch 4.
- Skip sleeve sts, dc in next body corner for second underarm.
- Finish dc across the second front.
This completes the row that joins the sleeve tops to the body and leaves the sleeve stitches on hold.
7.4 Filling the Underarm Chains
On the next row:
- When you come to a ch‑4 underarm bridge, work 4 dc into that chain space (one dc into each ch).
- Continue dc across the back.
- Work 4 dc into the second underarm chain.
- Complete the row.
At this point, all raglan and neck shaping is complete. The V‑neck has met, and you now work the body straight down without increases.
7.5 Body – Straight Rows
- From now on:
- Ch 2, turn at the beginning of each row.
- Do not increase at the front edges any longer.
- Dc into the second dc (skipping the very first dc) to avoid edge increases, then dc across to the last dc and dc only once into the last dc.
- This keeps the stitch count stable.
- Work straight dc rows, turning at each end, until the body reaches the desired length before the motif band.
The designer reports working 8 rows of straight body dc after separating the sleeves for the size 0–6 months. Adjust the number of rows if you need a longer or shorter cardigan.
8. Daisy Square Motif
You will make 8 motifs for size 0–6 months:
- 4 motifs across the back
- 1 motif for each front (2)
- 2 motifs to wrap around the sides, for a total of 8
You can adjust the number of motifs for larger sizes.
8.1 Daisy Center (Yellow – Color B)
- With yellow, make a magic ring.
- Ch 3 (counts as 1 dc).
- Work 11 dc into the ring (so you have 12 dc total including the first ch‑3).
- Pull the ring tight.
- Join with sl st to top of beginning ch‑3.
- Ch 1 to secure and fasten off yellow.
8.2 Daisy Petals (White – Color C)
- Attach white to any dc of the yellow circle.
- Ch 3.
- In the same st:
- Dc, leaving last loop on hook (do not complete the dc).
- Dc again in the same st, leaving the last loop on hook. You will have 3 loops (ch‑3 counts as one “leg” + 2 dc legs).
- Yarn over and pull through all loops.
- Ch 2. (Petal 1 formed.)
- Next petal:
- In the next dc of the yellow center, work 3 dc together, leaving the last loop of each dc on the hook (similar to step 3).
- Yarn over, pull through all loops.
- Ch 2.
- Repeat around so you have 12 petals (one on each of the 12 dc).
- Join with a sl st to the top of the first petal (top of the cluster).
- Ch 1, fasten off white.
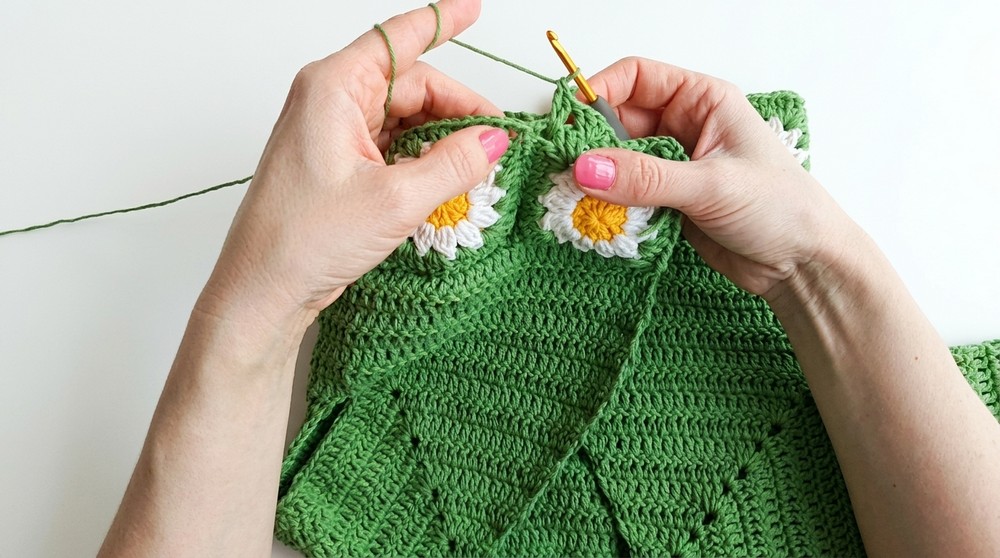
8.3 Turning the Daisy into a Square (Green border – Color D)
You will now make a square around the circle of petals, working into the ch‑2 spaces between petals.
- Attach green into any ch‑2 space between petals.
- Ch 3 (counts as dc).
- In the same ch‑2 sp, work 2 dc, ch 3, 3 dc. This is a corner.
- In the next ch‑2 sp: work 3 hdc.
- In the next ch‑2 sp: work 3 hdc.
- In the next ch‑2 sp (corner): 3 dc, ch 3, 3 dc.
- Repeat this sequence around:
- Corners: 3 dc, ch 3, 3 dc
- Sides (between corners): in each sp, 3 hdc
- After the 4th corner, join with a sl st to the top of the beginning ch‑3.
- Ch 1, fasten off green.
You now have a small square motif with a daisy in the center.
Make 8 motifs total for size 0–6 months. For larger sizes, you may need more motifs to go around the body.
9. Joining Motifs Together
- Place motifs RS (front/right sides) facing each other, so that wrong sides are facing outward.
- With green yarn and a yarn needle, sew motifs together, matching corners and working through the tops of the stitches.
- The designer sews through the tops of the dc sts and center chs of corners (e.g., the middle of the 3‑ch corner).
- Create a long strip of motifs that, when laid flat, matches the lower edge circumference of your cardigan body.
For size 0–6 months, she used:
- 4 motifs across the back
- 1 motif for each front edge
- 2 at the sides (i.e., total 8 motifs forming a full loop).
10. Attaching Motif Strip to the Body
- With the cardigan body inside out, place the motif strip so that the RS of the motifs faces the RS of the cardigan body, aligning raw edges.
- Pin or clip motifs in place if desired to prevent shifting.
- Using the same green yarn and a yarn needle, sew the top edge of the motif strip to the lower edge of the cardigan, matching corners and stitch counts as evenly as possible.
- Weave in and secure all ends.
The motifs will form a decorative band at the bottom of the cardigan. The designer notes that you may refine the appearance with additional borders, which she does next.
11. Lower Green Border Under the Motifs
After the motifs are attached, a green crocheted border is added underneath them.
With green (Color D):
- Attach yarn in any corner space of the motif band.
- Ch 3 (counts as dc).
- In the same space, work 3 dc (total 4 dc in first corner).
- Across side spaces:
- In each space between motif stitches, work 3 dc.
- In each motif corner where two motifs meet, place 2 dc in one motif’s corner and 2 dc in the adjacent motif’s corner.
- Continue all around the lower edge, placing:
- 3 dc in side spaces
- 2 + 2 dc in corners where motifs meet
- At the last corner, work 3 dc and join to the top of the beginning ch‑3 with a sl st.
- Ch 2, turn.
Second row of lower border (hdc pattern)
- Ch 2.
- In the first space (between dc groups), work 3 hdc.
- In the next space, work 2 hdc.
- Continue alternating 3 hdc and 2 hdc in each space along the row:
- 3 hdc, 2 hdc, 3 hdc, 2 hdc, etc.
- At the end of the row, ch 2, turn.
Third row (sc edging)
- Work 1 sc into each hdc across the entire row.
- Do not work into spaces, just into the top of each hdc.
- Fasten off and weave in ends.
This creates a soft, slightly textured lower band beneath the motifs.
12. Button Band and Buttonholes
Buttons are placed on one front edge (the designer appears to place buttonholes on the left front as worn).
With green (Color D):
12.1 Right Front Edge (without buttonholes)
- Attach yarn at the lower corner of the right front (as worn).
- Work 1 dc into the first side space or st.
- Then work dc up the edge:
- Place dc into the side of each row or relevant edge stitch so the edge is neat and even.
- Continue up to the neckline.
- Fasten off and weave in.
12.2 Left Front Edge (with buttonholes)
- Attach yarn at the lower corner of the left front.
- Ch 2.
- Dc in the first gap at the bottom edge.
- Continue working dc up the edge, similar to the other side.
- To form buttonholes, when you reach where you want a buttonhole:
- Work 1 dc,
- Ch 1,
- Skip 1 edge stitch (or gap),
- Dc into the next stitch.
- This creates a small 1‑ch buttonhole.
- The designer creates 3 buttonholes spaced evenly up the front.
After finishing the dc row with buttonholes, you may work a second row of sc for stability if you wish.
12.3 Sewing Buttons
- Sew 3 buttons on the right front edge, positioning each button opposite a buttonhole on the left front.
13. Sleeves
Work each sleeve in the round, picking up the held stitches at the armhole.
With main color (Color A):
- Join yarn in the lower region of the armhole at one of the existing dc stitches.
- Work dc around the entire armhole, including:
- 4 dc in the underarm chain area (as you did on the body)
- 1 dc in each dc around the sleeve opening
- Join with sl st to the first dc.
- Ch 2, turn (the designer works sleeves in rows turned in the round – one round RS, one round WS).
- Work dc in each st around and join with sl st to first dc.
- Continue working dc rounds, turning each round, until you have 11 rounds total for 0–6 months (or longer for larger sizes).
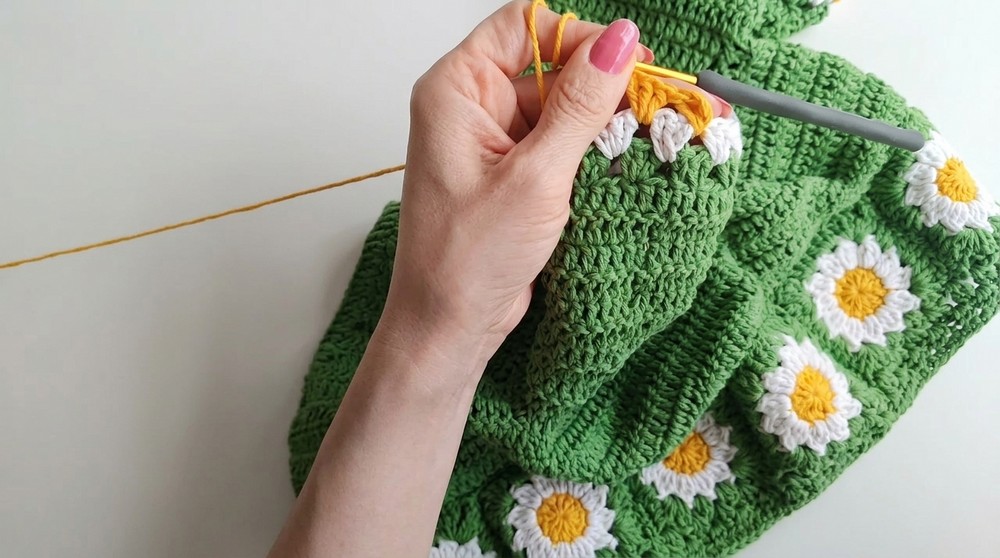
Sleeves – Decorative Daisy Band
At about 11 dc rounds, the designer adds a small decorative band of colored motifs at the sleeve end.
Change to Color C (white) or as desired:
- Round 1 (lace groups):
- Ch 3.
- [Sk 2 sts, 3 dc in same st (third st)] around:
- Ch 3 (counts as dc).
- Sk first 2 sts, 3 dc in next st.
- Sk 2, 3 dc in next repeat to near the start.
- At the end: if only 2 sts remain, work 2 dc into last st, then join to top of ch‑3.
- Fasten off if you will change color; otherwise, continue in same color.
- Round 2 (3 dc in each space) – Color C:
- Join yarn in any gap between 3‑dc groups.
- Ch 3 (counts as dc) + 2 dc in same gap (3 dc total).
- In each gap around, work 3 dc.
- Join with sl st to first dc.
- Fasten off Color C.
- Round 3 – Color B (yellow):
- Join yellow in any gap between 3‑dc groups.
- Ch 3 (counts as dc) + 2 dc in same gap (3 dc total).
- 3 dc in each gap around.
- Join with sl st.
- Fasten off.
- Round 4 – Color D (green):
- Join green in any gap between 3‑dc groups.
- Ch 3 + 2 dc in same gap (3 dc).
- Next gap: 2 dc.
- Next gap: 2 dc.
- Next gap: 3 dc.
- Continue this rhythm around: 2 dc, 2 dc, 3 dc, repeating as needed so that the sleeve edge slightly tapers.
- Rounds 5–6 – sc edging:
- Round 5: Work 1 sc into each dc around. Join with sl st.
- Round 6: Again work 1 sc into each sc around. Join and fasten off.
Repeat for the second sleeve in the same way.
14. Finishing
- Weave in all ends securely on the WS using a yarn needle.
- Check that the motifs are firmly sewn and edges are tidy.
- Lightly block the cardigan if desired:
- Gently wet or steam block cotton parts
- Lay flat to dry, shaping the garment, motifs, and borders evenly.
- Ensure buttons and buttonholes align properly and that there are no loose threads.
When finished, you will have a V‑neck baby cardigan with daisy motifs at the hem and cute decorative daisy‑style bands on the sleeves.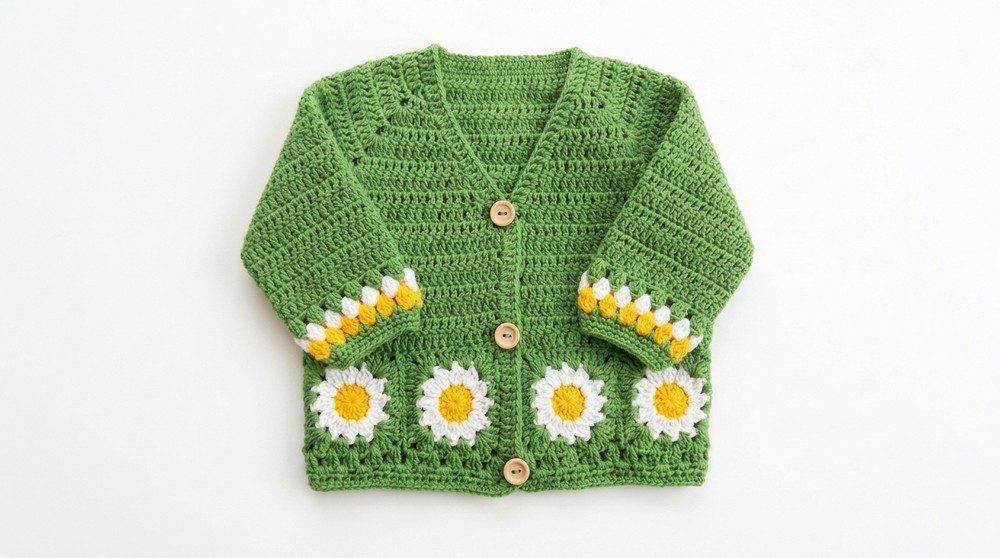
15. Tips and Customization Ideas
- Adjusting size by age
- For larger sizes (1 year and beyond):
- Work more yoke increase rows until the chest and armhole depth fit the intended age.
- Add more rows to the body and sleeves to increase length.
- You may also need to work more underarm chains (e.g., 5–6 instead of 4) and include more motifs in the hem band (e.g., 10–12 motifs for older children).
- If your yarn and hook are thinner than the suggested ones, consider:
- Adding 2–3 more yoke rows,
- Starting with a larger foundation chain (e.g., 48–52 ch), or
- Using a larger hook so your gauge is similar.
- For larger sizes (1 year and beyond):
- Color variations
- Use different petal colors (pink, purple, pastel shades) for the daisy motifs.
- Make the cardigan in a neutral tone and the motifs in bright colors for a playful look.
- Make a plain version (without motifs) by simply omitting motif band and adding a simple rib or lace border instead.
- Edge neatness
- When working along the vertical edges (front bands), insert your hook consistently into the same part of each row (e.g., under two loops of the side sts) to keep the edge even.
- Skill level
- This project is suitable for confident beginners to intermediate crocheters.
- If you are new to crochet, the teacher suggests watching a basic crochet training video (for learning dc, hdc, sc, magic ring, etc.) before starting.
16. Conclusion and Final Look
This cardigan features:
- A top‑down raglan yoke with a neatly shaped V‑neck,
- Soft, straight body worked in double crochet,
- Cute daisy square motifs around the hem, adding color and texture,
- Matching decorative bands on the sleeves echoing the daisy pattern,
- A practical button front, making it easy to put on and take off.
With the given instructions, you can adjust the length of the body and sleeves and the number of motifs to fit any age. The cotton blend yarn and airy motif band make this cardigan suitable for spring and autumn, and the daisy motifs allow for playful color combinations.