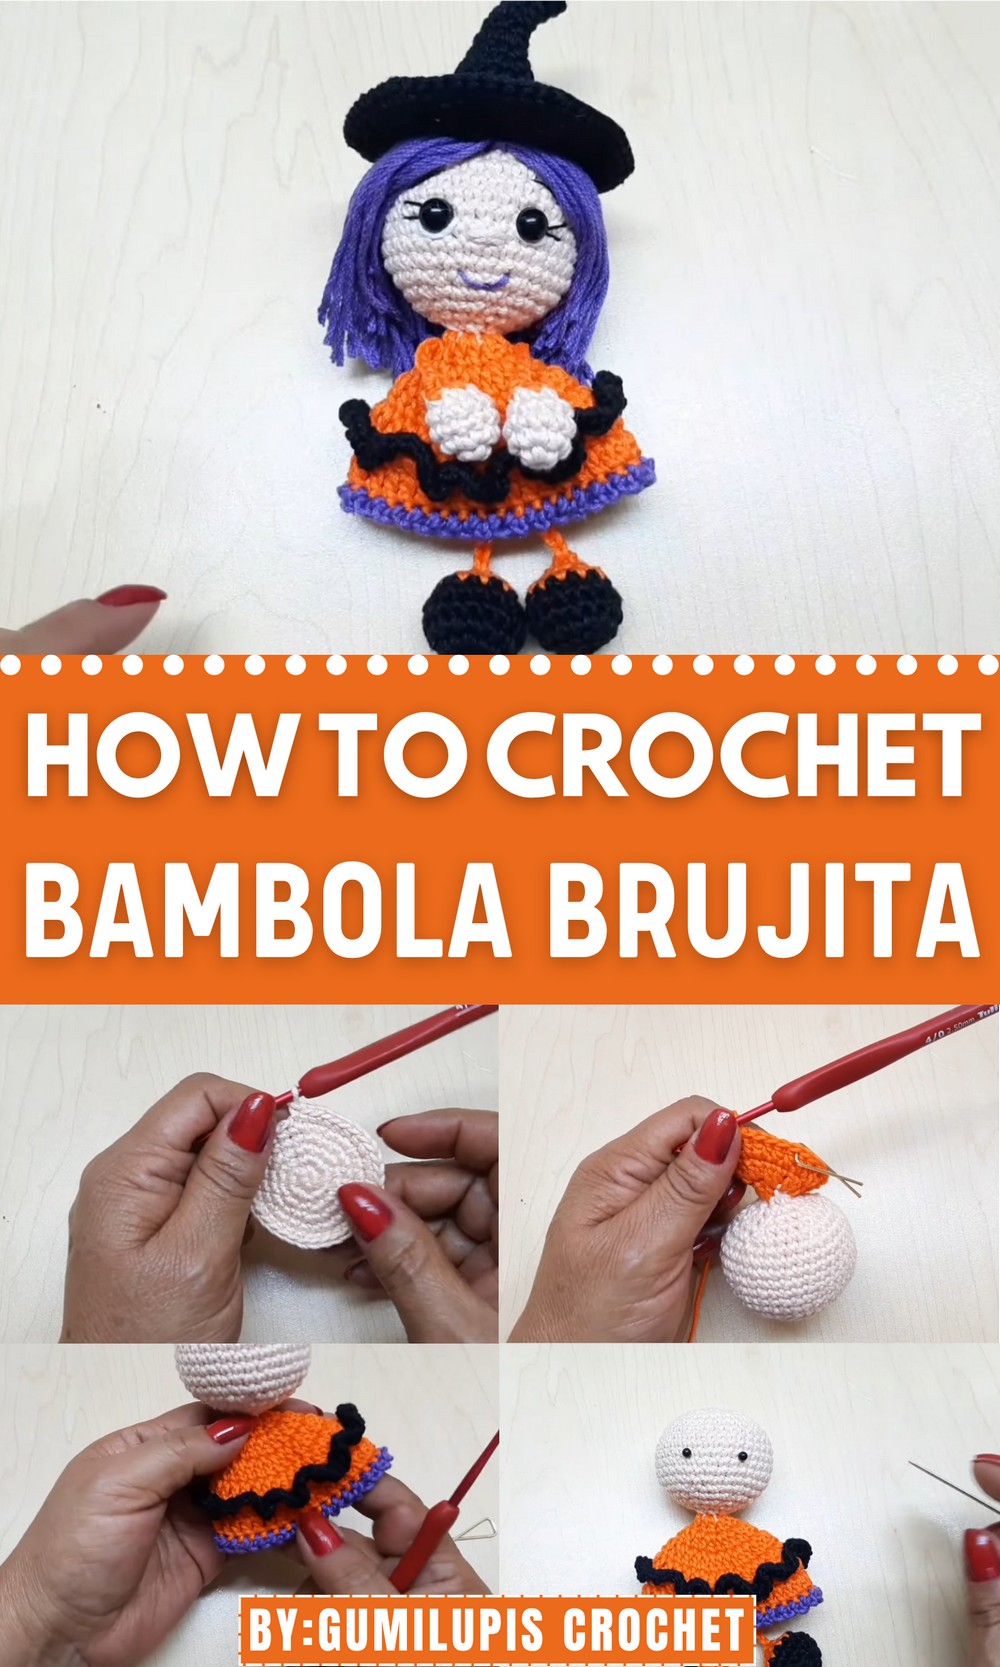
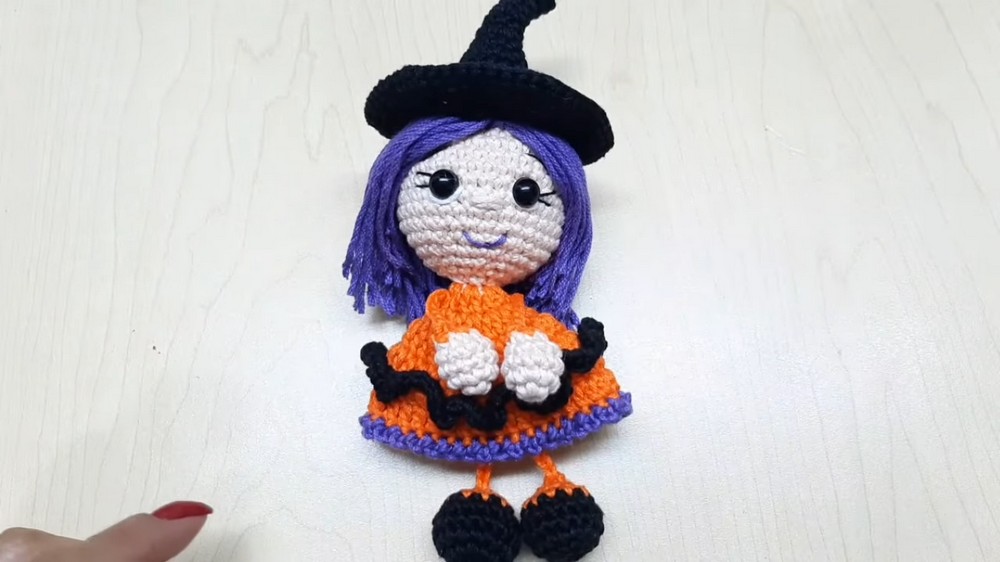
Bring a touch of magic with the Free Crochet witch doll Pattern, perfect for creating charming handmade dolls for décor or playful gifts.
Charming and full of personality, this free crochet witch doll pattern brings a delightful twist to traditional amigurumi. The doll’s expressive face, flowing hair, and detailed witch outfit are shown coming together step by step, making it both whimsical and approachable. One standout feature is its versatility, allowing you to customize hair textures, dress colors, and accessories to match your style or the recipient’s personality.
Free Crochet Witch Doll Pattern for Magical Décor Pieces
The benefits are clear, as the finished doll serves as a cozy toy, a charming décor piece, or a memorable handmade gift. Its uses are wide-ranging, from cheerful companions for children to decorative accents on shelves, themed spaces, or even as playful photo props during festive occasions. Beyond visual appeal, the pattern supports skill development, helping you practice familiar stitches and discover how small adjustments can create a doll with character and charm.
Following the free crochet witch doll pattern provides more than just a set of instructions, it gives you the joy of crafting a unique and meaningful keepsake while enjoying the creative process. The result is a polished, handmade piece that can be proudly displayed, gifted, or treasured for years to come.
Free Crochet Witch Doll Pattern
Special Features
The finished witch doll is a small amigurumi, measuring 12 centimeters from head to feet. Including the iconic pointed hat, the doll reaches a height of 18 centimeters. The hat’s tall design gives the doll its notable stature.
Level of Difficulty
The tutor explicitly states that this is an easy, easy, easy to make project, suitable even for those with basic amigurumi knowledge.
Tutor’s Suggestions
- Choose a variety of colors for the hair and dress to make your witch doll even more beautiful and unique.
- While the tutor uses a 2.5 mm crochet hook, you can also use a 2.0 mm hook to achieve a similar result.
- Use a fine embroidery thread for facial details, such as the eyelashes.
Uses
This adorable doll is perfect for many uses. You can hang it in your car or attach it to your handbag as a charm, decorate your home for the Halloween season (or all year round), or simply give it as a thoughtful, handmade gift.
Materials
You will use Sinfonía yarn in various colors: a skin tone, lilac, black, orange, and a light color (like peach) for the hair. In addition to the 2.5 mm crochet hook, you will need a stitch marker, a sewing needle, scissors, size 8 safety eyes, and fiberfill stuffing to fill the head and feet.
Step-by-Step Details
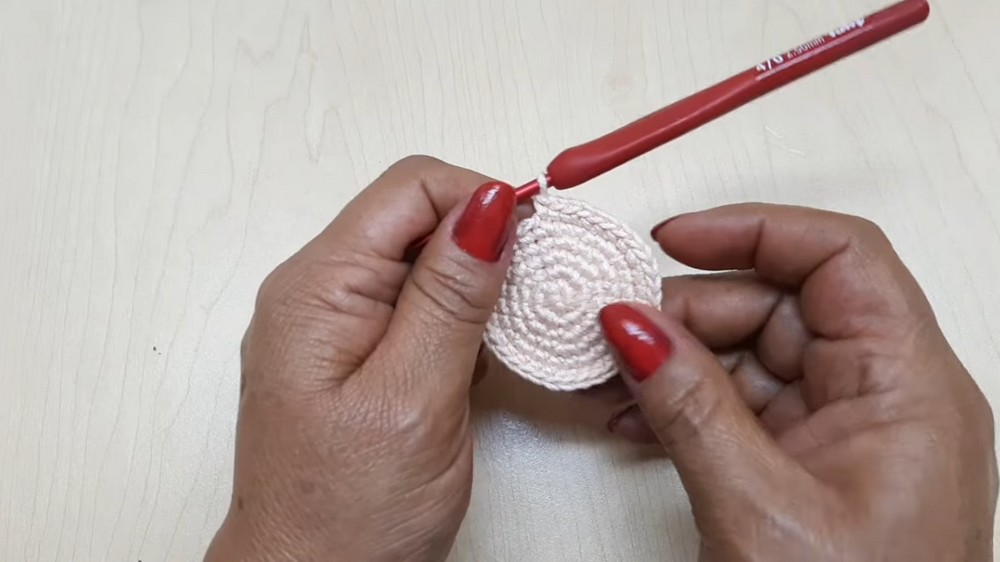
Crocheting the Head
- Begin the head using the skin-colored yarn. Create a magic ring and place 6 single crochet (sc) stitches inside.
- Increase by crocheting an increase (inc) in every stitch for 12 sc.
- Continue increasing: work (1 sc, 1 inc) for 18 sc; then (2 sc, 1 inc) for 24 sc; then (3 sc, 1 inc) for 30 sc; and finally (4 sc, 1 inc) for 36 sc.
- Crochet seven straight rows of 36 sc without increasing or decreasing.
- Begin the decreases: work (4 sc, 1 decrease (dec)) for 30 sc; then (3 sc, 1 dec) for 24 sc; then (2 sc, 1 dec) for 18 sc. Start stuffing the head at this point.
- Continue decreasing: work (1 sc, 1 dec) for 12 sc; then finish with 6 dec for 6 sc. Stuff the head firmly before closing the last stitch.
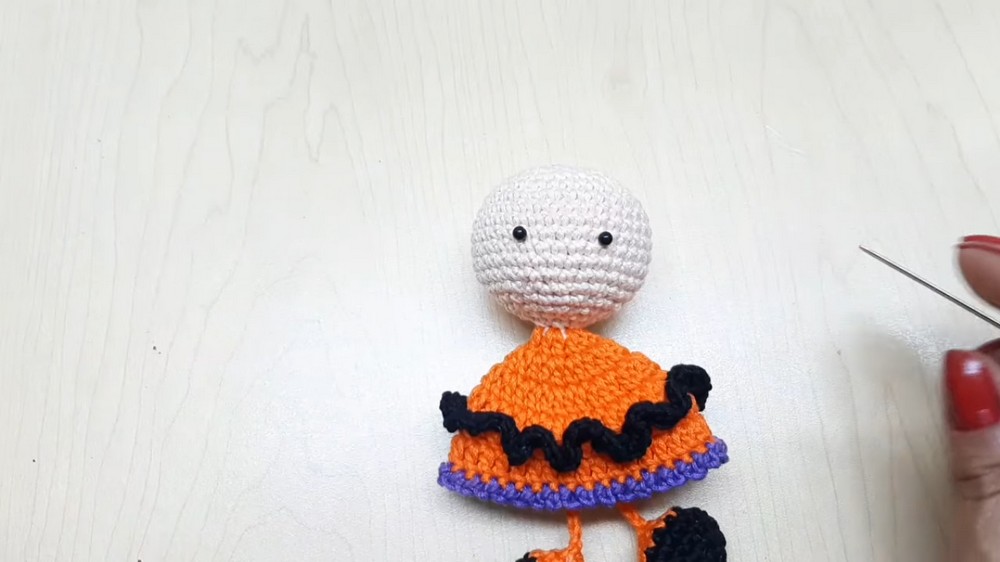
Crocheting the Dress and Body
- Change the yarn color to your chosen dress color. Work the next row in the front loop only (FLO), making a double crochet (dc) increase in each of the 6 stitches left from the head, resulting in 12 dc.
- Continue with increases: crochet 12 dc increases for 24 dc.
- Work (2 dc, 1 inc) for 32 dc.
- Work (7 dc, 1 inc) for 36 dc.
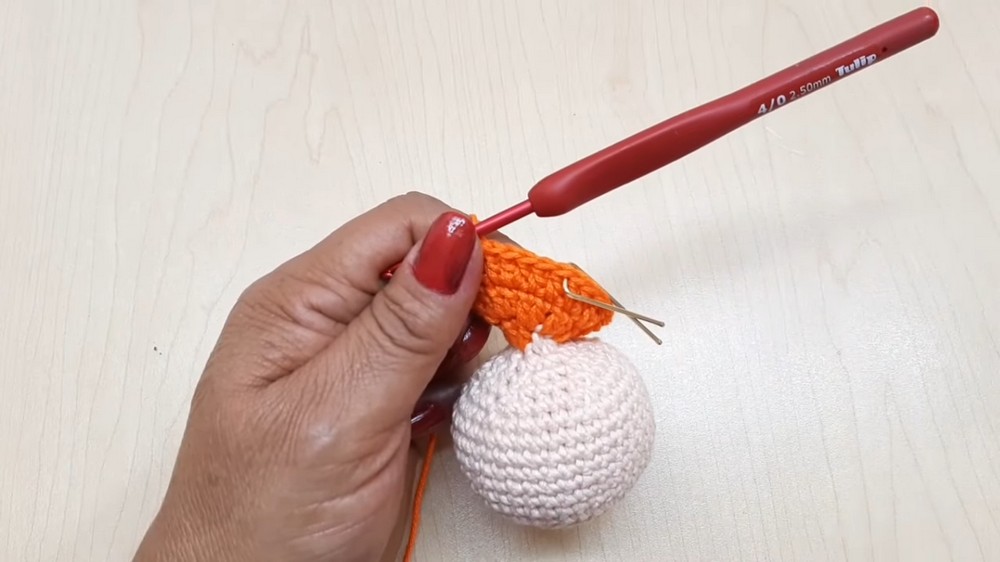
- Work the next row in the back loop only (BLO), crocheting 36 dc. This leaves the front loops visible for the second ruffle.
- Crochet the final straight row of 36 dc through both loops.
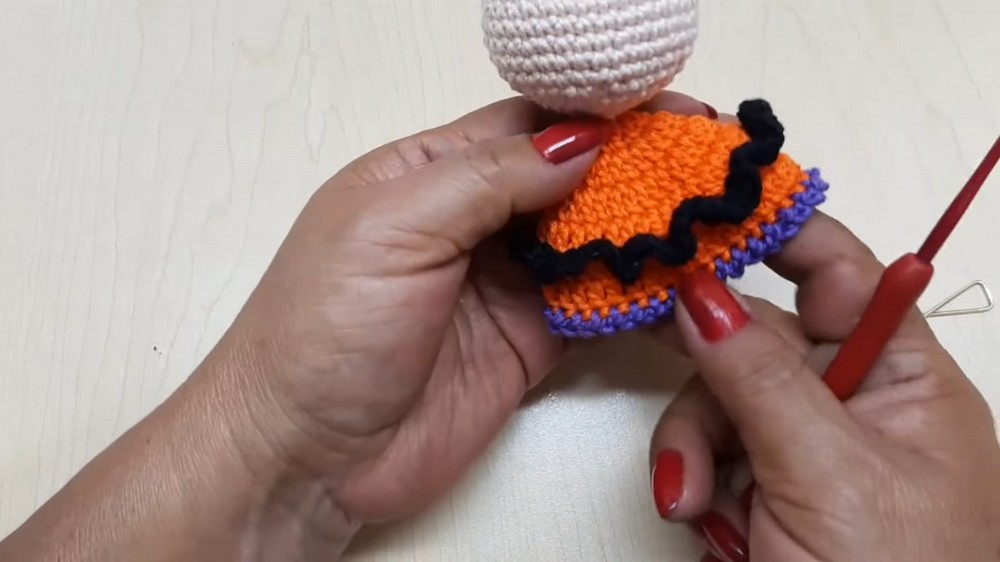
- Change to the edge color (e.g., purple) and create a decorative border: make a slip stitch, crochet 2 chains, and slip stitch into the next stitch, repeating this sequence around the entire rim.
- Create the skirt ruffle by reattaching a second color (e.g., black) to the FLO you left behind on the BLO row. Crochet 3 sc stitches into every single front loop around the body.
Crocheting the Feet, Legs, and Arms
- Crochet the feet: Use your chosen shoe color. Work a magic ring with 6 sc. Increase to 12 sc with 6 increases. Work (1 sc, 1 inc) for 18 sc. Crochet two straight rows of 18 sc.
- Change to skin color and start decreasing: work (1 sc, 1 dec) for 12 sc. Then crochet 6 decreases for 6 sc. Stuff the foot and use a needle to close the remaining hole by weaving through the front loops.
- Form the leg: Leave a long yarn tail. Thread the tail through the center of the foot and out through the magic ring on the body. Using a crochet hook, pull the yarn through and crochet a 20-chain leg. Make two legs.
- Crochet the arms: Use your cuff color. Work a magic ring with 5 sc. Increase to 10 sc with 5 increases. Crochet two straight rows of 10 sc.
- Change to skin color and crochet 5 decreases. Stuff the arm and close the hole with a needle. Leave a long yarn tail, and use a hook to pull the yarn through and crochet a 7-chain arm. Make two arms.
Crocheting the Hat
- Begin the hat with black yarn. Work a magic ring with 4 sc.
- Increase with (1 sc, 1 inc) twice for 6 sc. Work a straight row of 6 sc.
- Continue the increase sequence to form the cone: (2 sc, 1 inc) for 8 sc; straight row of 8 sc; (3 sc, 1 inc) for 10 sc; straight row of 10 sc; (4 sc, 1 inc) for 12 sc; straight row of 12 sc.
- Increase with (1 sc, 1 inc) six times for 18 sc. Work two straight rows of 18 sc.
- Increase with (2 sc, 1 inc) six times for 24 sc. Work a straight row of 24 sc.
- Increase with (3 sc, 1 inc) six times for 30 sc.
- Increase with (4 sc, 1 inc) six times for 36 sc.
- Crochet the brim: Work the next row in the FLO, crocheting (1 sc, 1 inc) around for 54 sc.
- Work a straight row of 54 sc through both loops.
- Finish the brim by crocheting (8 sc, 1 inc) around for 60 sc.
- Decorate the hat by crocheting a 25-chain strand to glue or sew around the hat’s base.
Assembly and Details
- Position the eyes between the 8th and 9th rounds of the head, leaving 4 stitches between them. Use cold or liquid silicone glue to secure the safety eyes.
- Embroider the face: Use a thin thread to embroider the eyelashes, eyebrows, and a small nose on the head. Use white thread to add a small light reflection detail to the eyes. You can optionally embroider a small mouth with a contrasting color.
- Attach the hair: Cut short strands of hair yarn (about 6 cm long) and attach them using the fringe method (tying them on) in two horizontal rows across the head, starting near the eyebrows. Trim the ends to give the hair a choppy, witchy look.
- Attach the limbs: Thread the leg chains through the bottom of the body, exiting at the neck’s magic ring, and secure them with a knot. Sew the arms’ chain ends to the first double crochet row of the dress.
- Secure the hat: Place the decorated hat on the head and sew it in place with small stitches.
- Add final touches: Use blush to add color to the witch’s cheeks and forehead, completing the figure.
Tip
Always check the stuffing before you completely close the head and feet. Take time to stuff these pieces firmly and evenly to ensure they maintain a smooth, beautiful shape, which is essential for the structure of the entire doll.
Conclusion
You have successfully constructed the Witch Doll Amigurumi! This pattern’s clever use of chains for the limbs, along with the distinct hat and two-layered dress, results in a delightful and poseable little witch. Embrace your choice of colors to make this easy amigurumi truly your own.