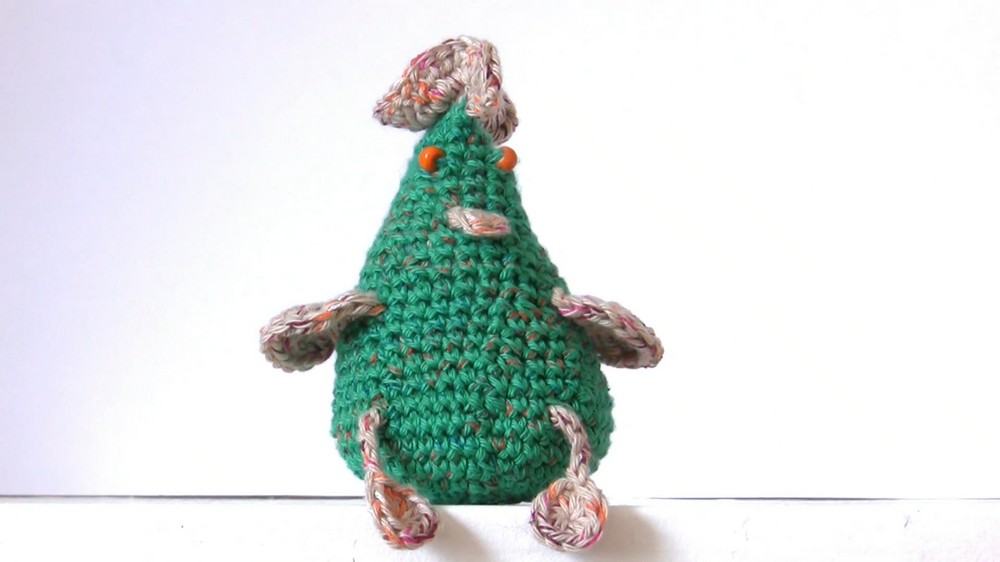
Celebrate spring charm with the Free Crochet Easter Hen Pattern, a delightful design that adds festive warmth and handmade joy to your seasonal décor.
Spring is a season of renewal, a time when vibrant colors and playful forms breathe life into our surroundings, reminding us of nature’s simple joys. Among the cherished symbols of this season is the humble hen, often representing abundance and warmth. Inspired by this timeless emblem, a charming handmade Crochet Easter hen brings a cozy, joyful touch to your home. With soft textures and delicate features, it’s a delight to behold, its cheerful personality radiating through every detail, from its beaded eyes to the intricately crocheted comb.
Free Crochet Easter Hen Pattern That’s Full of Country Charm

Versatile and meaningful, this decorative piece makes for an excellent holiday display or a heartfelt gift that carries the spirit of the season. Its compact size allows it to brighten spaces like shelves, tabletops, or even personalized baskets. Beyond its visual charm, the project itself offers rewarding benefits for those who love the meditative, rhythmic flow of crochet.
Celebrate springtime with an accessory that beautifully merges practicality with charm. With clear instructions tailored for makers of all skill levels, completing your own Easter hen is both relaxing and satisfying—an ideal addition to your festive collection.
Materials Needed
- Yarn: DK yarn in two colors – one for the main body and the other for the wings, legs, beak, and comb.
- Crochet Hook: A 3.5 mm hook for the main sections. You’ll also need a smaller hook to thread beads for the eyes.
- Beads: Two small beads for the hen’s eyes (ensure your small crochet hook fits through the beads).
- Stuffing: To fill the hen’s body and give it shape.
- Scissors: For trimming yarn ends.
- Stitch Markers: Recommended for marking specific stitches.
Special Features
- Adorable Design: The use of bead eyes, soft yarn wings, and a textured comb adds charm to the finished Easter Hen.
- Customizable: Choose playful colors for a vibrant hen or keep it neutral for a rustic look.
- Multi-Step Assembly: Wings, legs, comb, beak, and eyes are created separately and attached, which breaks the process into manageable sections.
Difficulty Level
The project is rated easy to intermediate. It’s beginner-friendly in terms of stitches but requires attention to detail when attaching the wings, legs, comb, and eyes. Anya provides specific guidance, making the tutorial accessible for newer crocheters.
Tutor’s Suggestions
- Use stitch markers to ensure symmetry when attaching parts like wings or legs.
- Secure yarn ends tightly inside the hen to prevent unraveling after the piece is complete.
- Moderate stuffing: Avoid overstuffing (as it will distort the shape) or under-stuffing (which will make the hen look deflated and uneven).
- Attach the wings and legs carefully to maintain the hen’s overall balance and aesthetic.
Uses
The Easter Hen can be used as:
- Seasonal Decor: Perfect for enhancing your Easter celebration with a handcrafted centerpiece or ornament.
- Gift: A lovable token for friends or family during the holiday season.
- Toy: A soft, stuffed animal that small children can enjoy playing with.
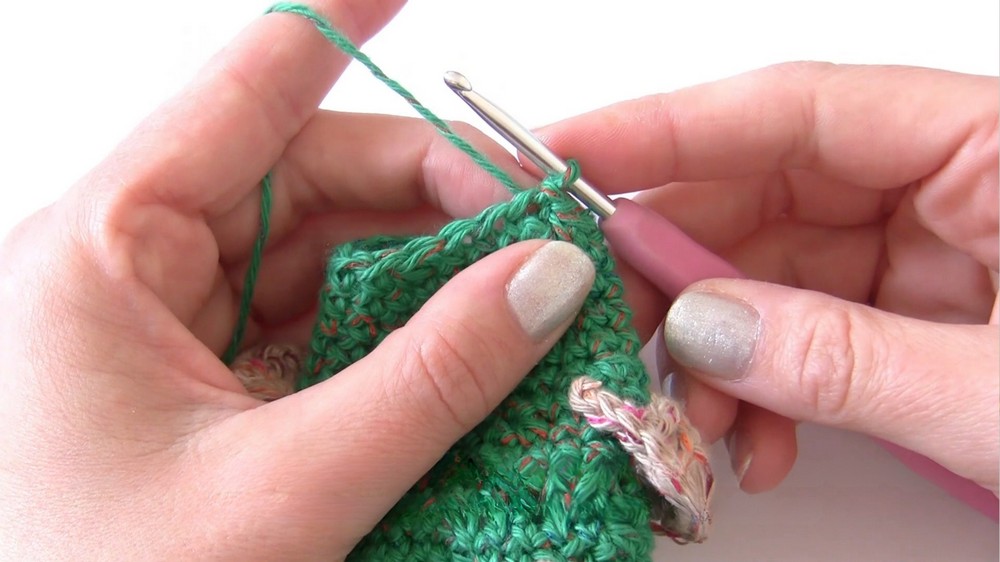
Step-by-Step Instructions
Main Body
- Start with a Slip Knot and make 2 chains. Into the first chain, work 8 single crochets. Slip stitch into the first single crochet to form a round.

- Second Round: Chain 1 (does not count as a stitch). Work 2 single crochets into each single crochet. You will complete 16 single crochets. Finish with a slip stitch.
- Third Round: Chain 1, work 1 single crochet into the first stitch, and 2 single crochets into the next. Repeat this pattern until you have 24 single crochets. Slip stitch at the end.
- Subsequent Rounds: For each new round, continue increasing stitches in a circular fashion using the following pattern:
- Round 4: 1 single crochet into each of the next two stitches, 2 single crochets into the next stitch. Total: 32 stitches.

- Round 5: 1 single crochet into each of the next three stitches, 2 single crochets into the next stitch. Total: 40 stitches.
- Round 6: 1 single crochet into each of the next four stitches, 2 single crochets into the next stitch. Total: 48 stitches.
- Round 4: 1 single crochet into each of the next two stitches, 2 single crochets into the next stitch. Total: 32 stitches.
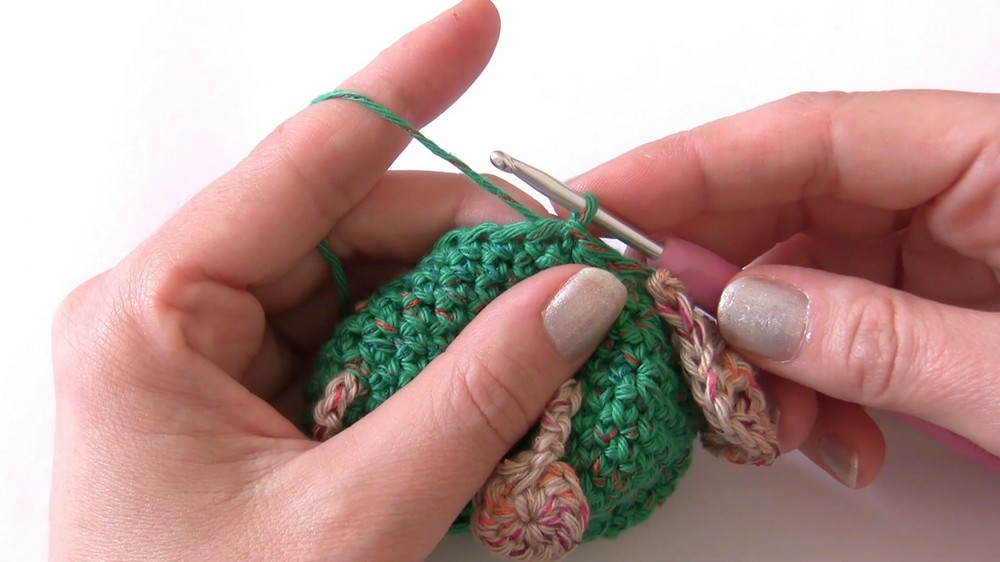
Legs
- Use the secondary yarn to begin the legs.
- Create a slip knot and chain 2. Into the first chain, work 10 half-double crochets. Slip stitch into the first half-double crochet.
- Chain 5 and weave the excess yarn tail into the chain for easier finishing. Pull through tightly and attach the leg to the body using slip stitching.
- Repeat to make the second leg.
Wings
- Mark the appropriate stitches where the wings will be attached.
- Create a slip knot with the secondary yarn and attach to the marked stitch.
- Work 15 treble crochets into a single stitch for each wing. Secure with slip stitching to the next marked stitch.
- Hide the yarn tails securely to prevent unraveling.
Beak
- Attach the secondary yarn color to the front of the hen’s body, between the eyes.
- Work a series of single, half-double, and double crochets into a small area to form the beak. Fasten off and secure the yarn tails.
Eyes
- Use a small hook to thread beads onto the yarn. Attach the beads by working them into specific stitches.
- Ensure the beads are tight against the yarn and secure with single crochets.
Stuffing
- Stuff the body of the hen evenly to give it shape but avoid overfilling.
- Continue closing the top while maintaining a rounded shape.
Comb
- Identify the single crochets above the bead eyes.
- Attach the yarn and work into these stitches to shape the comb using double crochets. Secure the yarn tails inside the hen.
Conclusion
This Easter Hen tutorial by Anya provides all the steps necessary to bring this delightful crochet project to life. With simple stitches and thoughtful assembly techniques, you’ll end up with a charming decoration that can brighten any Easter or springtime setting. The combination of soft textured yarn, bead eyes, and intricate detailing makes it a standout piece. Grab your materials, follow the video, and enjoy making your own adorable, handmade hen suitable as gifts or decor.
Pro Tip
When working on individual parts like wings or legs, take time to secure yarn ends inside the hen throughout the process. This will save you time and ensure a cleaner finish when assembling the final project.