Show off your feminine charm with the Crochet Rose Bouquet Top Pattern, perfect for warm days, casual outings, and enjoying effortless handmade style.
Sunny afternoons often call for clothing that feels light, airy, and effortlessly feminine. A Crochet Rose Bouquet Top pattern turns that idea into reality, blending soft yarn with beautiful rose motifs for a delicate, handcrafted top. It’s perfect for brunches, garden strolls, or layering over a tank on warm days, adding a handmade charm that elevates simple outfits.
Free Crochet Rose Bouquet Top Pattern for Stylish Everyday Wear
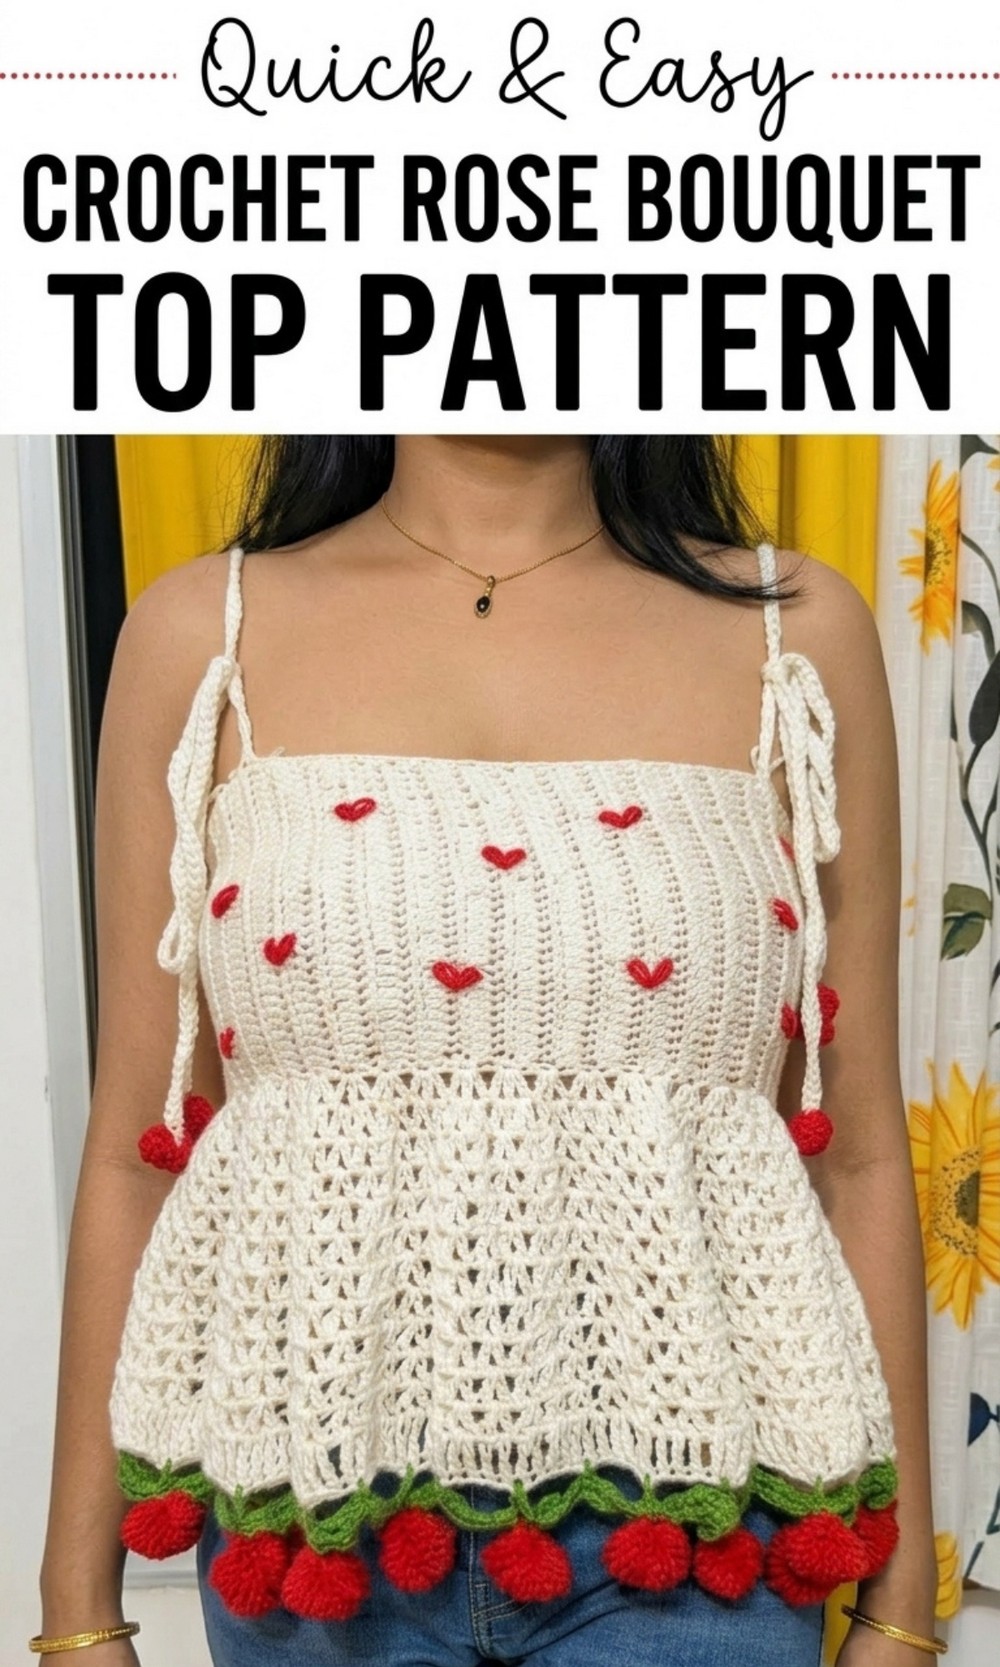
Beyond being a wardrobe favorite, this pattern offers a chance to practice advanced crochet techniques like creating 3D flower motifs and seamless joins. Using cotton or bamboo yarn gives the top a breathable, comfortable feel, while the finished piece provides versatility, style, and the satisfaction of wearing something you made yourself. Lightweight yet eye-catching, this rose crochet top transforms everyday wear into something special, combining practicality, skill-building, and a touch of floral elegance.
Crochet Rose Bouquet Top Pattern
Skill Level
Beginner to Intermediate – This project involves alternating stitches like slip stitch, half double crochet, double crochet, and treble crochet. It also includes decorative techniques, such as creating roses, leaves, and magic rings.
Materials
- Yarn:
- Body: 3 ply soft acrylic yarn (Main neutral or pastel color).
- Leaves: Green yarn.
- Roses: Thick red yarn.
- Hearts: Thinner red yarn.
- Hooks:
- 4 mm: For the main body of the top.
- 3 mm: For the floral heart accents.
- Scissors: For cutting yarn.
- Measuring Tape: To adjust length and strap size.
- Yarn Needle: For sewing layers, weaving ends, and attaching accents.
Finished Size
- Adjustable to fit all sizes (instructions for measuring are included).
Key Abbreviations (US Terminology)
- ch: Chain
- sl st: Slip Stitch
- sc: Single Crochet
- hdc: Half Double Crochet
- dc: Double Crochet
- tr: Treble Crochet
- trtr: Double Treble Crochet
- yo: Yarn Over
Special Techniques
1. Magic Ring
Used to create the hearts for the strap ends.
2. Slip Stitches in Back Loop
Creates the fitted ribbed texture for the bust panel.
3. V-Stitches
Double crochet clusters separated by chain spaces, providing flare for the baby doll section.
4. Decorative Roses and Leaves
Adds a fun floral touch using chains, loops, and structured crochet designs.
Step-by-Step Instructions
Part 1: Bust Panel
Step 1: Create the Ribbed Bust Panel
- Measure the length starting from your neckline to underbust.
- For standard fit: Approx. 6–7 inches.
- Start with a slip knot and create chains to match your measured length.
Rows: Alternating Slip Stitches and HDC
- After completing the chains, chain 1 and make sl st into each chain along the row.
- Be careful to keep sl st loose as it creates a tight fabric.
- Chain 1, turn, and make hdc into the back loop of each stitch for the next row.
- Alternate between sl st (back loop) rows and hdc (back loop) rows until the panel circumference matches your bust size.
- Ensure a snug fit; the panel will loosen over time.
- Ensure a snug fit; the panel will loosen over time.
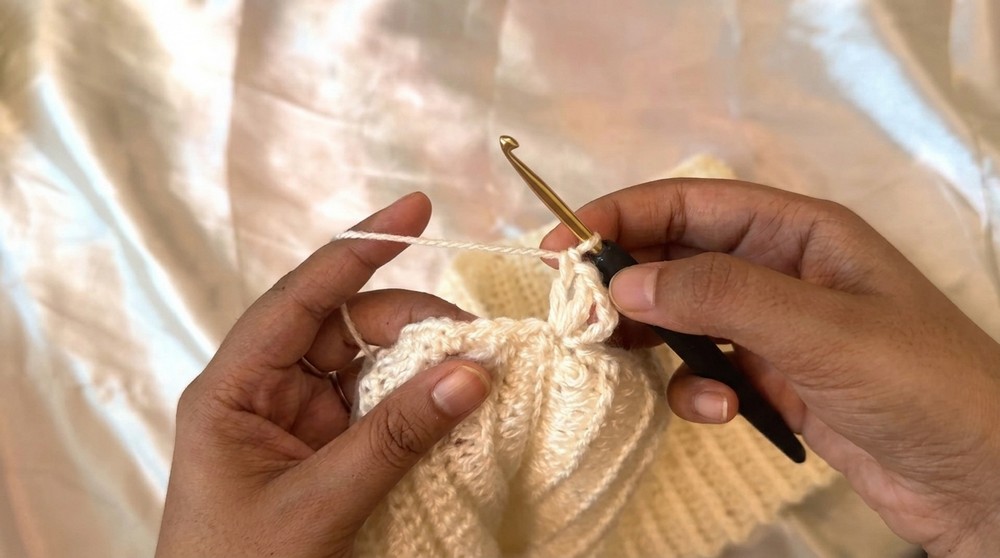
Step 2: Joining Bust Panel
- Turn the panel to the wrong side and align both edges.
- Use a slip stitch to join the two ends, working stitch-by-stitch across the row.
- Once joined, turn the panel right-side out.
- The fitted bust panel is now complete.
Part 2: Baby Doll Flare
Step 3: Adding Base Round
- With the 4 mm hook, attach yarn at the join.
- Ch 1 and make sc into each stitch around the bust panel.
- Close with a slip stitch at the first sc.
Step 4: Double Crochet V-Stitch Circles
- Ch 4 (Counts as dc + ch 1) and make dc into the same stitch.
- This forms your first V-stitch: dc, ch 1, dc.
- Skip the next stitch and repeat:
- dc, ch 1, dc into the next stitch.
- dc, ch 1, dc into the next stitch.
- Continue this V-stitch pattern around, skipping one stitch between each V-stitch.
- Slip stitch to the 3rd ch to close the round.
Step 5: Extend the V-Round Pattern
- Slip stitch into the chain space of the previous round.
- Begin each round with Ch 4 (dc, ch 1) and make another dc into the same space.
- Work into each V-stitch chain space from the previous round:
- dc, ch 1, dc (repeat).
- Repeat this process for 12 total rounds of V-stitches (or adjust according to preference for length).
Step 6: Flowy Treble Crochet Edge
- After completing the last V-round, start a final round with Ch 3.
- Make tr (treble crochet) into each stitch of the round to create a flowy edge.
Part 3: Rose and Leaf Decoration
Step 7: Green Leaf Foundation
- Attach green yarn and Ch 6.
- Skip the next 4 stitches, make sc into the 5th stitch to form a loop.
- Repeat: Ch 6, skip 4 stitches, sc into the 5th stitch for the entire round.
- Slip stitch to the starting sc.
Step 8: Leaf Formation
- Slip stitch into the first loop.
- Work the following into the same loop:
- Ch 1, sc, hdc, Ch 3, sl st into 2nd ch, hdc, sc into the loop.
- Move to the next loop and repeat leaf formation.
- Continue working leaves around the entire round. Cut green yarn and weave in ends.
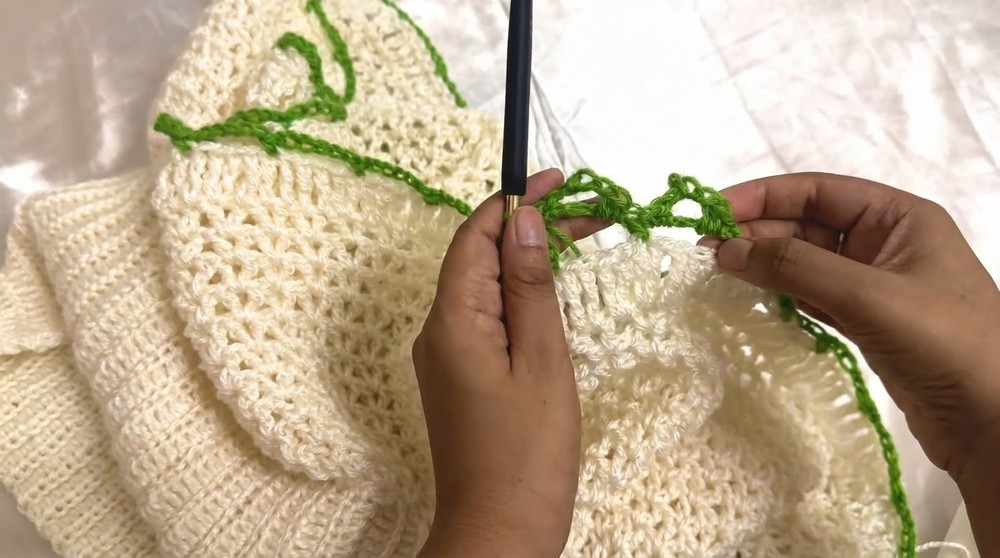
Step 9: Rose Creation
- For roses, attach thick red yarn to the space between two leaves.
- Ch 12 and crochet as follows:
- Skip the first 3 chains.
- Into the 4th ch, make 3 dc. Continue making 3 dc into each chain.
- As you work, the coil will naturally curl into a rose shape.
- Slip stitch to the base, leaving a long tail.
- Use the tail with a yarn needle to sew through layers of the rose to secure its shape.
- Repeat roses for all spaces between leaves.
Part 4: Straps and Heart Embellishments
Step 10: Add Ribbing to Top
- Attach yarn for a ribbed edge around the top; crochet a row of sc into each stitch.
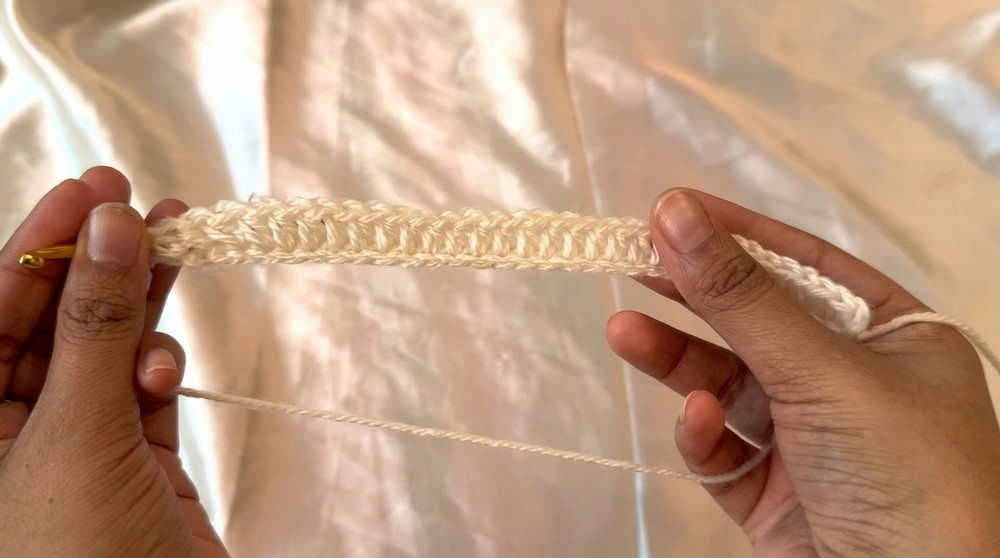
Step 11: Create Straps
- Mark 10 stitches from the corner on both front and back for strap placement.
- Attach yarn at the marked stitch and Ch 90 (or desired strap length).
- Work sc into each chain for a sturdy strap.
- Create 4 straps in total (2 front and 2 back).
Step 12: Add Heart Embellishments
- Using red yarn and the 3 mm hook, create hearts using a magic ring:
- Ch 3, make 3 trtr, 3 dc, Ch 1, 1 trtr, Ch 1, and repeat in reverse.
- Close the ring tightly.
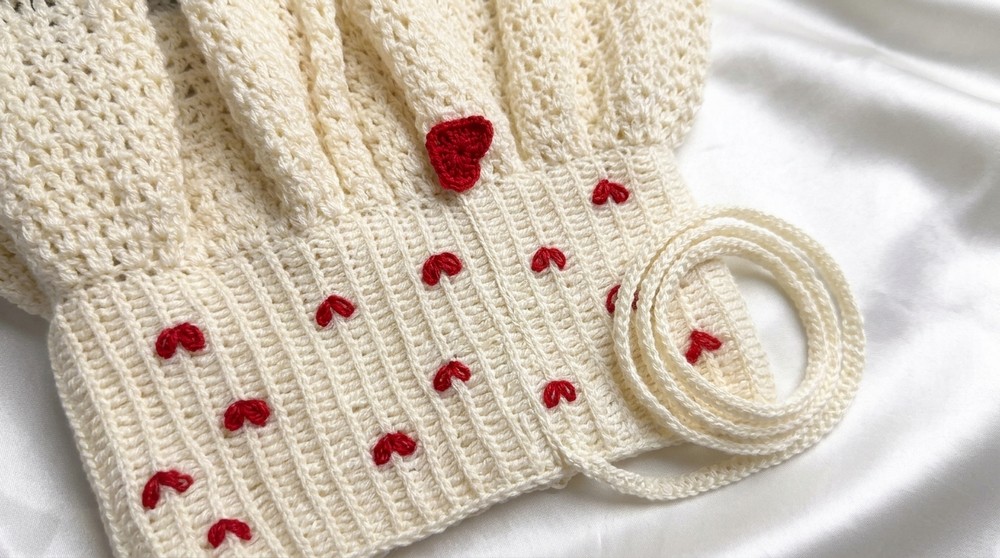
- Attach each heart to the strap’s end using a yarn needle.
Finishing the Top
- Weave in all loose ends.
- Block the top to shape the flare and accents evenly.
Final Words
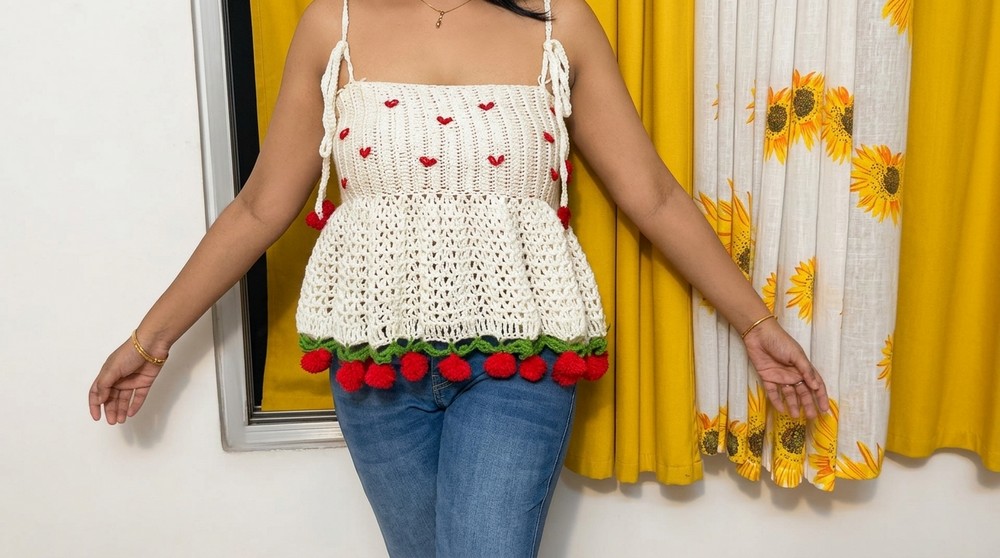
Your Rose Bouquet Baby Doll Top is complete, flaunting its floral accents, flowy edges, and charming straps. This versatile piece is perfect for gifting or wearing to elegant outings!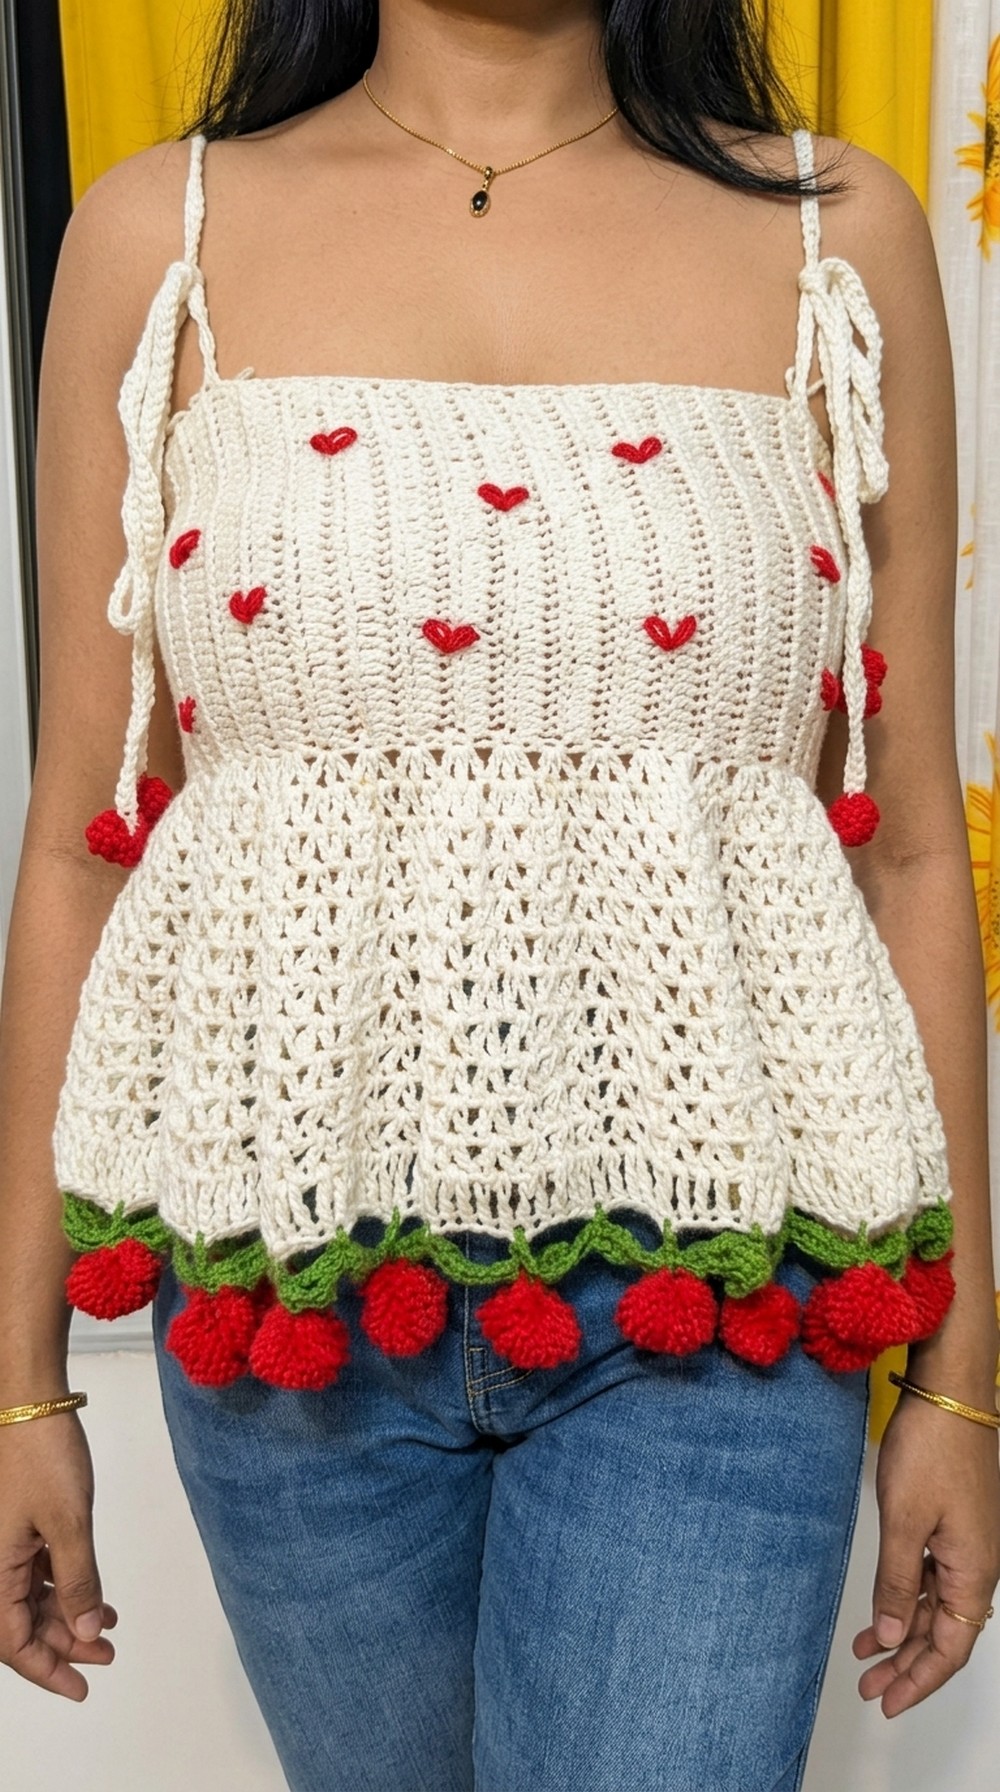
Tips
- Customization: Adjust strap length or top circumference to create the perfect fit.
- Border Control: Tighten slip stitches in the bust panel to prevent loosening.
- Creativity: Experiment with color combinations for roses and hearts to diversify styling.