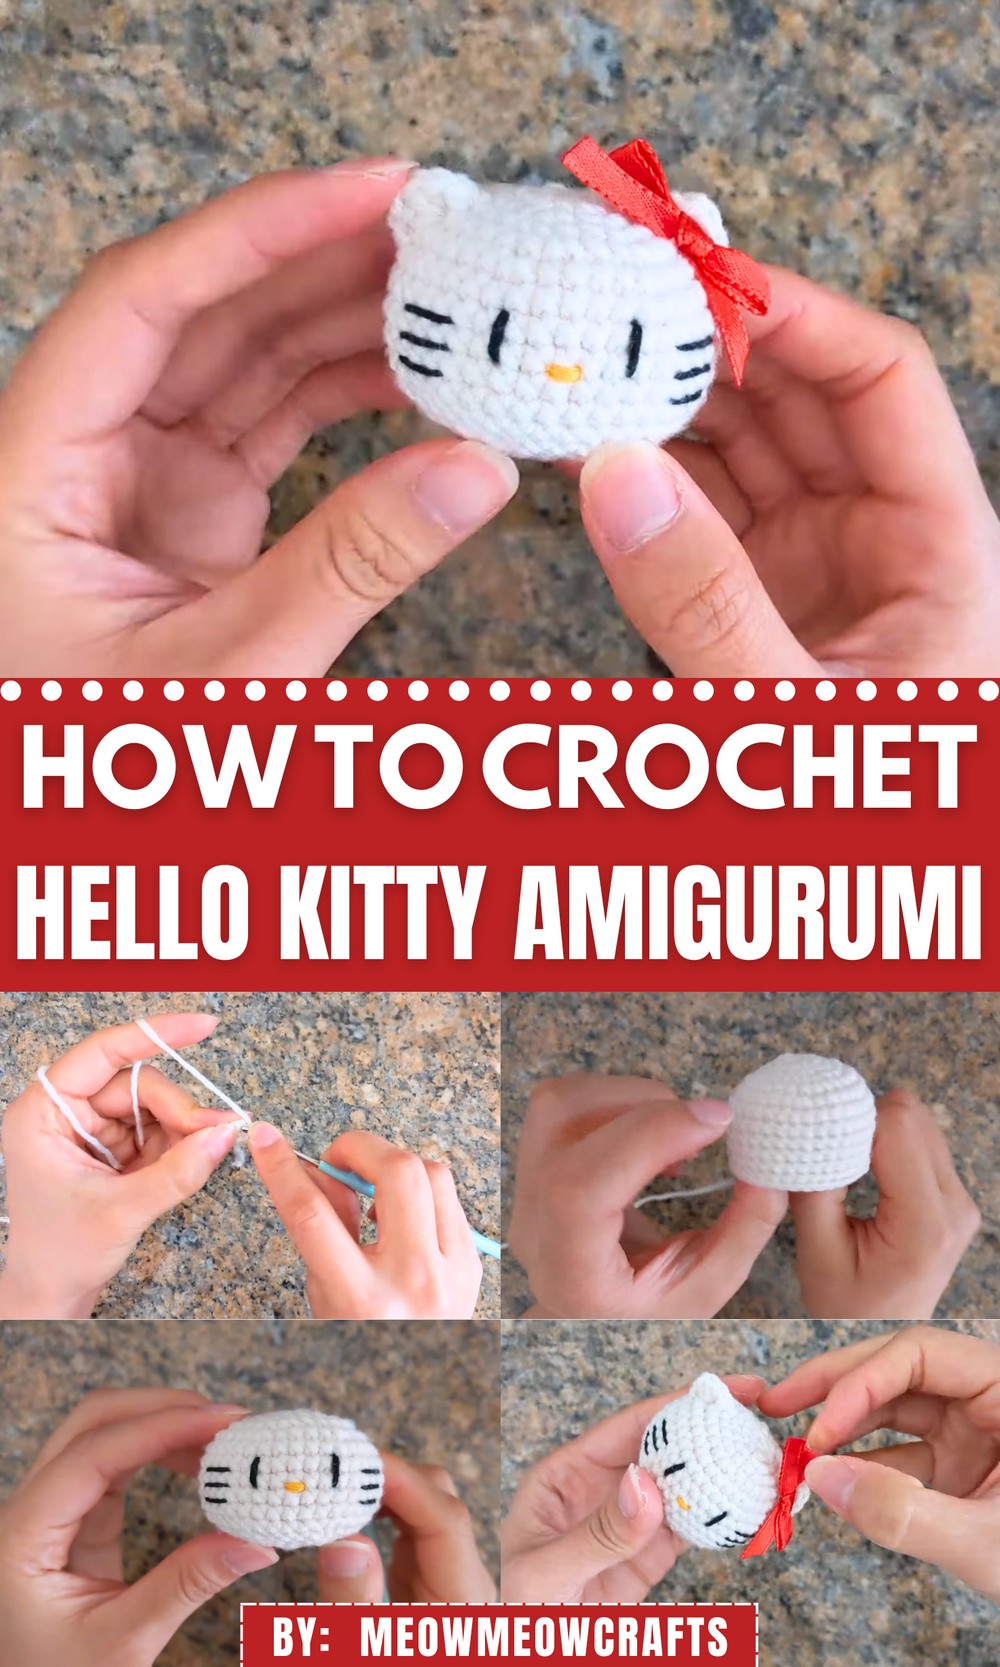
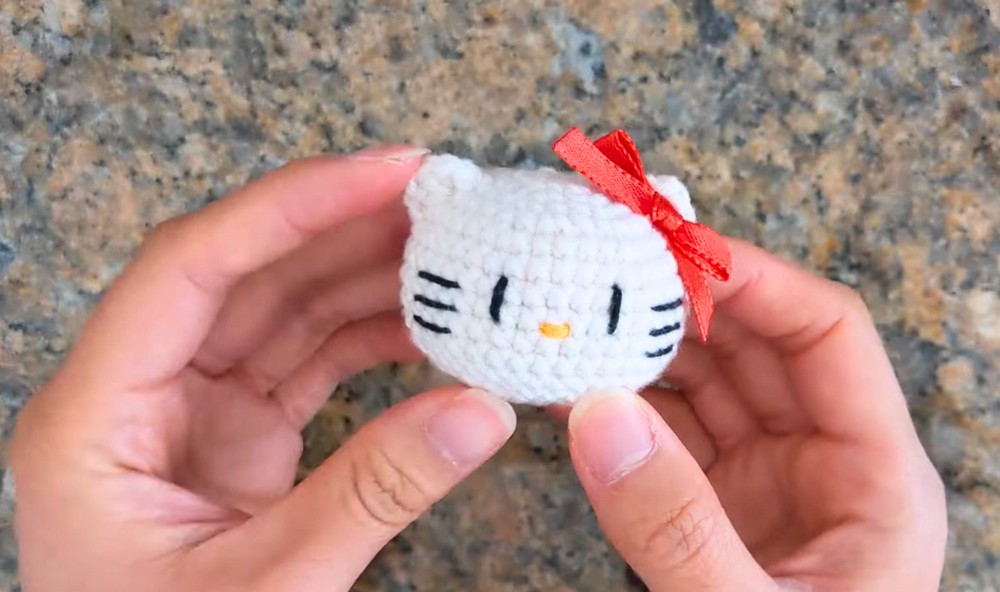
Spark joy with this Free Crochet Hello Kitty Amigurumi Pattern packed with playful charm, cuddly softness, and the perfect dose of kawaii cuteness.
Few characters have achieved the global recognition and timeless appeal of Hello Kitty, a cultural icon who has brought smiles to millions for nearly half a century. From her sweet expression to her unmistakable red bow, she has become a symbol of innocence and charm. Bringing this beloved character into your home in the form of an amigurumi opens up a world of creativity and nostalgic joy. More than just a project, it becomes a tangible reminder of childhood whimsy and a delightful piece of decor or play for fans of all ages.
Super Cute Crochet Hello Kitty Amigurumi Pattern for Happy Moments
The final product not only serves as a charming collectible but also offers endless possibilities, whether as a thoughtful handmade gift, a keychain, or an adorable shelf decoration. Beyond its aesthetic appeal, the process of making the amigurumi is meditative and satisfying, offering crocheters an opportunity to hone their skills while creating something truly special. In the end, this Hello Kitty piece is more than just yarn and stitches; it’s a heartwarming keepsake that celebrates the joy of crafting and the timeless allure of an iconic character.
The process of creating this Hello Kitty amigurumi follows a sequence of well-structured steps, ensuring every crocheter, particularly those at an intermediate level, can achieve a result full of character and beauty.
Crochet Hello Kitty Inspired Amigurumi Head
Materials
- Yarn:
- Light yarn, Milk Cotton in Ivory (main color, for the head and ears).
- Ribbon:
- Red ribbon (¼-inch wide, or adjust size and color as desired).
- Hook: 3.0mm crochet hook.
- Embroidery Thread:
- Black (for whiskers and eyes).
- Golden yellow (for nose).
- Other Tools:
- Tapestry needle (for weaving in ends).
- Sewing needle (for embroidery).
- Scissors.
- Stuffing or fiberfill.
- Stitch marker (optional, for rounds).
- Lighter (optional, to prevent ribbon fraying).
- Glue (for bow attachment).
- Keychain (optional, if converting into a keychain).
Skill Level and Techniques
Skill Level: Intermediate.
Techniques Used:
- Magic Ring (MR).
- Single Crochet (SC).
- Half Double Crochet (HDC).
- Double Crochet (DC).
- Increase (Inc).
- Invisible Decrease.
- Slip Stitch (Sl St).
- Embroidery.
Pattern Instructions
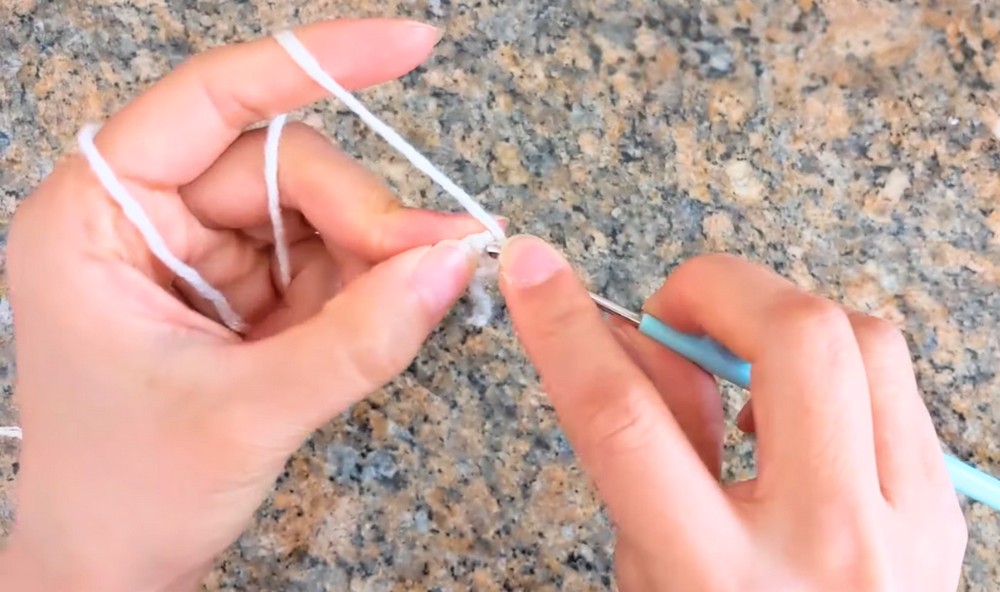
Head Base
- Round 1: Create a Magic Ring (MR). Work 6 SC into the ring. Pull the tail to close the loop.
- Join Round: Sl St into the first stitch. Ch 1.
- Round 2: Inc into every stitch (2 SC per stitch). [12 SC total]
- Round 3: Alternate 1 SC, 1 Inc around the round. [18 SC total]
- Round 4: Alternate 2 SC, 1 Inc five times. In the last stitch, 1 SC. [24 SC total]
- Round 5: Alternate 3 SC, 1 Inc six times. [30 SC total]
- Round 6: Alternate 4 SC, 1 Inc five times. In the last two stitches, 2 SC. [36 SC total]
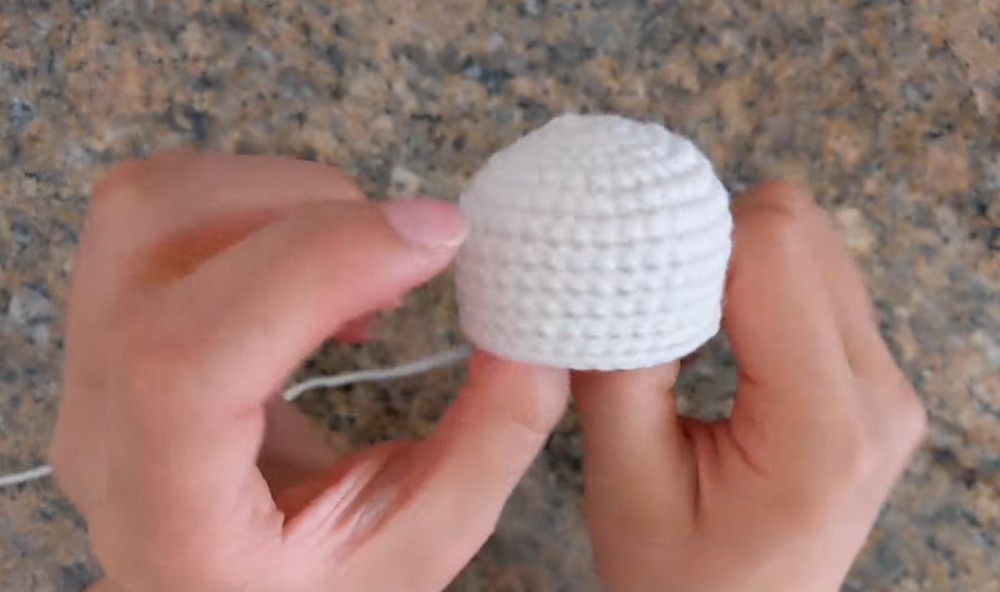
- Rounds 7–12: Work 1 SC into each stitch for a total of 36 SC per round.
- At the end of each round, Sl St and Ch 1 to join.
- Tip: Use a stitch marker or count carefully to ensure rounds align properly.
- At the end of each round, Sl St and Ch 1 to join.
Facial Details
Face Placement Chart:
- Eyes: Between rounds 7 and 8, spaced 5 stitches apart.
- Nose: Centered between the eyes.
- Whiskers: Three lines on each side, extending outward from the center.
- Whiskers:
- Thread black embroidery yarn onto a sewing needle.
- Loop each whisker line once for a thinner, delicate look.
- Eyes:
- Embroider oval-shaped eyes using black thread.
- Loop around each eye three times for thickness.
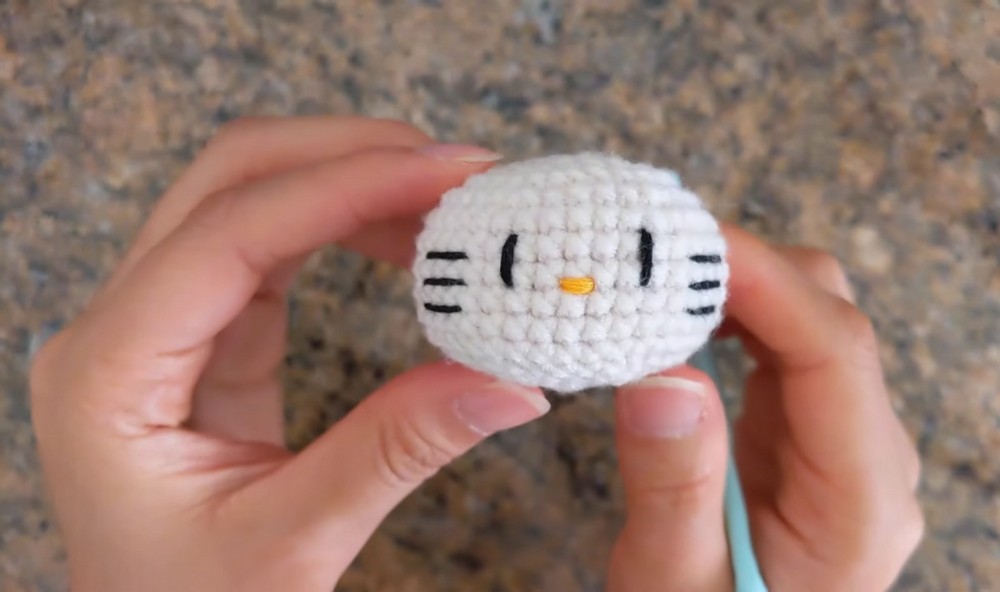
- Nose:
- Place the nose in the center between the eyes.
- Embroider one stitch in yellow thread, looping three times to achieve desired thickness.
Head Finishing (Rounds 13–17)
Shaping with Decreases:
- Round 13: Alternate 4 SC, 1 invisible decrease five times. Then SC into last two stitches. [36 SC total]
- Round 14: Alternate 3 SC, 1 invisible decrease six times. [24 SC total]
- Round 15: Alternate 2 SC, 1 invisible decrease five times. Then SC into the last stitch. [18 SC total]
- Add Stuffing: Insert stuffing before continuing to test fullness and shape.
- Round 16: Alternate 1 SC, 1 invisible decrease six times. [12 SC total]
- Round 17: Work 6 decreases around the round. [6 SC total]
- Fasten Off:
- After the last decrease, Sl St to join the round.
- Cut a medium tail, pull the yarn loop outward, and fasten off by threading through the front loops of the last round with a tapestry needle.
- Pull to Close: Secure and weave the tail through the base to hide it.
- Fasten Off:
Ears
Right Ear:
- Insert your hook between rounds 6 and 7, about 2 stitches away from the whisker edge. Pull yarn through and Sl St to attach.
- Into the same stitch, SC.
- Work HDC into the next stitch and into the same stitch: 1 DC, then 1 HDC.
- Into the next stitch, SC. Cut yarn and leave a medium tail to fasten off.
Left Ear:
- Start between rounds 4 and 5, mirroring ear placement.
- Attach yarn and repeat the ear pattern (SC, HDC, DC, HDC, SC).
- Finish off by weaving in all loose tails neatly.
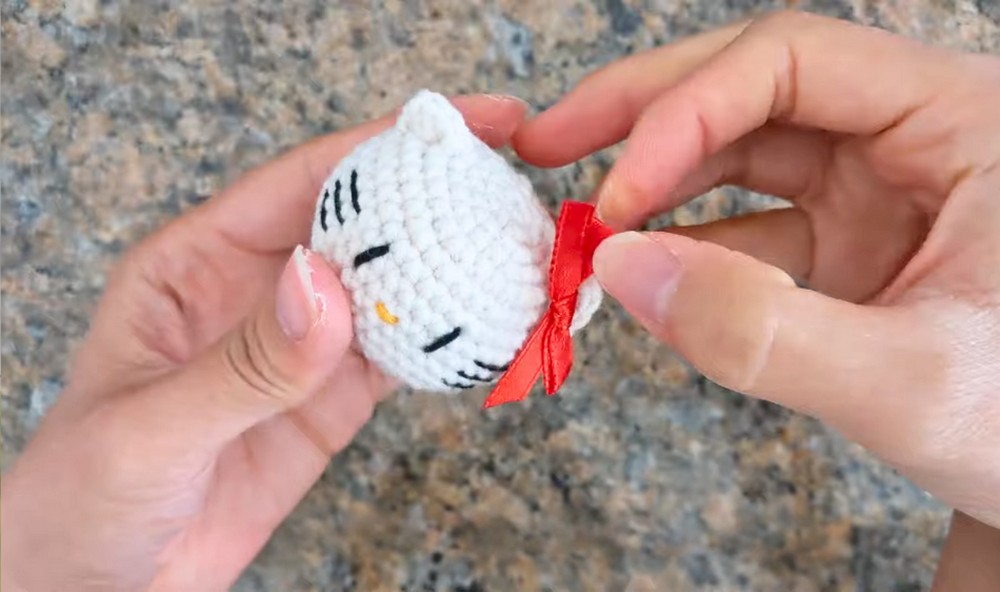
Iconic Bow
- Create Bow:
- Tie a small bow using red ribbon. Adjust until desired size is reached.
- Trim ribbon ends evenly and melt the ends with a lighter (optional) to prevent fraying.
- Attach Bow:
- Apply a small amount of glue to the back center.
- Attach the bow slightly above the right ear, pressing gently.
- Let dry completely before further handling.
Final Words
Congratulations! You’ve successfully crocheted Hello Kitty’s adorable head. Whether you’re keeping it for yourself, gifting, or using it as a decorative piece, this project showcases your craftsmanship beautifully.
Tips for Success
- Consistency: Maintain even tension when crocheting to ensure a smooth and uniform shape.
- Placement: Use stitch markers or reference points for facial details to avoid uneven distribution.
- Customization: Experiment with different ribbon colors to personalize your Hello Kitty design.
- Durability: Secure the embroidered features tightly to prevent loosening with time.
- Keychain Option: Attach a keychain or loop if converting the head into a practical accessory.