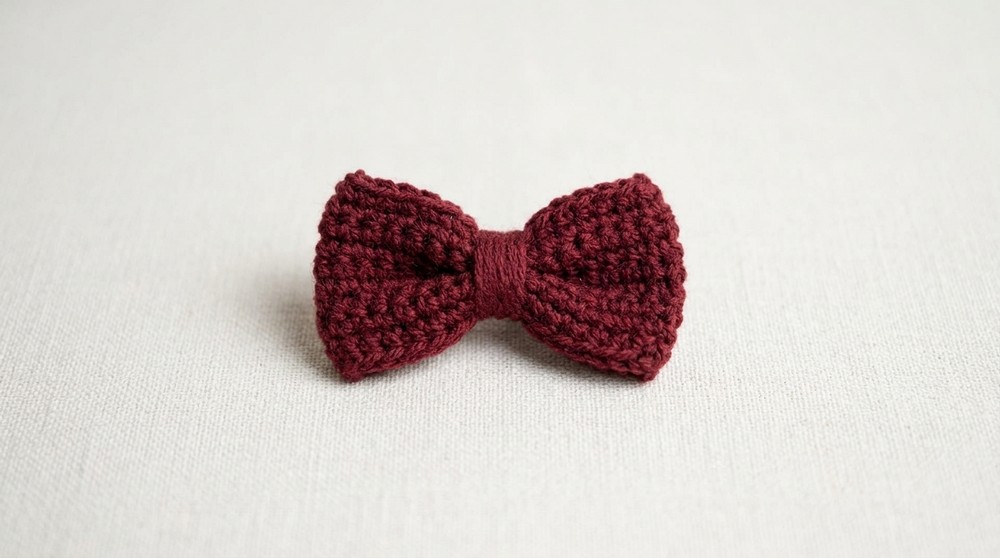
Hook this nice Free Crochet Bow Keychain Pattern to have a beautiful and soft ribbon for your keys or to hang on your bags for a fun look.

Cute Free Crochet Bow Keychain Pattern to Decorate Bags or Keys
Add a touch of magic to your everyday items with this Free Crochet Bow Keychain Pattern that made a tiny and cute accessory for your favorite things. It looks like a soft and pretty ribbon that stays perfect forever because it is made with strong and colorful yarn.
This bow features two lovely loops on top and two little tails that hang down to make it look just like a real bow. You can use this small charm to decorate your school bag or keep your keys safe and easy to find in your deep pockets.

The appearance is very neat and tidy because you wrap the yarn tightly around the middle to give it a perfect and balanced shape. It is a very special project because you can choose any bright color you like to match your clothes or your happy mood. This handmade keychain is a sweet gift for a friend or a fun way to show off your great crocheting skills.
Materials Needed:
- Yarn: Medium weight yarn (e.g., Hobbycraft medium weight yarn).
- Hook Size: 5mm crochet hook. (Smaller hooks make smaller bows, and larger hooks create larger bows.)
- Scissors: To cut the yarn.
- Keychain hardware (optional): If you plan to use it as a keychain.
- Tapestry needle: For weaving in the ends.
Gauge:
- Gauge isn’t critical for this project, but for reference:
- Using medium weight yarn with a 5mm hook will produce a medium sized bow. Adjust the size based on your preferences by using different yarn weights or hook sizes.
Finished Size:
The finished size of the bow depends on the yarn weight and hook size used:
- With medium weight yarn and a 5mm hook, you’ll produce an average sized bow (~3 to 5 inches wide).
Pattern Instructions:
Part 1: Crocheting the Loop Section
- Slip Knot: Start by creating a slip knot:
- Cross the yarn over into an ‘X’ shape.
- Pull the working yarn through the loop to form the slip knot.
- Insert the hook and pull tight.
- Chain: Create 25 chains:
- Yarn over, pull through the loop on the hook. Repeat until you have 25 chains.

- Yarn over, pull through the loop on the hook. Repeat until you have 25 chains.
- Join the Loop: Turn the chain into a loop:
- Insert your hook into the first chain (next to the slip knot).
- Yarn over, pull through both loops to create a slip stitch.
- Ensure the chain does not twist as you join it into the loop.
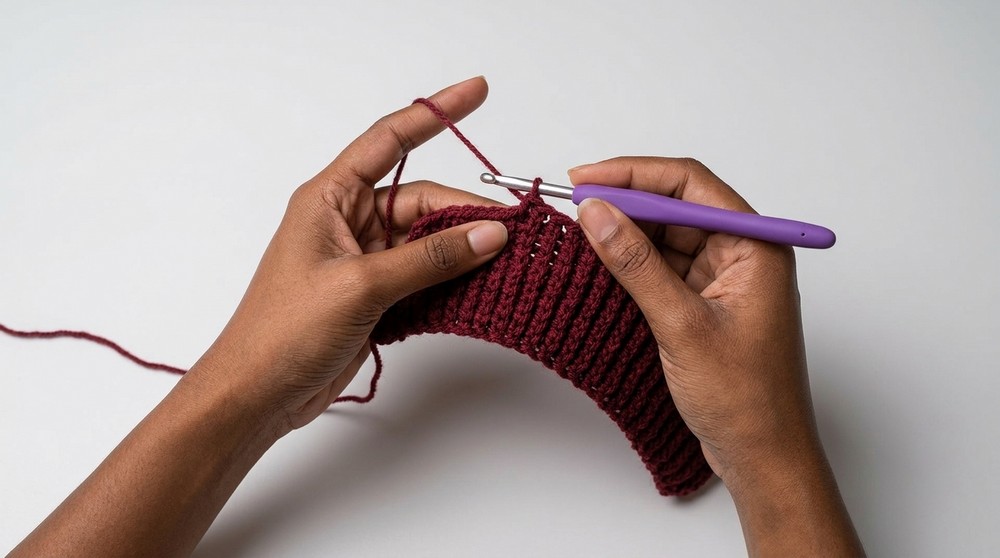
- Row 1 to 5: Single Crochet Around the Loop:
- Row 1: Chain 1. Skip the first chain, insert the hook into the next, yarn over, and pull through. Create single crochets all the way around.
- Repeat the process for Row 2 to Row 5, crocheting single crochets in each stitch until you complete five rows.
- Fasten Off:
- When the loop section is complete, pull the yarn through the final stitch.
- Cut the yarn, pull the loose end through the loop, and tighten.
Part 2: Creating the Bow Tails
- Create Another Slip Knot: Repeat the slip knot method from Part 1.
- Chain 25: Follow the same process to make 25 chains.
- Rows 1 to 4: Crochet the Tail Section:
- Row 1: Insert your hook into the second chain from the hook. Yarn over, pull through, then yarn over again and complete a single crochet. Repeat single crochets until the end of the row.
- Row 2 to 4: Chain 1, turn your work, and continue single crochet stitches across the rows.
- Fasten Off: As with part one, pull the yarn through the final stitch, cut the yarn, and tighten.
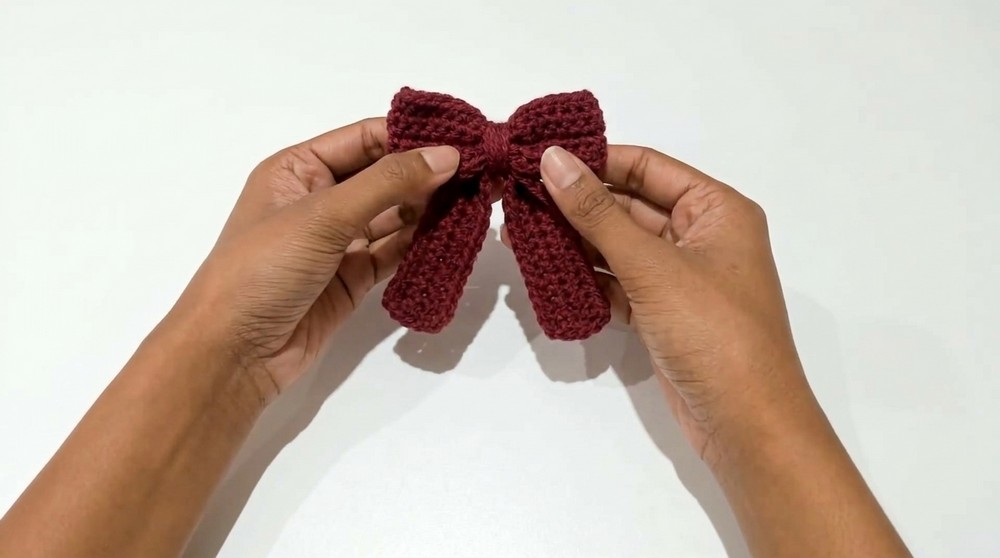
Part 3: Assemble the Bow
- Pinch and Fold the Tail Section:
- Fold the tail section in half, pinching it at the center.
- Add the Loop Section:
- Place the loop section on top of the pinched tail section.
- Wrap to Secure:
- Using the long tail of yarn leftover from the loop section, wrap the yarn tightly around the middle of the bow to join the two sections.
- Adjust the bow pieces gently until you’re satisfied with the shape.
- Final Knot:
- Wrap the yarn around your finger to create a loop. Pass the loose end through this loop and pull tight to secure the bow.
- Wrap the yarn around your finger to create a loop. Pass the loose end through this loop and pull tight to secure the bow.
Tips and Customization Ideas:
- Experiment with Colors: Make bows in bold, bright colors or soft pastel hues.
- Add Embellishments: Attach beads or sequins to the loop or tails for extra sparkle.
- Try Different Yarn Textures: Use velvet, cotton, or metallic yarns for unique results.
- Change the Size: Use a smaller hook and lightweight yarn for mini bows or a larger hook/yarn for oversized decorative bows.
Uses for the Crochet Bow:
This versatile bow has many creative applications:
- Hair accessories (attach to a clip or headband).
- Decorative appliqué for clothing or bags.
- Keychains.
- Gift wrap embellishments.
- Home decor accents.

Conclusion and Remarks:
The Free Crochet Bow Pattern is simple yet charming, perfect for beginners or quick projects. Its double layered structure enhances its fullness and makes it visually appealing. With its adaptable size and endless opportunities for customization, this bow can add beauty to numerous projects or serve as a meaningful handmade gift.