Rock your style with this free crochet striped crop top pattern that’s trendy, lightweight, and perfect for staying cool while showing off your fashion sense.
Imagine wearing something light, stylish, and perfect for warm sunny days. The free crochet striped crop top pattern is the ideal way to create a trendy outfit that’s both fun and comfortable. With its colorful stripes and modern cropped design, it stands out as a beautiful and playful addition to any wardrobe. Made with soft, breathable yarn, it keeps you cool and at ease whether you’re out with friends, relaxing at home, or enjoying a casual outing.
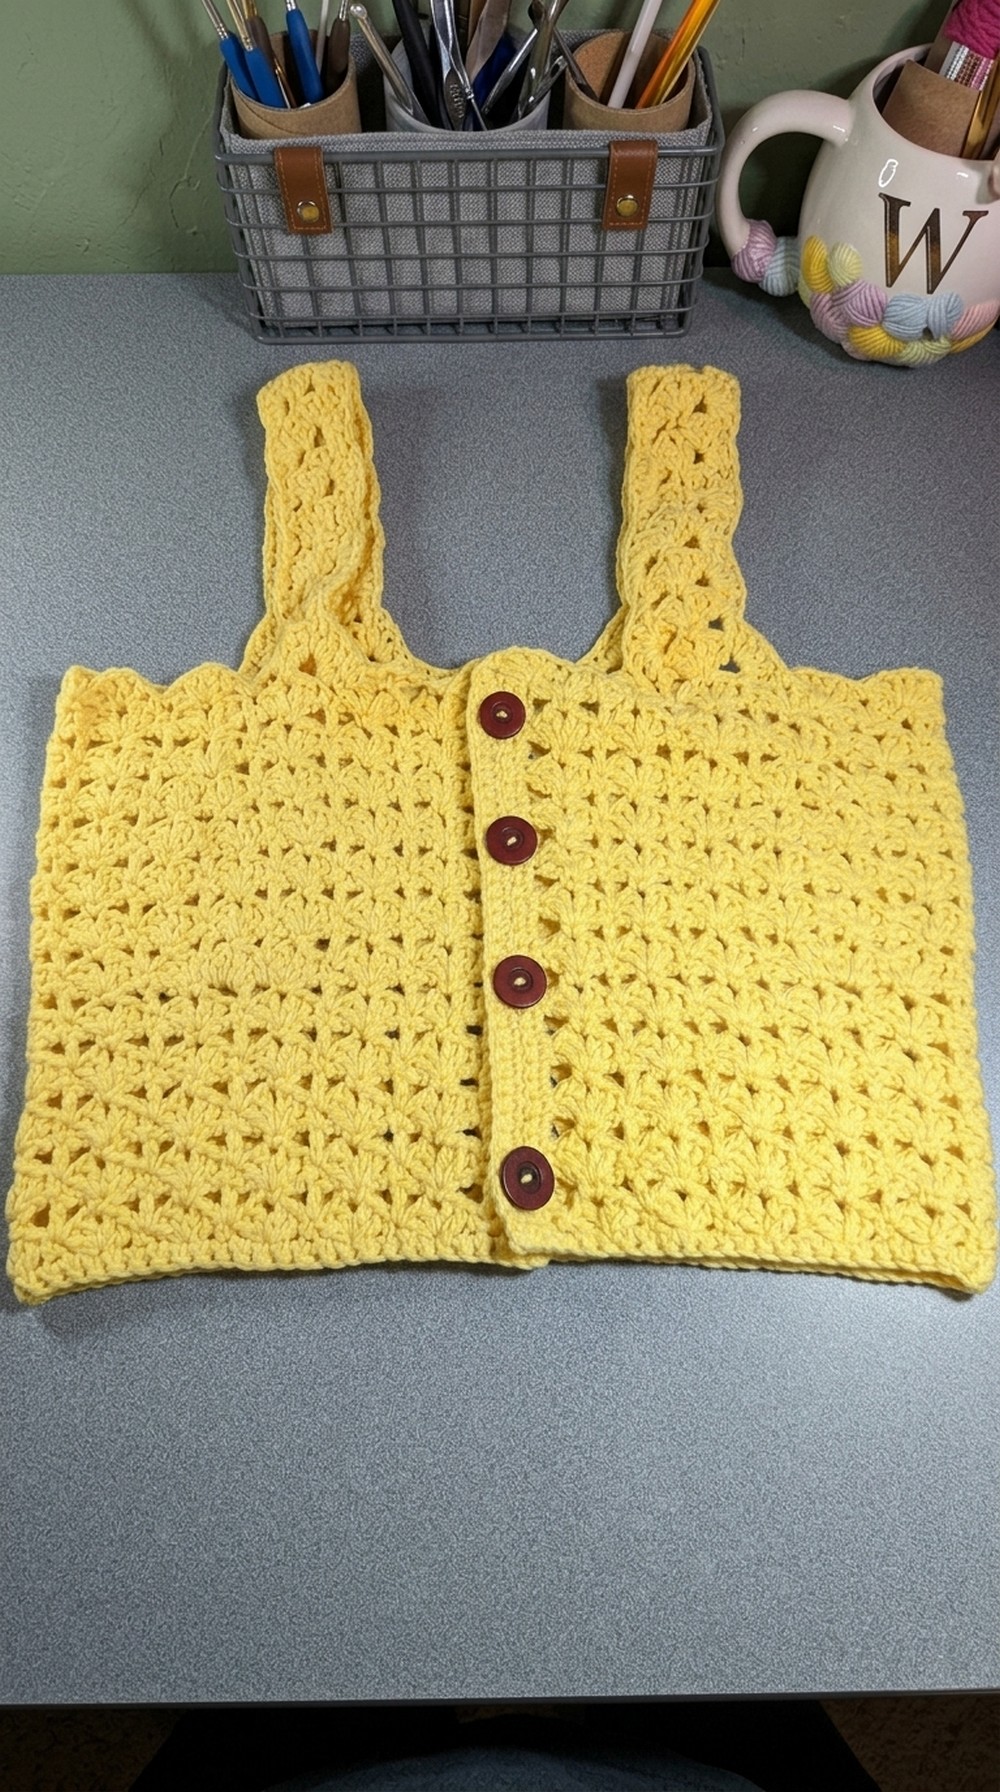
Lovely Free Crochet Striped Crop Top Pattern for Casual Looks
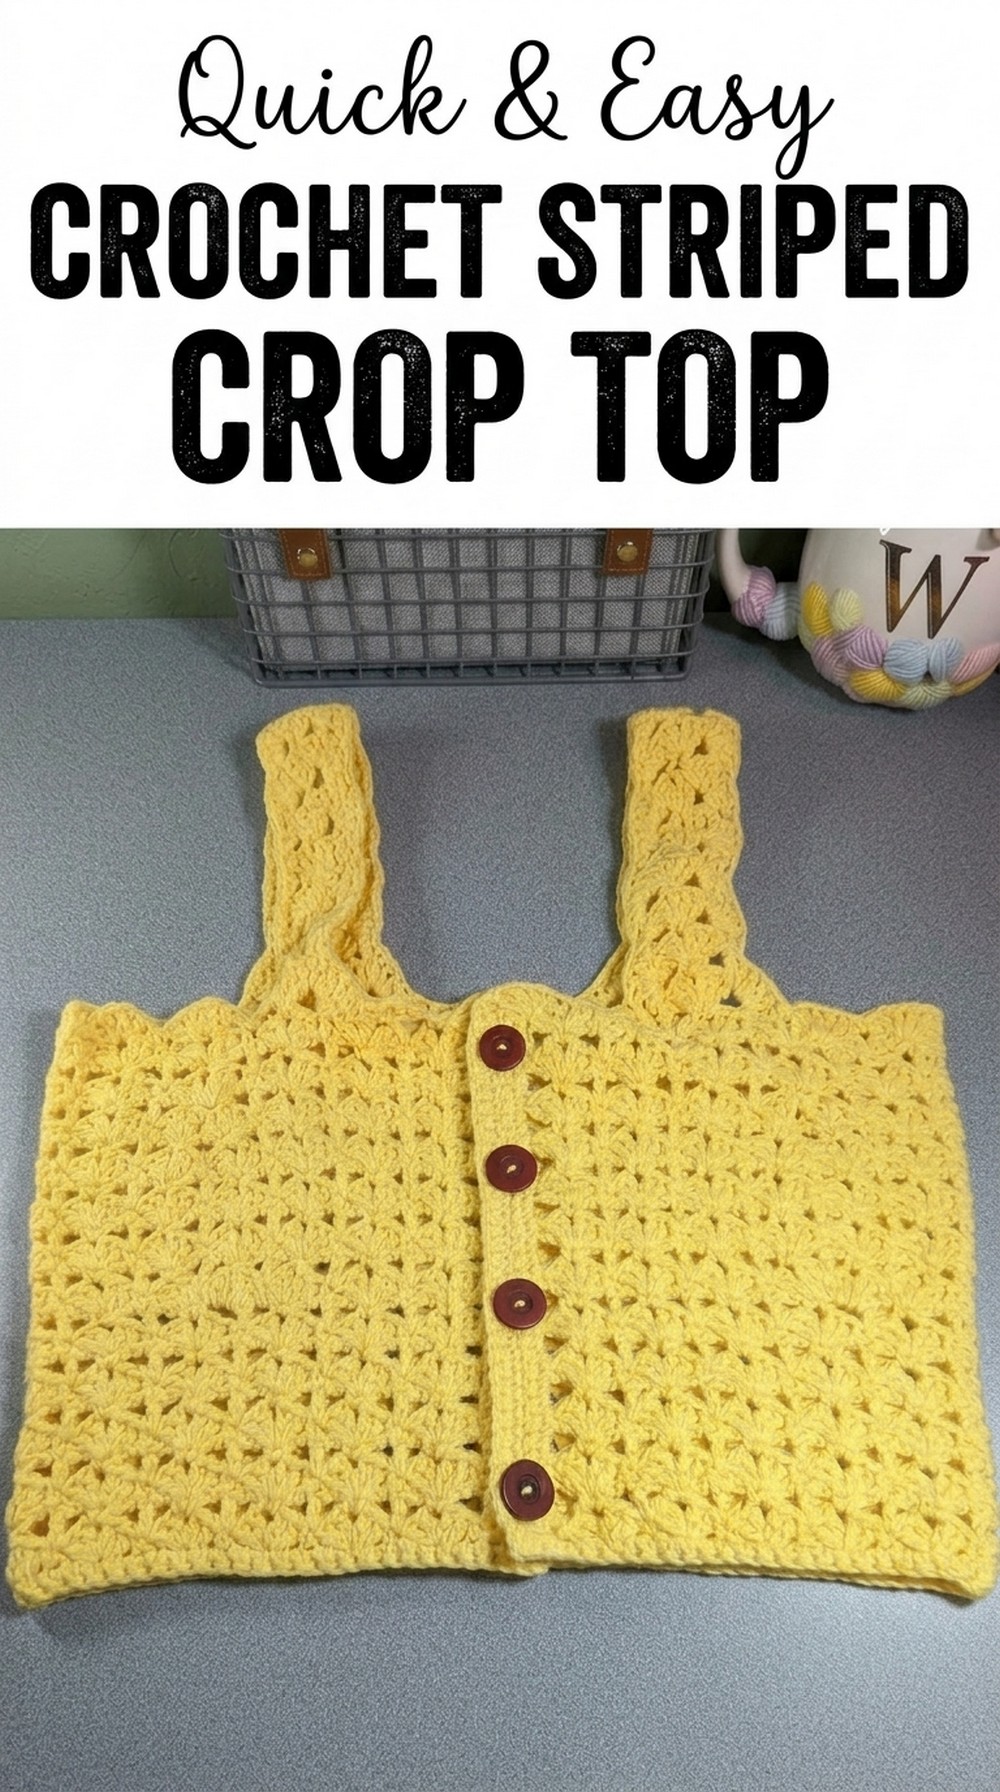
This crop top brings together charm, creativity, and functionality, making it easy to pair with jeans, shorts, or skirts for any occasion. It’s not just about fashion—it’s about having something you can make yourself, reflecting your own style and uniqueness. Beyond its beauty, this design inspires a sense of accomplishment and highlights the joy of wearing handmade items that are both stylish and meaningful.
Skill Level
- Advanced Beginner to Intermediate
Materials
- Yarn:
- Cotton yarn, worsted weight, 4mm thickness (or weight category 3-4). Approximately 400-500g depending on size.
- Crochet Hook:
- 4.0mm hook for tighter stitches and a clean finish.
- Measuring Tape:
- To ensure accurate measurements for the bust and length.
- Buttons:
- 4-5 buttons, depending on preference and closure style. Ensure buttons are evenly spaced along the length of the top.
- Stitch Markers:
- Essential for keeping track of key sections such as increases, decreases, and strap placement.
- Tapestry Needle:
- For finishing and sewing buttons.
- Scissors:
- To neatly cut yarn.
Gauge
- 10 stitches x 8 rows = 2 inches (5 cm) using double crochet (dc).
(Take time to ensure your gauge matches the pattern for a proper fit.)
Finished Measurements
- Bust Circumference: Customized based on the individual’s size (e.g., 30–36 inches).
- Length: Adjustable to preference from underbust (cropped) to waist (full-length). Example: Approximately 15-18 inches for a standard fit.
- Straps: Each measures 16 inches (adjust as needed based on personal fit).
Stitch Key
- Ch: Chain
- Sc: Single Crochet
- Dc: Double Crochet
- Sl st: Slip Stitch
- Rep: Repeat
- FO: Fasten Off
Pattern Instructions
Step 1: Foundation Chain and First Row
- Take Measurements:
- Measure your underbust or waistline based on desired fit. Subtract 1 inch (2.5 cm) for a snug stretchy fit.
Example:
- For a 30-inch measurement → Make a foundation chain measuring 30 inches – 1 inch = 29 inches.
- Foundation Chain:
- Work a foundation chain in multiples of 7 (this number is required to accommodate the fan-stitch pattern).
Example: For a 29-inch chain:
- Count the chains and ensure the number is divisible by 7 (e.g., 161 chains).
- Row 1:
- Add 1 extra chain for turning, then sc in the second chain from the hook. Work 1 sc in each chain across.
- Place a stitch marker at the center stitch to help with symmetry later.
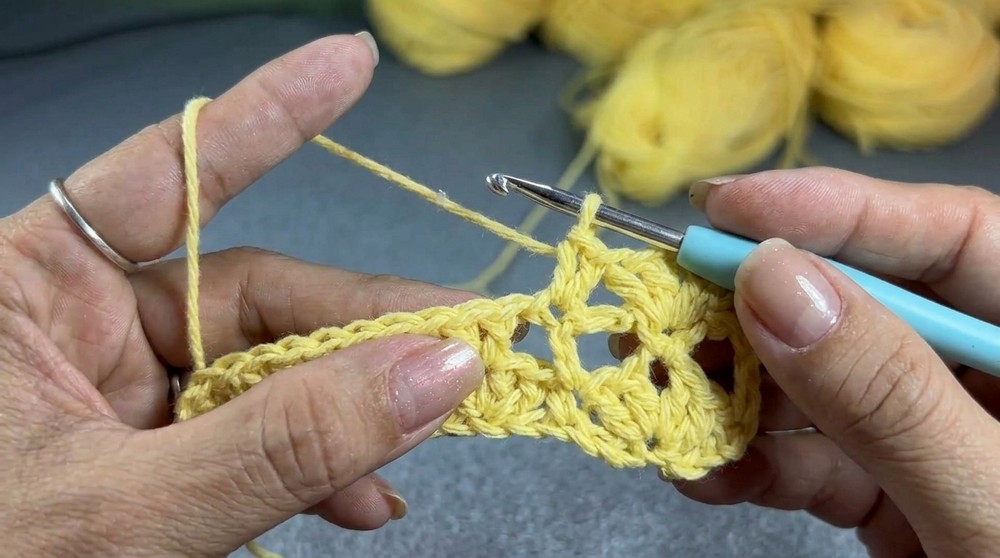
Step 2: Fan-Stitch Pattern
- Set Up the Fans (Row 2):
- Begin with ch 1, turn. Sc in the first stitch. Skip two stitches and work the following into the third stitch:
- 1 dc, ch 2, 1 dc into the same stitch (this forms half of the fan), followed by 2 more double crochets in the same stitch (completing the full fan).
- Skip the next two stitches, sc in the third stitch.
- Begin with ch 1, turn. Sc in the first stitch. Skip two stitches and work the following into the third stitch:
- Continue the Fan-Stitch:
- Skip two stitches and complete another fan in the third stitch. Fans consist of (2 dc, ch 2, 2 dc) worked into the same stitch.
- Alternate fans and sc stitches across the row.

- Row 3: Add Separating Chains:
- Ch 3 (counts as height), ch 2 (counts as separation chains), and turn.
- Sc into the center of the first fan stitch (ch-2 space).
- Ch 2, then dc into the sc of the previous row, ch 2.
- Continue alternating sc into the center of fan stitches and dc into sc stitches from the previous row.
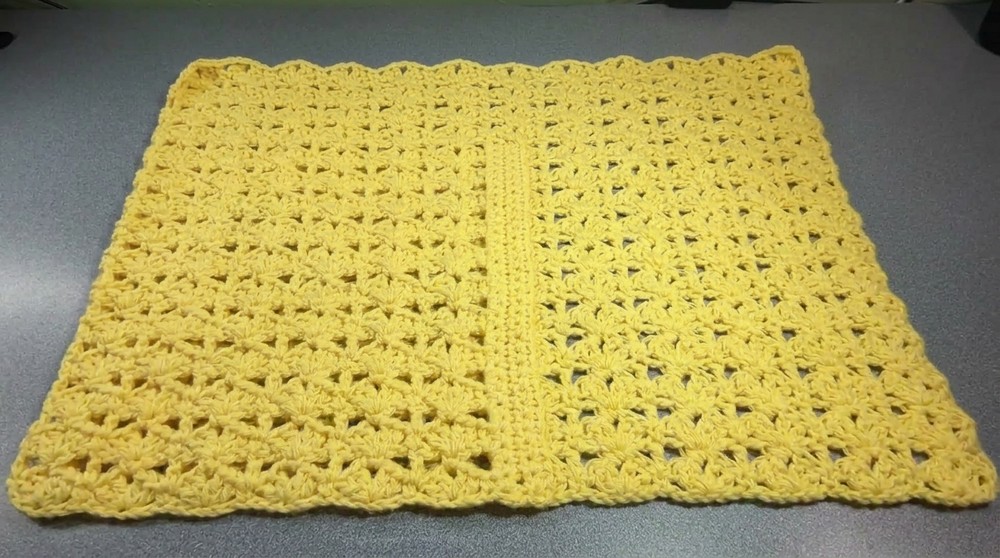
Step 3: Repeating the Pattern
- Row Repetition:
- Continue alternating fan rows (Row 2) and chain rows (Row 3) until the fabric reaches just under the bust or your desired length.
- Number of Repeats:
- Repeat approximately 5-6 fan rows, adjusting based on how long you want the top to extend before any increases or decreases.
Step 4: Increasing for Bust Shaping
- Where to Add Increases:
- To allow for bust shaping, locate the center rows and mark the middle fan with a stitch marker.

- To allow for bust shaping, locate the center rows and mark the middle fan with a stitch marker.
- Placement of Additional Fans:
- When at the marked center fan, work 1 additional fan stitch in the same sc space as the center fan. This increases the total number of fans along the bust line.
- Alternating Rows:
- Continue working alternating fan and chain rows over the new fan stitches to maintain consistency.
- Continue working alternating fan and chain rows over the new fan stitches to maintain consistency.
Step 5: Decreasing & Preparing Straps
- Where to Add Decreases:
- Once the bust has been covered, taper the sides by working fewer fans at each row’s edge:
- Skip the first fan and only work into every second or third fan space on each row as you decrease.
- Once the bust has been covered, taper the sides by working fewer fans at each row’s edge:
- Strap Placement:
- Mark where your straps will connect using stitch markers.
- Ideally, each strap should align with the center of the bust and the edges of the back panel for support.
- Crocheting the Straps:
- For each strap, attach yarn at the marked point.
- Work a short foundation chain (approx. 80-110 chains, depending on desired length), then sc back along the chain for sturdiness.
- Attach the strap to the opposite marked point.
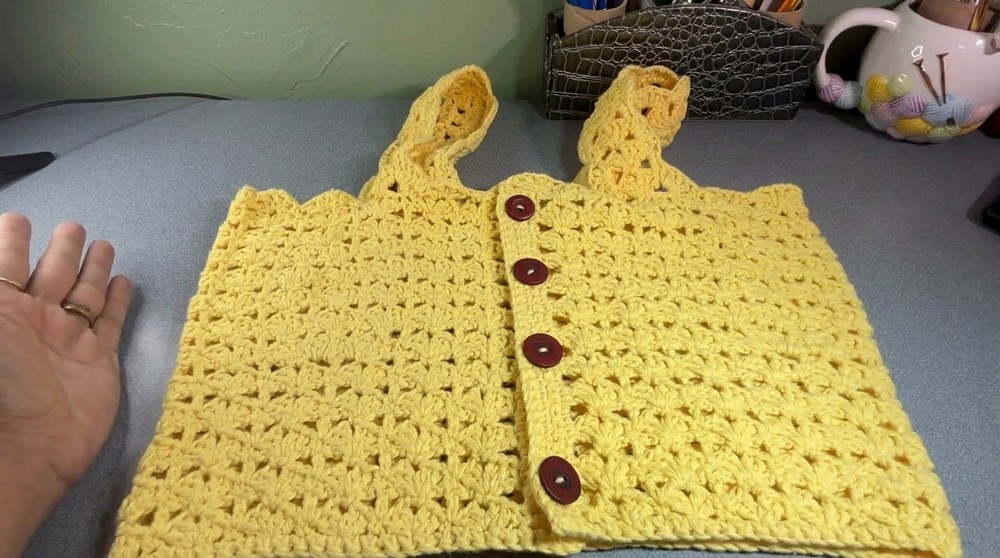
Step 6: Adding Button Band
- Right Side Edging with Buttonholes:
- Attach yarn along the right edge of the fabric.
- Work 4 rows of sc, leaving 2 chain spaces every 1-2 inches on one round to create buttonholes.
- Left Side Edging for Buttons:
- Work the same along the left edge, ensuring no chain spaces.
- Attach Buttons:
- Sew buttons onto the left band, aligning them with the chain spaces on the right.
Step 7: Finishing and Edging
- Decorative Edging:
- If desired, finish the bottom hem with a shell stitch or picot edge:
- Shell Stitch: (2 sc, ch 1, 2 sc) in every other stitch.
- Picot: (sc, ch 3, sc) in every other stitch.
- If desired, finish the bottom hem with a shell stitch or picot edge:
- Weave in Ends:
- Use a tapestry needle to neatly weave in all loose ends.
- Blocking (Optional):
- Gently block the top to ensure clean edges and consistent shaping.
- Gently block the top to ensure clean edges and consistent shaping.
Customization Ideas
- Length Adjustments:
- Crop the top for a summer style, or extend it for a longer tunic design.
- Strap Variations:
- Adjust strap width or use braiding techniques for added texture.
- Button Styles:
- Use vintage or decorative buttons for a unique touch.
Final Thoughts and Maintenance Tips
Congratulations on completing your handmade fan-stitch buttoned top! This is a versatile and elegant piece that works well for multiple occasions. Wash gently by hand with mild soap and lay flat to dry to maintain its shape and quality.