Turn yarn into a bright flower square with this free crochet flower granny square pattern that is fun to make for blankets, bags and decor.
Your New Favorite Free Crochet Flower Granny Square Pattern
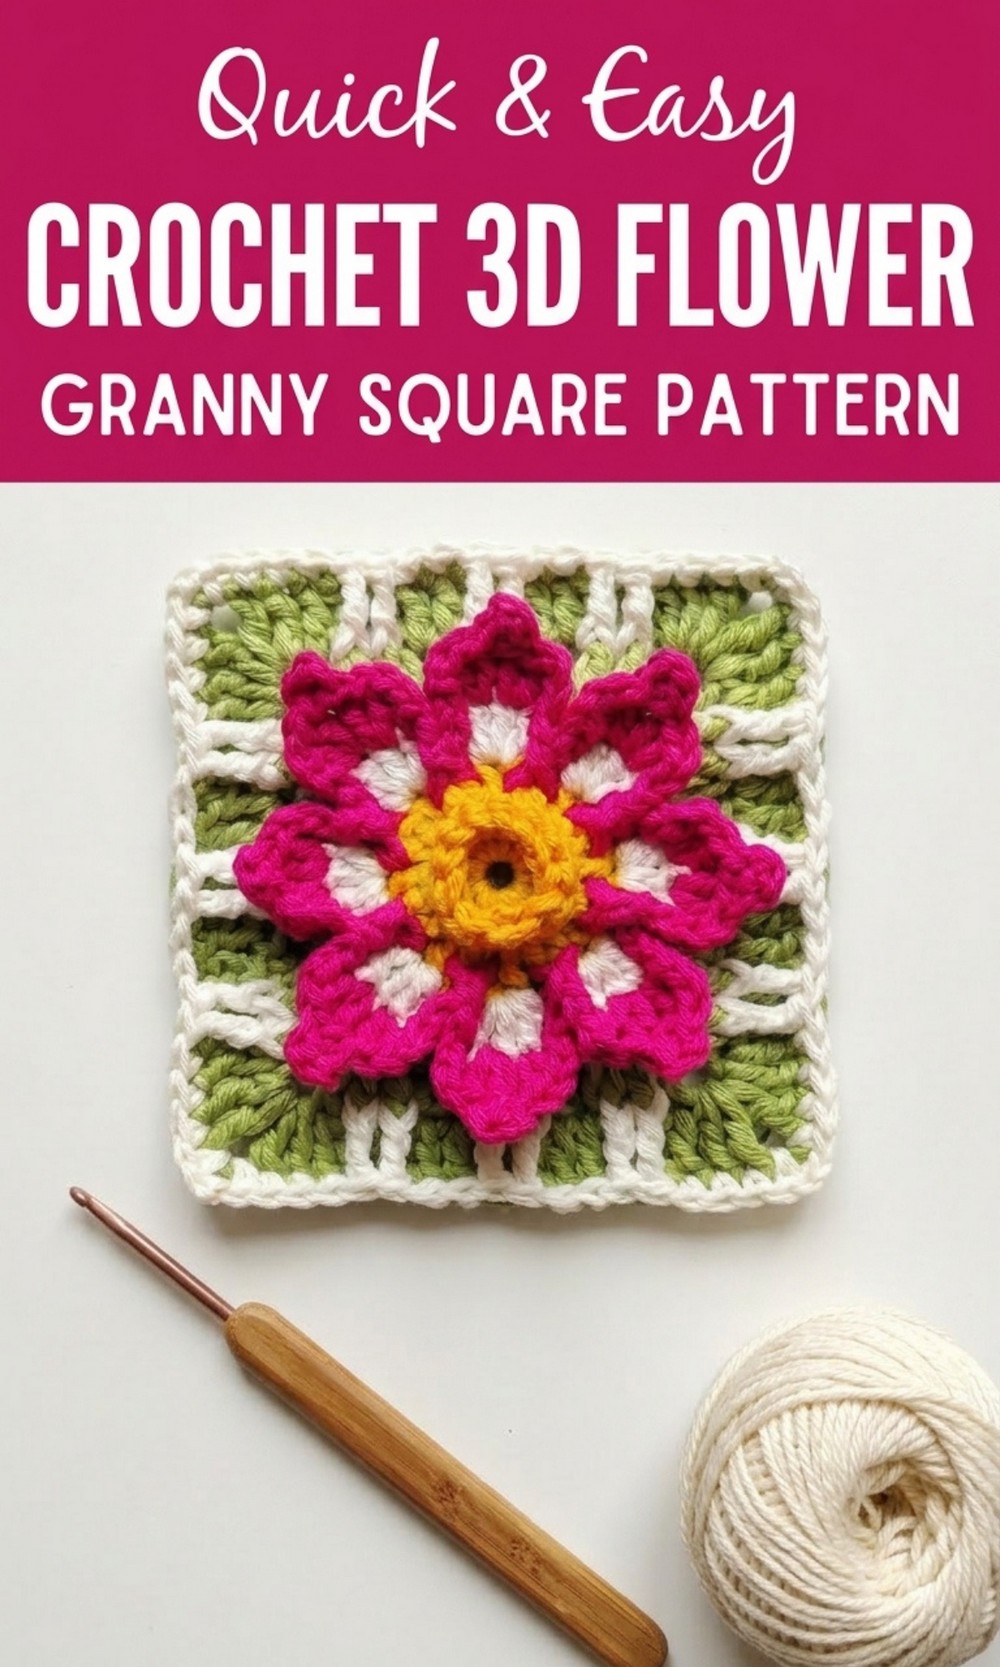
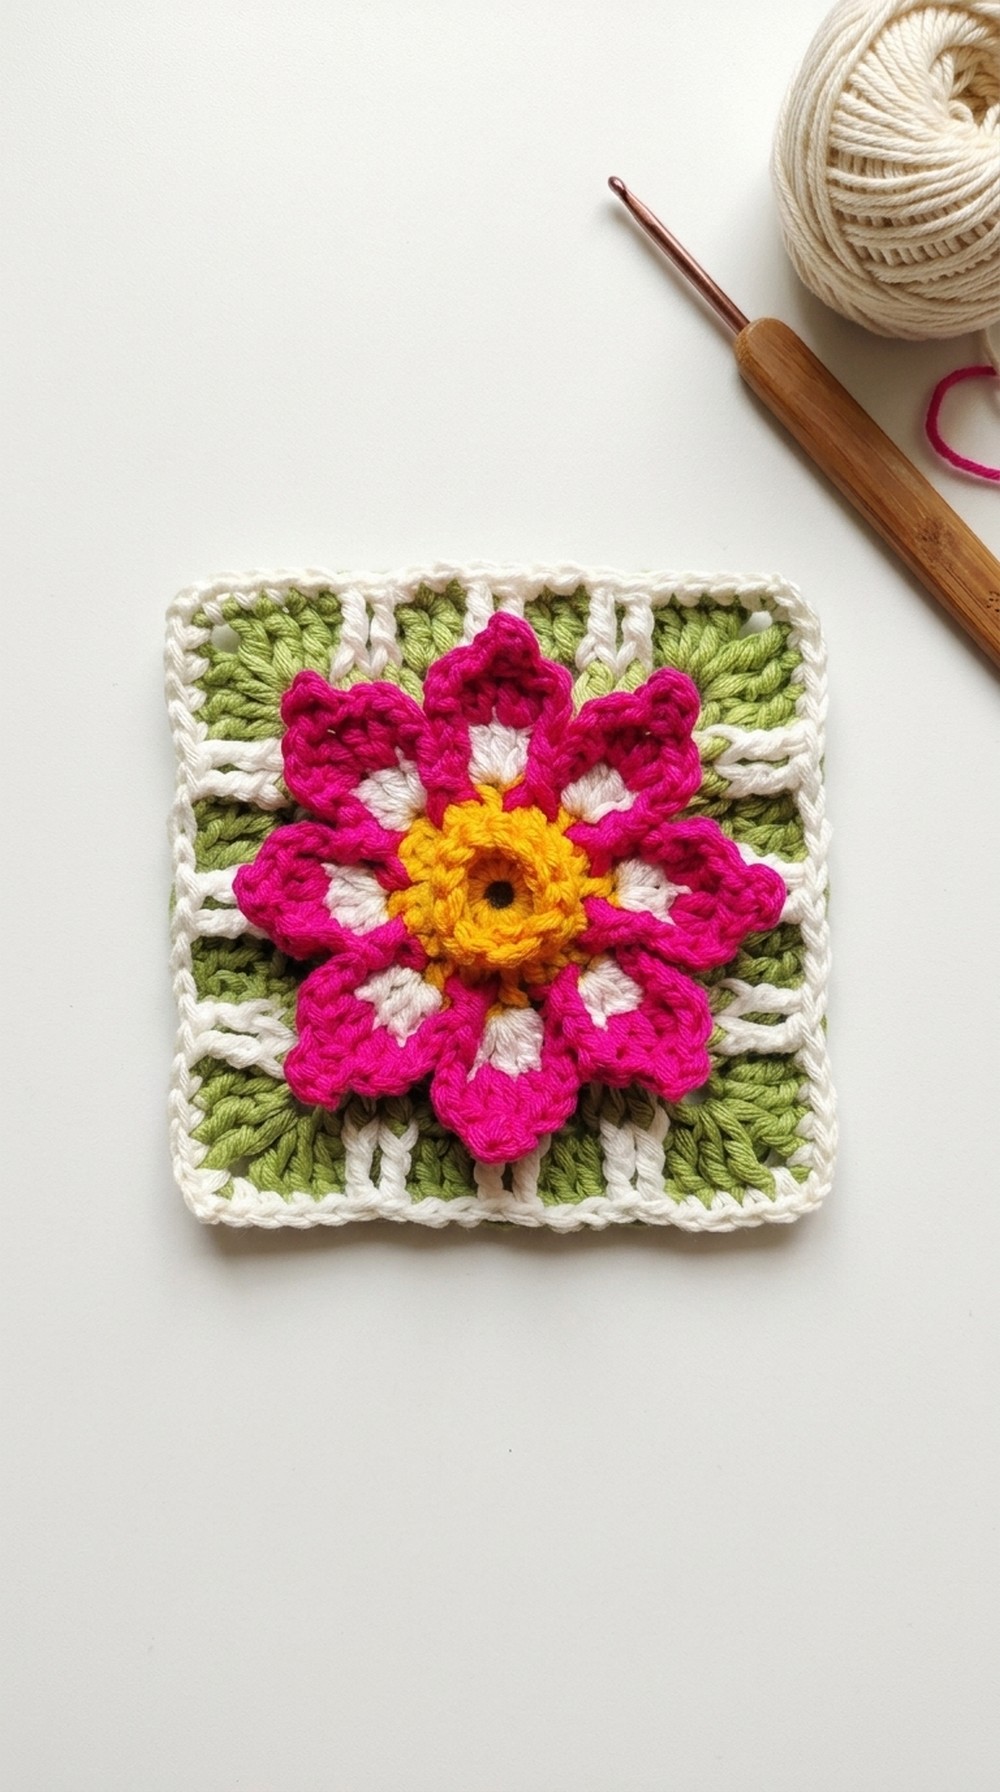
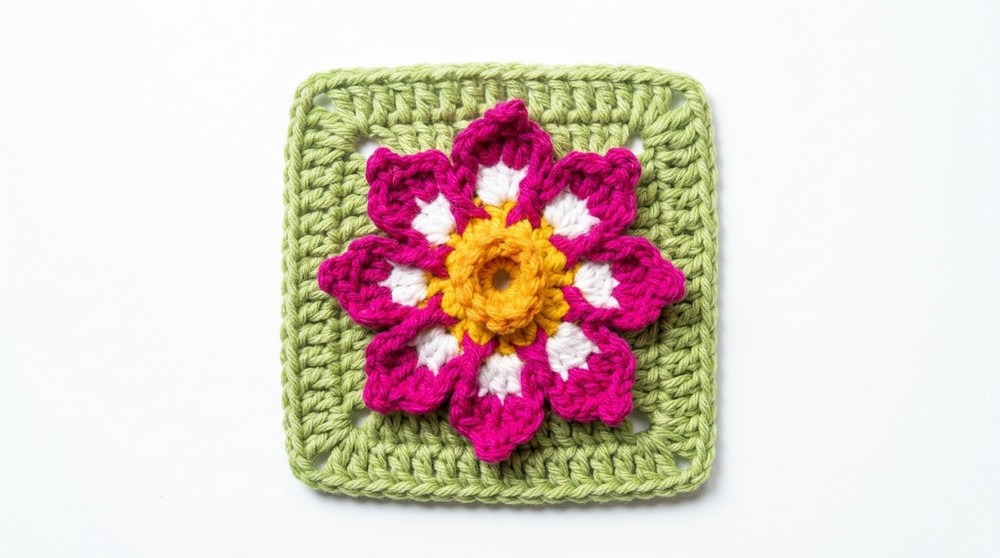
Bring the charm of a blooming garden right to your sewing table with this Free Crochet Flower Granny Square Pattern. At the heart of this soft and squishy square is a bright 3D flower that pops like a real blossom, spreading joy with its cheerful look. The deep orange and sunny yellow petals create a warm, happy vibe, while the crisp white border gives it a clean and polished finish.
The raised flower design makes it extra special, adding a texture that’s not only beautiful to see but also delightful to touch. This pattern is easy to follow, even for beginners, and can be used to crochet so many things — a cozy baby blanket, a stylish school bag, or even pillows to brighten your room.
 Making this gorgeous square is a fun way to unwind and show off your creativity with a design that everyone will admire.
Crochet Flower Granny Square Pattern
Finished Item
A 3D flower motif worked into a perfect square. The center is flower‑shaped, surrounded by a square border. You may use it for baby dresses, appliqué work, blankets, cushions, table runners, or as individual coasters.
Materials
- Yarn
- Flower center: Yellow (as in the video) or any light shade
- Flower petals: White (or any light contrasting color)
- Flower middle ring: Dark orange (or any darker contrast to the center)
- Square background: A coordinating color (in the video it appears as white for petals and background; adjust as you wish)
- Hook: A crochet hook suitable for your yarn (e.g., 3.0–4.0 mm for light DK / sport yarn, 4.0–4.5 mm for worsted)
- Notions
- Scissors
- Yarn needle for weaving in ends
- Stitch markers (optional)
Abbreviations (US Terms)
- ch = chain
- sc = single crochet
- hdc = half double crochet
- dc = double crochet
- sl st = slip stitch
- st = stitch
- sp = space
- lp = loop
- FLO = front loop only
- BLO = back loop only
- FP = front post
- rep = repeat
- RS = right side
Special Techniques
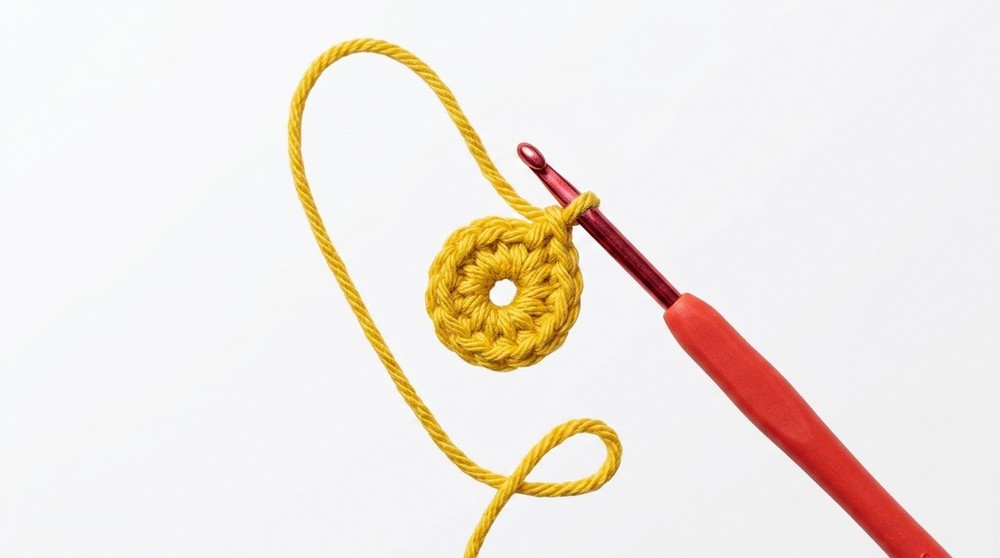
1. Magic Circle (Magic Ring)
Create an adjustable ring:
- Wrap yarn around two fingers to form a loop.
- Insert hook under the front loop, yarn over, pull up a loop.
- Ch 1 to secure.
- Work the required number of stitches into the ring.
- Pull the tail to close the circle.
2. Working in Back Loop Only (BLO)
Each stitch has two loops on top: the front loop (closest to you) and the back loop (farther from you). Insert hook only into the back loop.
3. Working in Front Loop Only (FLO)
Insert hook only under the front loop of the stitch.
4. Front Post Half Double Crochet (FP hdc)
Yarn over, insert hook from front to back to front again around the post of the stitch in the previous round, yarn over, pull up a loop (3 loops on hook), yarn over, pull through all 3 loops.
5. Picot (3‑chain Picot)
Ch 3, insert hook into both loops of the base stitch (the stitch just made), yarn over, pull through both the stitch and loop on hook (like a sl st). This forms a small point.
Pattern Instructions
Round 1 – Center Base (Foundation)
- Make a magic circle.
- Ch 1 (does not count as a stitch).
- Work 12 sc into the magic circle.
- Pull the tail to close the circle tightly.
- Join with a sl st into the first sc.
You now have 12 sc forming a small circle.
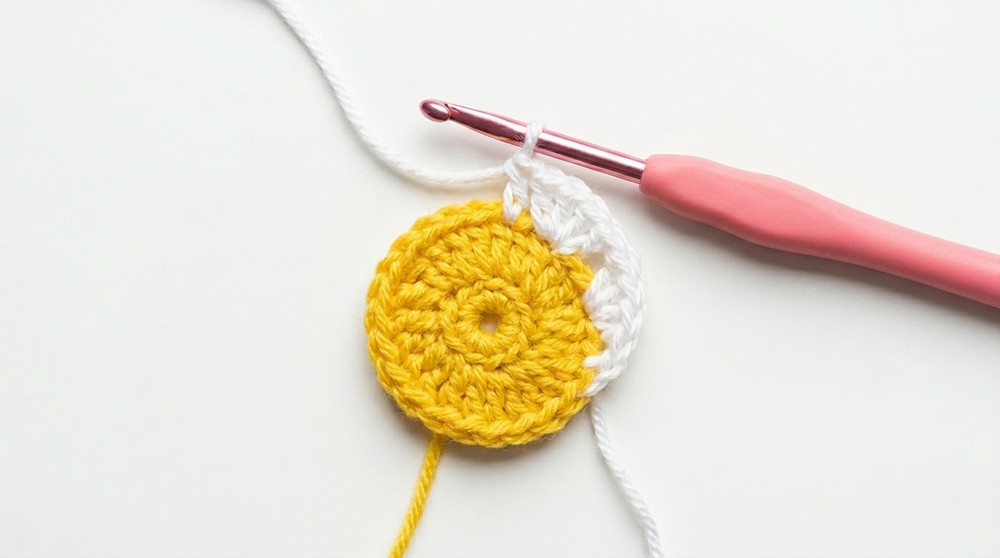
Round 2 – Base for Petals (Working in BLO)
In this round you work in the back loops only of Round 1. The unused front loops will remain for a later round (flower middle ring).
- Bring the working yarn to the back side of the work.
- In the same st (first sc), insert hook into the back loop only and make 1 long sc (a slightly elongated sc).
- Ch 1 (counts as the first dc of the round).
- In the same back loop st, work 1 dc (now you have: 1 long sc, ch 1, 1 dc in same st).
- In the next BLO stitch, work 2 dc in the same st (dc increase).
- Continue around: 2 dc in each back loop (dc inc in every st).
- Since there are 12 BLO sts, you will have a total of 24 dc in this round (ignoring the starting long sc, but counting the ch 1 as a dc as per the video’s approach).
- At the end of the round, join with a sl st to the starting ch (the chain that you counted as a dc).
- Bring the yarn to the back and fasten off if you are changing color for the petals.
Round 3 – Flower Petals (4‑dc Petals)
Change to the petal color (white in the video).
- Make a slip knot with the petal color.
- Yarn over (for dc).
- Insert hook into the top of any dc from Round 2.
- Draw up a loop and work 4 dc in the same stitch.
- Ch 1.
- Skip 2 sts, and in the 3rd st, work 4 dc in the same st.
- Repeat the sequence around:
- Ch 1, skip 2 sts, 4 dc in next st.
- Continue this pattern all the way around the circle.
- Join to the top of the first dc of the round with a sl st.
- Bring the yarn to the back and fasten off, or keep attached if working continuously as in the video (she fastens and resumes later).
You now have a ring of 4‑dc groups forming the base of the petals.
Round 4 – Shaping Each Petal (3D Flower)
Begin again with the petal color (white) on top of one 4‑dc group.
- Make a slip knot.
- Insert hook into the top of the first dc of any 4‑dc group.
- Work:
- 1 sc in this st,
- Ch 2.
- In the 2nd dc of this group: work 2 dc in the same st.
- Ch 3.
- Make a picot in these 3 chains (insert hook into the base of the ch‑3, yarn over, sl st to form the picot).
- In the 3rd dc of the group: work 2 dc in the same st.
- Ch 2.
- In the 4th dc of the group: work 1 sc in the same st.
This completes one petal.
- To move to the next petal:
- Ch 2.
- Identify the two stitches you skipped previously between the petal groups (from Round 3). Around those skipped sts, work 1 FP hdc.
- Ch 2 again.
- In the first dc of the next 4‑dc group, repeat the petal structure:
- 1 sc, ch 2, 2 dc in next st, ch 3, picot, 2 dc in next st, ch 2, 1 sc in last dc of group.
- Again: ch 2, FP hdc around the skipped 2 sts, ch 2, then repeat for the next petal.
- Continue this pattern all the way around the flower (each 4‑dc group becomes one petal separated by FP hdc sections).
- At the end of the round, join with a sl st into the first sc of the round.
- Bring yarn to the back and fasten off.
Now your 3D flower petals are complete and clearly raised.
Round 5 – Flower Middle Ring (Dark Orange in FLO)
Use the dark orange yarn (or your chosen contrast color) and work into the front loops (FLO) of Round 1 that were left unworked.
- Insert hook into any front loop of Round 1.
- Join yarn with a sc.
- Ch 2 (this counts as the first dc).
- In the next FLO, work 1 dc.
- Continue working 1 dc in each FLO around.
- There are 12 front loops, so you will have 12 dc in this ring.
- When you reach the first join, sl st into the top of the ch‑2 (or first dc).
- Bring the yarn to the back and fasten off.
This creates the colored ring at the center of the flower.
Round 6 – Chain Loops Behind Petals
Return to the petal color (or the color that will form the square).
You will now work behind the petals, joining into the white area between petals.
- Insert hook at the base area of a petal (where the white stitches form small visible sections between petals on the back side).
- Join with 1 sc.
- Ch 4.
- In the next available white section between petals, work 1 sc.
- Again, ch 4, then sc into the next section.
Repeat:
4 ch, 1 sc in next section around the flower.
You are essentially forming a round of ch‑4 loops all around behind the petals.
- At the end, join with a sl st into the first sc of this round.
Round 7 – Forming the First Square Round (Corners and Sides)
Continue with the same color (square background).
You will now use the ch‑4 spaces created in Round 6.
- In the first ch‑4 space:
- Sl st to reach the center of the space if necessary.
- Ch 1, 1 sc into the space.
- Ch 2 (counts as first dc).
- Then 3 dc in the same space.
- Ch 2.
- Again 4 dc in the same space.
This forms your first corner:
(4 dc, ch 2, 4 dc) in the same ch‑4 space. - In the next ch‑4 space:
- Work 4 dc (this forms the side between corners; no corner here).
- In the following ch‑4 space (next corner):
- Work (4 dc, ch 2, 4 dc) again.
- Continue around as follows:
- Side spaces: 4 dc in the space.
- Corner spaces: (4 dc, ch 2, 4 dc) in the same space.

You will have 4 corners in total.
- At the end of the round, join with a sl st into the top of the initial ch‑2 (or into the first dc as you prefer to count it).
The piece now clearly forms a square.
Round 8 – Double Crochet Round (Building the Square)
Still using the square background color.
- Ch 3 (counts as dc).
- Dc in each st along the side until you reach the corner ch‑2 space.
- In each corner ch‑2 space:
- Work 2 dc, ch 2, 2 dc in the same space.
- Continue working 1 dc in each st along each side, and (2 dc, ch 2, 2 dc) in each corner space.
Work this pattern all the way around the square.
- At the end, join with a sl st to the 3rd ch of the beginning ch‑3.
- Bring the yarn to the back and fasten off if you wish, or continue with another color for the final textured round.

Round 9 – Final Textured Edge (Front Post Detailing)
Change to a border color (or keep the background color).
This round adds subtle 3D texture on the sides of the square.
- Join yarn in any corner ch‑2 space.
- Work:
- 1 sc in corner space,
- Ch 2,
- 1 sc in the same corner space.
This forms a small pointed corner.
- After working the corner, work 3 sc in the next 3 sts along the side.
- Then look at the next group of 4 dc (from the previous round).
You will work FP stitches around the center 2 sts of these 4 dc:- Yarn over.
- FP hdc around the 2nd dc (front post).
- Yarn over.
- FP hdc around the 3rd dc.
- Then skip the next 2 sts in the top row.
- Work 2 sc in the next 2 sts.
- Again, for the next group of 4 dc:
- FP hdc around the center 2 sts (2 FP hdc),
- Skip 2 sts on the top,
- 2 sc in the next 2 sts.
- Repeat this pattern along the side:
- After certain repeats, the video indicates:
- three sc at the beginning of a side,
- then the sequence of FP hdc on the two middle stitches of every group of four, skipping two, then sc in the next two.
- After certain repeats, the video indicates:
- At the next corner ch‑2 space:
- Repeat: 1 sc, ch 2, 1 sc in the corner space.
- Continue the same pattern on each side:
- Corner: sc, ch 2, sc.
- Side: 3 sc, FP hdc on middle pair of the 4‑dc group, skip 2, 2 sc, repeat.
- Once you reach the starting point, join with a sl st into the first sc of the round.
- Bring yarn to the back, ch 1, cut yarn, and pull through to fasten off.
The square and 3D motif are now complete.
Finishing the Pattern
- Weave in Ends
- Use a yarn needle to weave in all loose ends securely on the back of your work.
- Weave in ends in multiple directions for a secure finish.
- Blocking (Optional but Recommended)
- If your square is slightly uneven, gently wet or steam block it.
- Pin each corner to a blocking board or a flat cushion, shaping the square neatly.
- Let it dry completely before use.
- Joining Squares (If Making a Larger Project)
- You may join multiple squares using:
- Slip stitch join,
- Single crochet join,
- Invisible mattress stitch, or
- Join‑as‑you‑go (if you adapt the last round).
- Ensure all squares are blocked to similar size for a neat finish.
- You may join multiple squares using:
Suggestions about the Pattern
- Color Play
- Use contrasting shades for the center, petals, and background to highlight the 3D flower.
- For baby items, soft pastel combinations work beautifully.
- Dark center and light petals give a realistic floral look.
- Yarn Choice
- Cotton or cotton‑blend yarn is great for items that need structure (coasters, table runners, appliqués).
- Acrylic or soft blends are perfect for blankets and baby clothes.
- Use as Appliqué
- You can stop after completing the 3D flower (before the square rounds) and use the flower as an appliqué on baby dresses, hats, or bags.
- Size Adjustments
- Add extra dc rounds around the square (like Round 8) to make larger squares for blankets or cushions.
- Use thinner or thicker yarn to change the size.
Tips to Maintain the Pattern (Care Tips)
- Washing
- Hand wash or use a gentle cycle if the yarn is delicate.
- Use mild detergent to preserve color and texture.
- Avoid hot water to prevent shrinking or distortion.
- Drying
- Lay flat to dry on a towel to keep the square shape.
- Reshape corners gently while damp.
- Storage
- Store flat in a drawer or box; avoid tightly folding 3D motifs for a long time to prevent flattening.
- If using as appliqué, avoid heavy pressing on the flower part.
- Refreshing the Shape
- If the square loses its crisp shape, lightly steam (without touching the iron directly to the yarn) and reshape the edges and corners.
Final Words
This flower motif square pattern combines simple stitches with clever construction to create a beautiful and unique 3D design. Although it looks intricate, the steps are accessible for confident beginners who are familiar with basic stitches such as sc, dc, and hdc. The use of front loops, back loops, and front post stitches creates depth and texture, turning a basic square into a decorative piece.
You may use this pattern to enhance baby dresses, blankets, cushion covers, table runners, or as individual coasters or wall décor. With thoughtful color choices and neat finishing, this motif will add a special charm and extra beauty to any project.