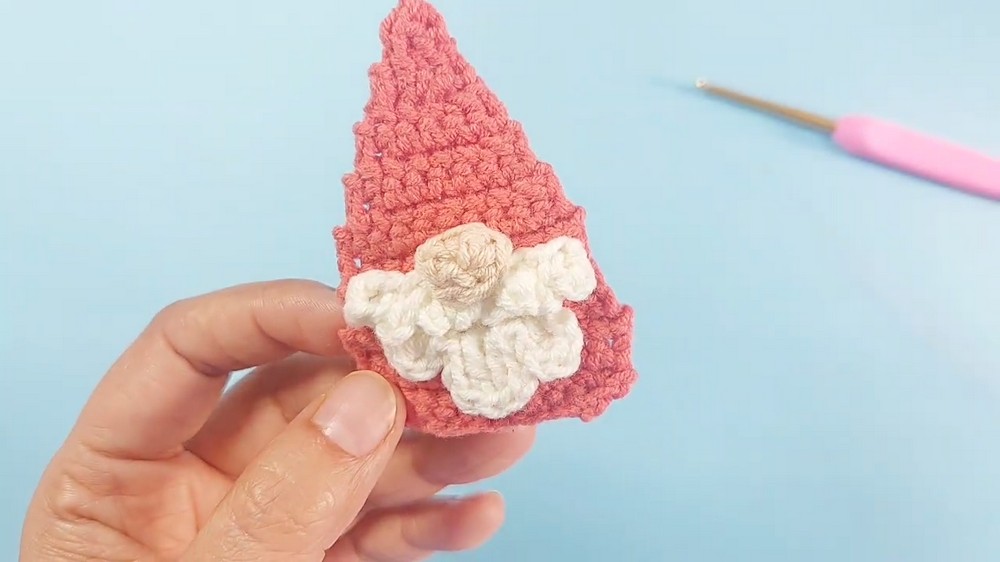
Bring whimsical magic to your projects with the Free Crochet Gnome Applique Pattern, perfect for decorating home décor, gifts, and festive projects.
In the quiet corners of a cozy home, tiny details often spark the imagination and bring warmth to familiar spaces. The Crochet Gnome Applique Pattern captures this charm, offering a whimsical touch that adds personality and character to any project. These small, enchanting designs can be incorporated into blankets, cushions, tote bags, or seasonal décor, transforming ordinary items into delightful, eye-catching accents.
Free Crochet Gnome Applique Pattern for Festive Projects

Their playful forms and intricate details convey a handmade elegance, balancing charm and sophistication in every stitch. Beyond their visual appeal, these appliques provide a sense of accomplishment and mindfulness, engaging focus and creativity in a way that is both calming and rewarding. They can be layered or combined with other designs, allowing for endless customization and artistic expression.
Ideal for gifting, they become thoughtful keepsakes that bring joy to recipients, reflecting care and personal touch. Lightweight yet durable, they add decorative flair without overpowering the overall design, making them versatile for a variety of uses. Combining aesthetic beauty, functionality, and the quiet satisfaction of creating something unique, these gnome appliques serve as more than embellishments, they are symbols of creativity, imagination, and the warm, whimsical spirit that makes handcrafted pieces so treasured in everyday life.
Materials Needed
- Yarn: Cotton yarn for durability and neat finishing.
- Suggested colors: White for the beard, peach or beige for the nose, and a color of choice for the body.
- Crochet Hook: 2.5 mm crochet hook (as suggested in the tutorial).
- Yarn Needle: For sewing the applique parts together and weaving in loose ends.
- Scissors: For snipping yarn when completing sections.
Step-by-Step Instructions to Crochet the Gnome Applique
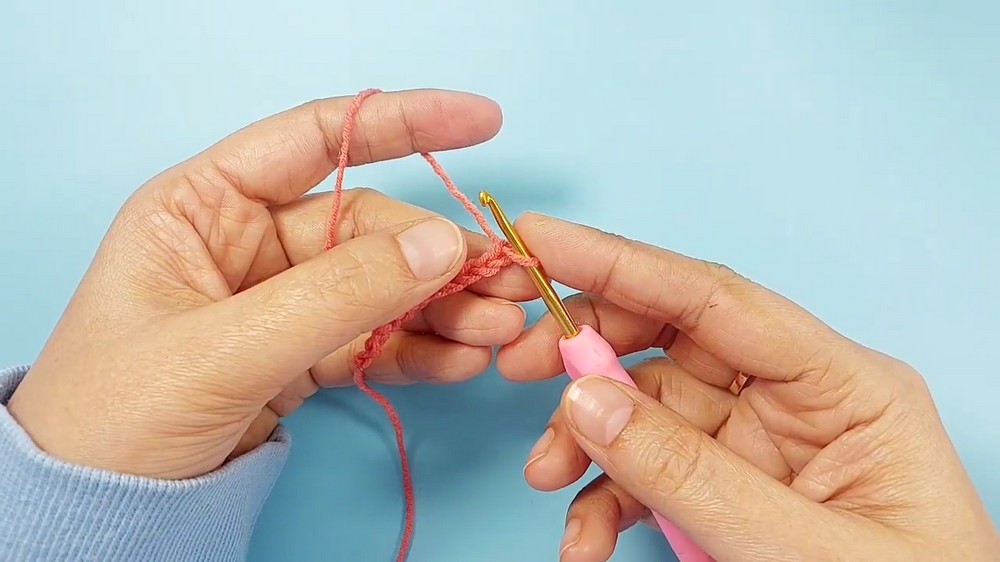
1: Crocheting the Body
- Round 1:
- Start with a slip knot and chain 11.
- Skip the first chain and create a single crochet into the second chain.
- Use the back bumps of each chain for a neat look (turn the chain and insert into the tiny bumps on the back).
- Use the back bumps of each chain for a neat look (turn the chain and insert into the tiny bumps on the back).
- Single crochet in each chain across the row—there will be 10 single crochets in total.
- Round 2:
- Chain 1 and turn your work.
- Work 2 single crochets into the first stitch.
- Then, do 1 single crochet in each stitch, except the last stitch where you will again add 2 single crochets.
- Total: 12 single crochets now.
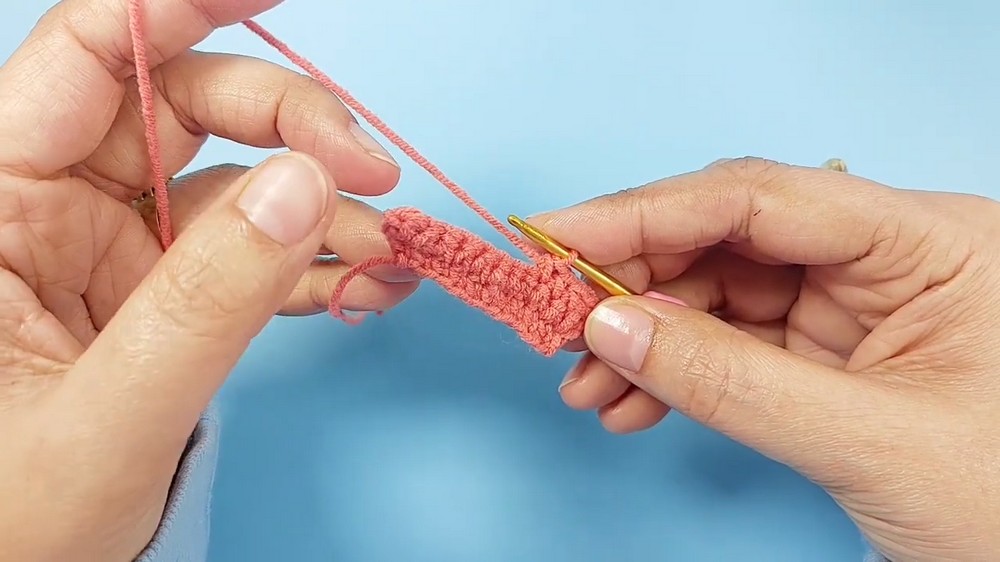
- Rounds 3, 4, and 5:
- Chain 1 and turn.
- Work 1 single crochet in each stitch across the row, maintaining 12 stitches per round.
- At the end of each row, chain 1 and turn.

- Round 6:
- Chain 1 and turn.
- Start with a decrease (insert your hook into the front loop of the first two stitches, yarn over, pull through both loops, yarn over again, and pull through the remaining loops to create one stitch).
- Crochet 1 single crochet in each stitch, continuing until the last two stitches, where you will work another decrease using the front loops.
- You now have 10 single crochets.
- Rounds 7, 8, and 9:
- Chain 1 and turn your work.
- Work 1 single crochet in each stitch for all 10 stitches.
- Round 10:
- Start with another decrease at the beginning of the round.
- Crochet 1 single crochet in the next stitches, and end with another decrease at the last two stitches.
- You now have 8 single crochets.
- Rounds 11:
- Chain 1, turn, and crochet 1 single crochet in each of the 8 stitches with no decrease.
- Round 12:
- Chain 1 and turn.
- Work 1 decrease at the beginning, continue single crocheting in the stitches, and finish with another decrease at the end.
- You now have 6 single crochets.
- Round 13:
- Do 1 single crochet in each of the 6 stitches, maintaining the count.
- Round 14:
- Begin with a decrease.
- Single crochet in two stitches, then decrease again.
- You now have 4 single crochets.
- Round 15:
- Crochet 1 single crochet in each of the 4 stitches.
- Round 16:
- Work two decreases at the beginning and end of this row.
- Chain 1, fasten off, and leave a long tail for sewing.
This completes the body.
2: Crocheting the Beard
- Step 1:
- Begin with a slip knot and chain 11 stitches.
- Skip the first three chains.
- In the fourth chain, work a slip stitch (insert the hook, pull up yarn, then pull through the loop on the hook).
- Step 2:
- Chain three stitches, then work another slip stitch into the next chain.
- Repeat this pattern: chain 3, slip stitch into next chain until the end of the row.
- Once complete, fasten off.
3: Smaller Part of the Beard
- Step 1:
- Begin with a slip knot and chain 6 stitches.
- Skip the first two chains, and in the third chain, work a half-double crochet (yarn over, insert hook, pull through the chain, yarn over, and pull through all loops).
- Chain 2, then work a slip stitch into the same chain.
- Work a slip stitch into the next chain, followed by:
- Chain 2, then work 1 double crochet into the same chain.
- Continue the pattern:
- Chain 2, slip stitch into the next chain, and so on until the end.
- Leave a longer yarn tail and fasten off.
4: Crocheting the Nose
- Begin with a magic ring (loop yarn to create a circle).
- Chain 1, then work the following stitches into the ring:
- 1 single crochet, 1 half double crochet, 2 single crochets, 1 half double crochet, and 1 single crochet.
- Tighten the ring and join with a slip stitch to the first single crochet.
- Fasten off and leave a long tail for sewing.
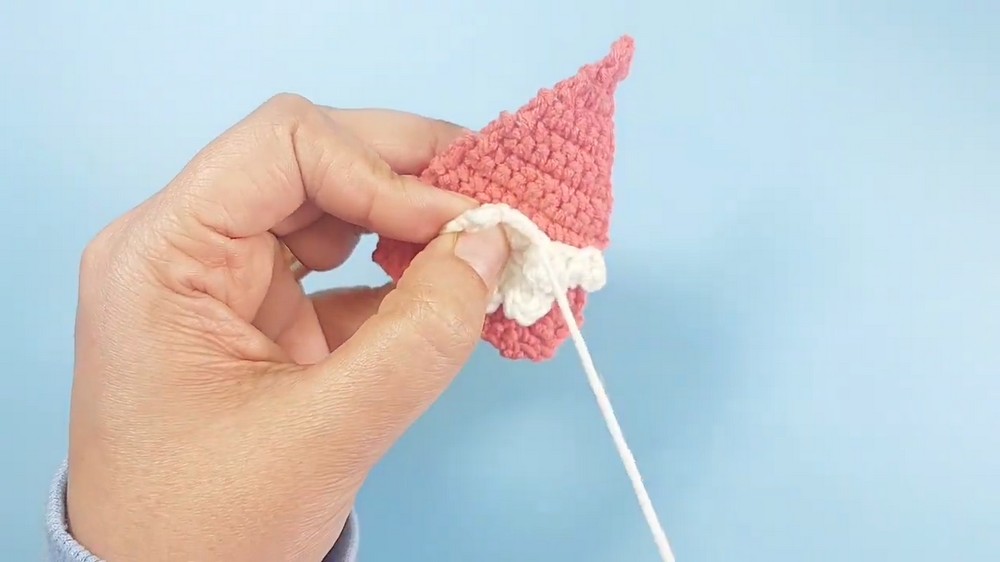
Assembly
- Use your yarn or a darning needle for sewing.
- Attach all the pieces together:
- Sew the beard to the body, the smaller beard piece on top, and finally secure the nose in the center.
Special Features
- Beginner-Friendly: The gnome applique is easy to follow, with basic stitches such as single crochet, slip stitch, and simple decreases.
- Versatile Design: The applique can be used for decorating bags, clothing items, wall art, or other craft creations.
- Small & Quick: It’s a compact and fast project, ideal for practicing skills on smaller designs.
Level of Difficulty
- Beginner-Friendly: The tutorial is straightforward, with clear explanations of stitches and decreases. Perfect for beginners and intermediate crocheters looking to explore cute applique patterns.
Tutor’s Suggestions
- Use Back Loops for a neat and tidy finish, as shown for the body part.
- Leave Longer Yarn Tails when fastening off, as these tails are essential for sewing the components together.
- Practice Decreases: For decreases involving the front loops of stitches, go slow to ensure the stitch is neat and secure.
Uses
- Decorative Accessory: Add to bags, hats, or clothing.
- Gift Item: Personalize as a small, handmade gift.
- Seasonal Decor: Perfect as a decoration for festive-themed crafts like Christmas or spring gnomes.
Tip
If working with small pieces like the beard and nose, try using sharp scissors and smaller hooks to minimize frustration with the yarn and ensure precision.
Conclusion
The crochet gnome applique tutorial is a fun and beginner-friendly project that helps you practice shaping, decreases, and creating small decorative pieces. With detailed instructions and simple techniques, it’s a creative journey that yields adorable results.