Twinkle with handmade charm using the Free Crochet Christmas Ball Ornament Pattern to create festive, colorful ornaments for your holiday décor.
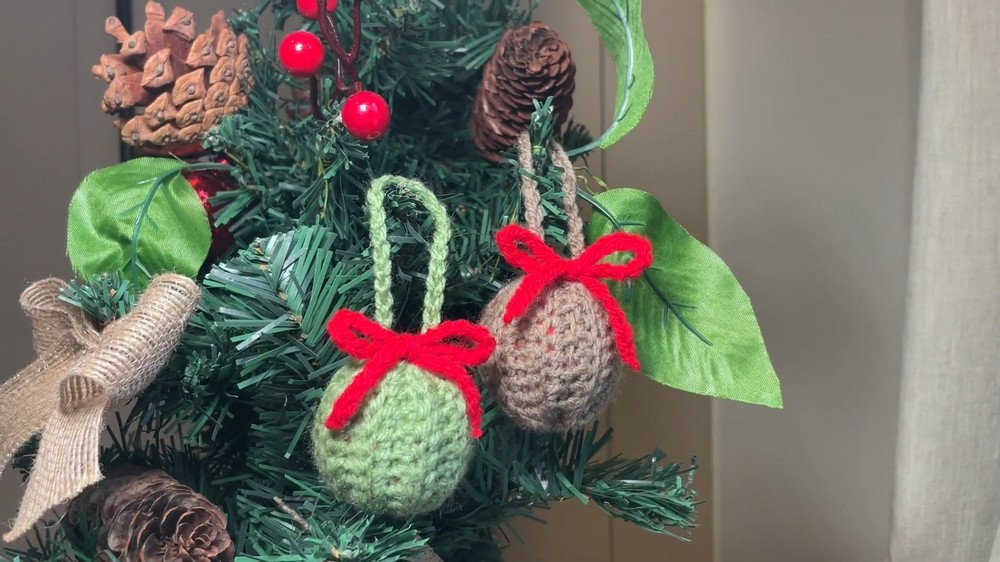
Shimmering with festive charm, these crochet Christmas ball ornaments instantly catch the eye with their perfectly rounded shape and cheerful colors. Each stitch adds texture and character, creating ornaments that feel both cozy and elegant, ideal for hanging on your tree, decorating your home, or gifting to loved ones. The Free Crochet Christmas Ball Ornament Pattern guides you step by step, making it easy to create professional-looking ornaments even if you’re a beginner.
Free Crochet Christmas Ball Ornament Pattern for Festive Gifting
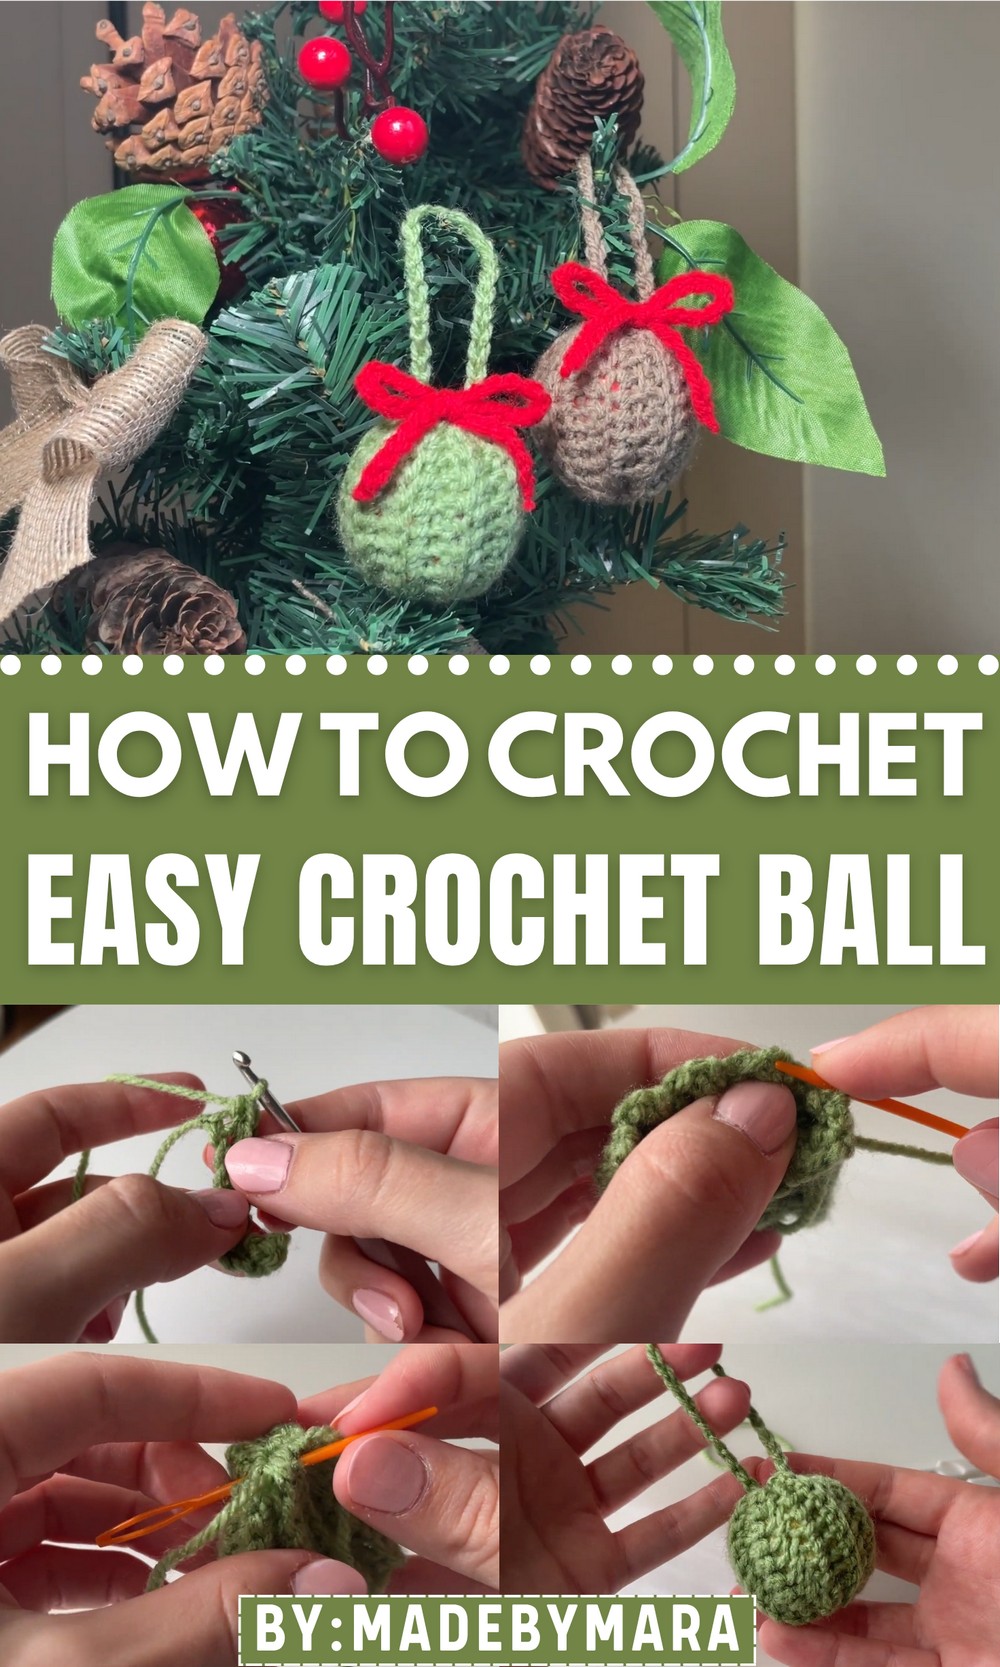
What makes this pattern extra special is its versatility, you can play with different yarn colors, add tiny embellishments, or make a matching set for a cohesive holiday display. The video tutorial walks you through every loop and turn, ensuring that your ornaments come out neat, symmetrical, and ready to dazzle.
Beyond just decoration, these crochet balls carry the warmth of handmade charm, turning a simple crochet into a memorable holiday keepsake. In just a few relaxing hours, you can transform basic yarn into festive magic, enjoying both the creative process and the joyful results.
Free Crochet Christmas Ball Ornament Pattern
Skill Level
- Beginner to Intermediate: Basic crochet stitches, working in back loops, sewing, stuffing, and finishing.
Finished Size
- Approximately 9.5 cm x 4.5 cm (3.75 inches x 1.75 inches).
- Ornament size can be increased or decreased by adjusting the starting chain length and number of rows.
Materials Needed
- Yarn:
- Scrap yarn in three colors:
- Main body (use any color).
- Green (for the hanger loop).
- Red (for the bow).
- Medium Weight Yarn (4-ply).
- Scrap yarn in three colors:
- Crochet Hook:
- 3.5 mm (E-4) hook.
- Notions:
- Scissors.
- Yarn Needle.
- Stuffing materials: Scrap yarn, fiberfill, or an old ornament for stuffing.
- Optional Customizations:
- Embroidery thread and needle for additional decorations.
Key Abbreviations (US Terminology)
- ch: Chain.
- sc: Single Crochet.
- sl st: Slip Stitch.
- BLO: Back Loop Only.
Special Notes
- Customization: Adjust the starting chain and number of rows to create larger or smaller ornaments.
- Tension: Ensure consistent stitches throughout to prevent misshaping the ornament.
- Alternate Uses: This ornament can double as a soft toy or decoration when done in different colors.
Step-by-Step Pattern
Step 1: Create the Ornament’s Base
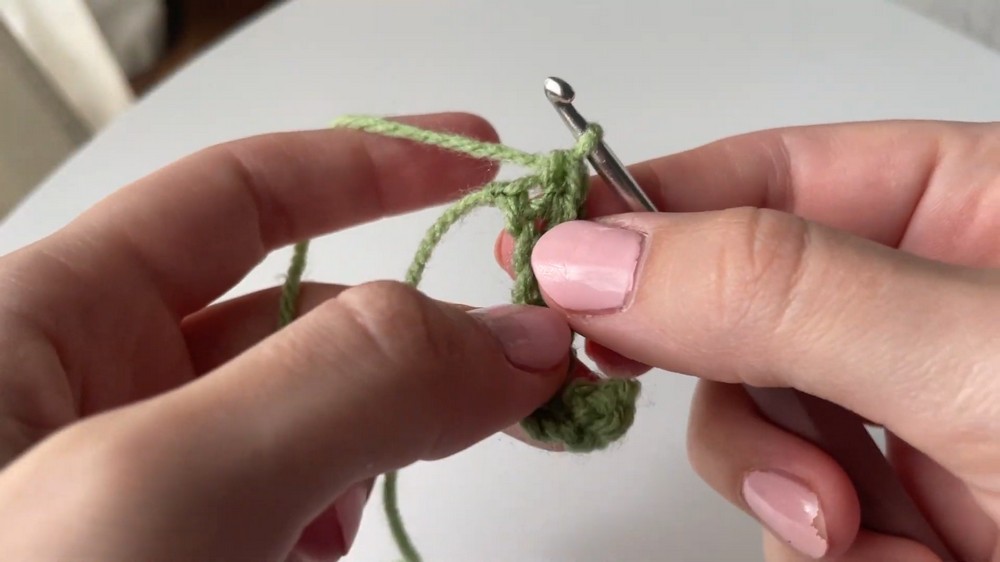
- Start with Slip Knot and Chain Stitch:
- Make a slip knot and chain 11 (ch 11).
- Row 1 (Single Crochet):
- Starting in the second chain from the hook, work 1 sc in each chain across. (10 stitches)
- Starting in the second chain from the hook, work 1 sc in each chain across. (10 stitches)
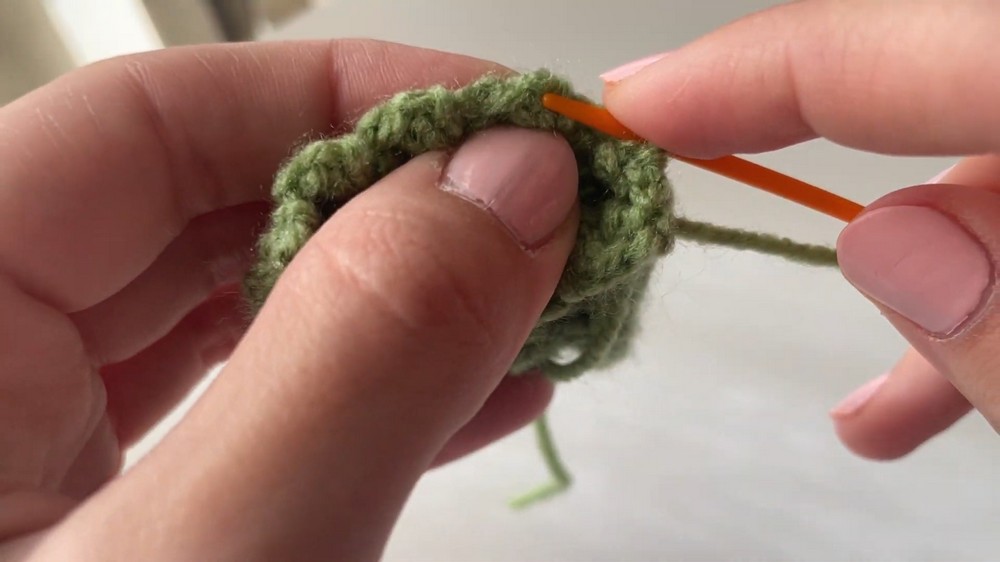
- Row 2:
- Chain 1 (ch 1), turn your work.
- Work 1 sc in BLO of each stitch across. (10 stitches)
- Repeat Row 2:
- Continue working 10 rows of sc in BLO, remembering to ch 1 and turn at the end of each row.
- Final Measurements:
- After completing 18 rows, the rectangle should measure approximately 9.5 cm x 4.5 cm.
Step 2: Shaping and Sewing the Ornament Base
- Finish Edge:
- After the last row, ch 1 and fasten off, leaving a long tail for sewing.
- Fold and Sew Side:
- Fold the rectangle so the short edges meet.
- Using a yarn needle threaded with the long tail, sew the edges together using a whipstitch, ensuring the seam is secure.
- Fasten off the yarn, leaving the top and bottom sides open.
- Close One End of the Ornament:
- With your yarn needle, sew along the top loops of the open side, weaving in and out around the edge.
- Pull the yarn tightly to close the opening, and sew in place to secure.
- Turn Inside Out:
- Flip the ornament right side out so the seam is hidden.
Step 3: Stuffing the Ornament
- Add Stuffing:
- Fill the ornament with fiberfill, scrap yarn, or an old ornament.
- Stuff firmly to give it a nice, rounded shape while keeping the surface even.
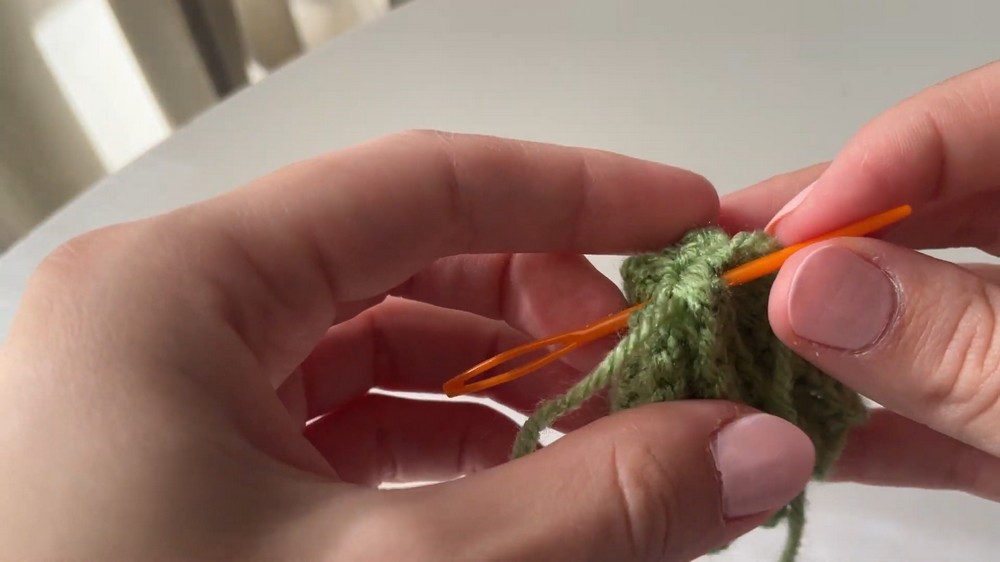
- Close the Second Opening:
- Sew along the top loops of the second opening (as done previously) and pull tightly to close.
- Secure the seam by sewing in and out several times.
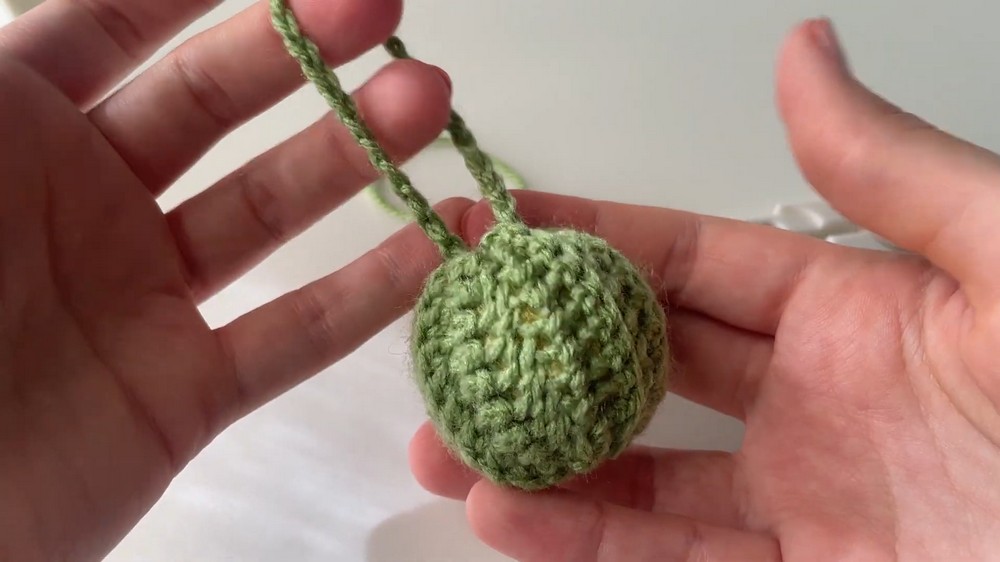
Step 4: Adding the Hanger Loop
- Make a Slip Knot and Chain:
- Using green yarn, create a slip knot and chain the desired length for the hanging loop (e.g., ch 20 for a standard size).
- Attach to Ornament:
- With a yarn needle, attach the loop ends to the top of the ornament by sewing through the stitches at the closed end.
- Secure the loop by tying and weaving the yarn tail into the seam.
Step 5: Making and Attaching the Bow
Create the Bow
- Make a Slip Knot and Chain:
- Using red yarn, create a slip knot and ch 35 (adjust based on preferred bow size).
- Fasten Off:
- Cut the yarn, leaving a long tail, and pull it through the last chain to secure.
- Tie into a Bow:
- Use the chained yarn to create a bow by forming two loops and tying them into a knot.
Attach the Bow
- Secure to Ornament:
- With the yarn needle, sew the bow to the front of the ornament, ensuring it is centered.
- Stitch through the back of the bow and tightly secure it to the ornament by weaving yarn into the top stitches.
- Finish the Attachment:
- Tie and knot the bow attachment securely and weave the remaining yarn tail into the inside of the ornament.
- Tie and knot the bow attachment securely and weave the remaining yarn tail into the inside of the ornament.
Pattern Customizations
- Size Adjustments:
- To make a larger ornament, chain more at the beginning (e.g., ch 15 or more) and increase the number of rows.
- Decorative Variations:
- Add embroidery designs such as stars, snowflakes, or initials to personalize the ornament.
- Use metallic or glitter yarn for a festive touch.
- Bow Alternatives:
- Decorate with ribbon bows or attach store-bought embellishments.
Conclusion
Congratulations on completing your crocheted mini ornament! This festive project is perfect for using up scrap yarn while creating a handmade holiday decoration. The ornament is versatile, customizable for any occasion, and easy to adapt for different colors, sizes, or textures.
Pattern Corrections
- Proper Tension in Base Rows: Ensure not to crochet too tightly when working in back loops, which could make folding and sewing the ornament uneven.
- Consistent Stitch Count: Double-check to ensure each row has the correct stitch count (10 sc) to avoid uneven edges.
Tips for a Flawless Ornament
- Use a stitch marker if you lose track of beginning or end-of-row stitches.
- Fluff and redistribute stuffing evenly before tightly securing the opening to ensure the ornament maintains a smooth shape.
- Hide any yarn ends securely by weaving them into the inside of the ornament to avoid messy finishes.