Brighten up your keys with this Free Crochet Smiley Face Keychain Pattern that’s cute, durable, and perfect for a fun handmade accessory.
Bright, cheerful, and delightfully compact, this Crochet Smiley face keychain Pattern adds a fun touch to everyday items while keeping keys, bags, or backpacks organized. Its lightweight design ensures portability, and its playful look brings a smile to anyone who sees it. Perfect as a gift, party favor, or personal accessory, it combines practicality with a whimsical sense of charm that appeals to all ages.
Charming Crochet Smiley Face Keychain Pattern for All Ages
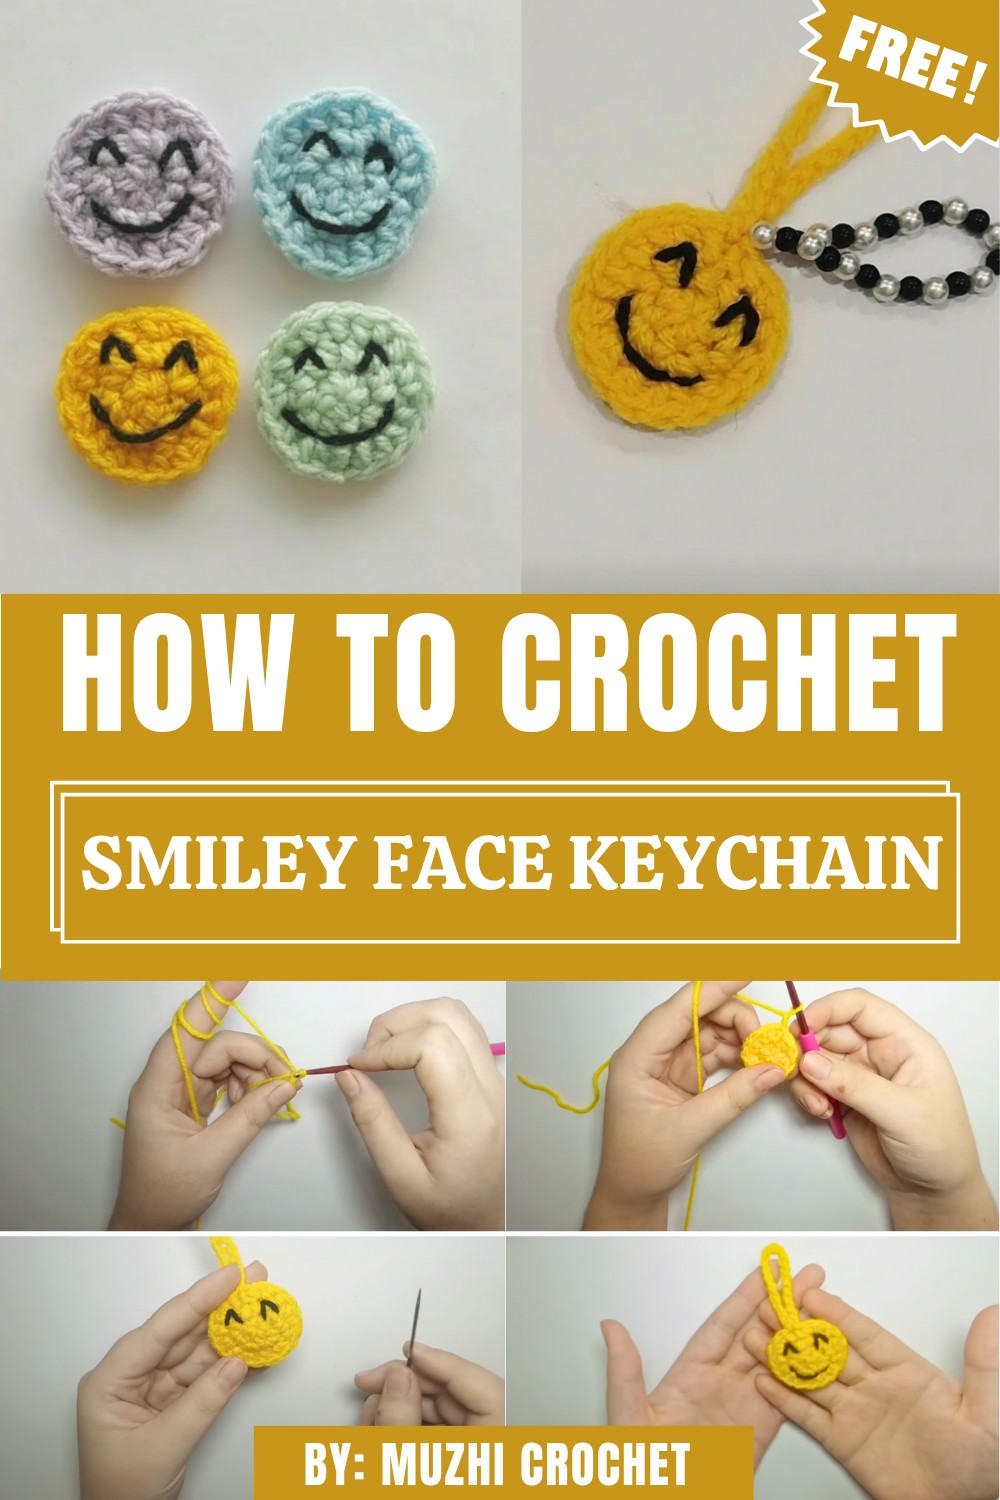
The Crochet Smiley Face Keychain allows you to create a vibrant, eye-catching piece with a joyful expression that instantly lifts moods. The pattern guides you through making a durable yet soft keychain featuring clean lines and simple shapes, ensuring a polished finish. Its design is versatile enough to match any style or color preference, giving you the freedom to personalize each keychain according to taste.
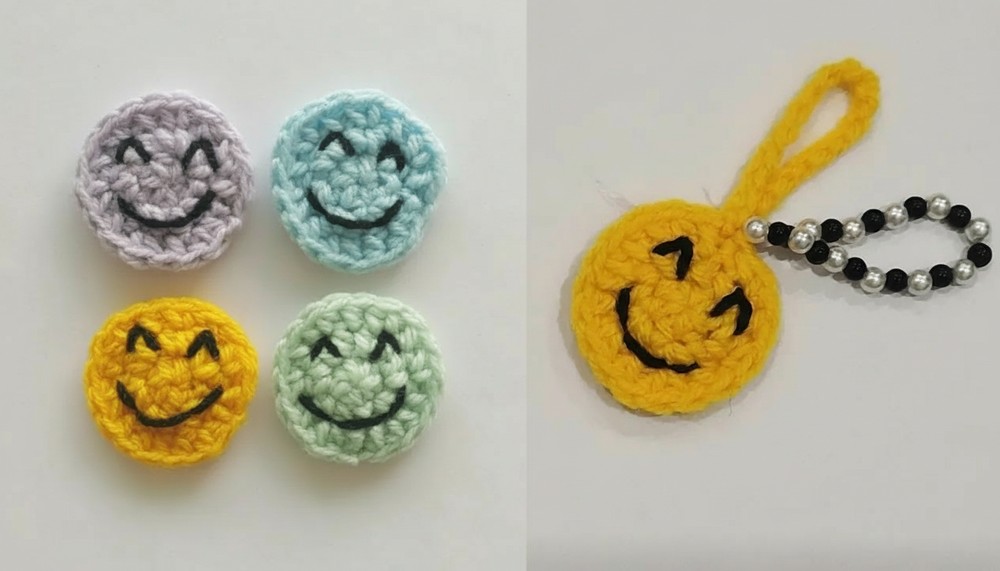
Beyond its cheerful appearance, this keychain provides functional benefits by keeping essentials easily accessible and organized. It can be attached to keys, zipper pulls, or backpacks, making it a practical everyday companion. With this pattern, you can enjoy creating a small, handmade item that brings happiness, style, and convenience all in one, turning a simple accessory into a charming statement piece.
Step-by-Step Details
Step 1: Gather Your Materials
Before starting, prepare the following items:
- Yarn: 3G yarn (yellow for the face and black for the eyes and smile).
- Crochet Hook: 2.5 mm crochet hook.
- Tools: Scissors and a yarn/darning needle.
Step 2: Create the Base (Smiley Face)
Row 1: Start the Magic Ring and First Row
- Make a magic ring by wrapping the yarn to form a loop.
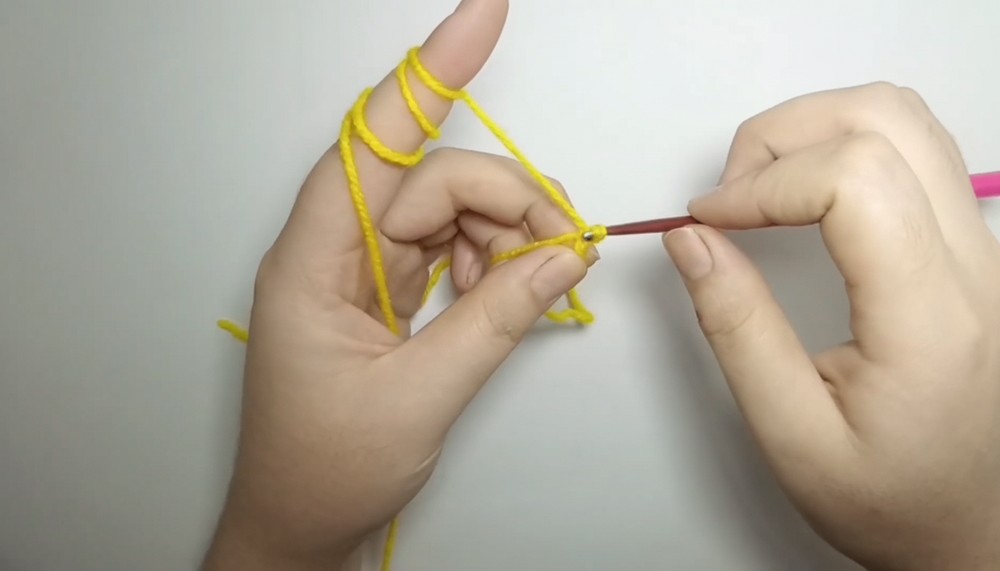
- Chain 1 and then crochet 6 half-double crochets (HDC) into the magic ring.
- Pull the yarn tail to tighten the magic ring and close the circle.
- Slip stitch into the very first stitch of the row to complete it.
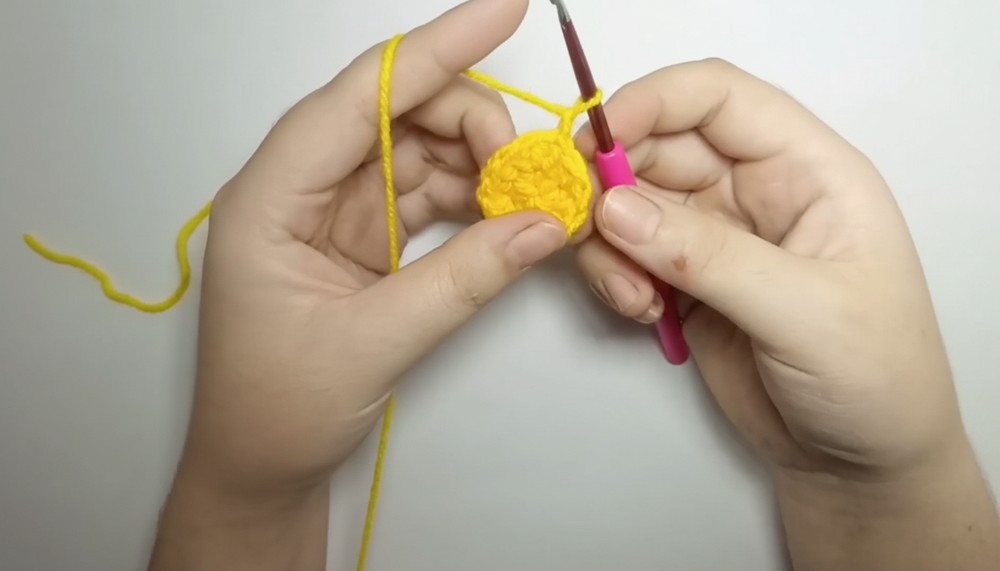
2: Increase
- Chain 1 and crochet two HDC in each stitch (HDC increase) around the circle.
- At the end of the row, slip stitch into the first stitch to join.
3: Alternating Normal and Increase Stitches
- Chain 1, then alternate between 1 single HDC (crochet normally) and 1 HDC increase (two HDC in one stitch) in the next stitch.
- Repeat this pattern until the end of the row (1 normal, 1 increase).
- Slip stitch into the first stitch to join.
Optional: Add More Rows for a Bigger Face
If you want a larger smiley face or applique:
- Keep working in the round.
- For the fourth row, crochet 2 HDC normally and then 1 HDC increase (repeat around).
- For the fifth row, crochet 3 HDC normally, then 1 HDC increase (repeat around).
- Adjust the number of normal HDCs as you move to each new row, adding one extra normal HDC before the increase.
3: Transform Into a Keychain
- Start by chaining 20.
- After making your chains, slip stitch into the spot where you began chaining.
- Fasten off the yarn with a long tail for weaving, ensuring your chains are secure.
- Weave in the remaining yarn through the stitches and snip off any extra yarn for a clean finish.
4: Add the Smiley Face Details
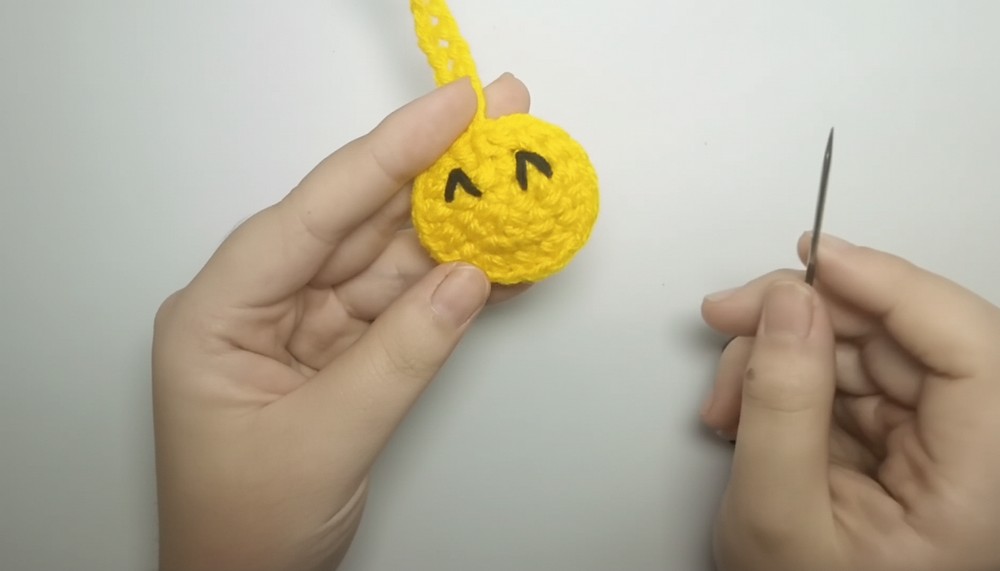
Create the Eyes
- Cut a small amount of black yarn.
- Thread the yarn into your needle and prepare to create the eyes.
- Insert your needle into the desired position on the face. Pull the yarn through while leaving a short tail on the back.
- Stitch the eye in place:
- Insert the needle into the top of the eye, pull the yarn through, then stitch into the left corner of the eye.
- Stitch back into the top to secure and shape the eye, pulling the yarn through firmly but not too tight.
- Tie two knots at the back of the work and snip off excess yarn.
- Repeat the same steps for the second eye to ensure symmetry.
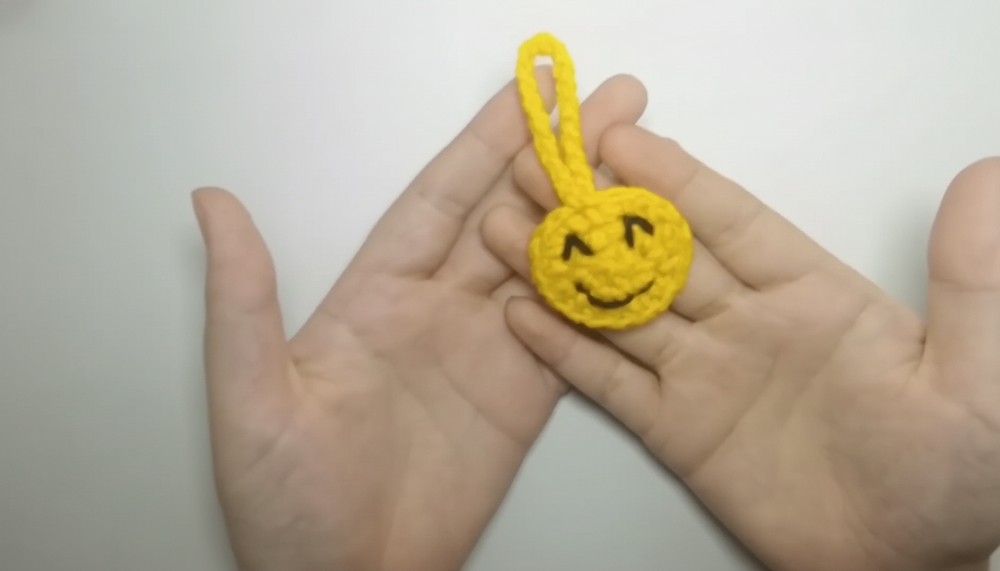
Crochet the Smile
- Cut another piece of black yarn and thread your needle.
- Find the spot where the beginning of the smile will be and insert the needle, leaving a short tail at the back.
- Stretch the yarn to the bottom curve of the smile and stitch it. Secure it by pulling it through the same spot.
- Then, insert the needle where the end of the smile should be and secure it in the same manner.
- The smile will now have a slight curve, giving the face its cheerful expression.
- Turn your work and tie two knots on the back to secure the yarn. Trim any excess threads.
Optional Step: Hide the Wrong Side of the Smiley Face
If the back of your applique looks messy or untidy, consider crocheting another identical face and joining it:
- Align the two faces together (right sides out).
- Stitch them together with yarn or by slip-stitching around the edges.
- This step is optional but gives the applique a neater finish.
Special Features
- Customizable Size: Add additional rows to increase the size of the smiley face as desired.
- Keychain Option: Easily transform the smiley face into a fun and unique keychain by adding a simple chain loop!
- Adorable Details: The black thread detailing for the eyes and smile adds character and brings the design to life.
- Versatile Use: The applique can be used as a keychain, a patch for clothing, a kitchen accessory, or even as a standalone craft.
Level of Difficulty
This project is beginner-friendly, as it primarily uses simple techniques such as the magic ring, half-double crochet, and slip stitch. While straightforward, it requires some basic familiarity with crochet skills. Adding the face details (eyes and smile) may require a bit of patience and precision, but the instructions are clear enough for anyone to follow.
Tutor’s Suggestions
- Use a light-colored yarn for the base: This makes it easier to see your stitches, especially while creating the circle and smiley face details.
- Increase evenly: While adding rows, maintain consistent stitch counting to avoid having a lopsided circle.
- Weave in ends neatly: Secure the yarn tails on the back carefully to ensure durability, especially if making a keychain.
- Go slow with the smile: Take your time with the black yarn to ensure the face looks symmetrical and neat!
Uses and Materials
Materials Needed:
- Yarn: Yellow yarn for the face and black yarn for the eyes/smile (3G yarn suggested for the face).
- Crochet Hook: 2.5 mm.
- Darning needle.
- Scissors.
Uses:
- Keychain: Easily transform the smiley face into a keychain for yourself, friends, or loved ones.
- Decorations/Patches: Stitch the applique onto hats, bags, sweaters, or blankets to add personality and a fun design element.
- Gifts and Accessories: These smiley appliques make fun, heartwarming handmade gifts or small tokens for any occasion.
Tip
When working on the black yarn detailing (eyes and smile), always leave a long tail at the back for tying knots. This ensures the stitches are secure and prevents unraveling over time. You can also double-knot the thread before cutting any excess to add extra durability.
Conclusion
The smiley face crochet applique is a quick, simple, and adorable project that can be completed in no time, even by beginners. With basic crochet techniques like the magic ring and half-double crochet, you can craft a piece that’s both customizable and versatile. Whether you use it as a fun keychain, an embellishment for clothes or bags, or as decor, this project is guaranteed to bring joy to the creator and its recipient. The clear instructions provided in the video make it easy to follow along and add personal touches to your design.