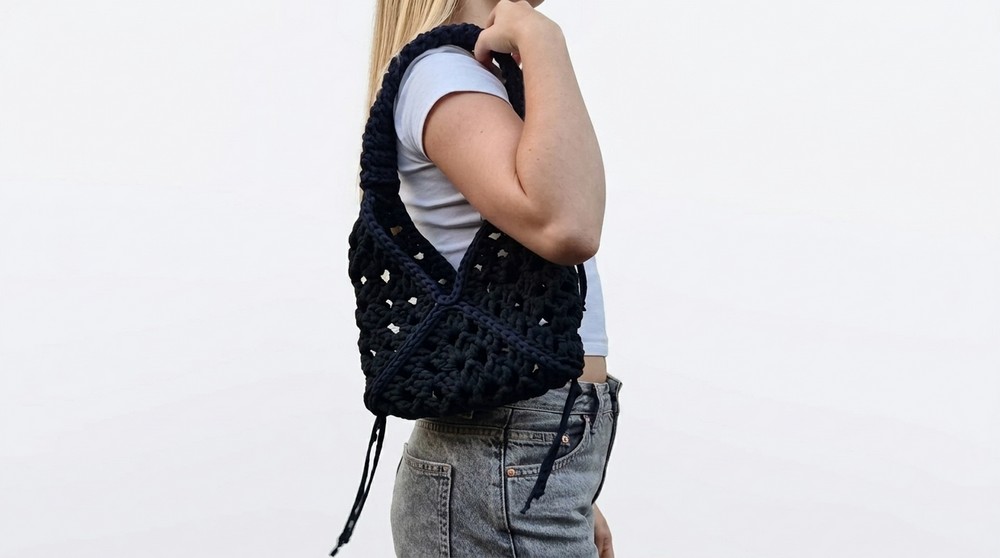
Build a soft and colorful bag using crochet t shirt yarn bag pattern—an easy and fun project that combines practicality with sustainable creativity.
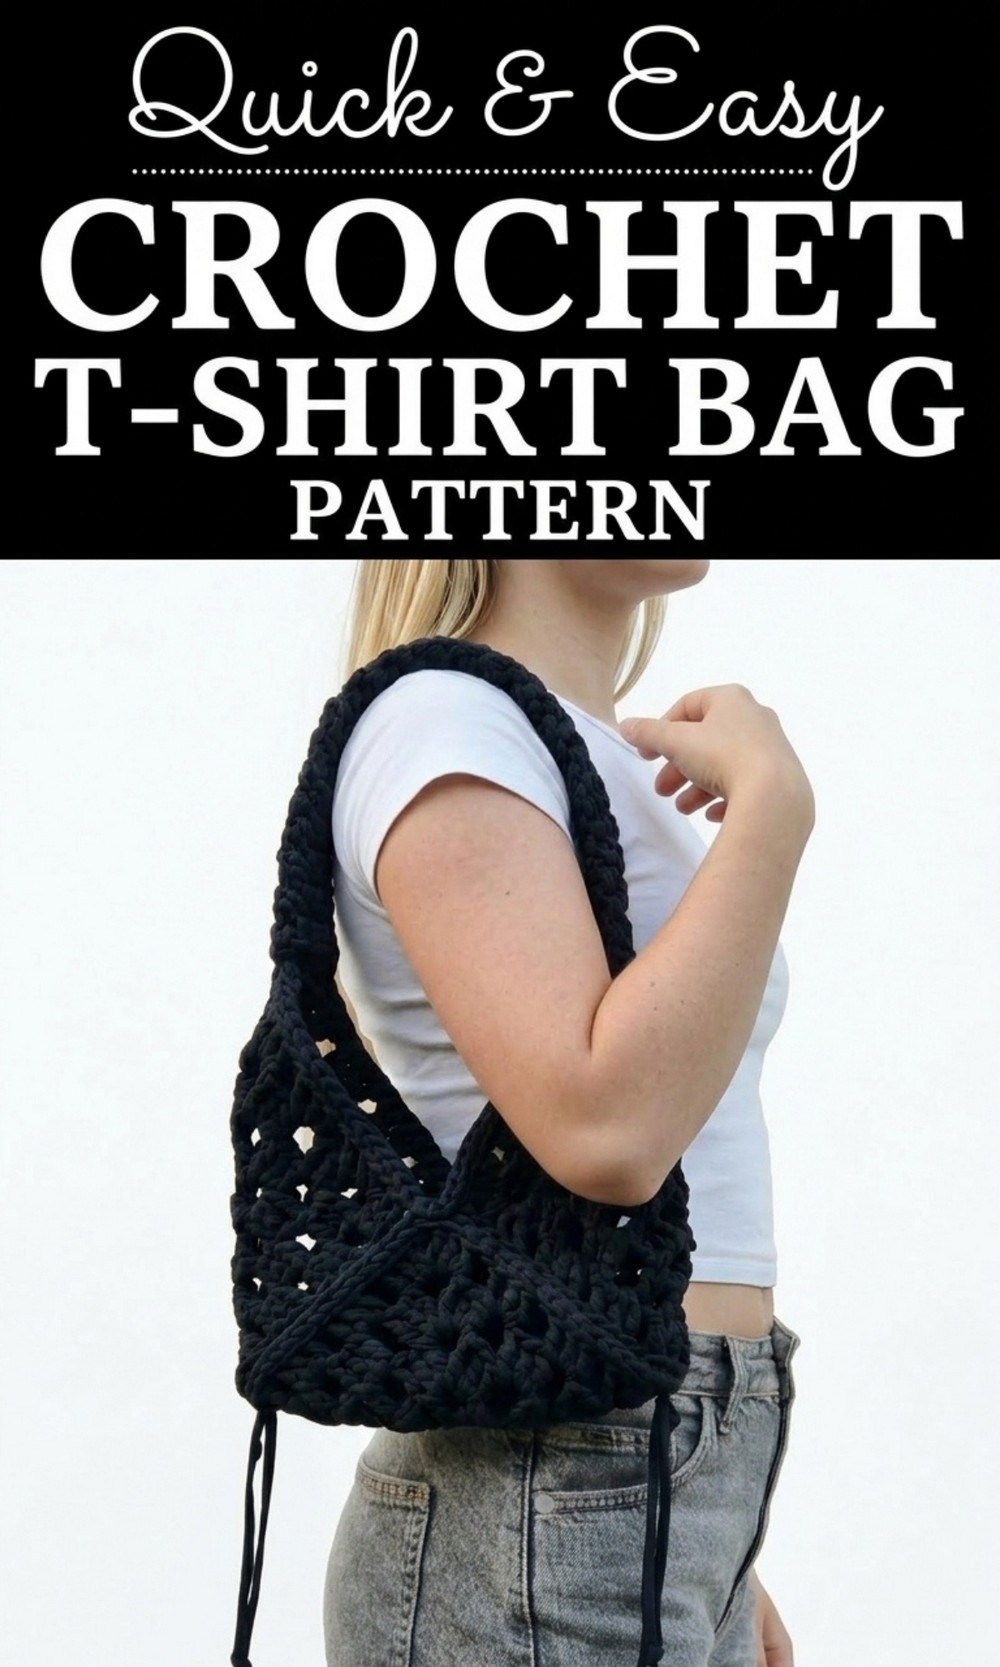
Free crochet t shirt bag pattern fun upcycle your wardrobe
Turn your old clothes into a bold accessory that’s both stylish and eco friendly. Imagine crocheting a tote that’s not only sturdy but feels wonderfully soft and thick in your hands. With the Free Crochet T Shirt Bag Pattern, your leftover stuff transforms into a vibrant, chunky stitched masterpiece—like a boutique worthy statement piece without the expensive price tag.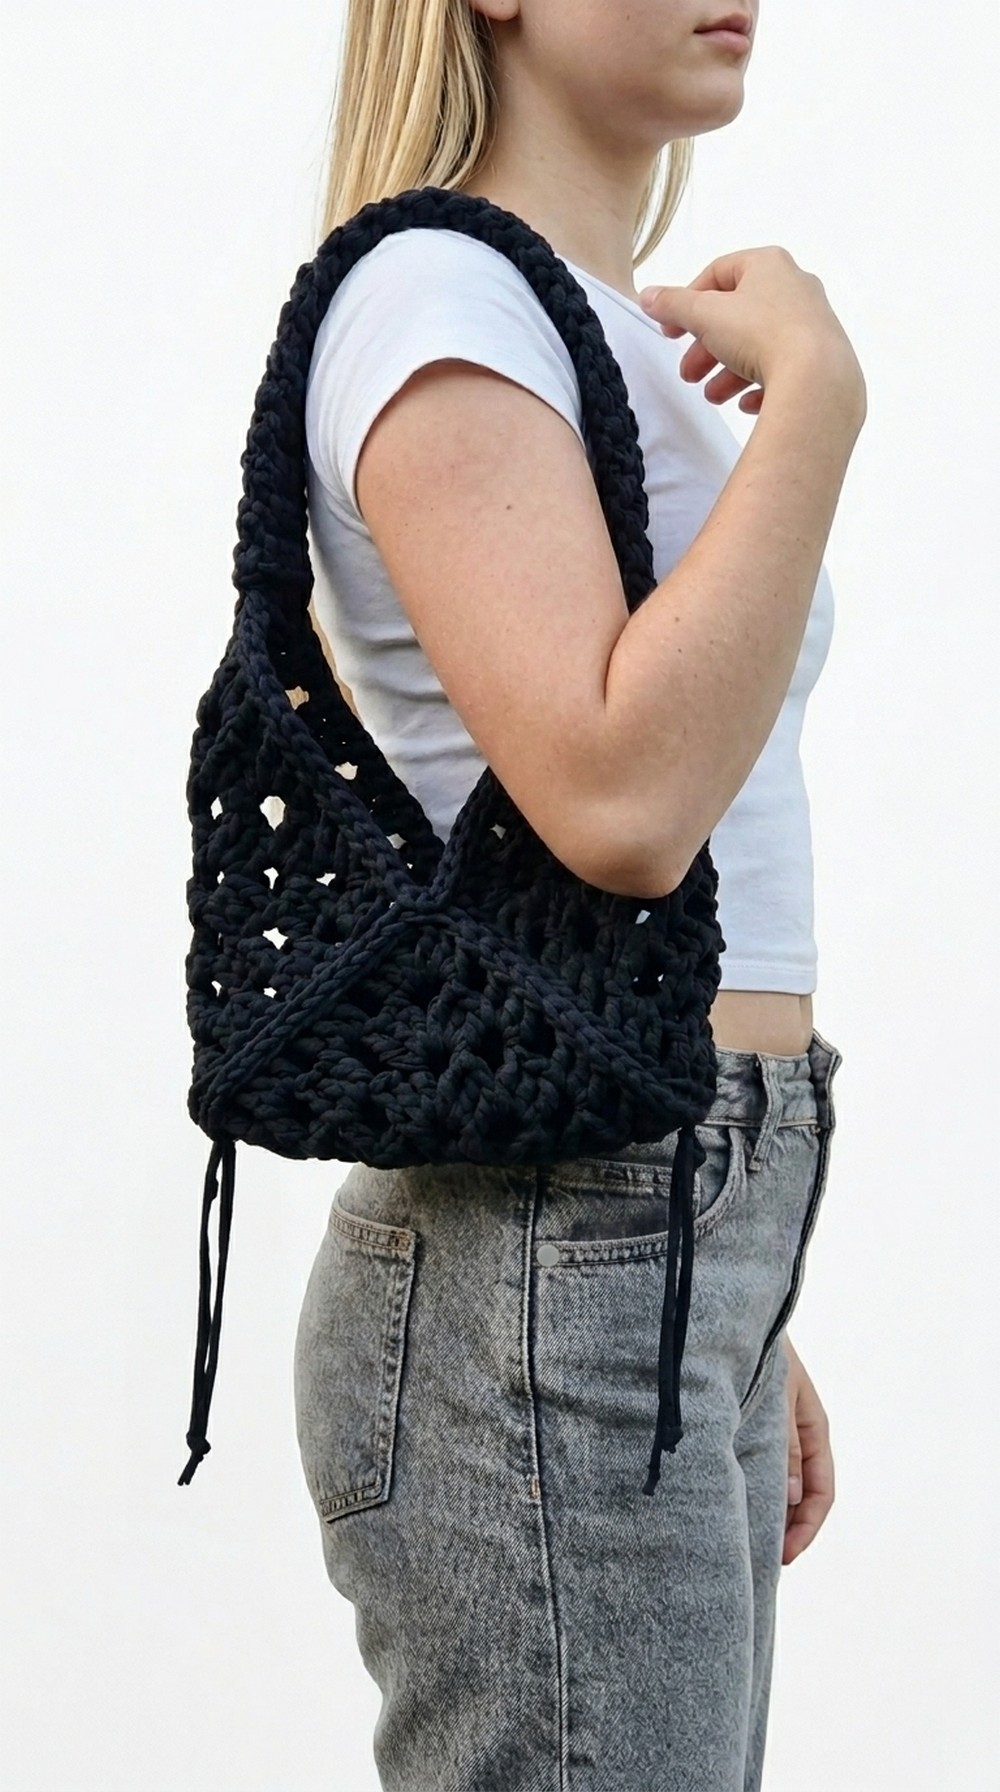 This tote isn’t just a looker—it’s seriously practical. Its roomy interior can hold heavy books, snacks, or essentials with ease, while perfectly crocheted wide handles rest comfortably on your shoulder. Need a reliable companion for a beach day? Or maybe a head turning bag for your school supplies? This bag adapts effortlessly to your lifestyle, stretching to fit everything safely, thanks to the flexible t shirt yarn.
Materials Required:
- T shirt yarn: 2 colors (Main color + a contrasting color)
- Crochet hook: 8 mm
- Scissors
- Tapestry needle (optional, for weaving in ends or detailing)
Special Techniques Used:
- Magic Ring: A method for crocheting in the round to ensure a tight and adjustable center.
- Slip Stitch: A flat stitch used for joining or edging work.
- Single Crochet: Basic crochet stitch used for reinforcing the handle.
- Back Loops Only: Technique to reinforce certain parts of the bag, like the strap.
Step by Step Instructions:
1. Create a Granny Square
You will need to crochet three granny squares to complete the structure of the bag.
Step 1: Magic Ring
- Begin with the main color yarn.
- Create a magic ring (this can be tricky due to the chunky yarn, but take your time).
- Chain 3 to start.
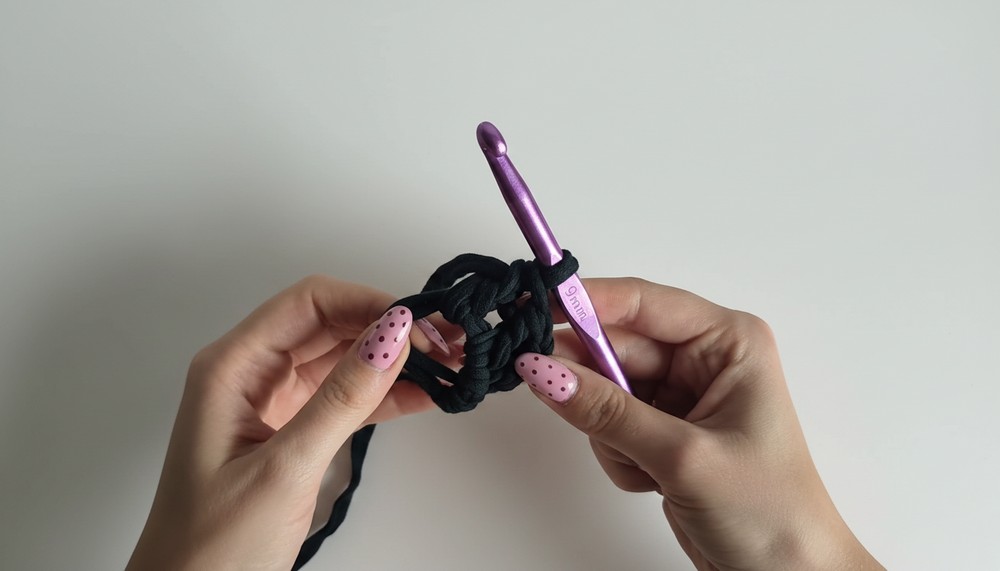
Step 2: First Round
- Into the magic ring, crochet four sets of three double crochets (dc stacks). The chain 3 counts as your first double crochet.
- After each set of three double crochets, chain 2.
- Tighten the magic ring by pulling the yarn tail and join the round with a slip stitch into the first double crochet.
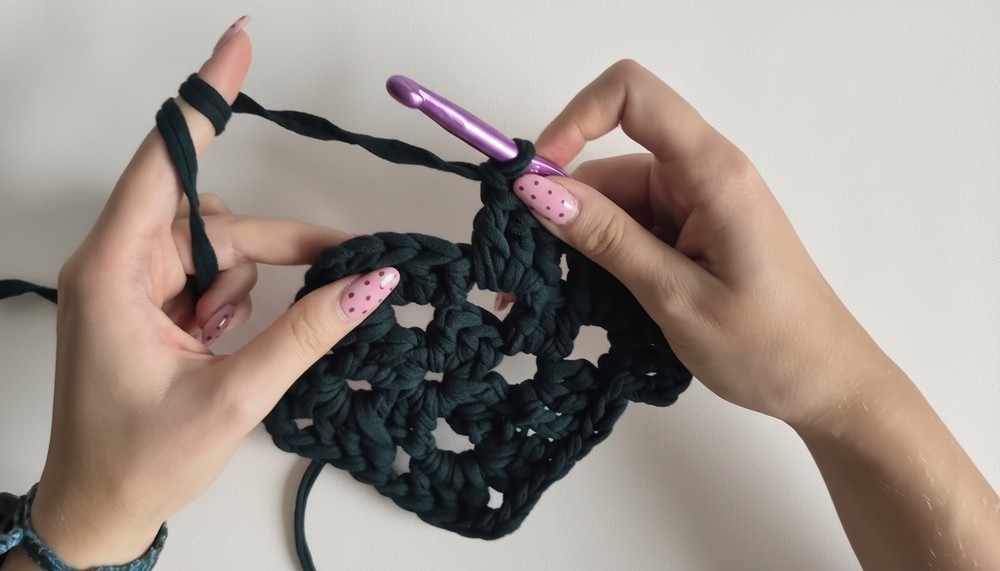
Step 3: Second Round
- Slip stitch into the nearest corner (chain space).
- Chain 3 (counts as your first double crochet) in this corner space.
- Crochet 2 more double crochets into the same corner, chain 2, and add another set of three double crochets into the same corner.
- Corners: Always create two sets of three double crochets with chain 2 between them.
- Between corners, chain 1 and crochet a set of three double crochets in the chain spaces along the side.
- Repeat this pattern around the square.
- Join the round with a slip stitch at the corner chain space.
Step 4: Additional Rounds
- Repeat the process for additional rows by working in a spiral. Ensure you continue with increased sets of chains and double crochets along the edges of the square as it expands.
- Decide on the size of your granny square; typically, 3–4 rows are optimal for a medium size bag using t shirt yarn.
Step 5: Finish Each Granny Square
- When you complete the rounds, cut the yarn and pull it through the last stitch.
- Weave in the ends using a needle or smaller hook.
Repeat Steps 1–5 to make three identical granny squares.
2. Assemble the Bag
Step 1: Fold Squares Into Triangles
- Fold each granny square diagonally to form a triangle.
- Arrange the triangles:
- One triangle will form the bottom of the bag.
- The remaining two triangles will form the sides.

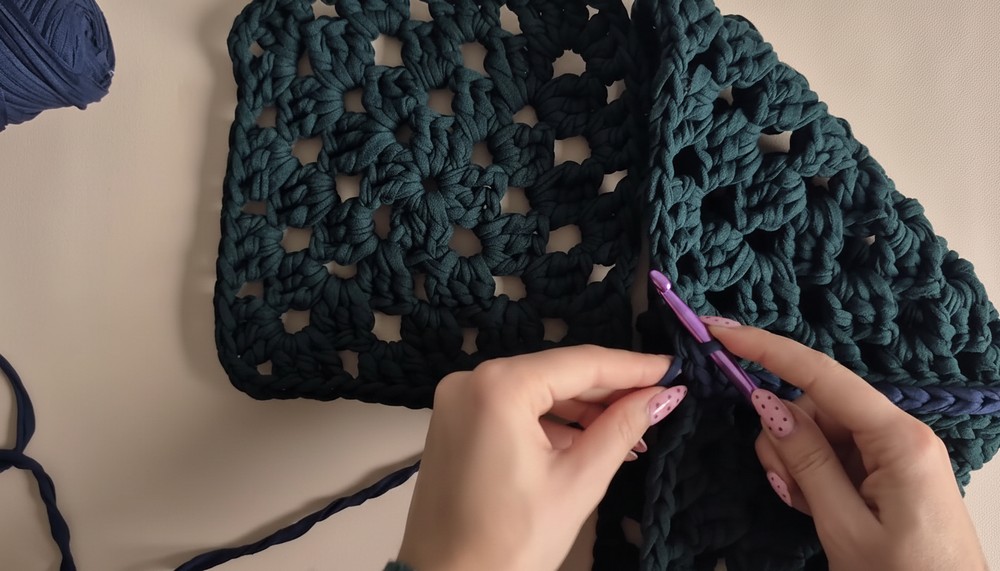
Step 2: Join the Squares
- Take the contrasting yarn and create a loop on your hook.
- Using the back loops only, begin joining the squares from the center of the base triangle and one side triangle.
- Insert the hook through the back loops of both squares and make a slip stitch.
- Continue slip stitching along the edge until the entire side is joined.
- Repeat this process to attach the third square to the other side.
- Ensure gaps are minimized by adding extra slip stitches where necessary.
Step 3: Complete the Edging
- Once the squares are assembled into a bag shape, work slip stitches around the top open edge of the bag using the contrasting yarn.
- This creates a clean, polished border and reinforces stability.
3. Create the Strap
Step 1: Choose Strap Placement
- Locate the four stitches in the top corners where the strap will connect.
Step 2: Crochet the Strap
- Use a smaller hook for tighter stitches.
- Chain 2 and work four single crochets (sc) across the designated area.
- Turn your work, chain 1, and crochet four single crochets into the front loops of the row below.
- Alternate between working into the front loops only and both loops to reduce stretchiness:
- Insert the hook into the front loop of the current row and the front loop of the previous row, then single crochet.
- Repeat until the strap reaches your desired length.
Step 3: Attach the Strap
- Sew or crochet the strap onto the opposite end of the bag, ensuring symmetry and secure attachment.
- Add a final border of slip stitches around the ends of the strap to polish its look.
Finishing Touches
- Hide Ends: Use a tapestry needle or smaller crochet hook to weave in all loose ends.
- Optional Design: Add knots or braids in contrasting yarn colors sporadically across the bag to personalize the look.
Final Words and Tips To Maintain the Pattern
Congratulations on completing your viral Pinterest inspired granny square bag, This handmade accessory is as durable as it is stylish, and here are a few tips to keep it looking fresh:
- Washing Care: If needed, spot clean or hand wash in cool water and air dry flat.
- Storage: Avoid overstuffing to maintain its shape.
- Creative Variations: Play with different yarn colors or add embellishments like tassels, beads, or appliques for extra flair.