Celebrate spring with this Free crochet Easter wreath Pattern, perfect for bright doors, festive walls, and cheerful seasonal décor at home today.
Whimsical Crochet Easter wreath Pattern Perfect for Front Doors

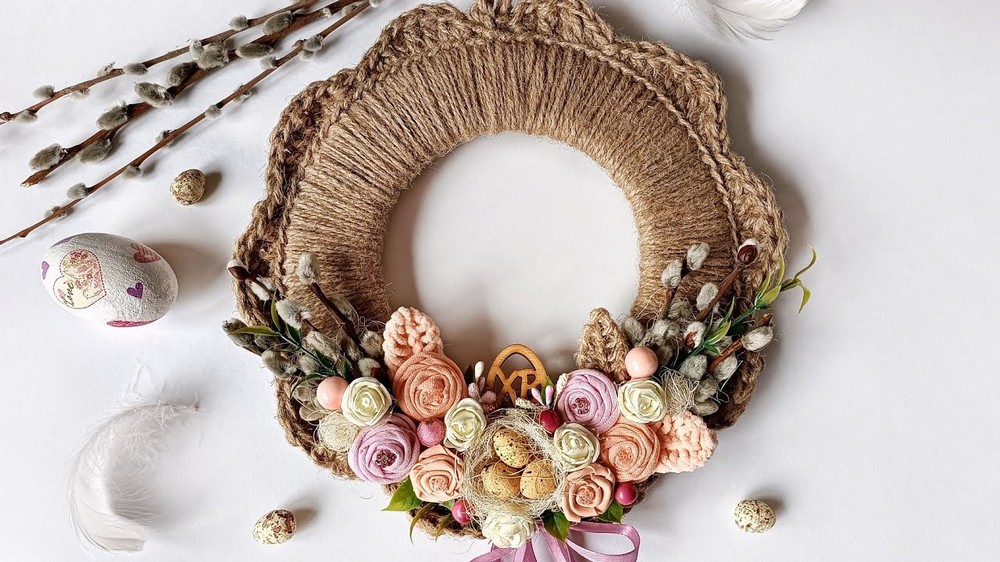
Seasonal décor becomes more meaningful when it reflects care, creativity, and personal effort. A Crochet Easter wreath Pattern offers a charming way to celebrate spring while adding warmth to your home. Its soft textures, pastel tones, and handmade details give it a gentle beauty that store-bought decorations often lack. This wreath can be used on front doors, living room walls, mantels, or party backdrops, bringing a festive yet graceful look to any space.
Materials Needed
Here’s a complete list of materials Victoria recommends in the video:
- Jute Twine: With a density of 1100 Tex (used in double thread).
- Crochet Hook: Size 5.5 (alternatively, use hook sizes 5 or 6).
- Corrugated Cardboard: Used for the wreath base; ensure it is dense and keeps its shape well.
- Foamiran: For decorative elements.
- Sisal Fiber: Used for making decorative balls or nests.
- Ribbons: Approximately 60–90 cm in length for tying removable decor.
- Hot Glue Gun: To fix decorations and ensure strong assembly.
- Artificial Decorative Items: Berries, beads, greenery sprigs, wooden figurines, and miniature eggs.
One major benefit is reusability, as it can be stored and displayed year after year without losing its appeal. Making it also supports mindful crafting, helping reduce stress while improving crochet skills. The scope of this pattern is wide, allowing color changes, added flowers, eggs, or bows to match personal style or trends. Beyond decoration, it can be a thoughtful seasonal gift or a small handmade product for festive sales. Overall, it blends tradition, creativity, and lasting beauty in a simple yet refined way.
Handmade Easter Wreath Crochet
Special Features of the Wreath
- Seasonal Versatility: The removable decor allows the same wreath base to be reused for different holidays, such as Easter, Christmas, and other events.
- Eco-Friendly Materials: Using jute twine and natural decor like sisal and willow branches adds a rustic, sustainable touch.
- Multi-Purpose Design: The wreath can be used in two ways:
- Wall/door hanging: Attach a loop to hang the wreath.
- Table centerpiece: Place in the center of the festive table and decorate it further with a cake or centerpiece items.
- Customizable Base and Decor: The size, style, and decor of the wreath are easily customizable to suit different tastes and themes.
Step-by-Step Instructions
1. Create the Base
- Cut the Cardboard Base: Cut corrugated cardboard into two identical pieces for added strength. Victoria used a 21 cm outer diameter with a 4 cm width. Glue the two pieces together if you need more sturdiness.
- Start Tying with Jute: Leave a small free end of the thread and make a secure loop to begin. Wrap the working thread around the cardboard base and crochet the first loop.
- Crochet the Circumference: Use the following steps around the edge:
- Wrap the jute thread around the base.
- Yarn over your hook, pull the thread back, and crochet two loops on the hook.
- Tighten the working threads and pull the loops well.
- Continue this method around the entire circumference, ensuring the loops stay neat.
- Adjust Loop Count: Ensure the number of loops is divisible by 9 for consistent arches in the next row. You can shift or adjust the loops to meet this requirement.

2. Crochet the Arches
- Start knitting the second row with arches using a variety of crochet stitches. These include:
- Single Crochet
- Half-Double Crochet
- Double Crochet
- Double Crochet with Two Yarn Overs (knit in three stages).
- After completing each arch, end with a connecting stitch. Straighten the arch before moving to the next one. Repeat this sequence to create approximately 10 arches around the base.

3. Add a Loop for Hanging
If the wreath is intended as wall or door decor:
- Crochet a chain of 10 air loops for the hanging loop.
- Fasten the end with a connecting loop and secure the thread by hiding it under the wrong side of the loops.

4. Make Decorative Elements
Leaves:
- Use plush yarn or jute for crocheting leaves.
- Chain 7 loops (longer chains create larger leaves).
- Pull yarn through each link without knitting to form loops.
- Alternate knitting across the loops to form one side of the leaf. Turn the work and repeat for the opposite side.
- Hide the thread ends securely. For plush yarn, seal the edges with fire (e.g., lighter) to prevent fraying.
Flowers:
- Flowers can be either purchased or handmade. Victoria suggests using foamiran strips (2 mm wide, 25 mm long) for budget-friendly handmade roses.
- Round off the edge and twist the foamiran strip into a bud.
- Apply hot glue as you fold to fix petals.
- Add beads or glitter for the center detail.
- Similar flowers can also be made using leftover yarn by folding in a spiral and securing with glue or stitching.
Other Decor:
- Create decorative nest elements with sisal fiber. Roll it into small balls or form a flat nest shape.
- Add wooden figurines, artificial berries, and greenery sprigs to enhance color and texture.

5. Assemble the Removable Decoration
- Cut a cardboard piece to fit the wreath and attach ribbons for tying the decoration securely. Victoria suggests using 60 cm ribbons but notes the upper part should be 10 cm longer for even hanging.
- Start Gluing the Decor:
- First, apply sisal fiber to cover the cardboard.
- Distribute larger decorative pieces evenly (e.g., flowers, leaves).
- Add smaller items like berries, wooden figurines, and beads to fill gaps. To avoid mistakes, take a photo of your layout before gluing.
- Hot glue everything in place, ensuring an even, harmonious composition. For hanging decor, add a tied bow at the bottom for a finishing touch.

Uses of the Wreath
- As a wall or door decor, the wreath is a perfect way to make your space festive.
- As a table centerpiece, it adds elegance and seasonal vibes to the dining setting, especially if paired with Easter cakes or decorative items.
- With its removable decor, you can recycle the wreath base for various events like Christmas, Thanksgiving, or fall celebrations.
Tutor’s Suggestions
- Always choose dense corrugated cardboard for the base to ensure it holds its shape.
- Pay attention to the décor colors: Victoria recommends pastel shades for a fresh, soft look.
- Use removable decorations for versatility and sustainability. This way, you can repurpose the wreath without creating waste.
- Try creating details like leaves in various sizes to suit your overall theme.
Level of Difficulty
This project is beginner-friendly, especially for crocheters with basic skills in forming chains, single crochet, double crochet, and other simple stitches. Minimal tools and affordable materials make this ideal for anyone looking for an engaging seasonal craft.
Conclusion
Victoria’s tutorial offers a fun and creative way to craft a seasonal wreath for Easter that can be repurposed for other holidays. By combining simple crochet techniques and accessible materials, you’ll have a versatile handmade piece with stunning removable decor. This project is not only rewarding but also an eco-friendly approach to seasonal decorations!
Pro Tip for Success
Before gluing the decor, lay out all elements on the wreath base. Take a photo to remember the arrangement and ensure a balanced, visually appealing design!