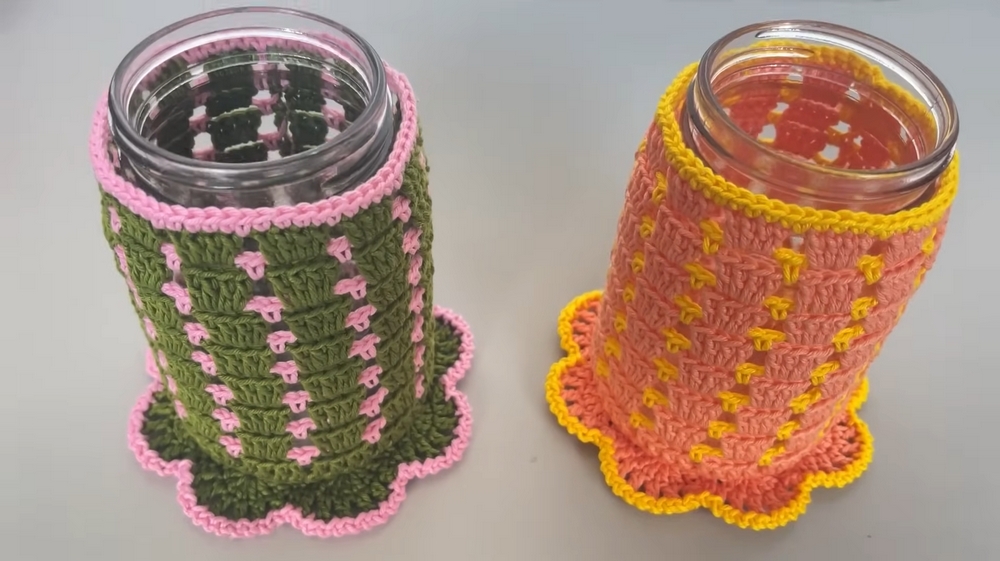
Bring charm to your table setup with this Free Crochet Cutlery Holder Pattern that keeps utensils organized while adding a soft, handmade touch.
Long before utensil drawers and plastic organizers became the norm, table settings were thoughtfully prepared with care and personal touches. Handmade cutlery holders were a simple way to add beauty to everyday dining while keeping things neat and accessible. That tradition still holds value today, especially with a soft, reusable crochet alternative that brings charm and utility together. With this free crochet cutlery holder pattern, you can bring order to your table while adding a subtle, handmade accent that guests will notice.
Perfect Free Crochet Cutlery Holder Pattern for Table Settings

Whether you’re setting up for a holiday meal, packing a picnic, or just adding a bit of charm to daily dinners, these holders offer a tidy solution that’s both functional and elegant. They’re easy to store, reusable, and customizable to match your decor, color scheme, or season. Tuck in napkins, forks, knives, or even small menu cards, the versatility makes them useful for any occasion.
Plus, they’re a thoughtful gift idea that balances beauty with purpose. This simple project brings an old-fashioned sense of care back to the table, an understated way to keep things organized while also offering a warm, handmade touch that guests will appreciate long after the meal is over.
Crochet Cutlery Holder Pattern
Materials
- Yarn:
- Amigurumi yarn (recommended size #4) in the following:
- Main color 1 (Yellow).
- Accent color 2 (Orange).
- Ensure the yarn is lightweight for smooth definition.
- Amigurumi yarn (recommended size #4) in the following:
- Crochet Hook:
- 2.5 mm hook (recommended for the amigurumi yarn).
- Additional Tools:
- Scissors.
- Tapestry needle (for weaving in ends).
- 500 ml glass jar or container, such as a mayonnaise jar or similar (approx. 500 ml capacity).
Finished Size
- Fits a 500 ml jar. Adjust the number of rounds or increases based on your container’s size.
Special Techniques
- Magic Ring: For a tight and seamless circular foundation.
- Slip Stitch (SS): Used for joining rounds.
- Single Crochet (SC): To create smooth edges and functional stitches.
- Double Crochet (DC): To form the main body of the holder.
- Back Loop Only (BLO): Creates texture for decorative detailing.
Pattern Instructions
Step 1: The Base
- Foundation (Magic Ring):
- Create a magic ring.
- Chain 2 (this does not count as a stitch).
- Round 1:
- Work 12 DC into the magic ring.
- Pull the tail to close the ring.
- Slip stitch (SS) into the first DC to close the round.
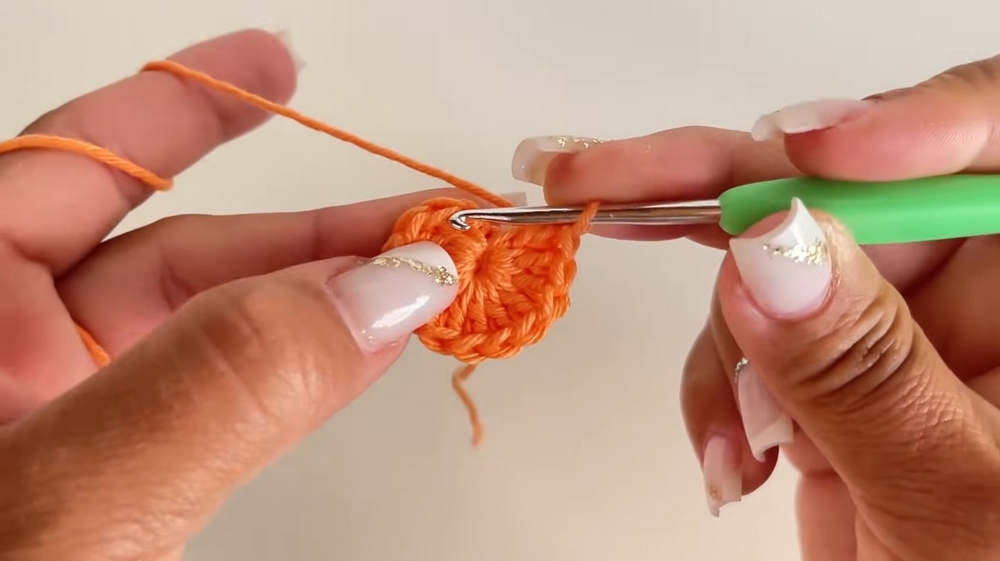
Stitch Count: 12 DC.
Pro Tip: If the magic ring is difficult, chain 5, join with a SS to form a ring, and start working within it.
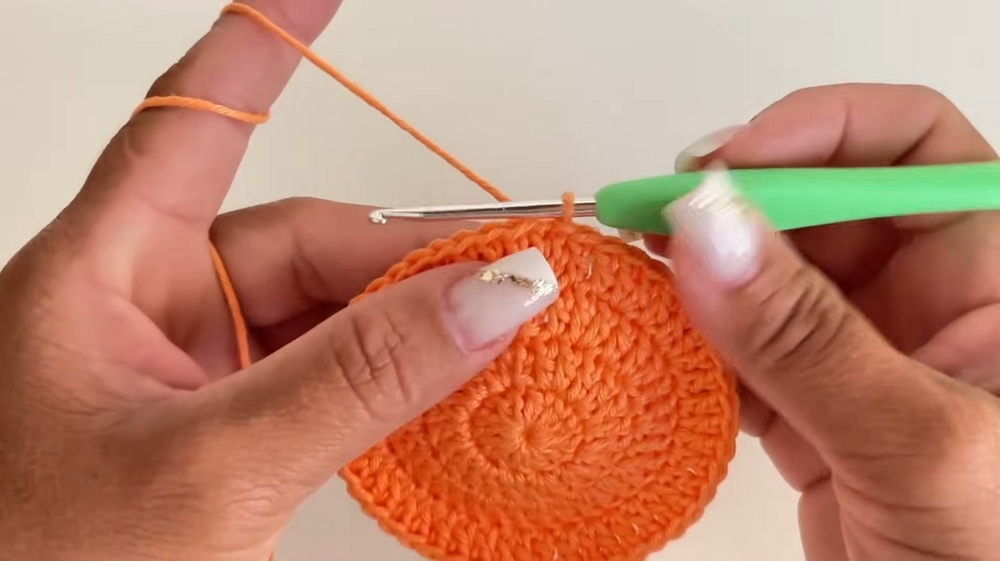
- Round 2 (Increase Round):
- Chain 2 (does not count as a stitch).
- Work 2 DC into each stitch around.
- SS into the first DC to close the round.
Stitch Count: 24 DC.
- Round 3:
- Chain 2.
- Work 2 DC in the first stitch, 1 DC in the next stitch.
- Repeat from * to * around.
- SS to close the round.
Stitch Count: 36 DC.
- Round 4:
- Chain 2.
- Work 2 DC in the first stitch, 1 DC in the next 2 stitches.
- Repeat from * to * around.
- SS to close the round.
Stitch Count: 48 DC.
- Rounds 5+ (Optional Rounds):
- Measure the base of your glass jar. If it is larger, repeat the pattern for another increase round:
- 2 DC in the first stitch, 1 DC in each of the next 3 stitches.
- Measure the base of your glass jar. If it is larger, repeat the pattern for another increase round:
Step 2: Working up the Sides
- Foundation for the Sides (Textures):
- Chain 3.
- Work 1 DC into each stitch around, but this time work into the BACK LOOPS ONLY (BLO).
- SS into the first DC to close the round.
Stitch Count: Stays unchanged from the last round of the base.
- Round 2 Onward (Body Construction):
- Chain 3.
- Work 1 DC into each stitch (grab both loops).
- SS to close the round.
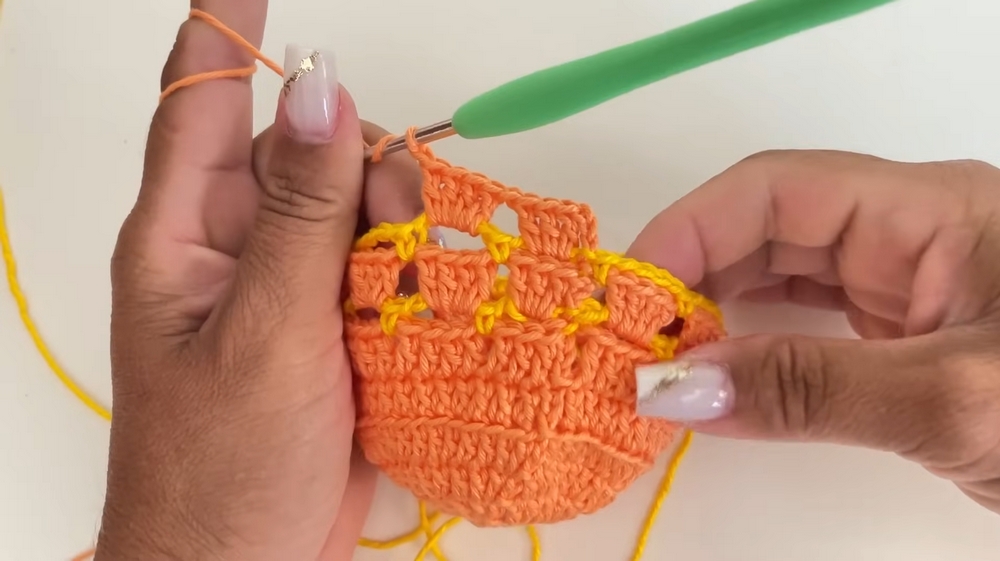
- Repeat Until Desired Height:
- For a 500 ml container, work approximately 8 total rounds for the body.
- Measure frequently to ensure a snug fit over the jar/container.
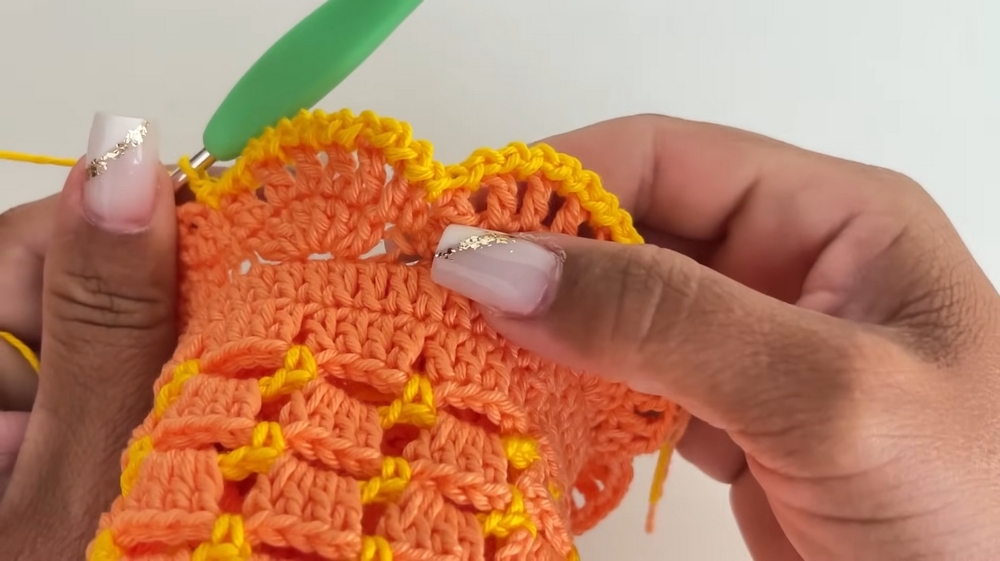
Step 3: Adding a Decorative Pattern
- Transition to Yellow Yarn:
- Attach yellow yarn after completing the body using orange yarn.
- Create Chains and Picots:
- Chain 4, skip the first stitch, SC into the next stitch.
- Repeat Chain 4, SC into the next stitch around.
- Finishing with Picot Pattern:
- Switch back to orange to close the final round with small shell-like embellishments.
- For each “chain space,” work 6 DC, skip the next space, work a SC.
- Repeat around and fasten off.
Step 4: Finishing the Top Edge
- Final Detailing (Top Round):
- Using yellow yarn, work 1 SC into each stitch around the top edge.
- SS and fasten off.
- Hide the Ends:
- Use the tapestry needle to weave in all loose ends.
Customizations
- Colors:
- Experiment with different color combinations for festive or themed holders.
- Height:
- Adjust the number of body rounds to fit taller or shorter containers.
- Multi-functionality:
- Use the holder as a cutlery organizer, vase wrap, or even for small trinkets.
- Additional Embellishments:
- Add small flowers, bows, or appliqués to the edge for added charm.
Finishing the Project
- Insert your 500 ml container securely into the crochet piece.
- Ensure a snug fit around the edges so the crochet holder stays in place.
Final Words and Tips
- Yarn Tips: Use a tight tension for the base so it provides proper support for the jar.
- Stretching: Cutlery organizers or jar covers typically stretch slightly with time; a snug initial fit is ideal.
- Washing: Handwash gently in cold water and reshape while damp to maintain the structure.
This versatile design is a perfect balance of beauty and utility. Whether used as a cutlery holder, jar cover, or a charming home decor piece, it is bound to bring warmth and creativity into any space.