Whip up an adorable crochet Santa hat with this cute free pattern and add holiday magic to your Christmas gifts, tree decorations, and cozy winter outfits.
Hook Holiday Magic with This Free Crochet Santa Hat Pattern
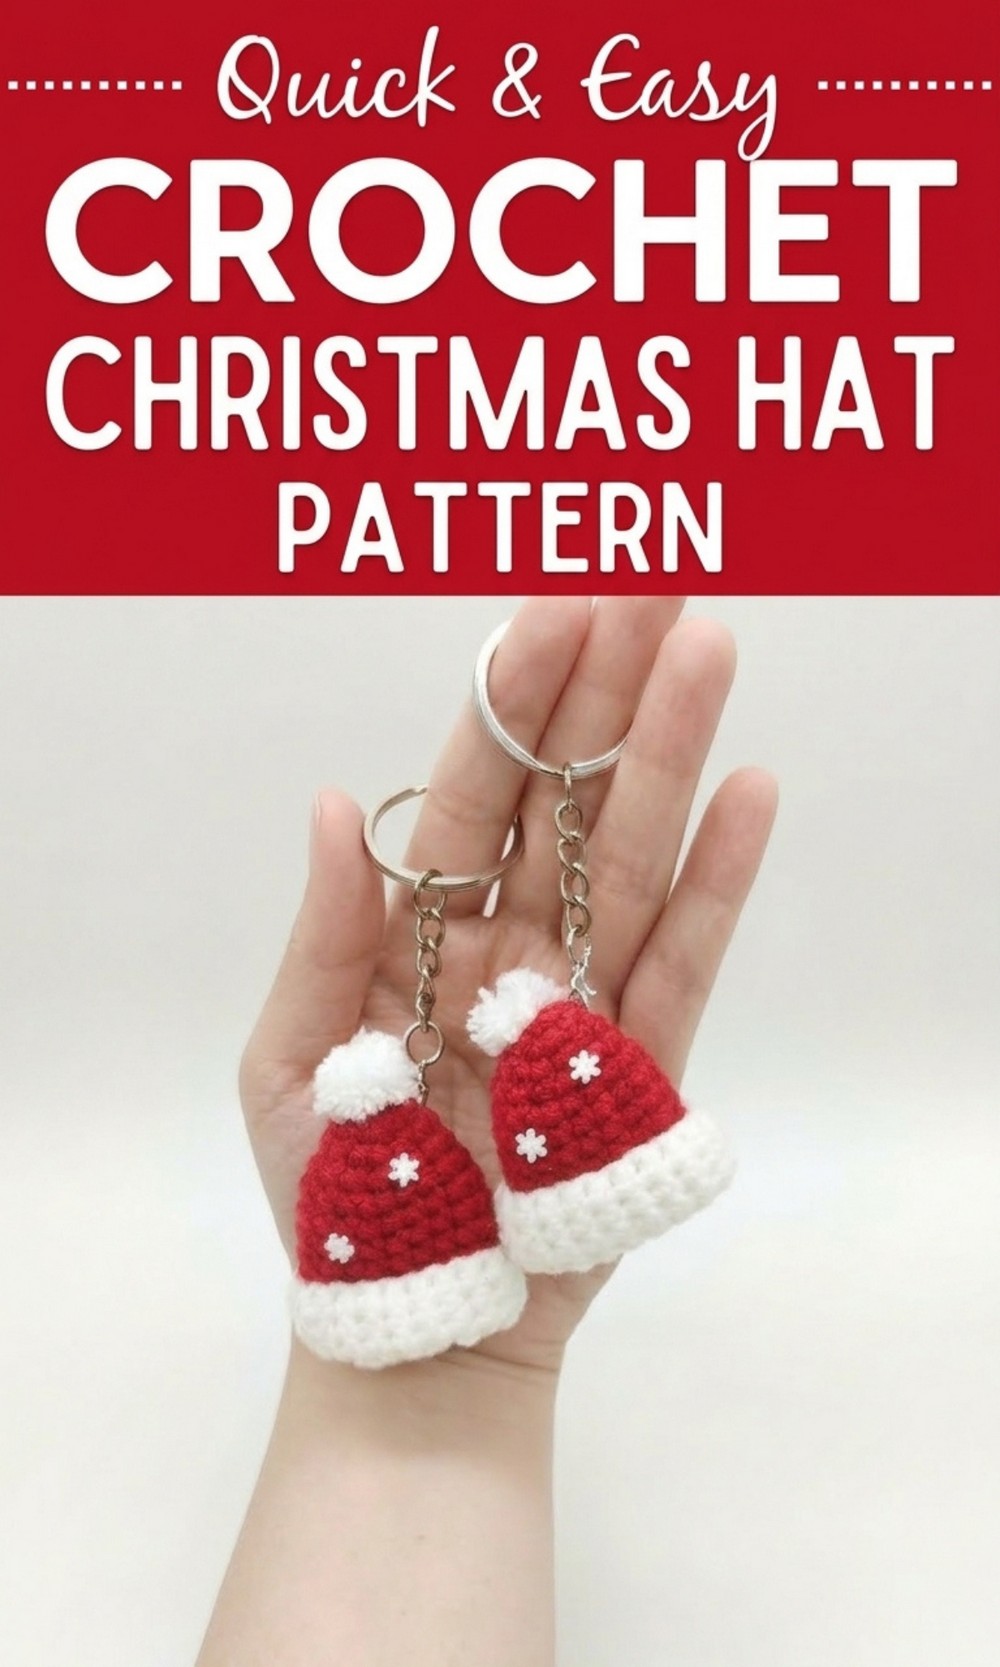
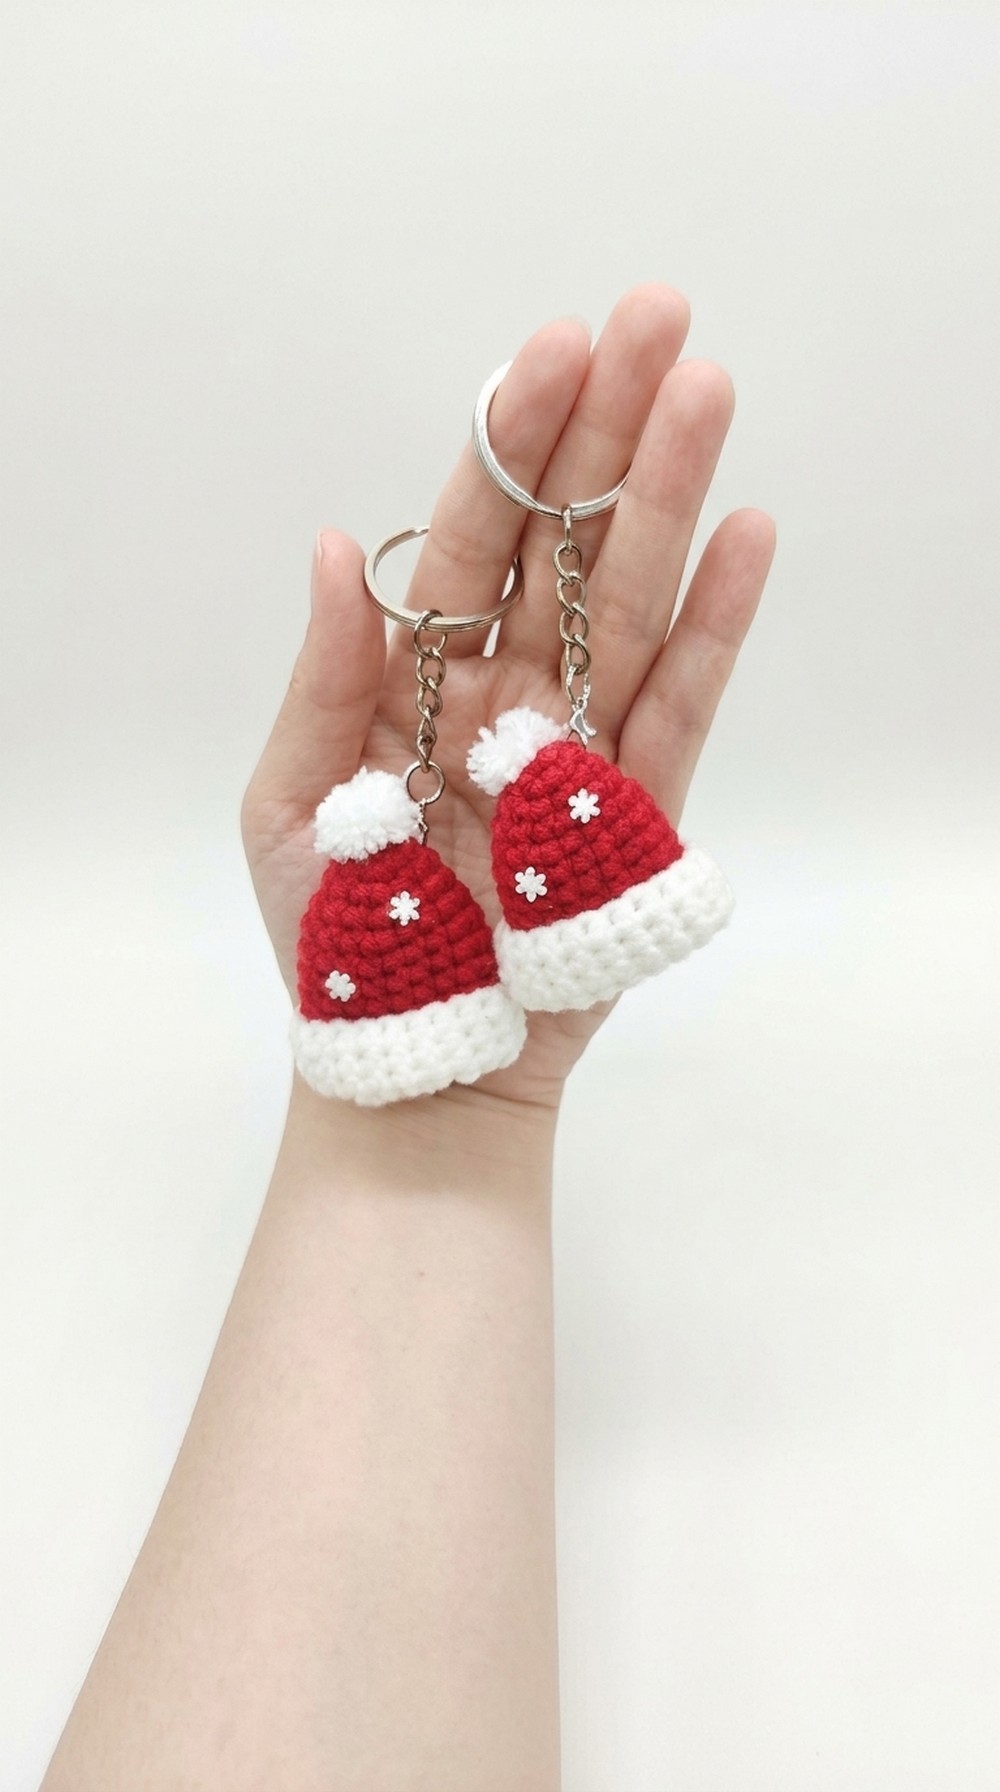
Have fun bringing festive cheer to life with this free Santa hat crochet pattern. This project is perfect for beginners and crochet enthusiasts alike, featuring simple stitches like single crochet and the magic ring. The vibrant red and soft white yarn create a cheerful and classic Santa hat complete with a cozy folded brim and a playful pompom.
It can be turned into a keychain, hung as a Christmas tree ornament, or even added as a charming decoration on gifts. The pattern is easy to follow, making it a quick and enjoyable project that adds a touch of holiday magic.
 Whether you make one or a dozen, these tiny hats are sure to spread smiles wherever they go. Gather your yarn and crochet hook, and let the holiday spirit shine with this adorable crochet creation.
Crochet Christmas Hat Keychain Pattern
Materials
- Yarn
- Red yarn: light worsted / DK / Category 3 or similar weight, smooth acrylic or cotton
- White yarn: same weight as the red yarn
- Crochet hook
- Hook size appropriate for your yarn (commonly 2.5–3.5 mm for DK; use a smaller hook than usual to get a firm fabric)
- Notions
- Yarn needle (tapestry needle) for weaving in ends
- Scissors
- Stitch marker or contrasting yarn to mark the beginning of rounds (optional but recommended)
- Small keychain ring or lobster clasp with chain
- Small snowflake embellishments (buttons, felt cutouts, or flatback decorations)
- Fabric glue or hot glue gun (for attaching snowflakes)
- Optional
- A small amount of stuffing if you want the hat to be slightly more structured (not required; it can be left unstuffed)
Abbreviations (US Terms)
- ch = chain
- st = stitch
- sl st = slip stitch
- sc = single crochet
- inc = increase (2 sc in the same st)
- MR = magic ring (magic circle)
- rnd = round / row (the video calls them “rows” but they are worked in the round)
The pattern is worked in joined rounds, as described in the transcription: each round ends with a slip stitch and begins with a chain.
Special Techniques
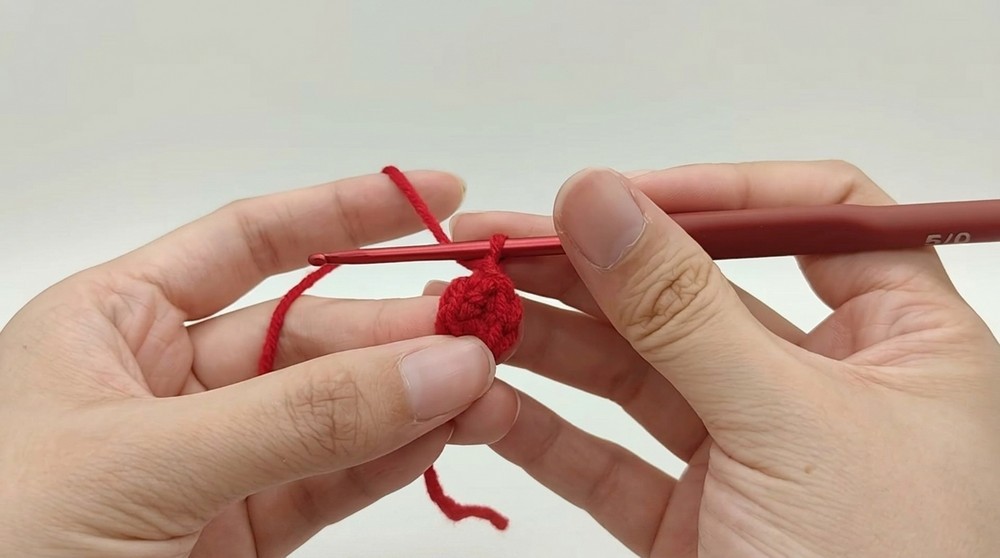
1. Magic Ring (MR)
- Wrap the yarn around two fingers to form a loop, with the tail crossing behind the working yarn.
- Insert the hook under the front strand and over the back strand.
- Pull the back strand through the loop.
- Ch 1 to secure (if desired).
- Work the required number of stitches into the loop.
- Pull the tail to close the ring tightly.
2. Single Crochet (sc)
- Insert hook into the stitch.
- Yarn over and pull up a loop (2 loops on hook).
- Yarn over and pull through both loops on hook.
3. Single Crochet Increase (inc)
- Work 2 single crochets into the same stitch.
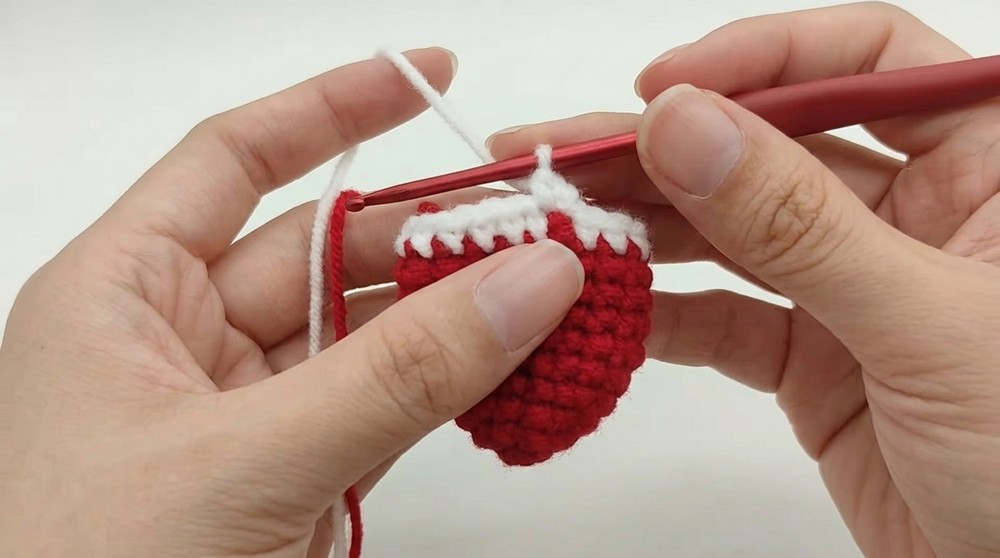
4. Color Change (Red to White)
The video changes color at the beginning of a new round:
- At the end of the red round, finish the last sc as usual.
- Join the round with a sl st in the first st of the round using the red yarn.
- When you make the beginning chain (ch 1) for the new round, drop the red yarn and yarn over with the white yarn instead.
- Pull the white yarn through to complete the ch 1.
- Work the next few sc stitches with both the red tail and white working yarn held together to secure and hide the color change inside the stitches.
- After 2–3 stitches, cut the short red end and continue working only with the white yarn.
Pattern Notes
- The pattern uses joined rounds:
- End each round with a sl st in the first sc of the round.
- Before beginning the next round, ch 1 (this ch 1 does not count as a stitch).
- The video refers to sequences such as “x v x,” meaning:
- x = single crochet in one stitch
- v = increase (2 sc in the next stitch)
- The hat gradually increases until the desired width, then continues straight for the length.
Step by Step Pattern
With Red Yarn
Round 1
- Make a magic ring.
- Ch 1.
- Work 6 sc in the magic ring.
- Pull the ring tight.
- Join with a sl st to the first sc.
Stitch count at end of Round 1: 6
Round 2
- Ch 1.
- Work the following around:
(1 sc, 1 inc) repeat 3 times.- 1 sc in next st
- 2 sc in next st (inc)
- Join with a sl st to the first sc.
Stitch count: 9
Round 3
The video describes this as “make x v x and repeat three times,” meaning (sc, inc, sc).
- Ch 1.
- (1 sc, 1 inc, 1 sc) repeat 3 times around.
- 1 sc in next st
- 2 sc in next st (inc)
- 1 sc in next st
- Join with a sl st to the first sc.
Stitch count: 12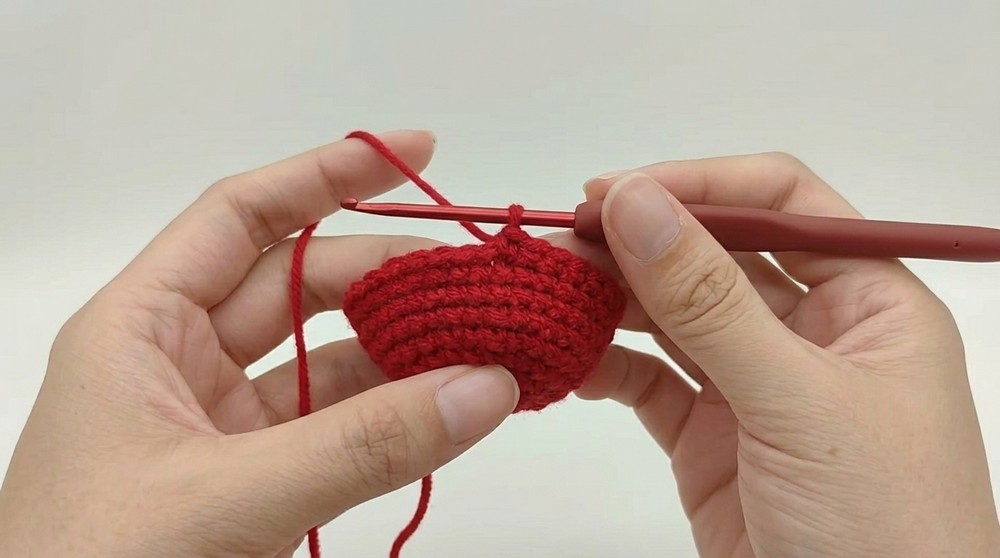
Round 4
The video: “make three single crochet and one increase, repeat three times.”
- Ch 1.
- (3 sc, 1 inc) repeat 3 times around.
- 1 sc in each of next 3 sts
- 2 sc in next st (inc)
- Join with a sl st to the first sc.
Stitch count: 15
Round 5
The video: “make two single crochet, one increase and two single crochets, repeat three times.”
- Ch 1.
- (2 sc, 1 inc, 2 sc) repeat 3 times around.
- 1 sc in each of next 2 sts
- 2 sc in next st (inc)
- 1 sc in each of next 2 sts
- Join with a sl st to the first sc.
Stitch count: 18
Rounds 6–9
The video: “in row six to row nine make 18 single crochets.”
- For each round (6, 7, 8, 9):
- Ch 1.
- Work 1 sc in each st around (18 sc).
- Join with a sl st to the first sc.
Stitch count each round: 18
After Round 9, the red section is complete.
Color Change to White
Round 10 (with White Yarn)
The video: “use white color yarn and make eight single crochet and one increase repeat two times… total 20 crochet in each row (from round 11 to 15).”
To reach 20 stitches, we will follow the structure described:
- At the end of Round 9:
- Join with a sl st in the first sc of Round 9 using red yarn.
- Begin Round 10:
- Drop the red yarn.
- With white yarn, yarn over and pull through to make the ch 1.
- Work the start of the round holding both red (tail) and white together for the first 2–3 stitches to secure the color change, then cut the red tail.
Round 10:
- Ch 1 (with white).
- (8 sc, 1 inc) repeat 2 times around:
- 1 sc in each of next 8 sts
- 2 sc in next st (inc)
- repeat this sequence once more
- Join with a sl st to the first sc.
Stitch count: 20
Rounds 11–15 (with White Yarn)
The video: “in row 11 to row 15 make one single crochet in each of the stitches, total 20 crochet in each row.”
- For each round (11, 12, 13, 14, 15):
- Ch 1.
- Work 1 sc in each st around (20 sc).
- Join with a sl st to the first sc.
Stitch count each round: 20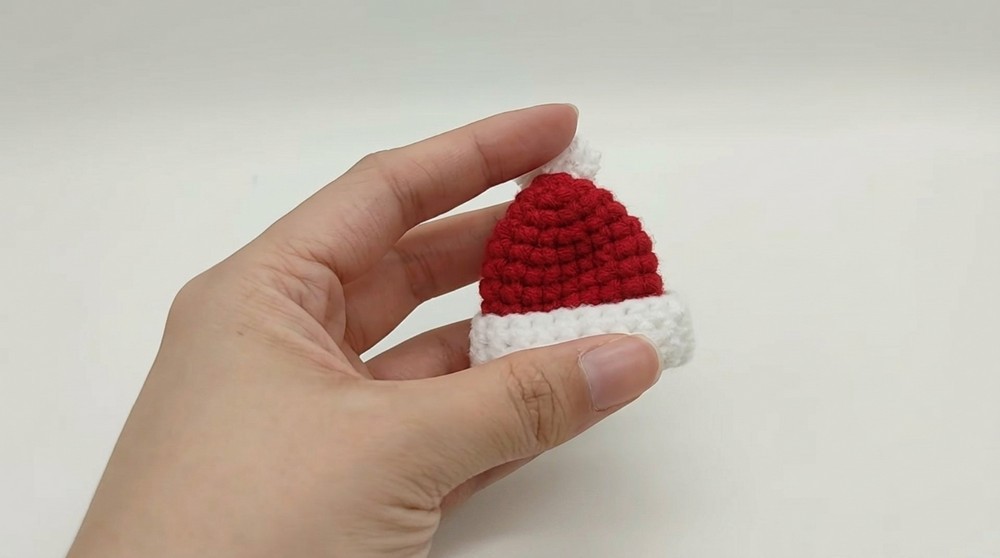
When Round 15 is complete, the crochet portion of the hat is finished.
Finishing the Hat
1. Fasten Off and Weave in Ends
- After completing Round 15:
- Cut the white yarn, leaving a tail long enough to weave in (10–15 cm).
- Pull the tail through the last loop to fasten off.
- Use a yarn needle to weave the tail securely through several stitches on the inside of the hat.
- Ensure all earlier tails (red and white) are also woven in or already covered inside the stitches, as referenced in the video.
2. Turn Over the Brim
The video states: “Turn over the hat brim.”
- Fold the lower edge of the white section upward toward the outside of the hat to create a brim.
- Adjust the fold so that it is even all the way around.
- If desired, you may lightly steam or shape it with your hands so the brim sits neatly.
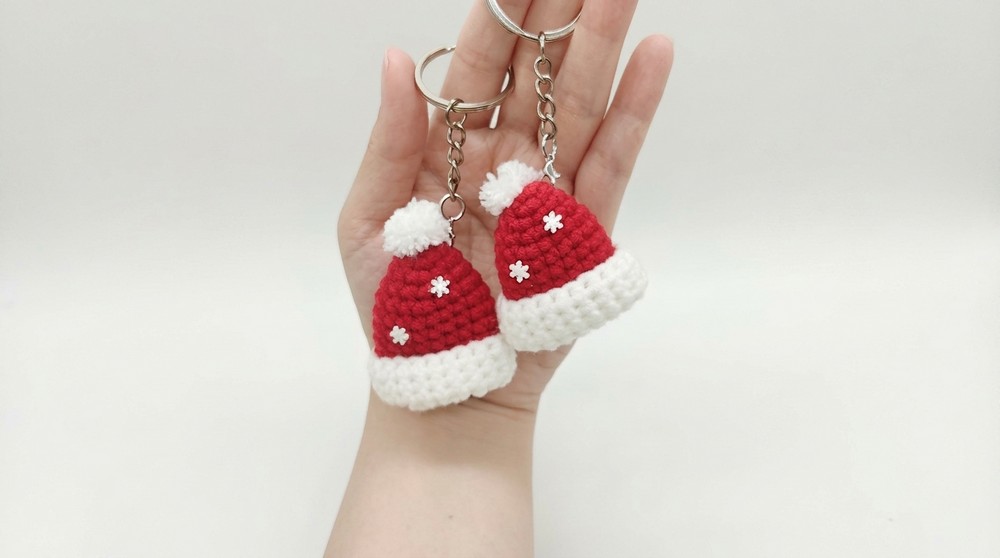
Making and Attaching the Pompom (Hairball)
The video: “after that make a small hairball and tie it to the top of hat.”
You may create a small pompom in either white or red:
Option A: Very Small Yarn Pompom (No Tool)
- Wrap the yarn around two fingers several times (10–20 wraps, depending on desired size).
- Carefully slide the wrapped yarn off your fingers.
- Tie a separate piece of yarn tightly around the center of the bundle and knot securely.
- Cut through all the loops on both sides.
- Trim the pompom to make it round and even.
Attach the Pompom:
- Thread the two long tying ends of the pompom through the top center of the hat (the top of Round 1).
- Pull the ends to the inside of the hat.
- Tie them securely inside with several knots.
- Weave in or trim excess ends.
Attaching Snowflake Embellishments
The video: “stick the snowflakes.”
- Choose small snowflake decorations (buttons, felt, or flat plastic/wood shapes).
- Arrange them on the hat where you would like them:
- On the red section,
- On the white brim,
- Or scattered decoratively.
- Use fabric glue or a hot glue gun to attach the snowflakes to the surface of the hat.
- Allow glue to dry completely according to manufacturer instructions.
Turning the Hat into a Keychain
The video: “put on the keychain, it is all done.”
- Use a keychain ring or lobster clasp with a small chain.
- Decide where you want to attach it:
- Through the top of the hat, near the pompom.
- Insert the ring or a jump ring:
- Slide the ring under one or two stitches at the top of the hat, or
- Attach a jump ring to a stitch at the top and then attach the key ring to that jump ring.
- Ensure it is firmly closed so it cannot slip out.
Tips and Suggestions
- Tension and Hook Size
- Keep your stitches relatively tight so the hat holds its shape and does not look loose or holey.
- If your stitches are too loose, use a smaller hook.
- Using Stitch Markers
- Even though the pattern uses joined rounds, placing a marker in the first stitch of each round can help you stay organized and avoid miscounting.
- Adjusting Size
- To make a slightly larger hat, you may add one more increase round before working straight rounds (for example, increase evenly to 21 or 24 stitches, then work several rounds of sc).
- To make a smaller one, you may stop increasing earlier (for example, stop at 15 or 18 stitches and work fewer straight rounds).
- Color Variations
- Use green and white, or any festive color combination.
- Add stripes by changing color every 1–2 rounds.
- Maintaining Shape and Appearance
- Store the hat flat or hanging to prevent it from being crushed.
- If it becomes misshapen, lightly reshape with your fingers; for cotton or acrylic, a gentle steam blocking (without direct iron contact) can help.
- Avoid machine washing if it has glued embellishments; if necessary, gently hand wipe the surface.
- Durability for Keychains
- Reinforce the top area where the key ring is attached by passing the yarn or thread through the same spot a few times.
- Ensure knots are tight and ends are well hidden so they do not unravel with use.
Final Words
This small crochet Christmas hat keychain is an excellent project for beginners, as the pattern mainly uses single crochets and simple increases. It also introduces basic techniques such as working in the round with a magic ring and changing colors neatly. With just a small amount of yarn and some simple embellishments, you can create a charming accessory that works beautifully as a keychain, bag charm, or holiday ornament.
You may make several in different colors and decorate them with various snowflakes, beads, or embroidery to create a personalized collection for gifts or seasonal décor.