This concise and easy-to-follow tutorial shows how to crochet a snug, stylish crochet beanie that fits remarkably well. With clear step-by-step guidance and helpful tips, it’s perfect for beginners and experienced crocheters alike. You’ll learn how to shape the crown, adjust sizing, and achieve a clean finish—all in under an hour.
Crochet Beanie Tutorial

Easy Crochet Beanie Tutorial
Crochet a matching beanie to complement any of your existing scarves with this step-by-step tutorial. Using a medium 4 yarn and a 5.5 mm US crochet hook, the process begins with creating a magic ring, followed by rounds of increasing stitches.
It features techniques like half double crochets and front post double crochets to create a textured pattern. The hat fits snugly, is customizable in depth, and pairs beautifully with scarves.

Materials Needed
- Yarn: Medium-weight (4) yarn, adaptable based on personal choice.
- Crochet Hook: 5.5mm US crochet hook, or the size recommended by the yarn used.
- Other Tools:
- Scissors
- Tapestry/darning needle
- Stitch markers
- Measuring tape
Steps to Start the Hat
Creating the Magic Ring & Foundation Rounds
- Begin with a magic ring.
- Round 1: Crochet 8 half double crochet stitches into the magic ring.
- Round 2: Increase by placing 2 stitches in each stitch (total: 16 stitches).
- Round 3: Follow a one-two pattern:
- First stitch gets one half double crochet.
- Second stitch gets two half double crochets (total: 24 stitches).
- Round 4: Continue increasing using a one-one-two pattern (total: 32 stitches).
- Repeat this process across multiple rounds until the diameter reaches the desired size. For example: 6 ¾ inches or 17 cm for a larger hat.
Non-Increase Round
Working in the Back Loop
- After achieving the desired diameter, crochet a non-increase round using double crochet stitches in the back loop only.
- Example: For a hat with 64 stitches:
- Slip stitch into the first stitch.
- Chain two to set the height (chain does not count as an actual stitch).
- Complete one double crochet stitch in every back loop around.
- Mark completed stitches to keep track and ensure consistency.

Pattern Round
Combining Half Double Crochet and Front Post Double Crochet
- Start with:
- 3 half double crochet stitches.
- 1 front post double crochet (around the previous post).
- Repeat the pattern across the round:
- Look for the available top stitch after each front post double crochet to avoid accidentally increasing.
- After finishing each round, turn the work to maintain structure and texture.
Alternating Rounds
- Continue alternating between:
- A full round of half double crochet stitches.
- A pattern round incorporating front post double crochet stitches.
- Repeat this until the hat reaches the desired depth/height (e.g., 8 inches or around 20 cm). Adjust based on personal preference, head size, or style (e.g., covering ears or folding over).

Adjustments & Notes
Handling Challenges
- The front post double crochet round may seem tricky due to turning the work.
- Pay attention to alignment of the top stitch relative to the body of the stitch — turning can shift perspectives and create confusion.
- When turning, ensure the stitch top is correctly identified to avoid crocheting into the wrong stitch.

Completing the Hat
- Finish with a round that includes front post double crochet stitches to maintain uniformity in the design.
- Slip stitch into the first stitch to close the round.
- Chain one, cut the yarn, and fasten off securely.
- Weave in all loose ends using a tapestry needle.
- The tail from the magic ring can be pulled tightly to close the ring completely, then tucked in or tied off.
Measurements
- Width: Approx. 11–12 inches (28.5 cm) for a large/extra-large size hat.
- Depth: Approx. 8 inches or more (20 cm).

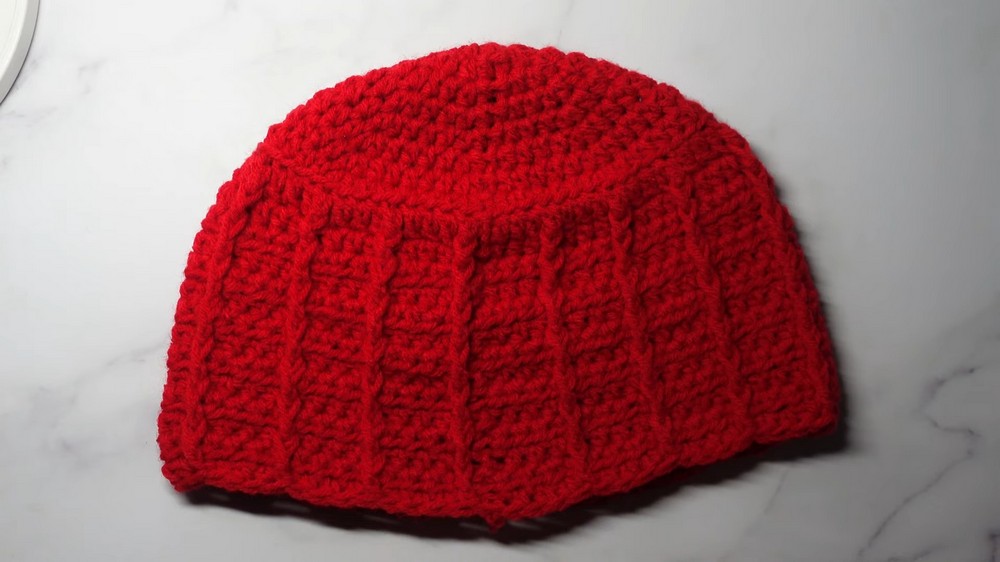
Final Design
- The finished hat features:
- A flat top with a textured pattern transitioning into the body.
- A seamless, snug fit without a brim.
- The hat is versatile; it can be adjusted to accommodate different head sizes or styling preferences.
Purpose & Matching Scarf
- The hat was designed to complement a previously crocheted scarf, sharing the same central pattern (three half double crochets and one front post double crochet).
- Colorways may differ for demonstration purposes, but matching yarn colors can be used for a cohesive set.
The best yarn for crocheting a beanie is soft, stretchy, and warm. Worsted weight (medium #4) yarn is a popular choice, offering the right balance of thickness and flexibility for a snug, comfortable fit.