Radiate holiday cheer with this Free Crochet Christmas Table Runner Pattern that instantly adds warmth and festive elegance to your seasonal setup.
Every holiday season tells a story of family gatherings, radiating warmth and connection, where small details add to the festive spirit. Amidst the bustling joys of Christmas, one element that can truly illuminate your dining experience is a breathtaking table centerpiece. A Christmas table runner not only serves as a functional accessory but also transforms the dining experience into a visual festival. The table runner detailed in this exceptional project promises to be both a conversation starter and a beautiful keepsake that brings splashes of festive charm to your holiday decor repertoire.
How to Crochet a Christmas Table Runner That Feels Timeless

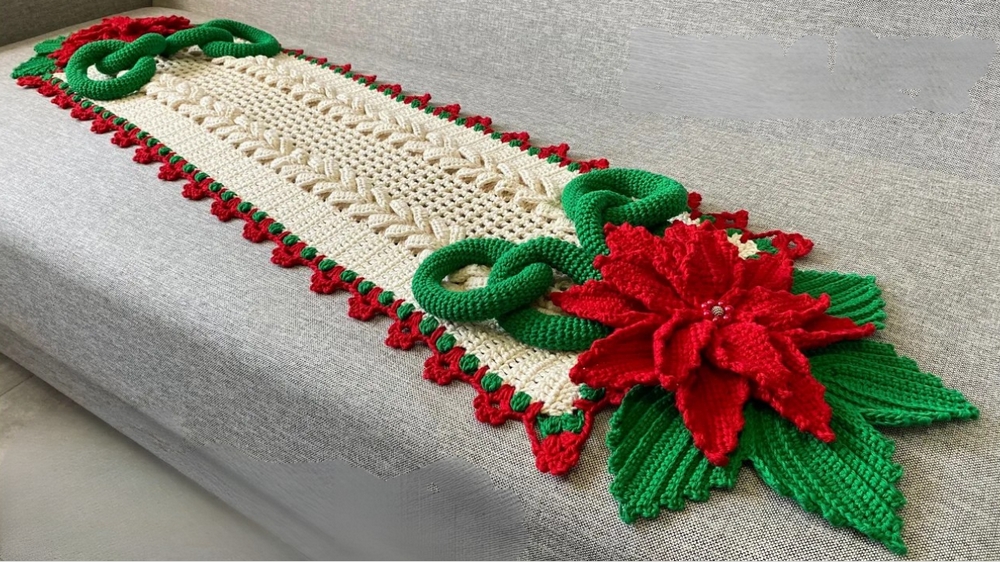
This crochet project introduces an intricate yet surprisingly simple Christmas table runner, measuring approximately 1.5 meters in length and 38 centimeters wide ideal for adorning a family dining table or even a buffet lineup.
The beauty lies in the delicate layering of crocheted floral motifs, including vividly detailed petals and leaves, paired seamlessly with elegant braids and decorative loops. Accentuated with sparkling pearls at its center, the project integrates practicality and artistry for a table runner that’s as functional as it is decorative.
Crochet Floral Table Runner Pattern
Materials:
- Yarn:
- For flowers/leaves: Cotton or acrylic yarn in desired colors (e.g., red, green, and contrasting colors).
- For the table runner body: Medium-weight cotton yarn in two colors (base color and accent).
- Crochet Hook: Size 4.0mm or as needed for desired tension.
- Yarn Needle: For sewing petals, leaves, and rings.
- Hot Glue (optional): For temporary placement during assembly.
- Rings: Create 8 rings (details in the “Rings” section).
- Scissors: For cutting yarn ends.
- Measuring Tape: To achieve precise lengths for table runners.
Skill Level
Intermediate to Advanced: Techniques include magic circles, picots, fans, braided stitches, shaping petals, and assembly.
Key Abbreviations (US Terminology):
- ch: Chain
- sc: Single Crochet
- dc: Double Crochet
- hdc: Half Double Crochet
- sl st: Slip Stitch
- st(s): Stitch(es)
- sp: Space
- rep: Repeat
Special Notes:
- Versatility: The flowers, leaves, and braided sections can be adapted for alternative home decor projects like placemats, smaller runners, or even wall hangings.
- Consistency: Use the same brand/type of yarn throughout to ensure uniformity between sections.
- Assembly Patience: Ensure careful alignment while attaching pieces.
Step-by-Step Instructions
Part 1: Flower (Petals)
Materials for Each Flower
- Small Petals: Make 5 smaller petals per flower.
- Large Petals: Make 8 larger petals per flower.
Small Petal
- Foundation Chain: Ch 13.
- Single Crochet Row: Skip the first ch, sc into the second ch and each ch across (12 sc total).
- Turn and Chain: Ch 3, turn, and make a sc in the same st.
- Decrease Row: Work 10 sc, skipping the first st on every turn. Hide tails as you go.
- Total of 10 sc in this row.
- Half Double Crochet Row:
- Turn, skip the first st, and hdc into the next st.
- Work 8 hdc across the row.
- Continue Working Sides:
- Work your way downward and repeat the sequences, decreasing toward the tips.
- End with 4 hdc at the narrowest section.
- Finish the Small Petal: Fasten off, leaving a 20 cm tail for sewing.
- Repeat: Make 5 small petals for each flower.

Large Petal
- Foundation Chain: Ch 17.
- Single Crochet Row: Skip the first ch, sc into the second ch and each ch across (16 sc total).
- Turn and Chain: Ch 3, turn, and sc into the same st.
- Decrease Rows: Work 14 sc for the next row.
- Gradually decrease rows, adding symmetry to the edges.
- Work 12 hdc, then 8 hdc, then 4 hdc, while tapering off.
- Finish the Large Petal: Fasten off, leaving a 20 cm tail for sewing.
- Repeat: Make 8 larger petals for each flower.
Part 2: Leaves
- Foundation Chain: Ch 20.
- Single Crochet Row: Skip the first ch, sc into the second ch and each ch across (18 sc total).
- Turn and Chain: Ch 3, and sc into the same st. Hide tails as you go.
- Decrease Rows:
- Work 17 sc, 15 sc, and continue reducing rows symmetrically.
- Work into one loop only to achieve clean edges.
- Complete: End with 5 sc at the narrowest section, ensuring symmetry.
- Repeat: Create 8 leaves (four leaves per flower).
Part 3: Table Runner Base
- Foundation Chain:
- Ch 45 (adjust for desired runner width).
- Work 43 dc, counting the turning chain as the first dc.
- Rows 2-4: Work rows of dc.
- Braided Section:
- Add fans: Work 3 dc, ch 2, 3 dc into designated spaces.
- Create chains for braided sections between fans (8 ch, sc into center, continue).
- Repeat for desired length of the runner.

- Outer Edges:
- Alternate between fan rows and rows of simple dc to create clean border edges.
Part 4: Rings
- Foundation Chain: Ch 10, forming a loop.
- Rows: Work rows of sc around the loop for 50 rows.
- Each ring measures approximately 30 cm.
- Assembly: Create 8 rings. Sew or glue rings together as shown in the pattern.
Part 5: Assembly
- Flower to Runner: Attach flowers using the previously left tails or yarn matching the base color. Use secure whip stitches.
- Add Leaves: Arrange leaves symmetrically beneath flowers and attach.
- Attach Rings: Secure rings to marked positions using a hot glue gun or by sewing.

Conclusion
The Floral Table Runner combines intricate flower details, leaves, and elegant braiding for a striking finish. Perfect for festive occasions like Christmas or everyday use, the runner is both functional and decorative.
Pattern Corrections
Ensure consistent stitch counts when creating braids and attaching rings. Skip stitches evenly to avoid accidental puckering.
Tips
- Block flowers and leaves before attaching to enhance symmetry.
- Use a tapestry needle for clean sewing during assembly.
- Experiment with colors to complement your table setting!