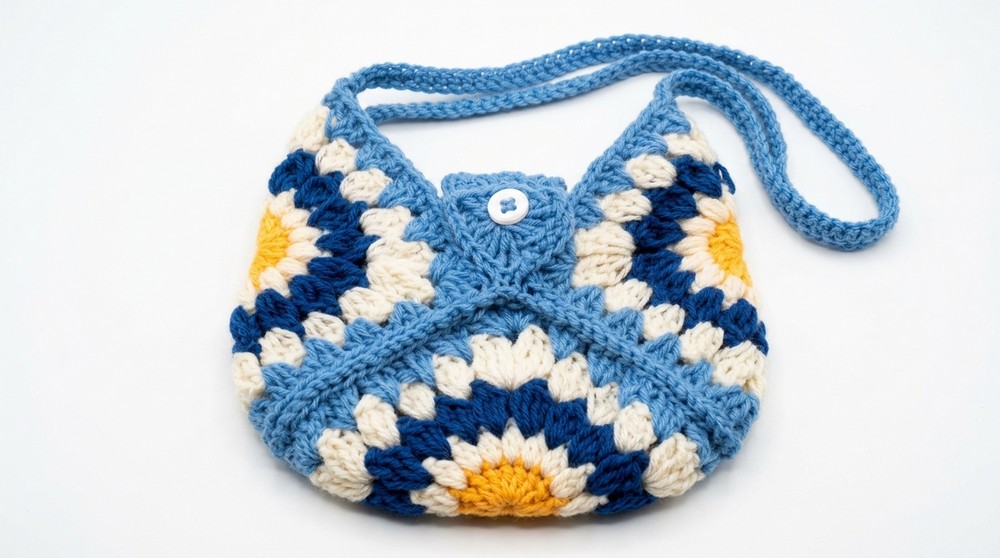
Brighten up your accessories with a free crochet sunburst bag pattern that’s perfect for holding your daily essentials.
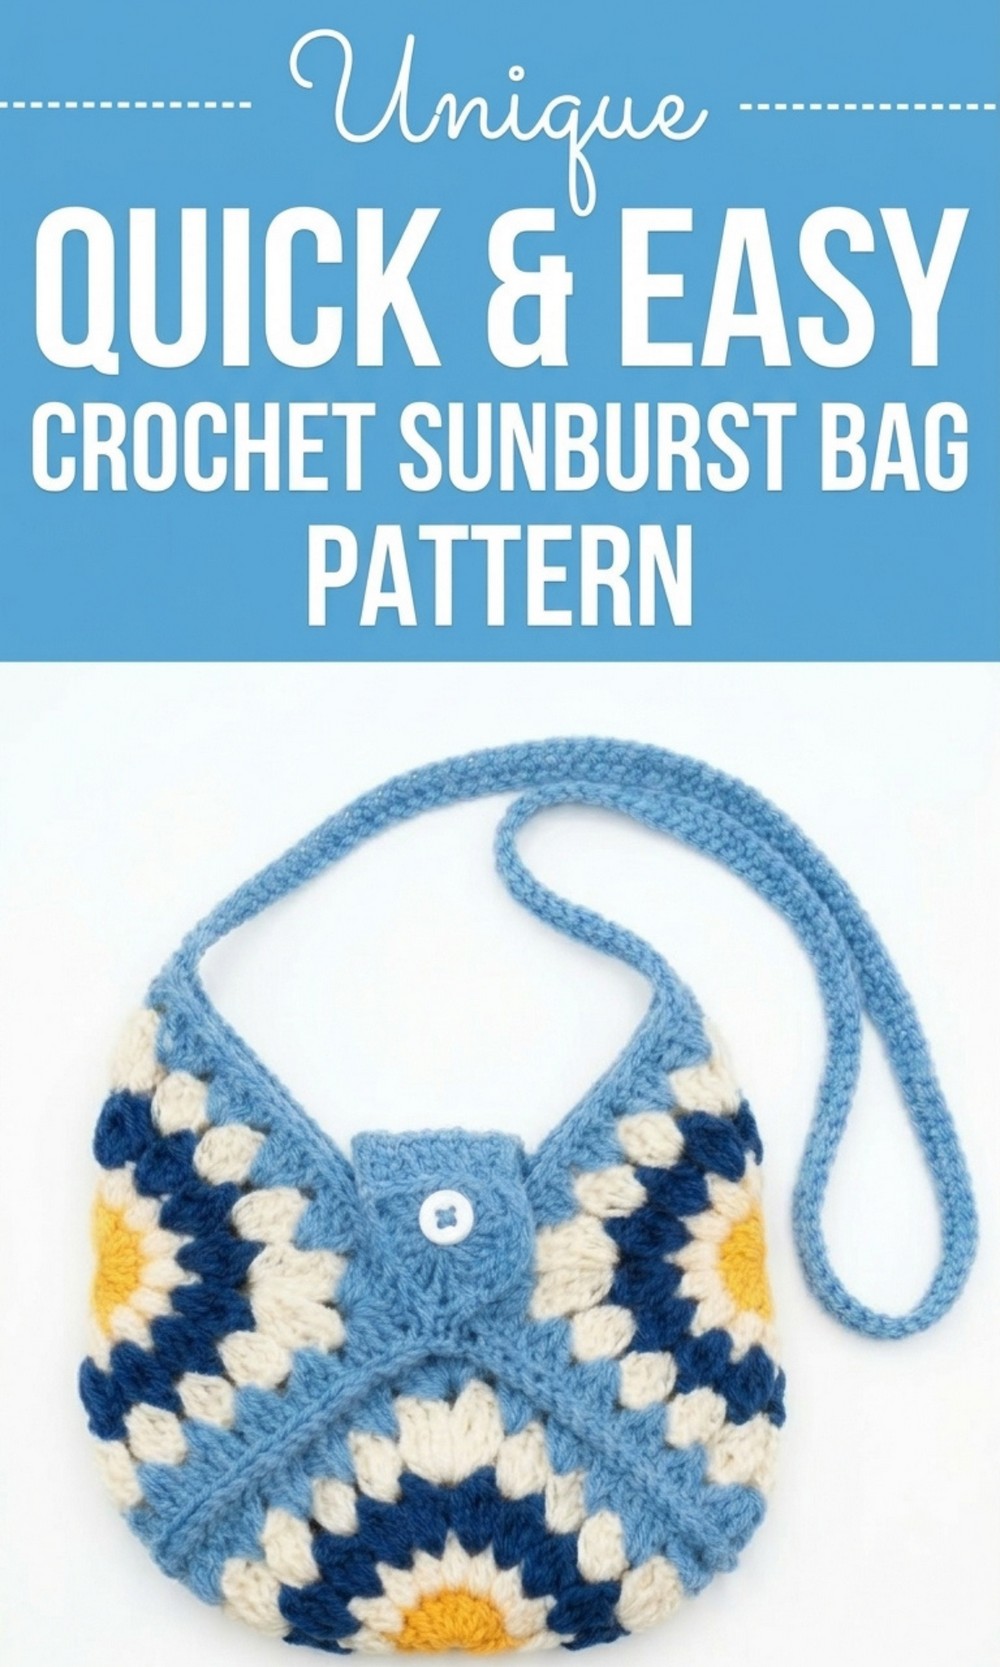
Your New Favorite Free Crochet Sunburst Bag Pattern Awaits
It is made of vibrant granny squares with beautiful sunburst designs that catch everyone’s attention. This bag is perfect for carrying small items like lipstick, keys, or toys, making it ideal for daily use. Using soft cotton yarn with bright colors like yellow, white, and blue, the bag looks cheerful and unique. 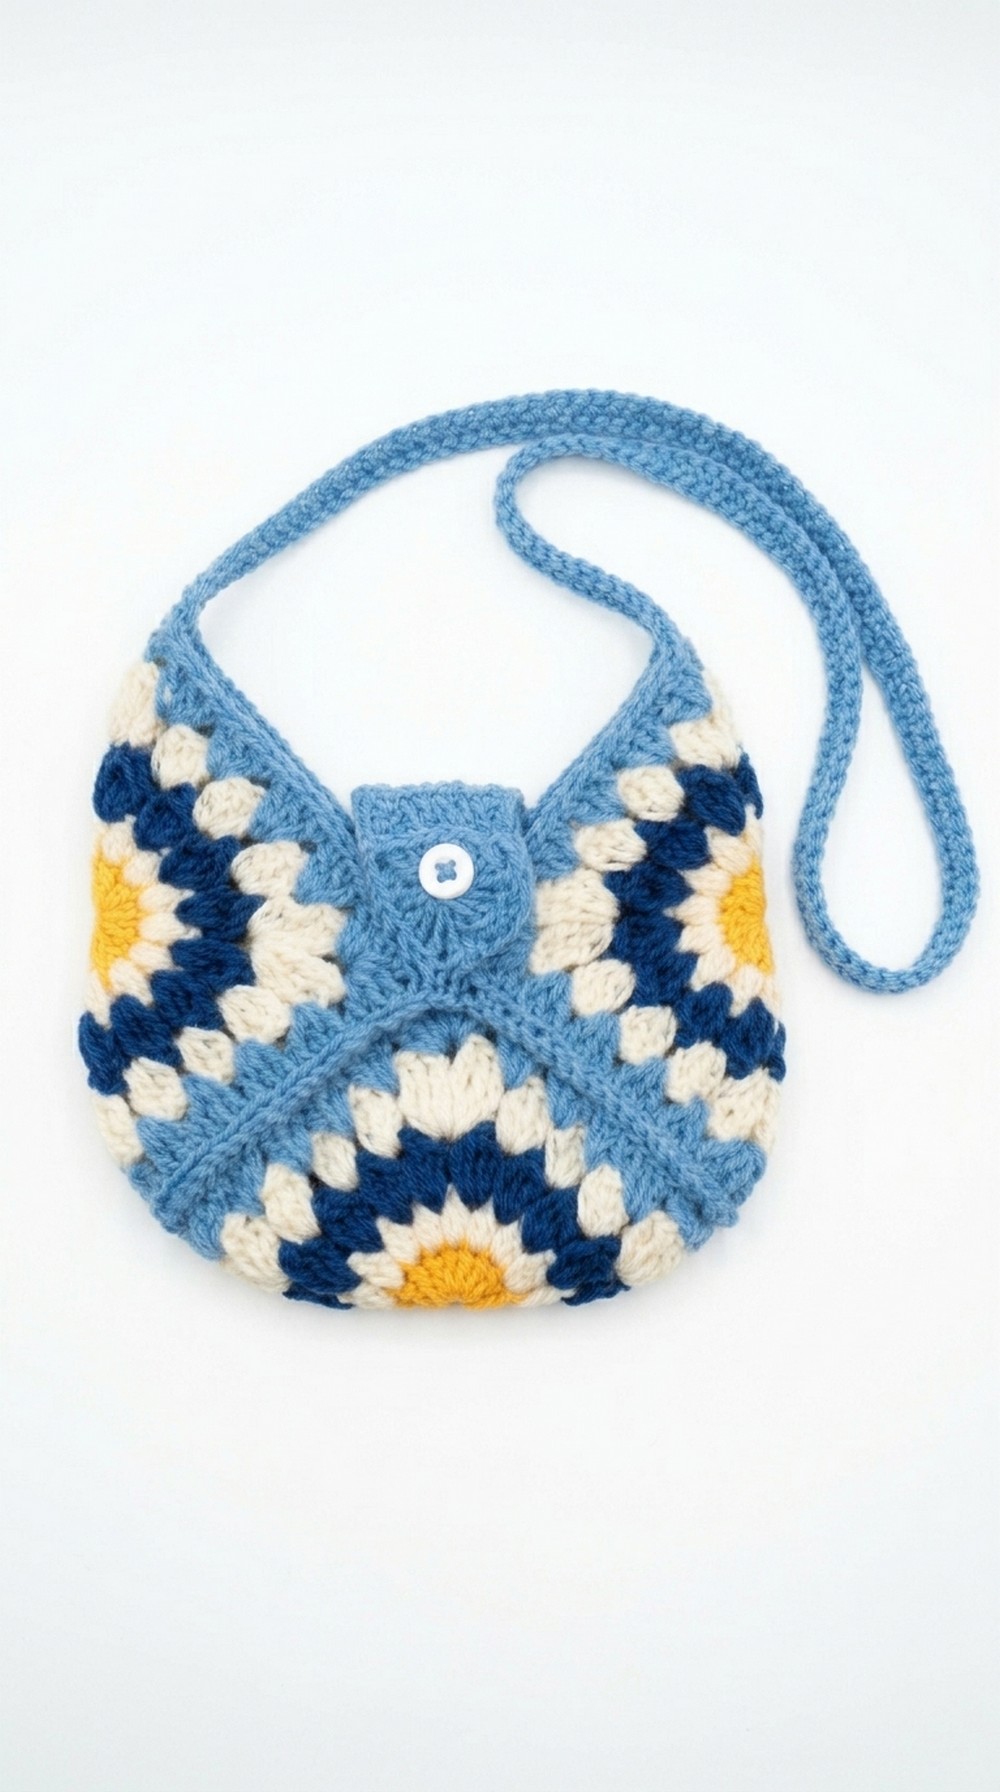 The Free Crochet Sunburst Bag Pattern is easy to follow, allowing even beginners to crochet this lovely project. Its lightweight design makes it perfect for kids or adults wanting a simple yet practical accessory.
The bag features a secure button closure and a sturdy handle for easy carrying. Whether for yourself or as a handmade gift, this crochet bag feels special, creative, and fun to use every day.
Materials Needed
- Yarn: Cotton threads in these colors:
- Light Yellow
- White
- Dark Blue
- Light Blue
- Hook Size: 3.5 mm crochet hook
- Scissors: For trimming the yarn
- Darning Needle: To weave in loose ends
- Button: A small sized button for securing the bag closure
- Optional: Sewing needle (if desired for assembling the squares or sewing details)
Techniques to Know
- Magic Circle / Magic Loop: Begin a foundation round neatly.
- Slip Stitch (sl st): For joining stitches or squares.
- Chain (ch): Foundation element for crochet.
- Double Crochet (dc): Basic crochet stitch.
- Triple / Treble Crochet (tr): Taller version of the double crochet.
- Half Double Crochet (hdc): Used for smaller, tighter stitches.
- Decreasing: Combining stitches into one to reduce stitch count.
- Cluster Stitch / Puff Stitch: Creates textured petals or designs.
Step by Step Instructions
Part 1: Making Sunburst Granny Squares
You will create three granny squares for the bag.
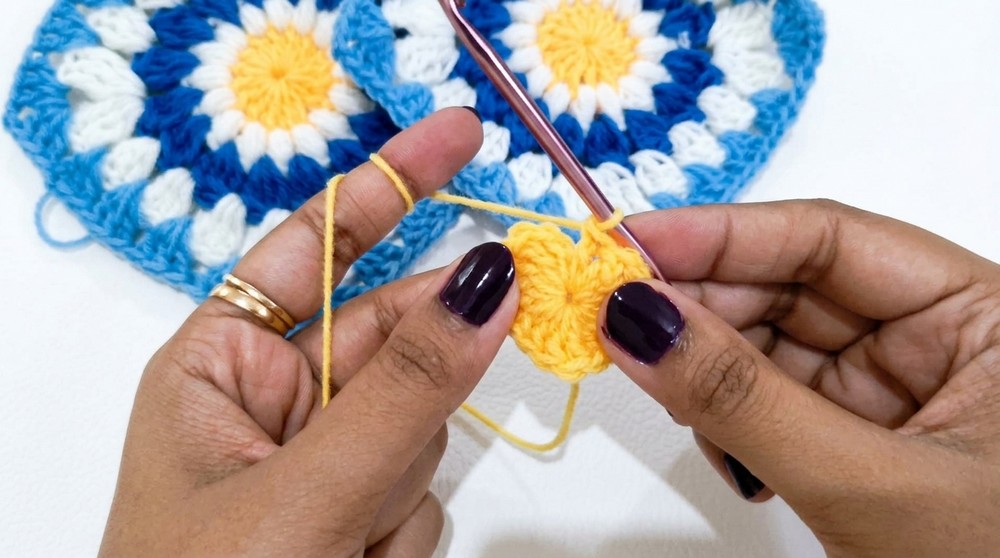
1. Round One (Light Yellow Color):
- Create a Magic Circle.
- Chain 3 (counts as the first double crochet).
- Work 15 double crochets (dc) into the ring, totaling 16 stitches (including the initial chain 3).
- Pull the Magic Circle tight, and slip stitch into the top of the chain 3 to close the round.
- Chain 1 and cut the yarn, securing the center.
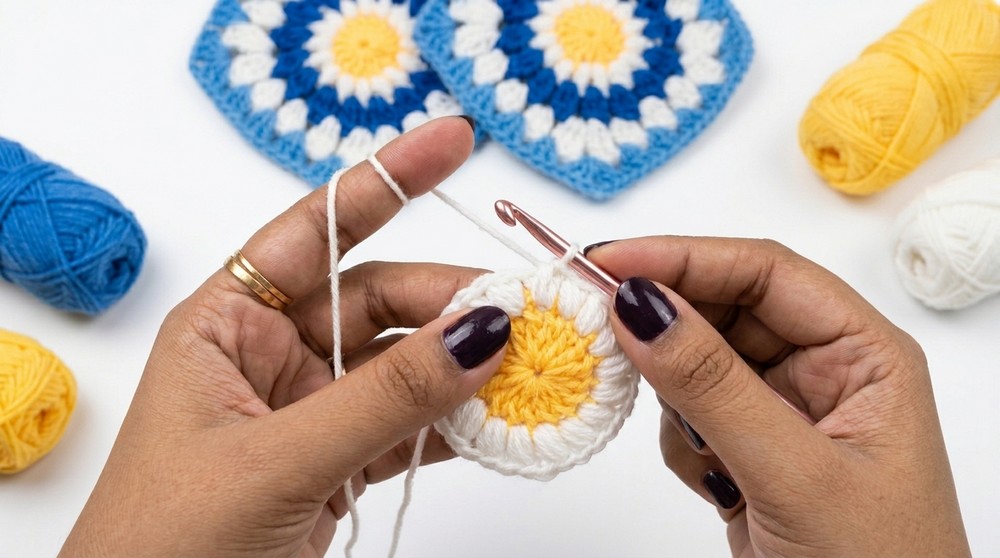
2. Round Two (White Color):
- Attach the white color yarn in any space between double crochets.
- Chain 2 (acts as height for the round).
- Create a puff stitch in the same space:
- Yarn over, insert hook, draw up a loop. Repeat three times to create three loose loops on your hook.
- Once all loops are on the hook, yarn over and pull through all loops.
- Chain 1 to secure the puff stitch.
- Repeat Step 3 in every space around, creating 16 puff stitches.
- Slip stitch into the first stitch to close the round and trim the yarn.
3. Round Three (Dark Blue Color):
- Attach dark blue yarn to any gap between puff stitches.
- Chain 3 (counts as the first double crochet).
- Create a cluster of 4 incomplete double crochets (dc) in the same gap:
- Work a double crochet halfway (leave the last loop on the hook) and repeat three more times.
- Yarn over and pull through all loops on the hook.
- Chain 2 to secure.
- Repeat the cluster stitch in all gaps around the circle, ensuring you create 16 clusters with 2 chains in between each.
- Slip stitch into the top of the initial chain 3 to close the round. Trim and secure the yarn.
4. Round Four (White Color): Create the Square Shape
- Attach white yarn to any gap.
- Work 3 double crochets (dc) into each gap:
- For corners: Work 3 dc, chain 2, and 3 dc in the same gap.
- Repeat this process around, forming the square shape.
- Slip stitch into the first stitch to complete the round and trim the yarn.
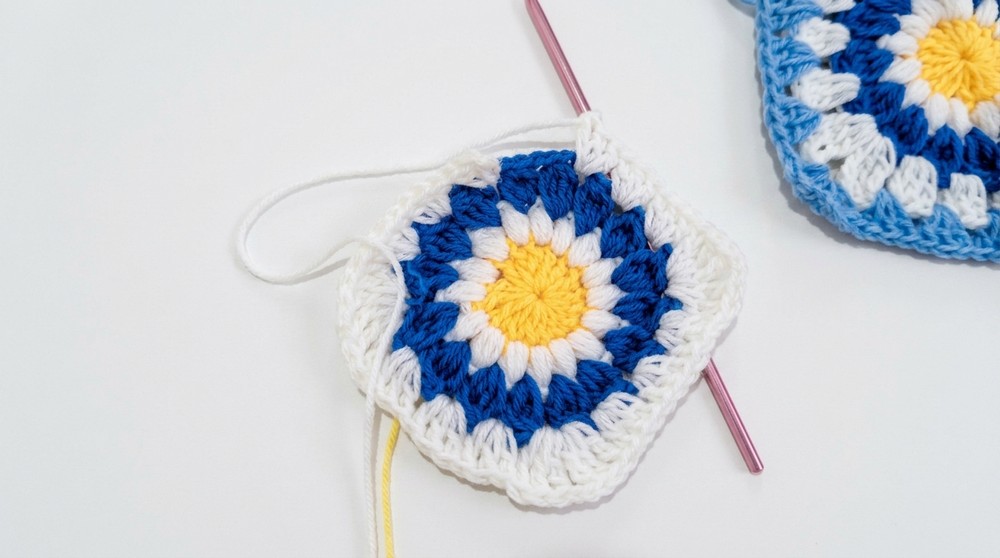
5. Round Five (Light Blue Color): Final Border
- Attach light blue yarn to any gap.
- Repeat the same pattern as Round Four, ensuring to chain 2 in all corners.
- Upon completing the round, slip stitch into the first stitch and secure the yarn.
Repeat these steps to make 3 identical granny squares.
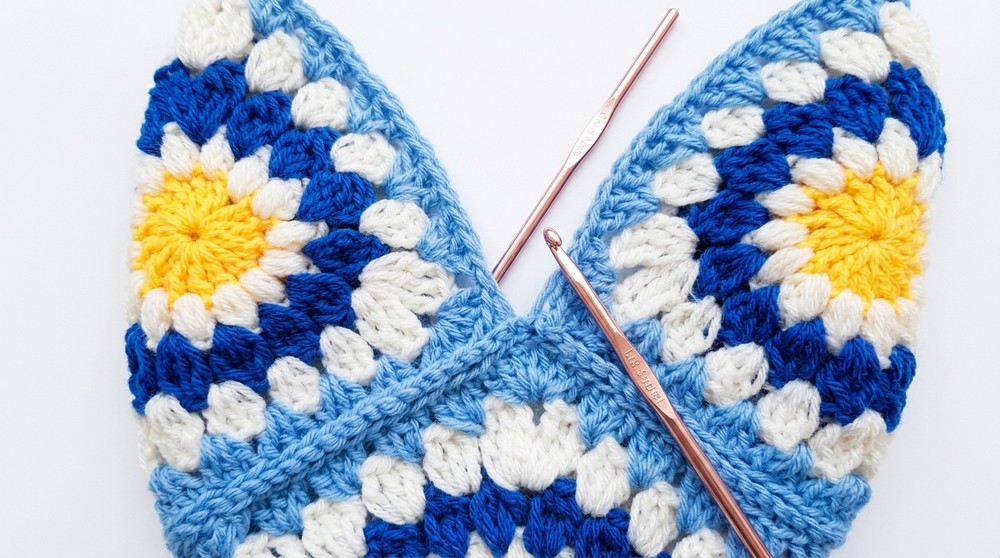
Part 2: Assembly
Using slip stitches, join the granny squares to form the structure of the bag.
- Bag Shape:
- Use one square for the front, one for the back, and the third as the bottom.
- Align the squares along their edges.
- Joining Process:
- Use the outer loops only of the squares while joining.
- Work slip stitches along the edges to securely attach the squares together.
- Ensure all sides are aligned evenly.
- If preferred, use a sewing needle to stitch the edges instead of slip stitches.
Part 3: Adding Triangle Pieces
To close gaps at the top edges, add smaller triangle shapes.
1. Triangle Pattern:
- Start with a Magic Circle.
- Chain 3 (counts as the first double crochet).
- Work 4 double crochets (dc), followed by 1 triple crochet (tr).
- Chain 2 and work 1 more triple crochet to form the corner.
- Work 4 more double crochets.
This forms one side of the triangle. - Repeat the above steps for the other two sides of the triangle.
- For corners, chain 2 between triple crochets.
- Slip stitch into the top of the chain to finish the triangle. Cut and secure the thread.
2. Attaching the Triangles:
- Position the triangles on the open edges (top left and right).
- Use slip stitches or sewing to attach them to the main bag structure.
Part 4: Adding Closure
- Button Loop:
- Attach yarn to the top corner of the bag.
- Chain 7 (or adjust based on your button size) to form a loop.
- Slip stitch into the starting point to secure the loop.
- Adding the Button:
- Sew a small button on the opposite side where it aligns with the closure loop.
Part 5: Adding the Handle
- Create a Rope like Handle:
- Start with a slip knot and chain 3.
- Form an i cord by pulling stitches as you continue:
- Insert the hook into the back loops to create a rolled appearance (similar to twisted rope).
- Adjust the length of the handle as per preference.
- Attach Handle:
- Sew or slip stitch the handle securely to the sides of the bag.
Finishing the Bag
- Weave in all loose ends using a darning needle.
- Trim excess yarn for a clean and professional appearance.
- Smooth out the bag and check for any uneven sections.
Final Words
Your Sunburst Granny Square Bag is complete! This bag is ideal for carrying light items such as cosmetics, toys, or accessories.
Tips to Maintain the Bag
- Washing: Handwash with mild detergent to keep the yarn color intact.
- Avoid Stretching: Do not overload the bag with heavy items to preserve its shape.
- Storage: Store flat when not in use to prevent deformity.
- Repair: Repair loose ends promptly to maintain the durability of the stitches.