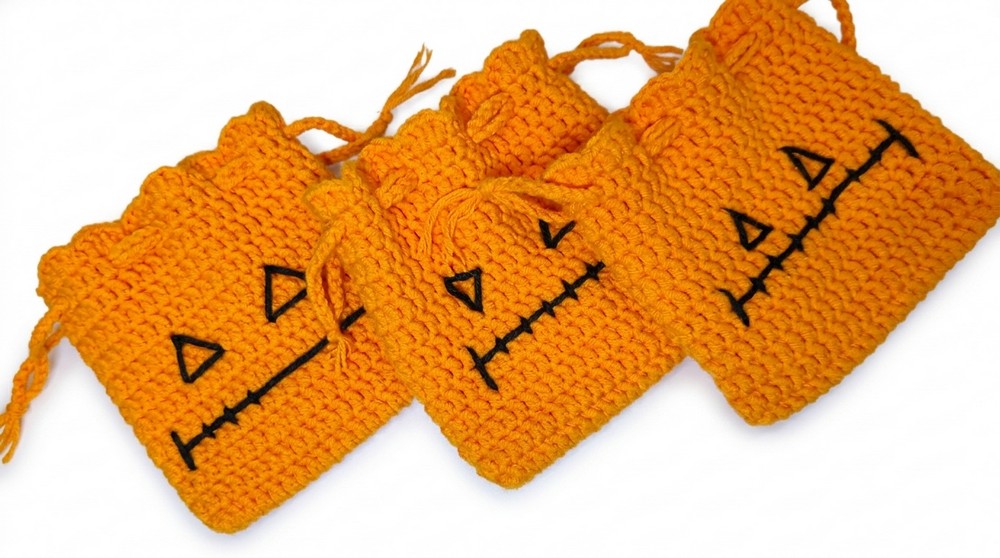
Stitch your way to Halloween fun with this free crochet Halloween pouch bag pattern for a cute pouch, perfect for treats or as a unique handmade gift.
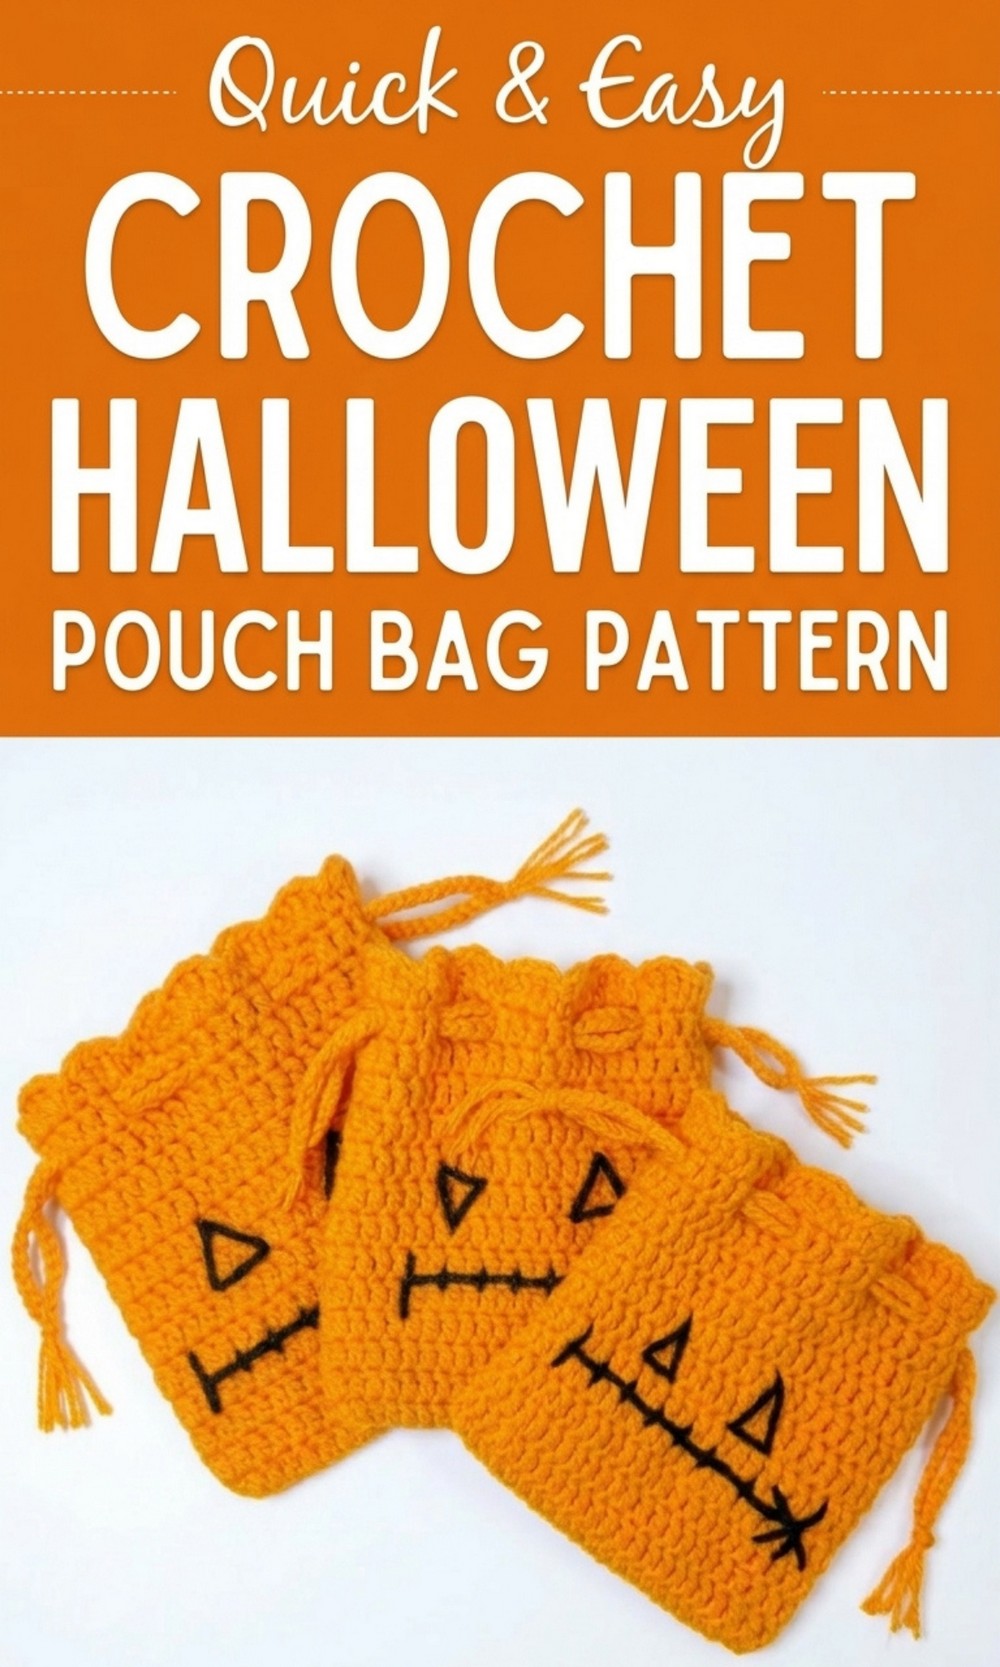
Free Crochet Halloween Pouch Bag Pattern for Candy Fun
Add a little spooky magic to your Halloween this year with this Free Crochet Halloween Pouch Bag Pattern. Imagine taking a simple crochet hook and some bright orange thread to create a charming little pumpkin pouch that holds all your treats in style. As you work, you’ll see an ordinary string transform into a festive, cheerful pumpkin friend that’s perfect for collecting candy or giving as a thoughtful gift.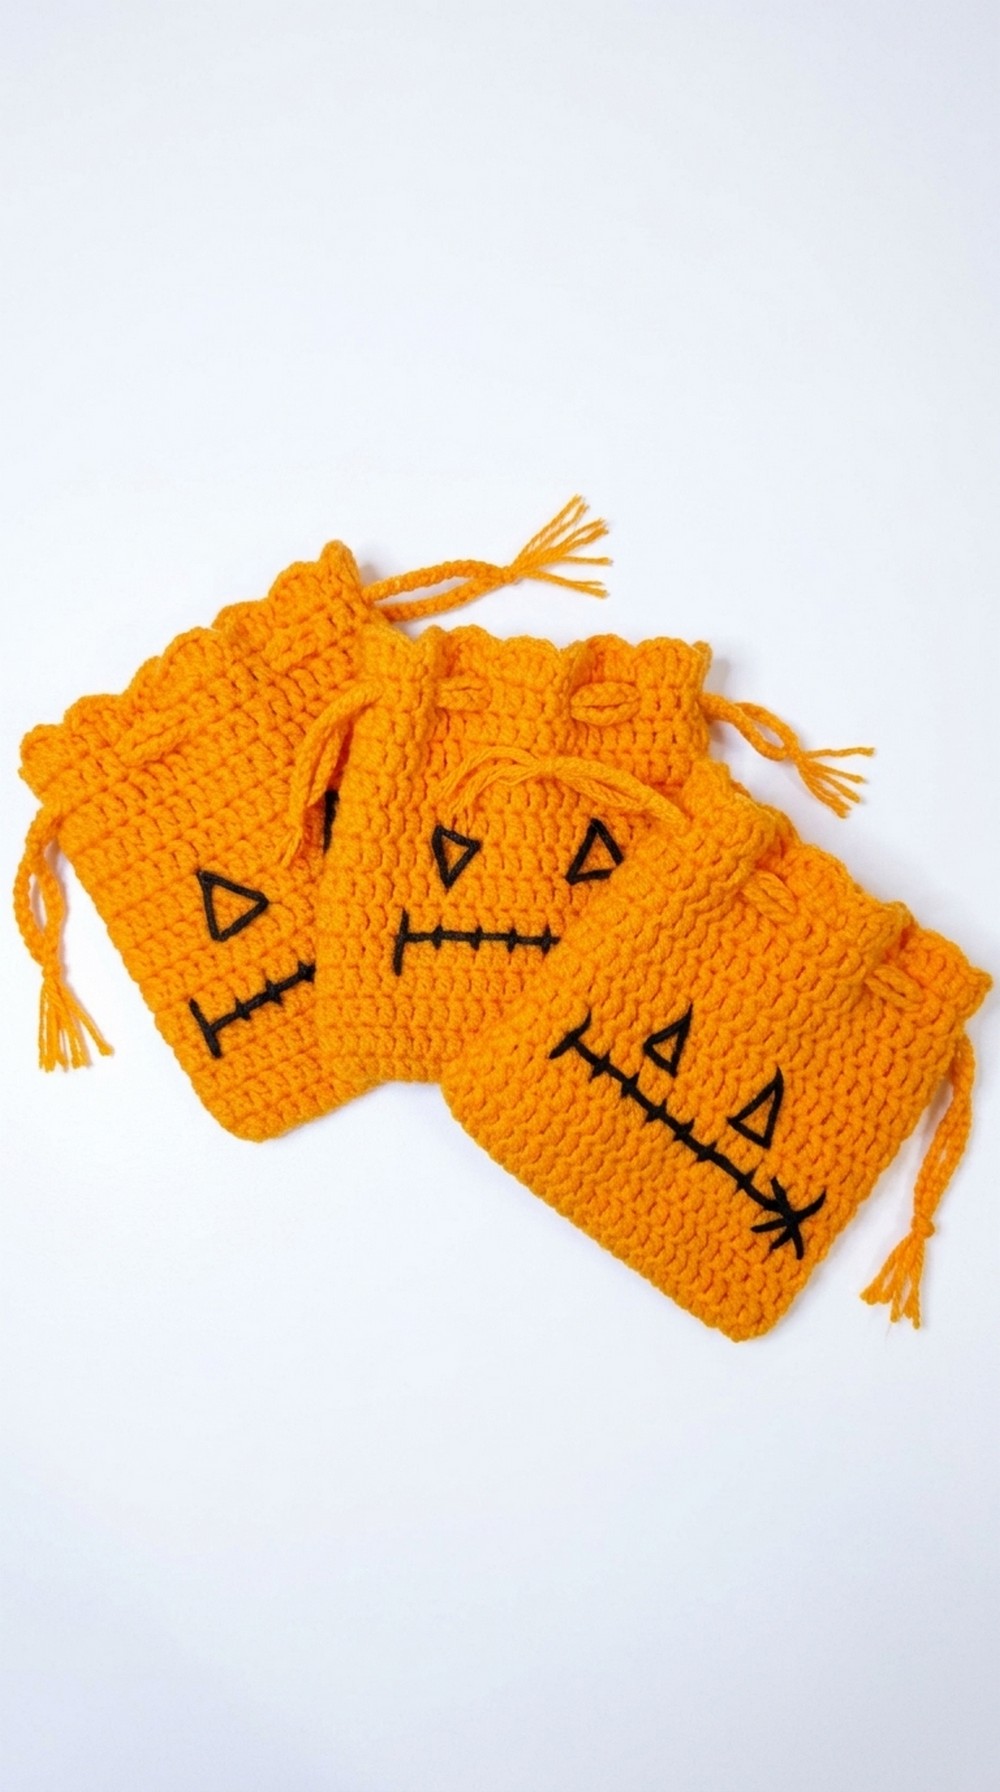
The lightweight yet sturdy design means it’s perfect for carrying sweets or little goodies, and the soft, professional finish makes it feel extra special. Whether you use it as a candy collecting bag or gift it to a friend, this unique handmade pouch is destined to keep its magic for years to come. Let your creativity shine and make your Halloween even more fun.
Bright Crochet Halloween Pouch Bag Pattern
Skill Level
Beginner friendly
Materials
- Yarn: Milk cotton yarn, approximately 125 g, 5 ply (or any similar DK/light worsted weight yarn) in:
- Main color for the pouch (e.g., orange for Halloween pumpkin style)
- Small amount of black yarn for the face
- Hook: 3 mm crochet hook
- Notions:
- Scissors
- Yarn needle (for sewing in ends and embroidering the face)
- Stitch marker (to mark the beginning/end of rounds)
Abbreviations (US Terms)
- ch = chain
- sl st = slip stitch
- sc = single crochet
- dc = double crochet
- st(s) = stitch(es)
- inc = increase (2 stitches worked into the same stitch)
Note: The pattern uses US crochet terms.
Special Techniques
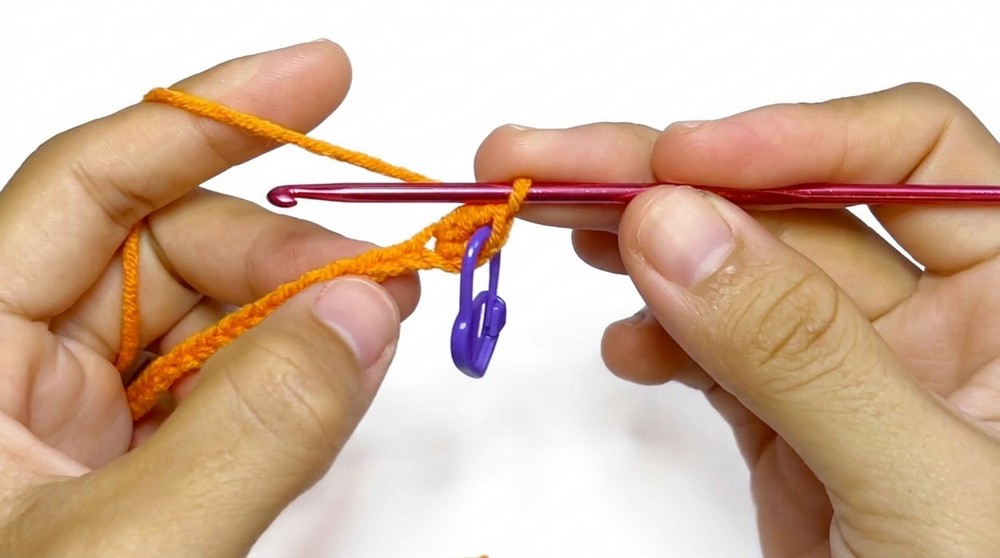
- Slip Knot
- Create a loop with the yarn, pull a strand through the loop to form a knot, and place it on the hook. Tighten gently.
- Foundation Chain
- Yarn over and pull through the loop on the hook to make chains.
- Double Crochet (dc)
- Yarn over, insert hook into the stitch, yarn over and pull up a loop (3 loops on hook), yarn over and pull through 2 loops (2 loops remaining), yarn over and pull through the last 2 loops.
- Single Crochet (sc)
- Insert hook into the stitch, yarn over and pull up a loop (2 loops on hook), yarn over and pull through both loops.
- Slip Stitch (sl st)
- Insert hook into stitch, yarn over and pull through both the stitch and the loop on the hook.
- Working in the Round (Oval Base)
- You will work around both sides of the starting chain to form an oval. The ends are increased to create a rounded base.
Finished Size (Approximate)
The exact size may vary slightly with your tension and yarn, but this pouch is roughly:
- Width: About 12–15 cm (4.7–6 in)
- Height (without strap): About 14–16 cm (5.5–6.3 in)
Pattern Instructions
1. Base of the Pouch (Oval)
- Foundation Chain
- Make a slip knot.
- Ch 24.
- Row/Round 1 – Forming the Oval Base
- Skip the first 2 chains (these count as the first dc).
- Dc in each chain across until you reach the very last chain of the row.
- When you reach the last chain:
- Work 4 dc into this same last chain.
- This turns your work so you can now work along the opposite side of the starting chain.
- Now continue working on the other side of the foundation chain:
- Dc in each chain back along the other side until you reach the first stitch (the place where you first started working dc after the turning chains).
- In the first stitch at the other end:
- Work 3 dc in the same stitch to complete the increase at this end.
- Join with a sl st to the top of the initial dc (or the 2nd chain of the starting ch-2) to close the round.
- Place a stitch marker at the joining point if desired.
At this point, you have an oval base.
2. Body of the Pouch
- Row/Round 2 – Straightening the Sides
- Ch 2 (counts as first dc).
- Dc in each stitch around (no increases; just one dc in every stitch).
- Join with a sl st to the top of the first dc (or the ch 2).
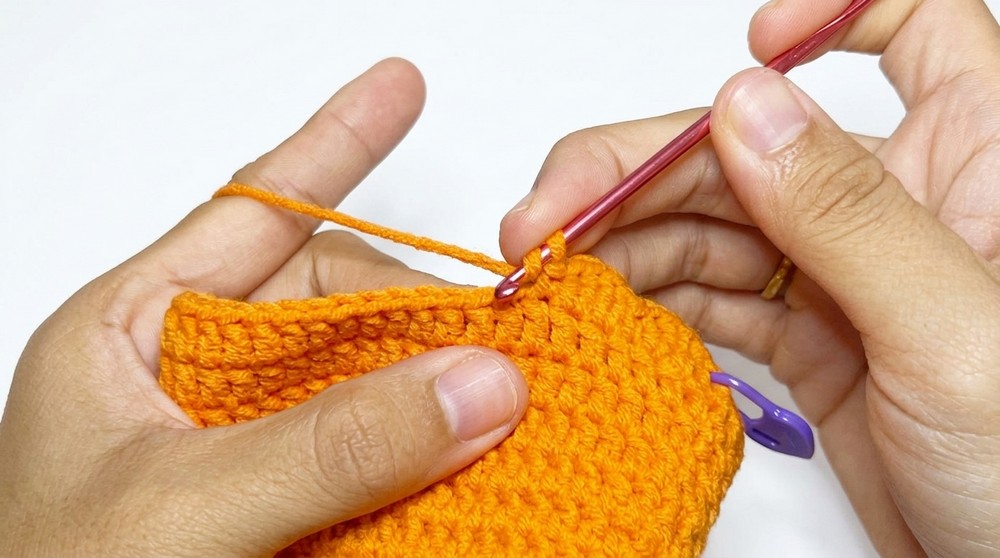
- Row/Round 3 to Row/Round 12 – Build the Height
- For each round:
- Ch 2,
- Dc in each stitch around.
- Join with a sl st to the top of the first dc (or ch 2).
- Repeat this process from Round 3 through Round 12.
- This will create the straight cylindrical body of the pouch.
- For each round:
3. Brim of the Pouch
- Row/Round 13 – Decorative Brim
- Ch 1.
- Pattern repeat around:
- Sc in the next stitch,
- Dc in each of the next 2 stitches,
- Sc in the next stitch.
- Repeat this sequence:
- 1 sc, 2 dc, 1 sc
- all the way around the top edge of the pouch.
- When you reach back to the starting point, join with a sl st to the first sc.
- Cut the yarn and pull through to secure. Weave in this end later.
This creates a slightly textured and decorative brim at the top of the pouch.
4. Straps (Drawstring)
You will make two long chains and attach them as a drawstring style strap.
- Make the Straps
- With the main color yarn:
- Make a slip knot.
- Ch 70.
- Fasten off, leaving a small tail for weaving in.
- Repeat the same process for the second strap:
- Make another ch 70.
- With the main color yarn:
- Attach the StrapsThe video does not specify exact stitch counts for placement, but the method is:
- Decide on two opposite points at the top of the pouch where the straps will be attached (for example, left and right sides, spaced evenly opposite each other).
- With your yarn needle or hook:
- Insert one strap through the upper stitches at two points on one side of the pouch so that the chain runs along the top edge.
- Secure the ends on the inside by knotting or weaving them in (according to how it appears in your reference video).
- Repeat the process on the other side with the second chain, mirroring the first strap.
In the video, after attaching, the straps are used like a drawstring:
- Pull on both straps to close the pouch opening.
- Tie the ends together on both sides so the top closes neatly.
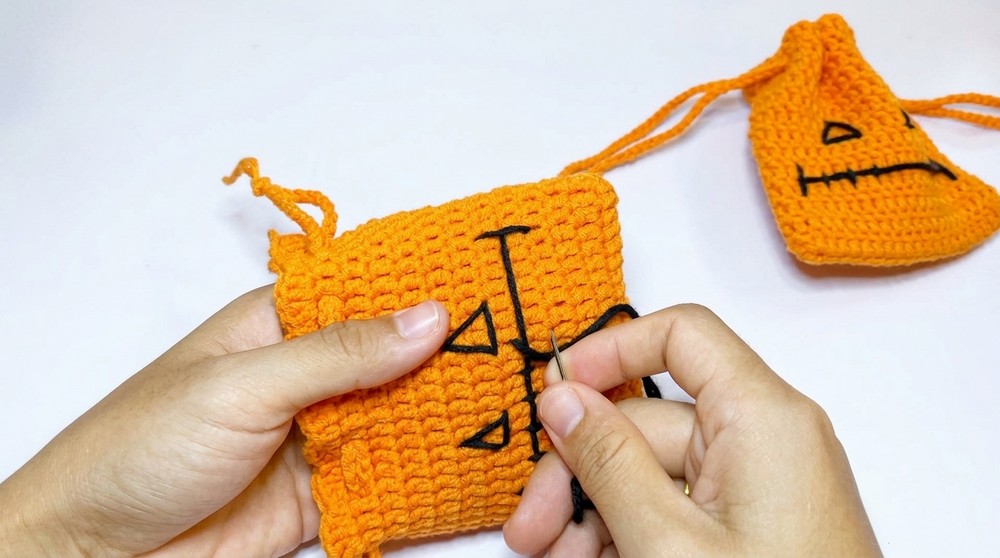
5. Halloween Face
- Sewing the Face
- Use black yarn and a yarn needle.
- You may create any Halloween themed face you like:
- Triangular eyes
- A zigzag mouth
- A simple smiley or spooky expression
- Steps:
- Thread your yarn needle with black yarn.
- Insert the needle from the inside of the pouch to hide the knot inside.
- Use simple embroidery stitches (backstitch or straight stitches) to form the eyes, nose, and mouth.
- When you are done, weave the yarn tail into the inside of the pouch and secure it.
Finishing the Pouch
- Weave in all loose ends on the inside of the pouch using the yarn needle.
- Check that:
- The brim is smooth.
- The drawstring straps move easily and can close the top.
- The face stitches are firmly secured and not too tight (to avoid puckering the fabric).
- Gently shape the pouch with your hands.
- The Halloween pouch bag is now ready to be used for:
- Candy
- Small gifts
- Makeup or personal items
- Halloween party favors
Suggestions and Pattern Notes
- Yarn Choice
- Cotton or cotton blend yarn is recommended for better shape and durability.
- You can change the color to match different themes (orange for pumpkin, purple or black for spooky vibes, etc.).
- Size Adjustments
- To make the pouch wider, increase the length of the starting chain (more than 24 chains).
- To make the pouch taller, add more dc rounds between Round 3 and Round 12 (e.g., up to Round 15 or 18).
- For Beginners
- Keep a stitch marker at the beginning of each round to avoid losing track of where to join.
- Practice your tension on a small swatch before starting to keep stitches even.
Tips to Maintain the Pouch
- Washing
- Hand wash in cool or lukewarm water with mild detergent.
- Avoid harsh rubbing on the embroidered face.
- Drying
- Do not wring.
- Gently press out excess water with a towel.
- Lay flat to dry to keep the pouch in shape.
- Storage
- Store flat or lightly stuffed with tissue paper to prevent creasing.
- Keep away from sharp objects that can snag the yarn.
- Repairs
- If a stitch breaks or the face embroidery loosens, re sew it using matching yarn before it unravels further.
Final Words
This Halloween Pouch Bag pattern is a simple and enjoyable project, suitable even for beginners who know basic stitches like chain, single crochet, and double crochet. It makes a charming gift and a practical Halloween accessory. You can easily personalize it with different colors, facial expressions, or even add small embellishments such as buttons or beads.
With proper care and a bit of creativity, this pouch can be used year after year as a unique handmade piece for the Halloween season.