Stitch an adorable Demogorgon with this Free Crochet Demogorgon Pattern, perfect for crocheting, decorating, or sharing with friends who love Stranger Things.
Strang Free Crochet Demogorgon Pattern for Cosplay Accessories
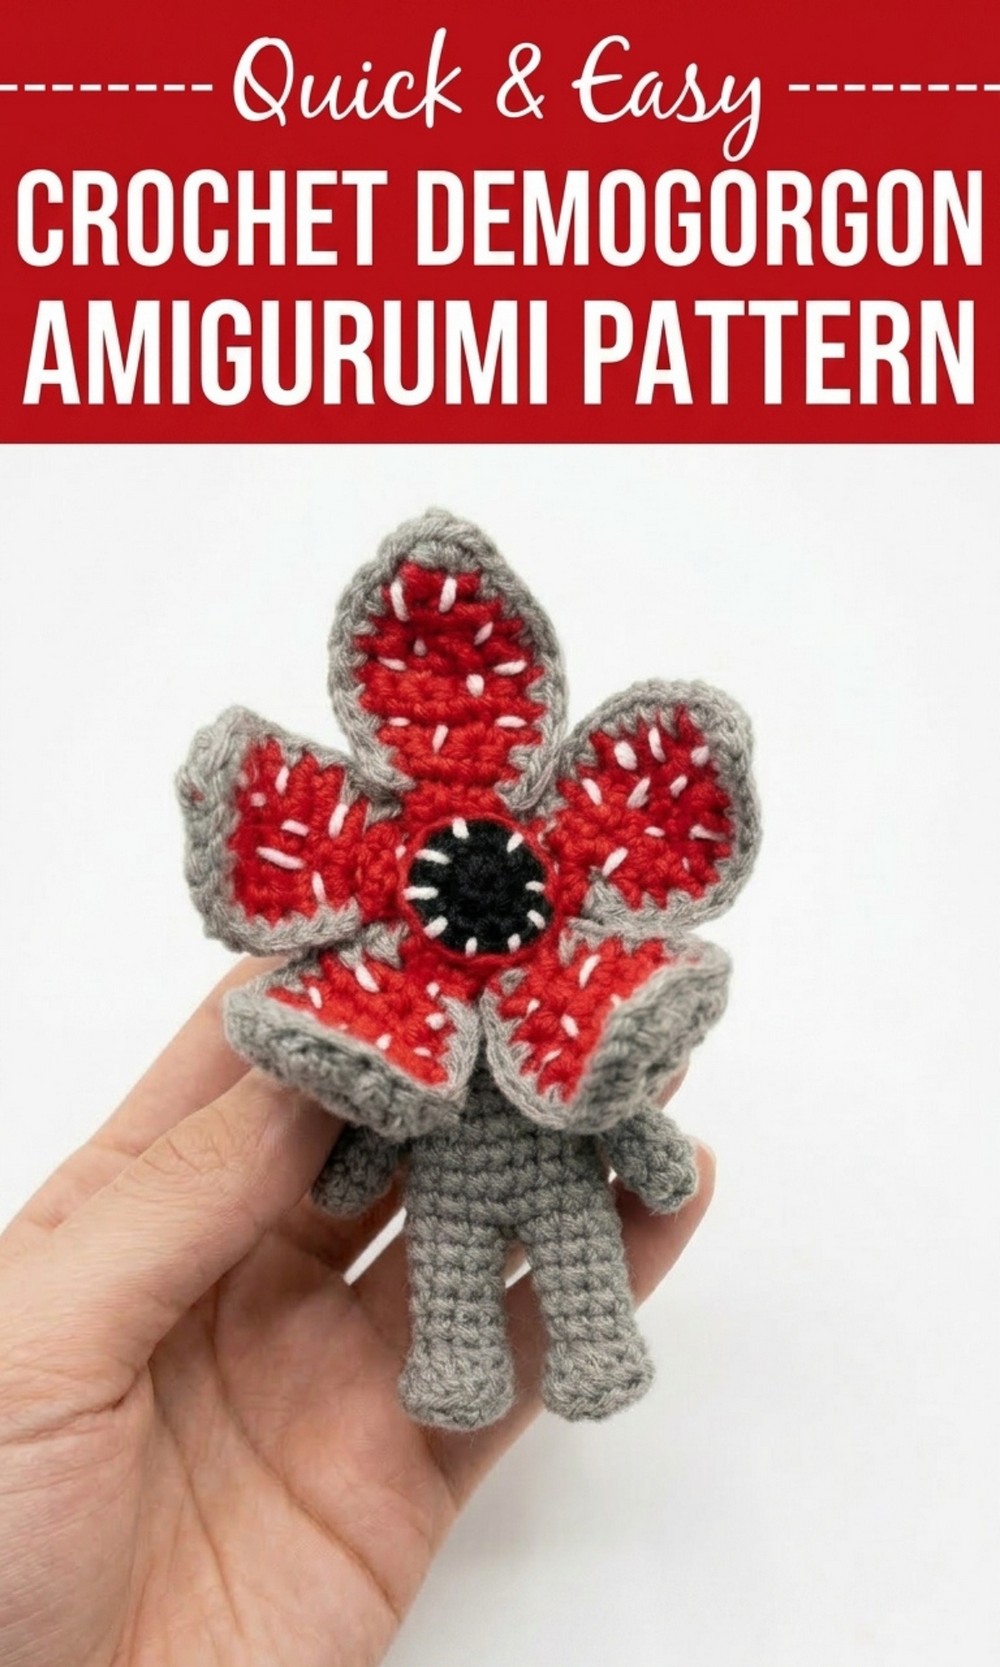
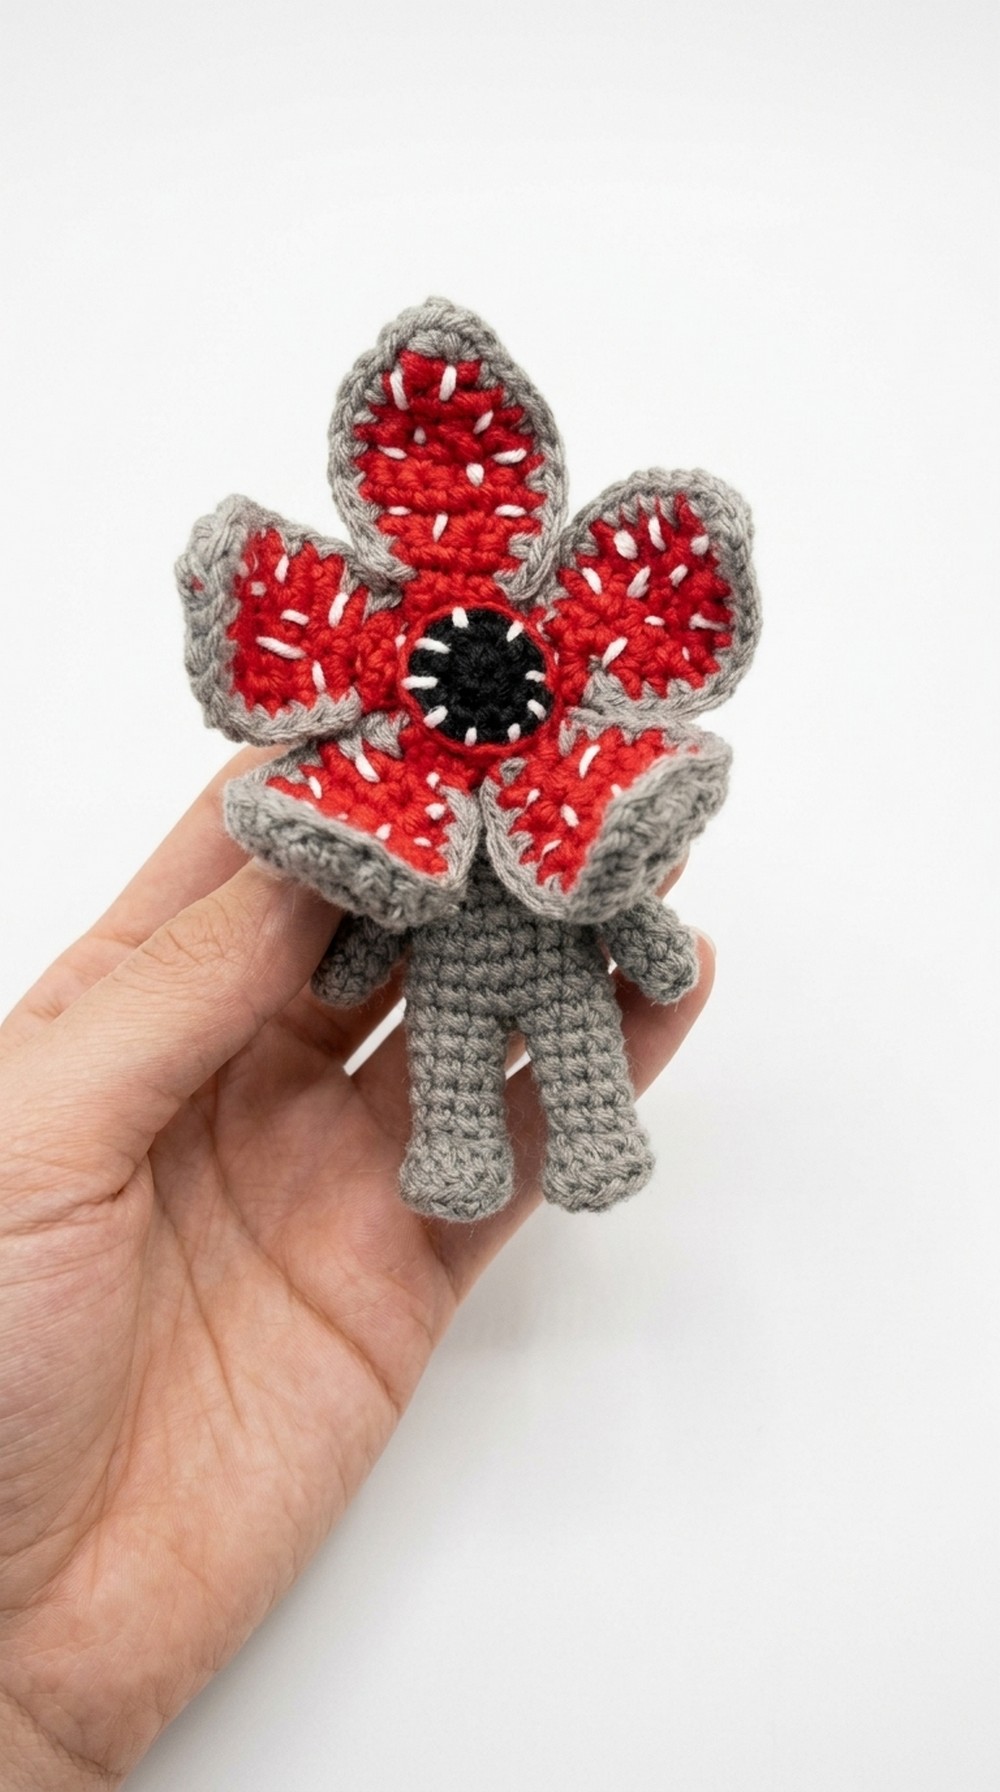
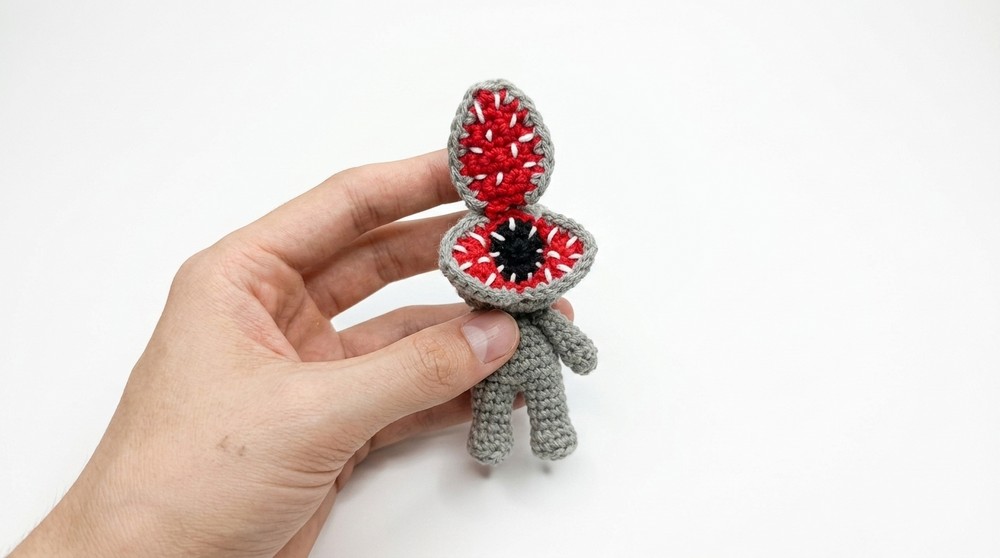
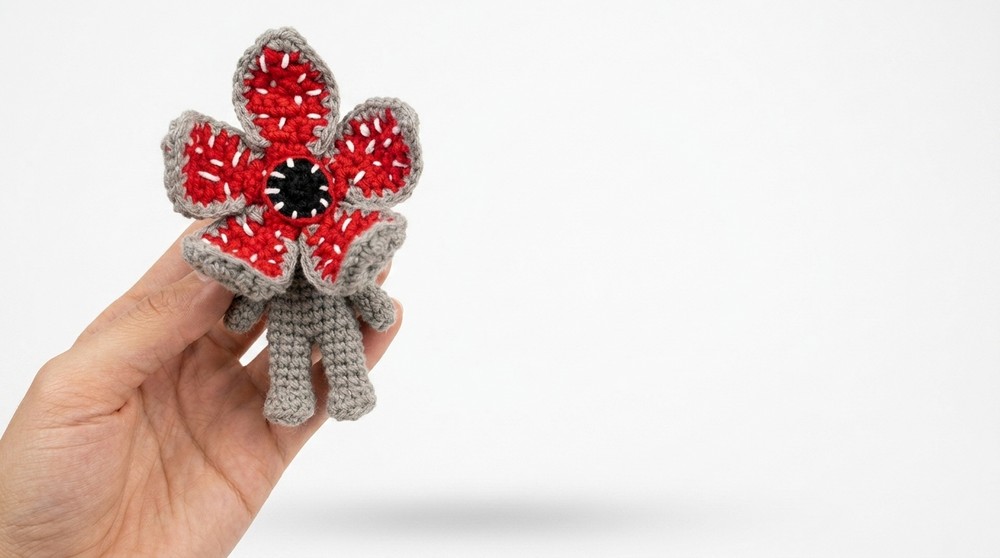
Learn how to make an adorable yet spooky crochet Demogorgon Amigurumi with this free pattern. Inspired by the iconic creature from Stranger Things, this soft and fun creation is perfect for fans of all ages. The Demogorgon features five vibrant red petals with sharp teeth details, giving it a fierce yet playful look. The gray body, tiny arms, and legs complement the stunning petals and black center perfectly.
This crochet piece is special because it combines creativity with fun. You can use it as a unique gift, an eye catching centerpiece, or a collectible for your Stranger Things display. If you love decorating or making something unique for friends, this is a great choice. Plus, you can even make it moveable by adding simple accessories like a wire base.
With its cute size and detailed features, this crochet Demogorgon is a creative project that will delight fans and highlight your crochet skills.
Free Crochet Demogorgon Pattern
Materials Needed
To create your mini Demogorgon, you will need the following materials:
- Yarn
- Gray yarn for the body, legs, and arms.
- Red yarn for the petals.
- Black yarn for detail at the center of the head’s petals.
- White yarn for stitching the teeth/dental pattern on the petals.
- Hooks
- A 2.5 mm crochet hook for the red petals.
- A 3.0 mm crochet hook for the gray petals to ensure consistency.
- Other Materials
- Fiberfill for stuffing.
- A tapestry needle (or aguja lanera) for sewing parts together.
- Optional: Thin, malleable wire for shaping the petals.
- Stitch markers.
- Scissors.
- A silicone hot glue gun (optional).
Abbreviations (US terms):
- ch: Chain
- sc: Single crochet
- sl st: Slip stitch
- inc: Increase (2 sc in the same stitch)
- dec: Decrease (sc2tog, using two stitches to make one)
- BLO: Back loop only
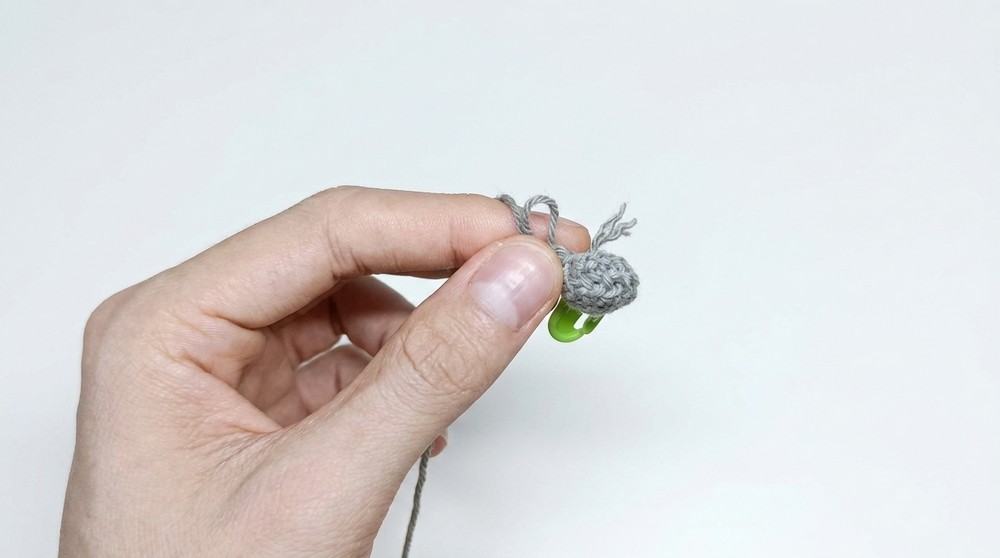
Step 1: Legs
Each leg will be worked separately, so follow the steps below to make two legs:
- Leg Base (Gray Yarn)
- Begin with a magic ring.
- Round 1: Work 5 sc into the magic ring. (5 stitches)
- Round 2: Work 1 inc in each stitch (increase in all). (10 stitches)
- Round 3: Work in BLO for 10 sc. (10 stitches)
- Shaping the Legs
- Round 4: Work 3 sc, 2 dec, 3 sc. (8 stitches) Trim the loose thread inside the leg.
- Rounds 5–8: Work 8 sc to build leg height. After finishing the first leg, fasten off (leave some yarn), but do not fasten off for the second leg.
- Joining the Legs
- Using the second leg, crochet 2 additional sc to center the leg correctly.
- Place both legs together, align them properly, and begin crocheting around both legs as follows:
- Round 9: Crochet around both legs (8 sc per leg) and add an sc into the space between legs for a total of 18 sc.
Step 2: Body
- Build the Torso
- Rounds 10–12: Work 1 sc in each stitch around. (18 stitches per round)
- Round 13: Work 4 sc, 1 dec; repeat around. You will finish with 15 stitches.
- Round 14: Work 3 sc, 1 dec; repeat. Finish with 12 stitches.
- Add Fiberfill
- Stuff the body with fiberfill as you go along to give it a firm shape.

- Stuff the body with fiberfill as you go along to give it a firm shape.
- Form the Neck
- Round 15: Work 1 sc, 1 dec; repeat around. Finish with 8 stitches. Leave a long tail for sewing later and close the neck opening by pulling tightly with a tapestry needle.
Step 3: Arms
You will need two arms for your Demogorgon:
- Make Each Arm
- Begin with a magic ring using gray yarn.
- Round 1: Work 7 sc into the magic ring.
- Rounds 2–6: Work 7 sc in each round.
- Flatten Edges
- Flatten the arms, and crochet through both sides (2–3 sc across the opening). Fasten off, leaving a long thread, and sew the arms onto the body.
Step 4: Head
The head consists of the main sphere and the signature Demogorgon petals:
Main Head Structure
- Neck Base
- Begin with a magic ring.
- Round 1: Work 5 sc into the magic ring.
- Round 2: Work 1 inc in each stitch. (10 stitches)
- Rounds 3–7: Work 1 sc in each stitch to form the neck. Then, flip the piece inside out.
- Expand the Head
- Round 8: Switch to BLO and work an inc in each stitch. (20 stitches)
- Round 9: Work 1 sc, 1 inc, repeat around. (30 stitches)
- Rounds 10–16: Work 1 sc in each stitch. Add fiberfill as you go to shape the head.
- Closing the Head
- Round 17: Work 3 sc, 1 dec; repeat. (24 stitches)
- Round 18: Work 2 sc, 1 dec; repeat. (18 stitches)
Add final stuffing before closing:
- Round 19: Work 1 sc, 1 dec; repeat. (12 stitches)
- Use a tapestry needle to make deco style decreases and pull tight.
Step 5: Petals
Each petal consists of a red front and a gray back stitched together:
- Red Portion
- Row 1: Start with red yarn. Chain 3, turn, skip the first chain, work sc into the next two. (2 stitches)
- Row 2: Chain 1 and turn. Work 1 inc in each of the stitches. (4 stitches)
- Row 3: Chain 1, turn, work 1 sc, 1 inc in the next two, 1 sc. (6 stitches)
- Rows 4–5: Work 1 sc in each stitch.
- Shaping Down
- Row 6: Work 2 sc, 1 dec, 2 sc. (5 stitches)
- Row 7: Work 2 sc, 1 dec, 1 sc. (4 stitches)
- Row 8: Work 2 dec. (2 stitches)
- Gray Back
- Repeat the same process as the red front for the gray back. Stitch the red and gray pieces together, adding an optional wire for shape.
- Assemble Petals
- Create 5 petals and arrange them in a star pattern on the back of the head. Sew or glue them in place.
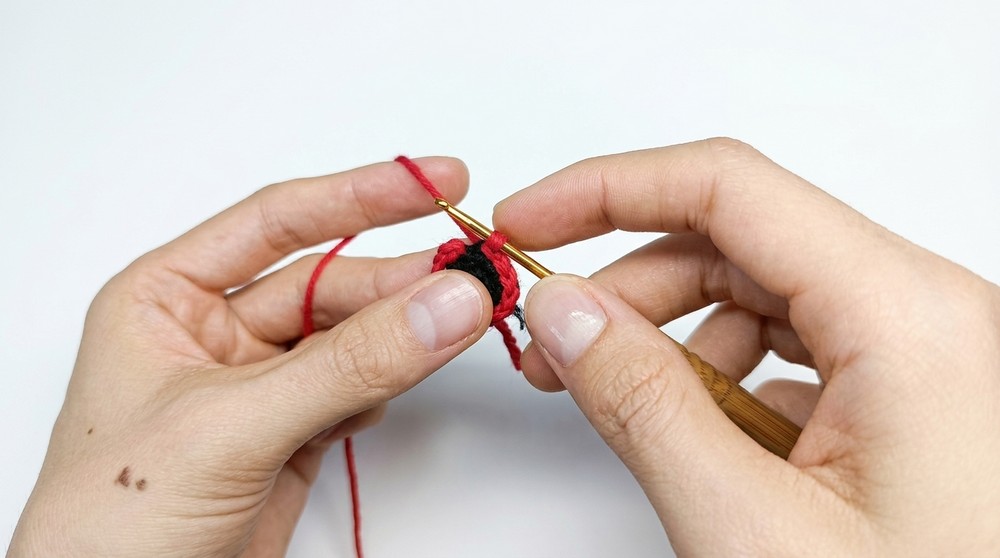
Step 6: Face Details
- Center Circle
- Use black yarn to crochet a small circle and attach it to the middle of the petals.
- Teeth Embroidery
- Use white yarn to stitch the teeth around the red petals. Add detail by stitching diagonally.
Finishing Touches
- Attach the head to the body using a tapestry needle or glue.
- Test fit the head for a “Funko” bobble effect or sew it tightly for a fixed look.
Final Words and Maintenance Tips
Congratulations! You now have your own mini Demogorgon Amigurumi! Whether for collection or fun display, this crochet project showcases your skills.
Tips for Maintenance:
- Keep away from dirt and dust by placing it in a display case.
- Handwash gently with mild soap if needed.
- Avoid excessive pulling or twisting to protect the structure.