Celebrate playful creativity using the Free Crochet Bob the Minion Pattern, ideal for gifting, collecting, or adding personality to your handmade lineup.
A small yellow character with oversized goggles and an endless supply of charm once captured the hearts of millions, Bob the Minion. Known for his innocence, teddy bear companion, and wide-eyed joy, Bob has become a favorite among fans of all ages. Bringing that same cheerful spirit into your home can be both fun and rewarding. A handmade version of Bob is more than a decorative item, it’s a lovable keepsake filled with personality. The Free Crochet Bob the Minion Pattern allows enthusiasts to recreate this iconic figure in soft yarn, making it a thoughtful gift or delightful collectible.
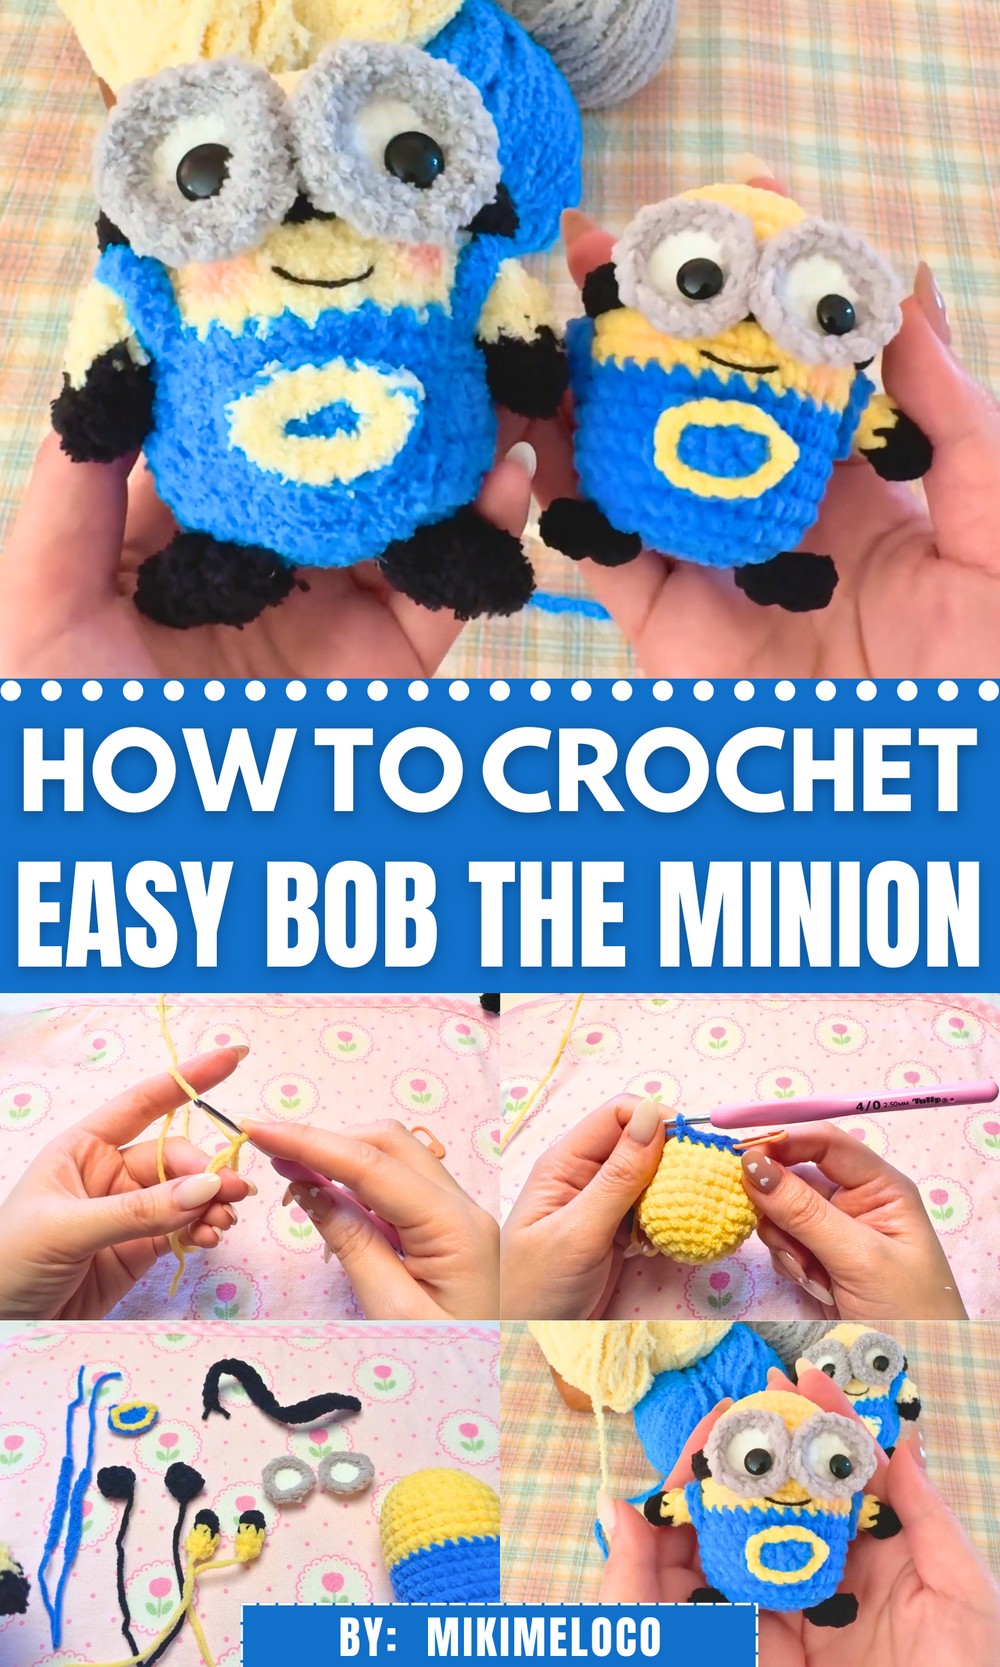
Free Crochet Bob the Minion Pattern with Step-by-Step Easy Fun
Using basic techniques and accessible stitches, this project suits both beginners and experienced hands seeking something playful yet familiar. The finished result holds its own as a desk buddy, shelf accent, or comforting toy. Bob’s bright expression and compact form add whimsy to any room, and his presence often sparks smiles and fond memories.
Whether for a fan of the films or someone in need of a cheerful mascot, this little Minion stands out. With minimal materials and just a bit of time, the joy of this beloved character comes to life through your handiwork, stitch by stitch.

Materials
- Yellow Yarn: For Bob’s body and arms
- Blue Yarn: For his clothes and straps
- Black Yarn: For his feet, arms, glasses band, and mouth
- White Yarn: For the glasses
- Gray Yarn: For the glasses’ frames
- Polyfill: To stuff the body
- Crochet Hook – Recommended size per your yarn type
- Scissors
- Tapestry Needle: For sewing parts together
- Stitch Markers: Helpful for keeping track of rounds
- Hot Glue (Optional): For assembly
Special Features
This pattern includes some unique aspects, such as:
- Restyling iconic Minion aspects to make them distinctively “Bob the Minion.”
- Switching colors seamlessly between sections (yellow to blue, white to gray).
- Crafting invisible decreases for a polished appearance.
- Flexible assembly options—sew or glue parts together.
- Adding final embellishments such as blush and a smile for personality.
Step-by-Step Instructions
1. Crocheting the Body
- Begin with yellow yarn and make a magic ring.

- Round 1: Crochet 6 single stitches.
- Round 2: Crochet 6 increase stitches (total 12 stitches).
- Round 3: Follow the pattern: 1 single crochet and 1 increase. Repeat six times (18 stitches).
- Round 4: Crochet 2 single stitches followed by an increase. Repeat six times (24 stitches).
- Continue through successive patterns until reaching 30 stitches by Round 6.
- From Rounds 7–11: Crochet 30 single stitches for each round.
2. Switching to Blue Yarn
- At the end of Round 11, switch from yellow to blue yarn seamlessly.

- Rounds 12–17: Crochet single stitches in blue yarn.
- Round 18 introduces invisible decreases to taper the shape. Repeat three single crochets followed by an invisible decrease six times.
- Round 19: Crochet 12 invisible decreases to fully close the body, leaving an opening for stuffing.
- Add polyfill inside the body and close it tightly using alternative front loops.
3. Making the Glasses
- Start with white yarn and make a magic ring. Crochet six single stitches for Round 1.
- Round 2: Increase stitches to total 12 stitches.
- Switch to gray yarn in the last stitch of Round 2.
- Round 3: Crochet 2 single stitches followed by an increase. Repeat four times to complete one glasses lens. Make two identical pieces.
- For the black band, chain 25 stitches, then crochet 24 single stitches along the chain.
4. Crafting Bob’s Arms
- Begin with black yarn and create a magic ring with five single stitches.
- Round 2: Crochet five single stitches.
- Switch to yellow yarn in the final stitch.
- Rounds 3–4: Crochet five single stitches in yellow for two identical arms.
5. Making Bob’s Feet
- Using black yarn, start with a magic ring.
- Round 1: Crochet six single stitches.
- Rounds 2–3: Continue with six single stitches in black. Create two identical foot pieces.
6. Creating Bob’s Clothes
- Pocket: Using blue yarn, chain five stitches. Crochet the pattern across the chain to form the fabric piece, adding yellow yarn around the edges for detailing.
- Straps: Chain 10 using blue yarn to make each strap. Once finished, sew or glue straps to the clothing piece.

7. Assembly
Now that all parts are complete:
- Attach the arms, feet, glasses, band, and clothing securely to Bob’s body. Use either sewing or glue depending on your preference.
- Embroider Bob’s mouth with black yarn and add blush to his cheeks for extra character charm.

Level of Difficulty
The tutorial is rated as beginner to intermediate. While the techniques used are straightforward, such as single crochets and increases, switching colors and assembly require attention to detail.
Tutor’s Suggestions
Mickey emphasizes the importance of:
- Adding standing stitches at the start of each round to maintain consistency.
- Using stitch markers to track rounds.
- Adding polyfill gradually to avoid uneven stuffing.
- Switching yarn colors correctly for a clean finish. Mickey even shows how to align yarn to the back to simplify transitions.
Uses
- Decor: Add Bob as a cute item to your workspace, kids’ room, or shelves.
- Gift: Perfect as a handmade gift for fans of “Despicable Me.”
- Toy: Safe and soft for children when properly assembled without glue.
Tip
Use Hot Glue for Extra Ease: If you find sewing parts tricky, Mickey suggests using hot glue as an alternative method for assembly. Just ensure the glue is placed sparingly for a neat finish.
Conclusion
This pattern is an excellent guide for creating a detailed and adorable Minion plushie. Crocheting Bob the Minion not only enhances your crochet skills but brings joy through creating something unique and charming.