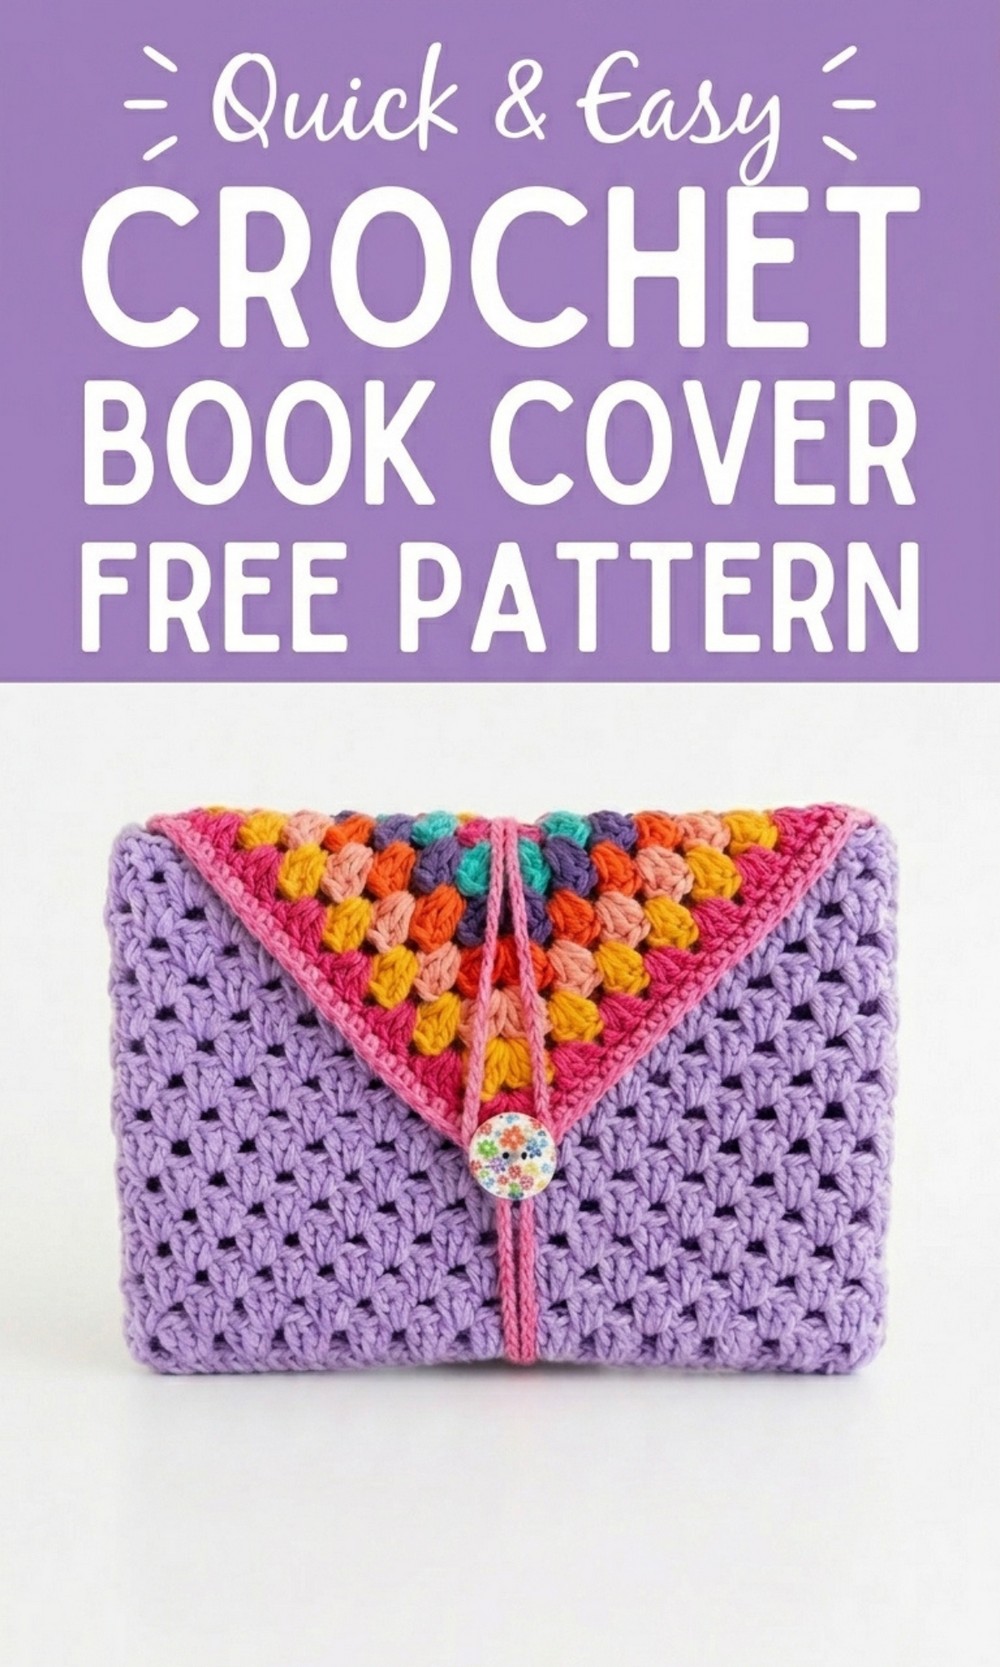
Cozy up your library shelf with this vibrant free crochet book cover pattern to make a thick and protective sleeve that feels like a soft warm cloud on your books.
Keep Books Stylish with This Free Crochet Book Cover Pattern
Snag this trendy free crochet book cover pattern and add charm to your favorite books in a fun and creative way. It’s a simple yet stylish project that lets you make a protective cover for your books while showcasing your creativity. The design is soft, colorful, and easy to customize with your favorite colors and patterns, making it the perfect handmade accessory or gift for someone special.
This beautiful book cover fits snugly around your book and includes a handy flap for secure closure. There’s also a button loop for added convenience, giving it a polished and practical look. 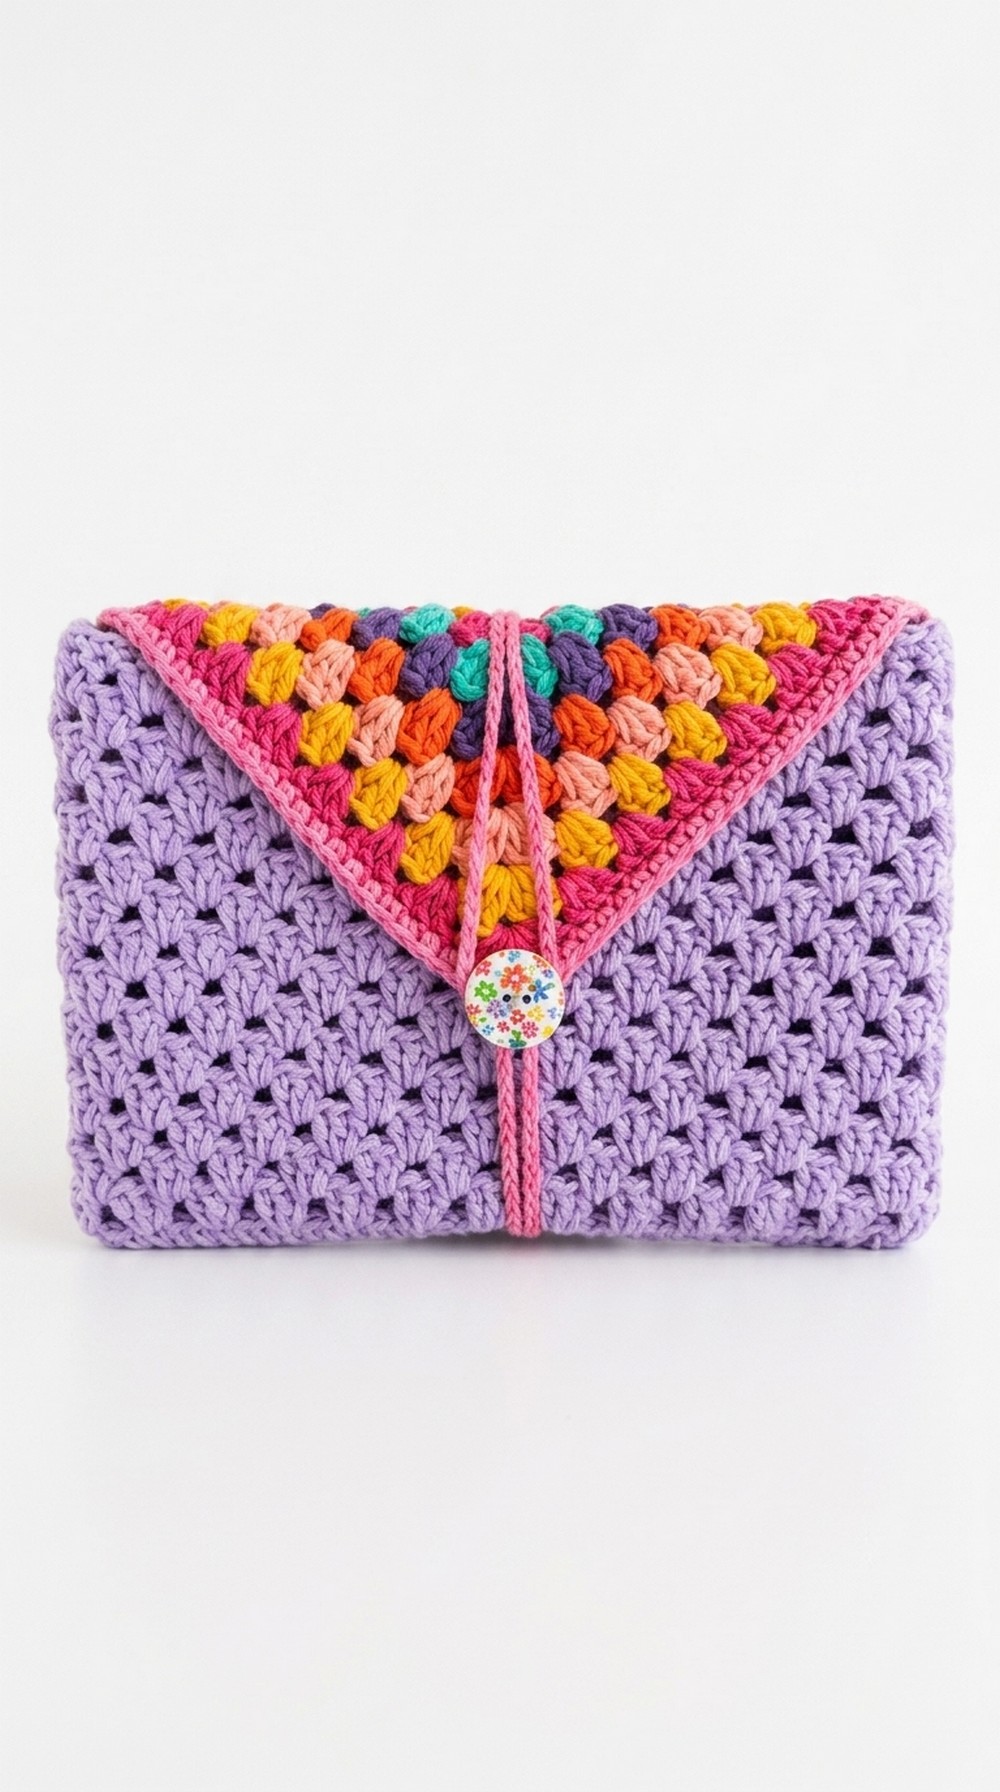 Not only does this crochet book cover shield your book from scratches and everyday wear, but it also adds personality and charm to it. It’s a unique crocheting project that’s perfect for book lovers and crochet enthusiasts alike.
Fantastic Crochet Book Cover Pattern
1. Materials
- Yarn
- Spagetti Yarn Silim Coton Plus (as in the video) or any similar medium‑thick cotton yarn
- Main color for body
- Several contrasting colors for the flap motif (yellow, pink, green, etc.)
- Hook
- 3.5 mm crochet hook (as used in the video)
- Notions
- Yarn needle (for weaving in ends and sewing pieces)
- Scissors
- 1 button (for closing the flap)
- Measuring tape
2. Special Techniques Used
- Chain (ch)
- Slip stitch (sl st)
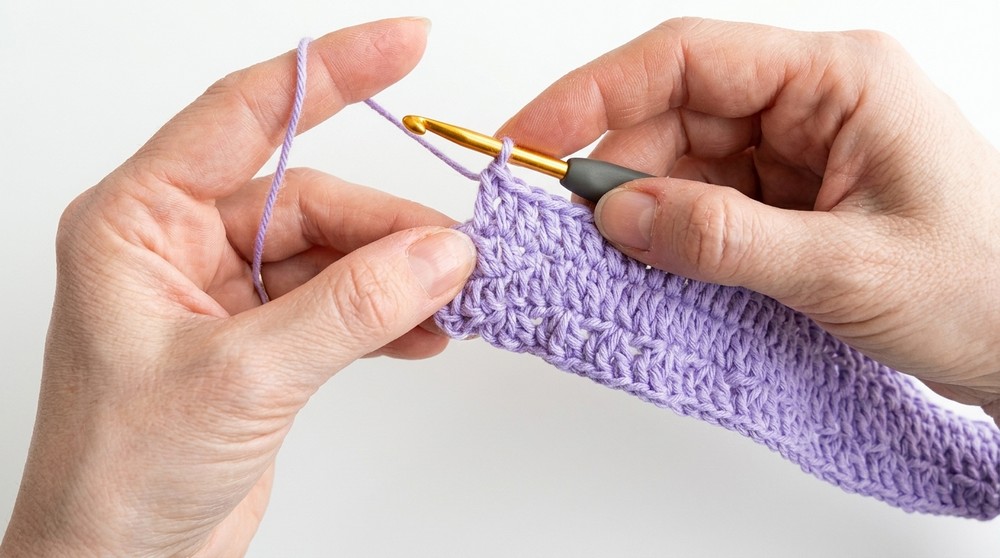
- Single crochet (sc)
- Double crochet (dc)
- Magic ring (sihirli halka)
If you are new to crochet, the designer mentions a separate beginner tutorial. You can search a “basic crochet tutorial” to learn these stitches before starting.
3. Gauge and Size
- The designer worked 15 rounds for the cover body.
- Finished body size:
- Width: approximately 20 cm
- Height: approximately 14–14.5 cm
You should measure your own book and adjust the number of rounds so that:
- Width of base oval = around the width of your book
- Height = around the height of your book
PART A – BASE RECTANGLE / OVAL BODY (MAIN PIECE)
This is the main sleeve part that the book will sit inside.
Step 1: Foundation Chain
- With your main color yarn, make a slip knot.
- Chain 39.
- This gives you a starting length of about 20 cm with 3.5 mm hook and similar yarn.
Step 2: First Round – Forming the Oval
- Skip the first 3 chains from the hook.
- In the 4th chain from the hook: work 3 dc.
- Together with the 3 skipped chains (which count as 1 dc), you now have 4 dc in this first “end” stitch. This forms one rounded corner.
- Work 1 dc in each remaining chain across until you reach the last chain.
- In the last chain (which is actually the first chain you made at the very beginning): work 4 dc into the same chain.
- This forms the other rounded corner.
- Now continue along the other side of the foundation chain:
- Work 1 dc into each chain (into the unworked loops) until you reach your starting point.
- Work 1 dc into each chain (into the unworked loops) until you reach your starting point.
- Join the round:
- Insert hook into the top of the beginning chain‑3, yarn over and pull through both loops to make a slip stitch.
- You now have an oval base.
Step 3: Second Round – Setting Up the Motif Strips
- Chain 3 (counts as 1 dc).
- Skip 2 dc, then in the 3rd dc work 3 dc in the same stitch.
- Skip 2 dc, in the 3rd dc work 1 dc.
- Repeat this sequence around:
- Skip 2 dc, work 3 dc in the next;
- Skip 2 dc, work 1 dc in the next.
- At the end of the round you may have to adjust slightly: the video says when she reaches the end and has 3 dc left, she:
- Skips 2 dc, and in the last dc works 2 dc, then joins to the top of the beginning ch‑3 to complete a group of 3 dc.
- Join with a slip stitch to the top of the beginning ch‑3.
- At this point you see repeated clusters of 3 dc separated by single dc – the “motif base” she always uses.
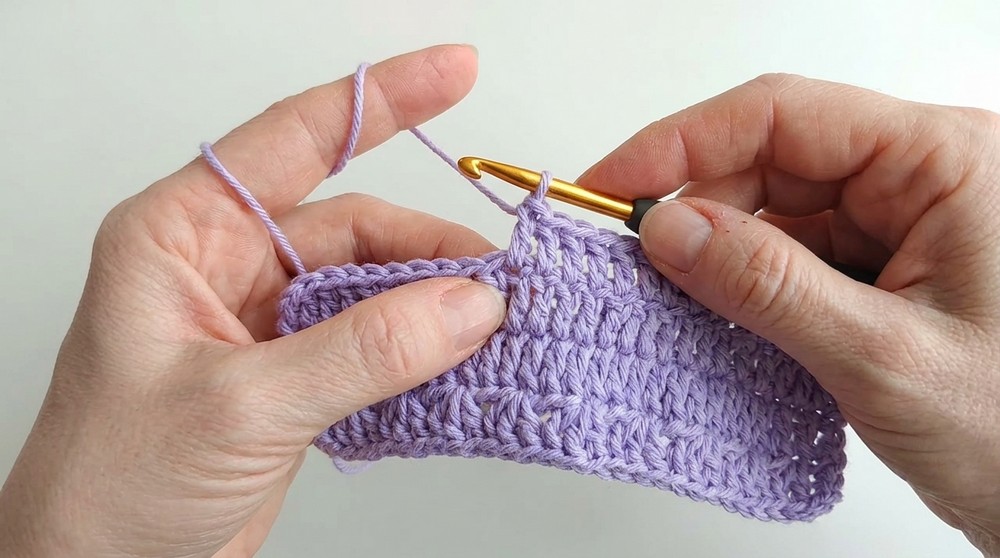
4. Growing the Body – Repeated Rounds of 3‑dc Clusters
From this point, the work is done in rounds, forming a rectangle with rounded ends.
General Rule for Each Round
- Work 3 dc in every space between the 3‑dc clusters from the previous round.
- At the beginning of each round:
- Slip stitch to the appropriate point (top of 3‑dc group or first dc),
- Chain 3 (counts as 1 dc),
- Then fill each space (gap) between groups with 3 dc.
Example for Round 3 (as in video)
- After joining previous round, insert hook into the top of the first dc of a cluster.
- Chain 3.
- In the first space between clusters, work 2 dc (together with ch‑3, this gives 3 dc in that space).
- Then in each next space around, work 3 dc into the space.
- At the end of the round, join with a slip stitch to the top of the beginning ch‑3.
Continue Growing
- Repeat this method for each new round:
- Join, chain 3,
- 3 dc in each space around,
- Join to the beginning ch‑3.
- In the video, the designer works 15 rounds of these 3‑dc clusters.
After 15 rounds, the size is approximately:
- Width: 20 cm
- Height: 14–14.5 cm
You should stop when your piece matches the height and width you need for your own book.
5. Border Around the Body – Single Crochet Edge
After reaching the desired size:
- Chain 1.
- Work 1 sc in each dc stitch all the way around the piece.
- Go stitch by stitch, not in the spaces this time.
- Continue until you return to the first sc.
- Join with a slip stitch into the first sc.
- Fasten off and cut the yarn.
- Weave in the end using a yarn needle.
The designer notes that one round of sc is enough, but you may work two rounds if you prefer a thicker border.
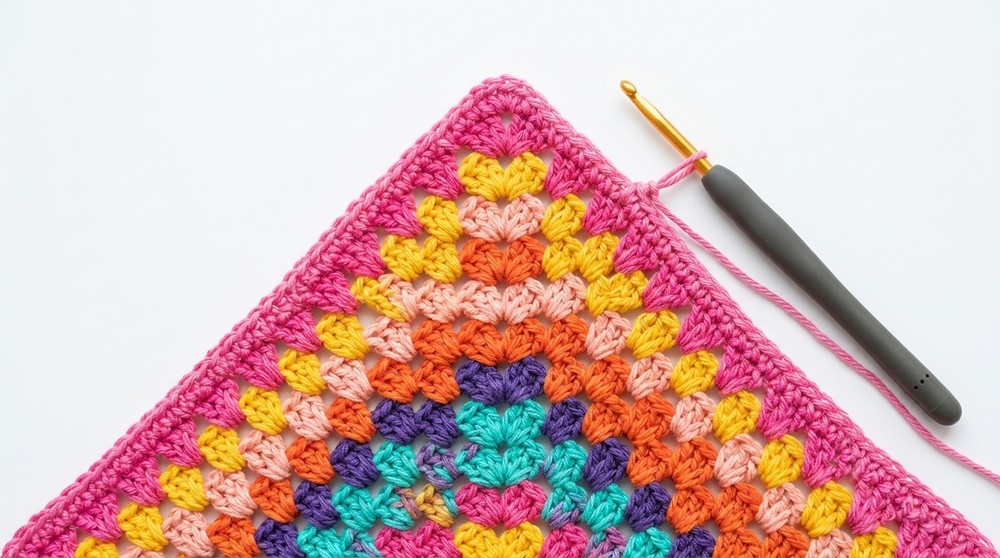
PART B – COLORFUL FLAP / COVER (GRANNY‑STYLE SQUARE)
This is the decorative flap that folds over the book and closes with a button.
Step 1: Center of the Flap (Magic Ring and First Color)
- With yellow yarn (or any first color), make a magic ring.
- Into the ring:
- Chain 3 (counts as 1 dc).
- Work 3 dc into the ring (so you have a total of 4 dc including ch‑3).
- Pull the ring slightly to tighten.
- Chain 2 (this will form a corner).
- Into the same magic ring, work 4 dc again.
- Pull the magic ring firmly to close the center.
- Chain 1 and cut the yarn.
- Tighten all ends.
You now have a small, almost rectangular cluster shape: 4 dc, 2 ch, 4 dc.
Step 2: Second Round – Add Second Color
- Join pink yarn (second color) to the top of the first dc of any group from the previous round.
- Chain 3 (counts as 1 dc).
- Between the 1st and 2nd dc of the first 4‑dc group, insert your hook in the space and work 3 dc (this is a side cluster).
- Skip the next 3 dc in that group.
- In the corner space (2 ch):
- Work 3 dc, chain 2, 3 dc (this forms a proper square corner).
- Skip the 3 dc of the next group.
- In the next space between groups, work 3 dc.
- In the last dc of the round, work 1 dc (as the video does to close the round neatly).
- Chain 1 and cut the yarn.
Now you see a small square‑like motif with 3‑dc clusters and a corner.
Step 3: Third Round – Add Third Color
- Join green yarn (third color) to the top of the first dc of any side.
- Chain 3.
- In the first side space: work 3 dc.
- In the next side space: work 3 dc.
- In each corner space:
- Work 3 dc, chain 2, 3 dc.
- Continue around the square, working 3 dc in each side space, and 3 dc, ch 2, 3 dc in each corner.
- At the last side space before joining, work 3 dc, then in the last dc of the round work 1 dc if needed to complete a cluster (as in the video).
- Chain 1 and cut yarn.
Step 4: Continue Growing the Flap
- Repeat the same style as a granny square:
- Join a new color to a stitch at the start of a side, chain 3,
- Work 3 dc in each side space,
- Work 3 dc, ch 2, 3 dc in each corner space.
- The video states she continues until she has 8 rounds total of these colorful rows.
After 8 rounds, she places the flap on the body and checks that:
- The width of the flap fits the width of the body,
- The length is suitable to cover the top of the book and reach a point where it can be closed with a button.
You can adjust the number of rounds (more or fewer) depending on:
- Thickness of your yarn,
- Size of your book,
- How long you want the flap to be.
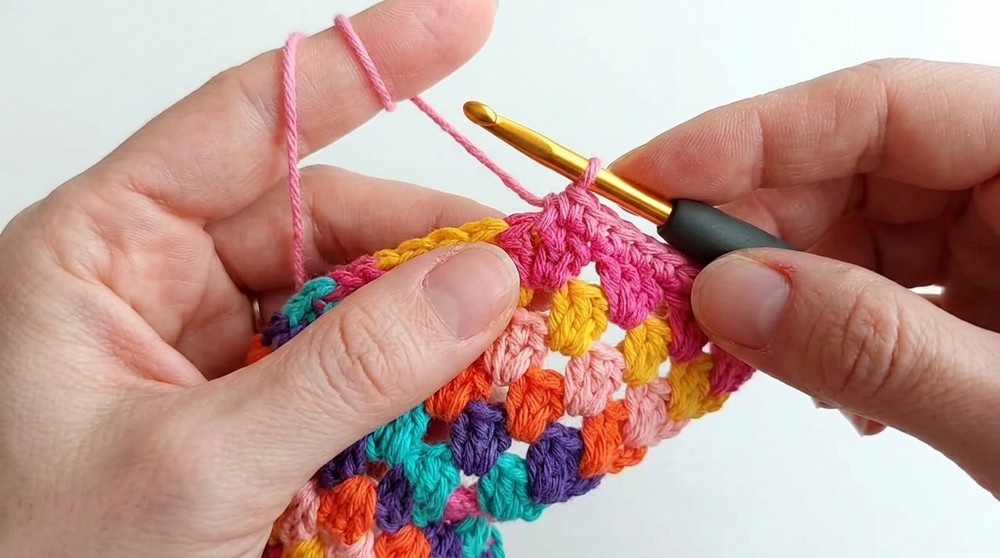
6. Flap Border and Button Loop
Once the flap is big enough:
Step 1: Single Crochet Border with Button Loop
- Join pink yarn (or desired edge color) to the first dc at one corner or side.
- Chain 2 (or 1, depending on your tension; the video says 2 chains at the start).
- Work 1 sc in each dc stitch around the flap.
- When the designer approaches the corner where the button loop will be, she makes a long chain.
- At the corner where the flap will close at the front, after working 1 sc into the corner stitch, chain about 150 chains (this is what she states in the video).
- This long chain will become the button loop and decorative string.
- After finishing the 150 chains, go back to the same corner stitch and work 1 sc to anchor the chain.
- Continue working sc in each dc around the remaining sides of the flap.
- Join with a slip stitch to the first sc, fasten off, and weave in ends.
You may adjust the length of the chain depending on:
- Size of your button,
- How much slack you want,
- Whether you want it to wrap around multiple times or simply hook over the button.
PART C – ASSEMBLY (SEWING FLAP TO BODY)
Step 1: Positioning the Flap
- Lay the body piece flat, right side facing up.
- The designer notes:
- The right side looks more “pressed” or neat.
- The wrong side looks less even.
- The designer notes:
- Place the flap on one short edge of the body, aligning the straight edge of the flap with the short edge of the body.
- The flap should be centered widthwise.
Step 2: Sewing
- Thread a yarn needle with a length of yarn in a matching color.
- With right sides facing outward, or flap right side facing up:
- Sew along the edge where the flap meets the body using a simple whip stitch or mattress stitch.
- Make sure your stitches are even and not too tight to avoid pulling or distorting the fabric.
- Sew from one side of the flap to the other, then secure the yarn and cut the end.
Step 3: Attaching the Button
- Fold the flap down over the body to see where the tip of the flap or the central “triangle” area lands on the body.
- Place the button on this point (on the body piece).
- Use sewing thread or yarn and a sewing needle to stitch the button firmly in place.
- Pull the long chain loop over the button to test the closure.
- Adjust if needed (if too loose, you can shorten the chain in your next project; if too tight, increase chain length).
Finishing the Pattern
- Weave in all remaining ends using a yarn needle.
- Optionally, gently block the cover:
- Lightly steam it (if your yarn allows) or dampen and pin it to desired measurements, letting it dry flat.
- Insert your book into the cover.
- Fold the flap over and secure it with the chain loop and button.
Your colorful crochet book cover is now complete.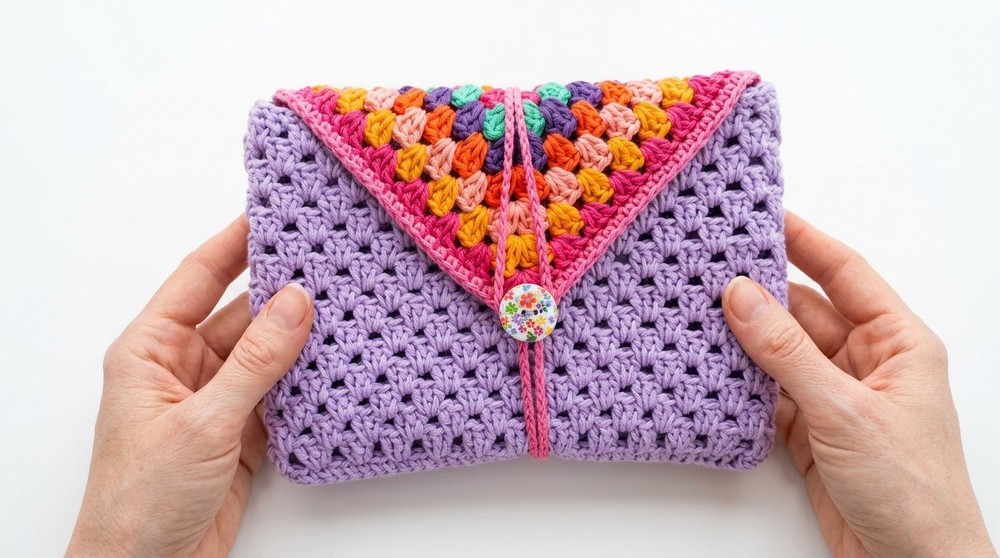
Suggestions and Tips for Success
- Check Your Measurements Early
- After the first few rounds of the body, measure against your book.
- Adjust the number of chains at the beginning if your book is significantly larger or smaller.
- Keep Your Tension Even
- Try to keep your stitches the same size.
- Uneven tension can cause the cover to be too tight or too loose.
- Yarn Choice
- Cotton is recommended: it is strong, keeps its shape, and protects the book well.
- Avoid very stretchy yarns, as they may loosen over time.
- Color Planning
- Decide your color order for the flap before you start.
- Repeating colors in a pattern (for example yellow‑pink‑green‑yellow‑pink‑green) makes the flap look harmonious.
- Neat Corners on the Flap
- Always remember: corners are 3 dc, ch 2, 3 dc in the corner space.
- This keeps the granny square flap flat and square, not wavy.
- Securing Ends
- Weave in each color change securely.
- Because this is an item that will be used often, weakly woven ends may come out.
- Maintaining the Cover
- Hand wash gently in cool water with mild detergent.
- Do not twist or wring; press out water in a towel.
- Lay flat to dry to maintain shape.
- Avoid hot ironing directly on acrylic; if using cotton, use low heat and a pressing cloth.
Final Words
This crochet book cover pattern creates a practical and decorative item that protects your books and shows off your creativity. The oval based body hugs the book, while the colorful granny‑style flap adds charm and personality. Because the construction is repetitive and based on simple stitches, it is suitable for confident beginners and a relaxing project for more experienced crocheters. By adjusting the number of rounds and measurements, you can adapt this pattern for different book sizes, notebooks, or even tablets. With careful finishing and a little color planning, each cover you make will be unique and long lasting.