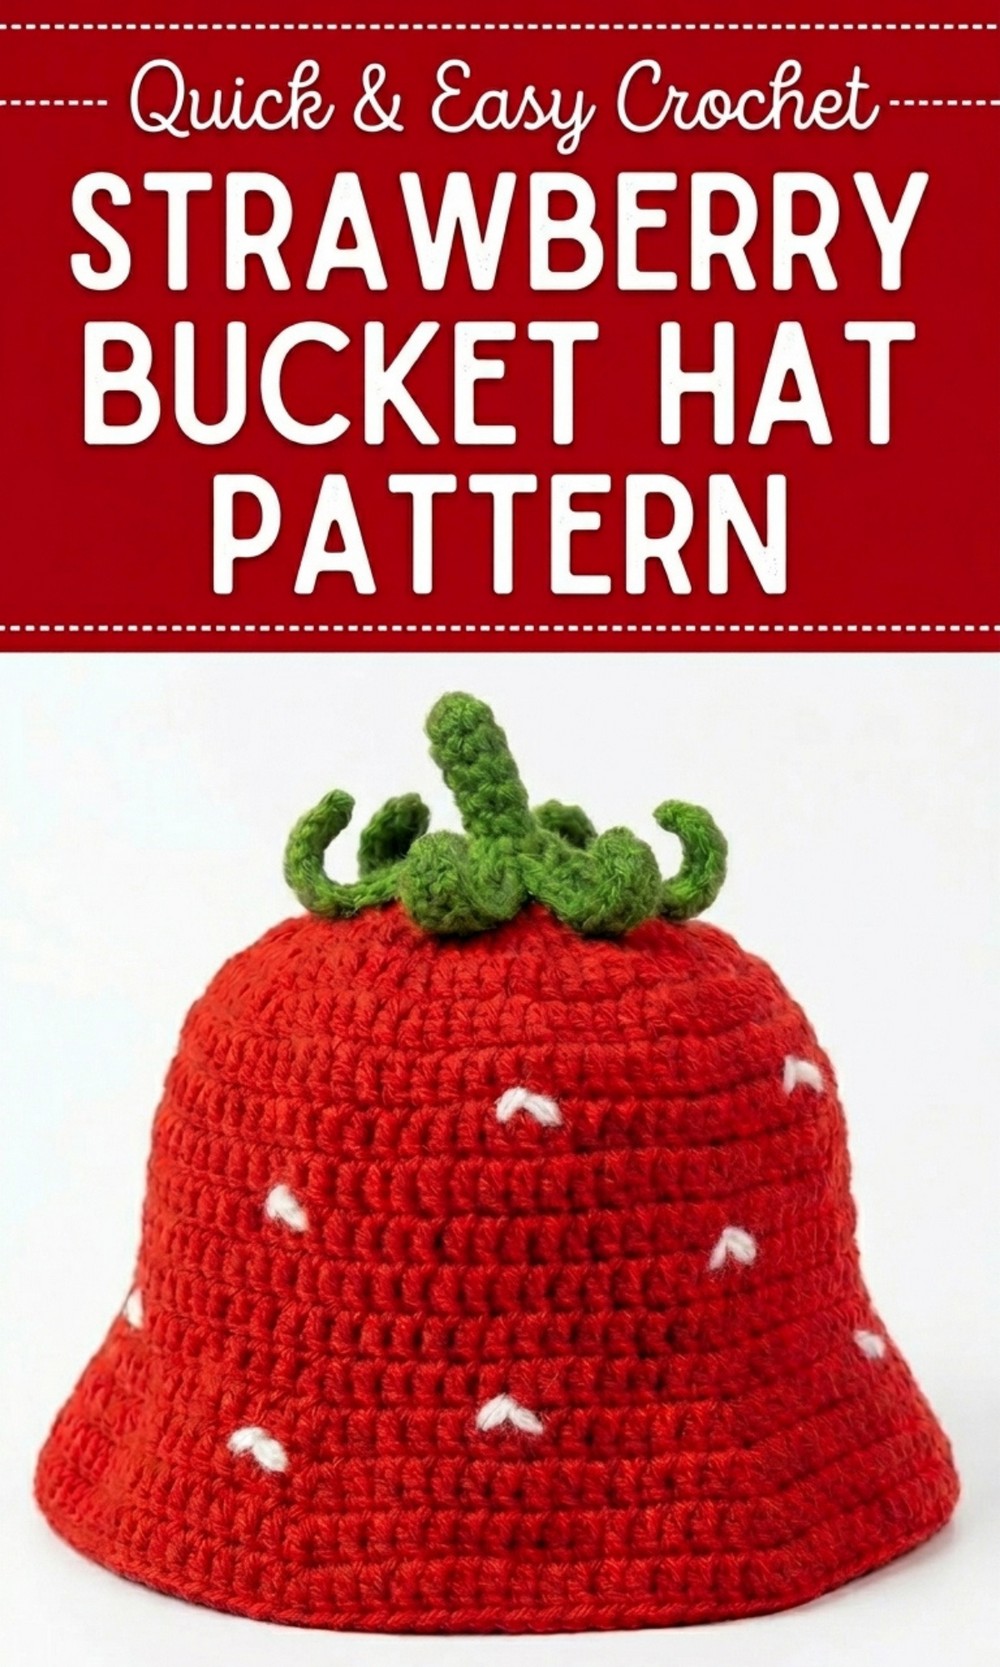
Glowing with this whimsy Free Crochet Strawberry Bucket Hat Pattern that shows you a fun way to make your own cute strawberry hat everyone will love.
 Add Personality to Your Wardrobe with This Free Crochet Strawberry Bucket Hat Pattern
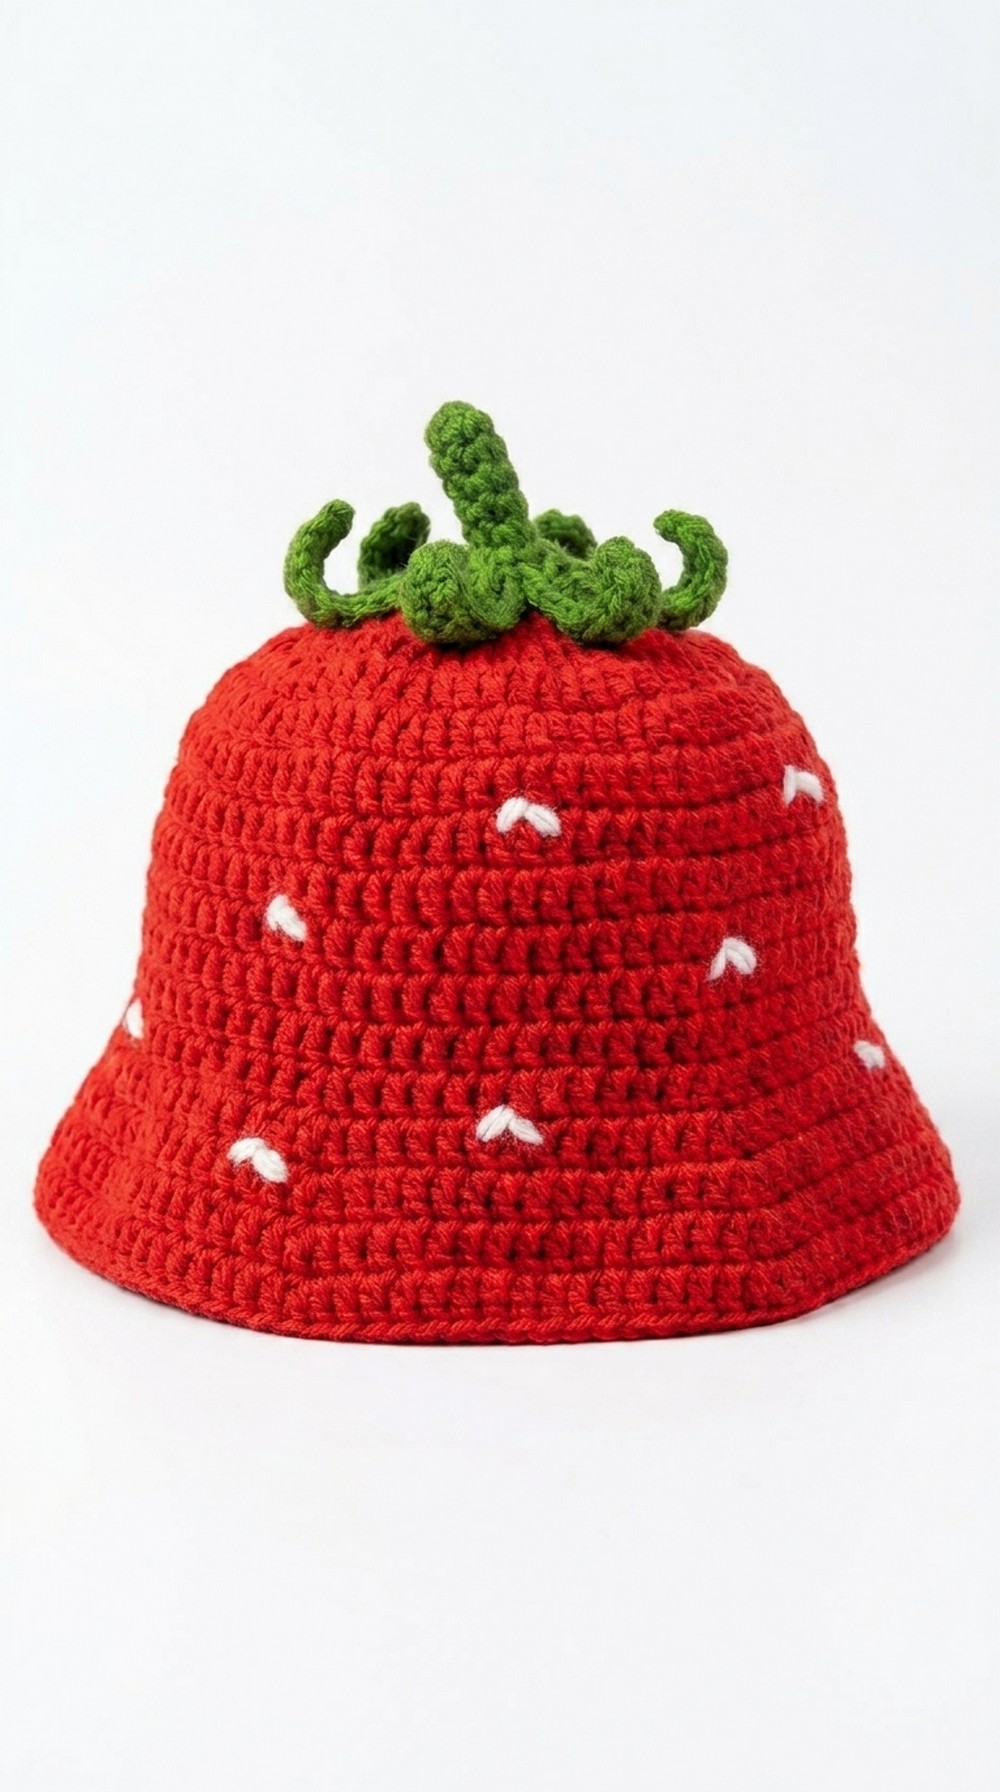
This Free Crochet Strawberry Bucket Hat Pattern turns ordinary yarn into a bright and cheerful hat that looks just like a juicy strawberry. The hat has a vibrant red base decorated with tiny white seed shaped details and a fresh green top that looks like a leafy crown.
It’s soft, comfy, and super fun to wear, making it perfect for sunny outings or adding a playful touch to any outfit. The wide brim not only adds a stylish touch but also helps keep the sun out of your eyes on bright days.
 This hat is great for personal use or as a thoughtful handmade gift for a friend or family member who loves unique and colorful accessories. It’s a fun and special project that lets you turn yarn into something one of a kind. With this hat, you’ll be ready to shine in any outdoor adventure or casual day out.
Gorgeous Crochet Strawberry Bucket Hat Pattern
Materials Required
- Yarn: 5 ply Milk Cotton Yarn
- Colors:
- Red (2 balls or less for the main body of the hat)
- Green for the stem and leaves (small amount)
- White for the seeds (small amount for embroidery)
- Colors:
- Crochet Hook: 4 mm hook
- Darning Needle: For weaving ends and embroidery
- Scissors: For cutting yarn
- Measuring Tape: To check sizes
Gauge
- The gauge for this pattern is measured based on the circle at the top of the hat (diameter):
- Kids Small Size: 5.25 inches or 13.5 cm diameter.
- You can adjust the gauge for adult sizes by continuing with increases.
Finished Sizes
- Kids Small: Approximately 17 cm (6¾ inches) in diameter.
- Adult Small to Medium: 16 cm (approximately 6¼ inches) diameter.
- Adult Medium to Large: 18 cm (approximately 7 inches) diameter.
Pattern Instructions
1. Top of the Hat
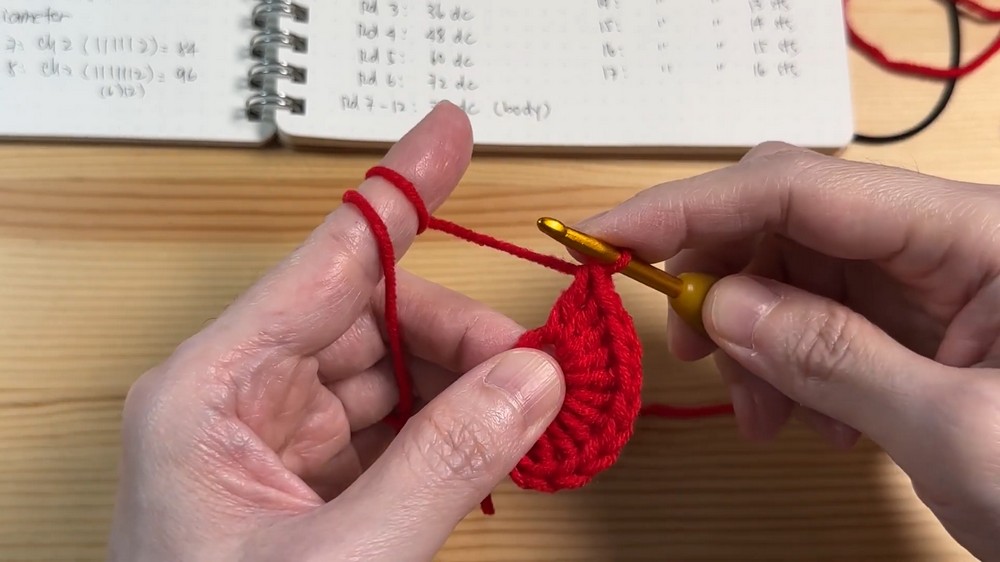
Round 1 – Double Magic Ring
- Start with a double magic ring:
- Create a loop by wrapping the yarn twice, leaving a long tail.
- Chain 2 (does not count as a stitch).
- Crochet 12 double crochets (DC) into the magic ring.
- Pull the tail to close the ring tightly.
- Slip stitch into the first DC to complete the round.
Round 2 – First Increase
- Chain 2 (does not count as a stitch).
- Create 2 double crochet in each stitch around for a total of 24 double crochets.
- Slip stitch into the first DC to close the round.
Round 3 – Alternating Increase
- Chain 2.
- Follow the pattern:
- 1 DC in the first stitch, 2 DC in the next stitch (increase).
- Repeat 1 DC, increase pattern around for a total of 36 double crochets.
- Slip stitch into the first DC to close the round.
- Slip stitch into the first DC to close the round.
Round 4 – Further Increase
- Chain 2.
- Follow the pattern:
- 1 DC in the first stitch, 1 DC in the second stitch, 2 DC in the third stitch (increase).
- Repeat 1 DC, 1 DC, increase around for a total of 48 double crochets.
- Slip stitch into the first DC to end the round.
Round 5 – Expanded Pattern
- Chain 2.
- Follow the pattern:
- 1 DC in the first 3 stitches, 2 DC in the fourth stitch (increase).
- Repeat 1 DC, 1 DC, 1 DC, increase around for a total of 60 double crochets.
- Slip stitch to complete the round.
Round 6 – Final Base Diameter Increase
- Chain 2.
- Follow the pattern:
- 1 DC in the first 4 stitches, 2 DC in the fifth stitch (increase).
- Repeat 1 DC, 1 DC, 1 DC, 1 DC, increase for a total of 72 double crochets.
- Slip stitch to finish the round.
- At the end of Round 6, the diameter should measure 5.25 inches (13.5 cm).
Note: For larger sizes, continue with the same pattern by increasing every 5th, 6th, etc., stitch until the desired diameter is achieved.
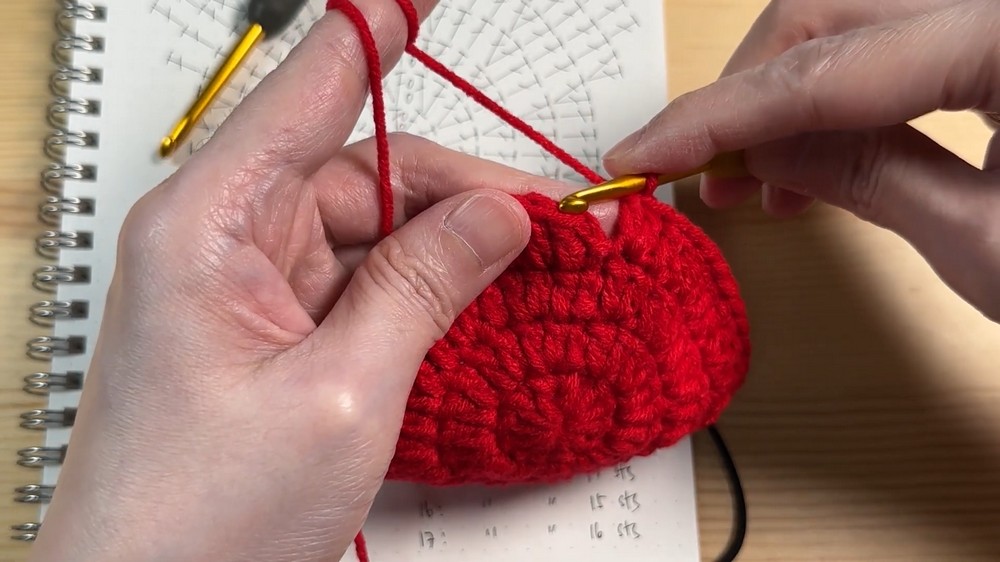
2. Body of the Hat
Rounds 7–12
- Chain 2.
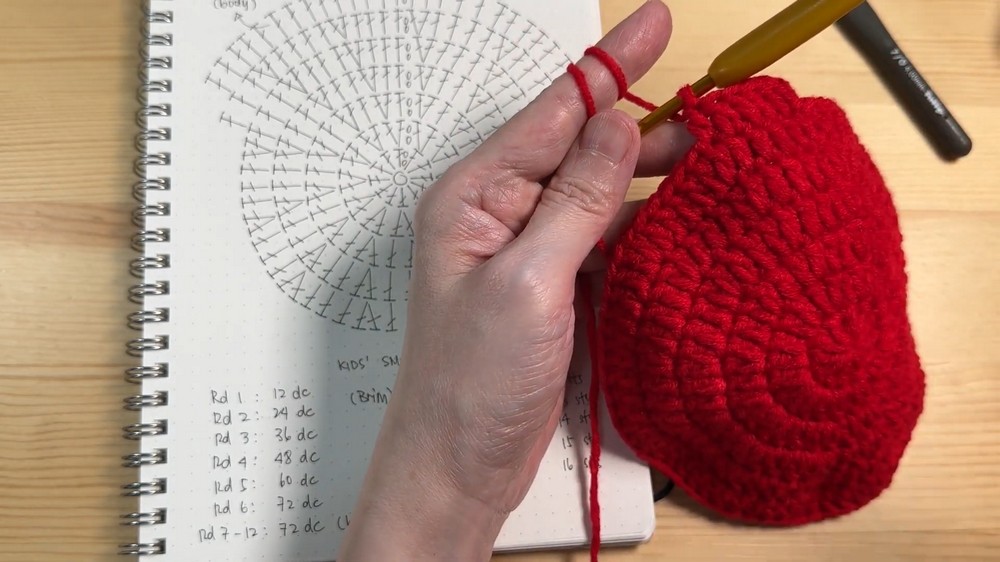
- Crochet 1 DC into each stitch (no increases) for 6 to 7 rows, or until the desired height for the hat body is achieved.
Tip: For a longer hat body, you can add 1 or 2 more rounds.
3. Brim
Round 13 – Starting the Brim
- Chain 2.
- Crochet 1 DC into the first 11 stitches, then increase by crocheting 2 DC in the 12th stitch.
- Repeat the pattern 1 DC x 11, increase around.
- Slip stitch into the first DC to end the round.
Subsequent Rounds – Expanding the Brim
- Continue the brim using the same method, increasing after every additional stitch group in each round:
- Round 14: 1 DC x 12, increase
- Round 15: 1 DC x 13, increase
- Round 16: 1 DC x 14, increase
- For the final round (Round 17), finish with an invisible join:
- Cut the yarn and use a darning needle to join neatly, skipping the chain-2 section and weaving ends securely.
4. Stem and Leaves
Stem
- Start with a magic ring.
- Crochet 6 single crochets (SC) into the ring.
- Tighten the ring and slip stitch into the first SC.
- Continue working SC for several rounds to create the desired stem height (approximately 1 inch).
Leaves
- Begin with 11 chains.
- Skip the first chain and follow the stitch pattern:
- Slip stitch in the second chain.
- SC in the next 2 chains.
- Half double crochet (HDC) in the next 2 chains.
- DC in the next 3 chains.
- Extended double crochet (EDC) in the next chain.
- Treble crochet (TC) in the last chain.
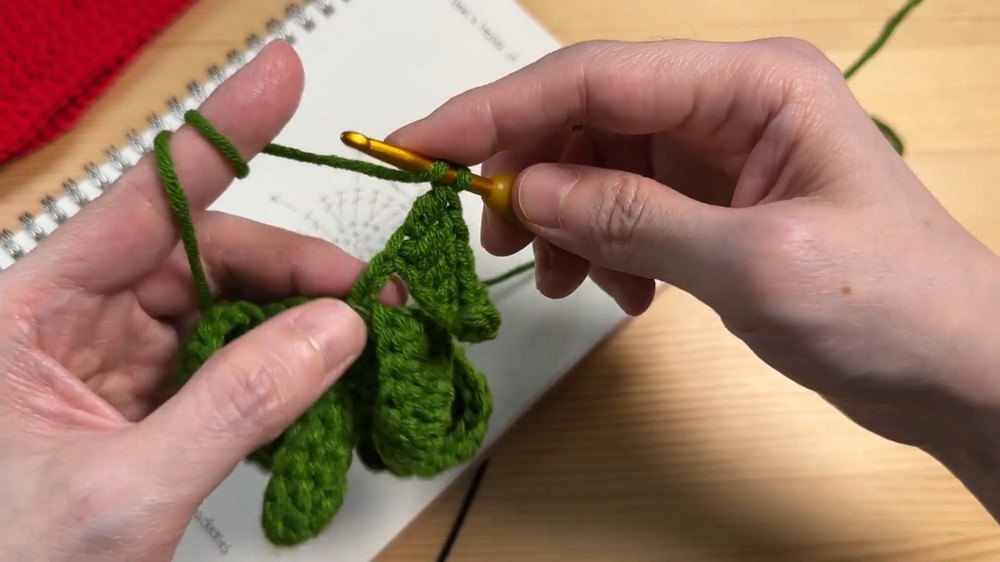
- Skip 2 base stitches and slip stitch to the third stitch to attach the leaf.
- Repeat this process to create 5 more leaves.
5. Embroidered Seeds
- Cut several 10 inch pieces of white yarn.
- Using a darning needle, create inverted V shapes randomly across the hat body.
- Knot the yarn securely at the back after each stitch to hold the seeds in place.
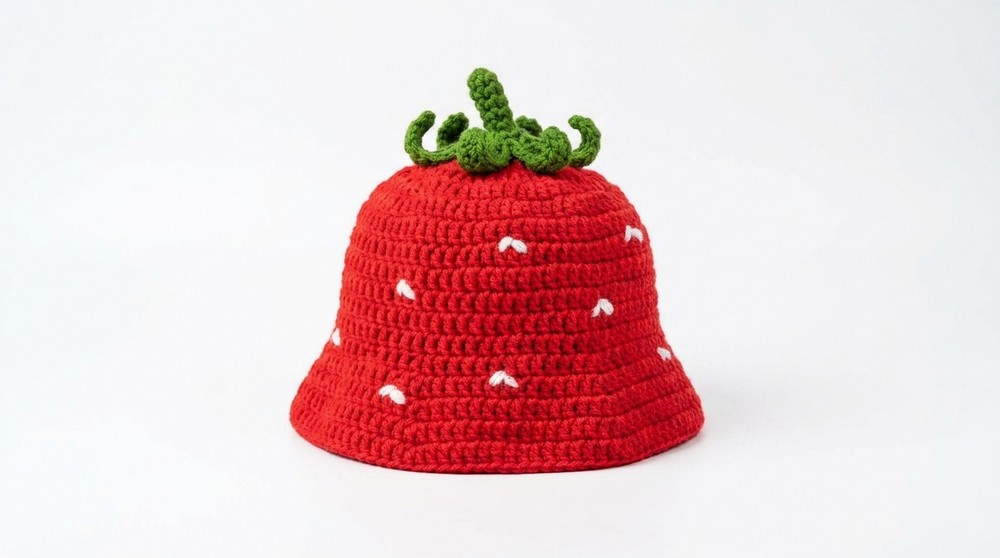
- Knot the yarn securely at the back after each stitch to hold the seeds in place.
Special Techniques
- Double Magic Ring: Provides a sturdy base for the hat’s crown.
- Invisible Join: Ensures a smooth and professional finish.
- Extended Double Crochet (EDC): Adds versatility to the leaf design.
Customization Ideas
- Add more leaves or make them larger for unique flair.
- Use pastel colors for a fun twist.
- Apply fewer seeds if you want a minimalist design.
Conclusion
The strawberry bucket hat is a delightful, playful accessory suitable for any age group. With its bright colors, sturdy structure, and soft texture, it’s perfect for gifting or wearing on sunny days. The detailed pattern ensures that you can make this charming hat with confidence.
Important Remarks:
- Ensure proper stitch counts at the end of each round for accurate sizing.
- For adult sizes, continue increasing rounds until the desired diameter is reached.
- Block the hat lightly if needed to achieve the perfect final shape.