Hook an eco friendly, stylish crochet water bottle holder with this free pattern, perfect for carrying bottle while staying hands free.
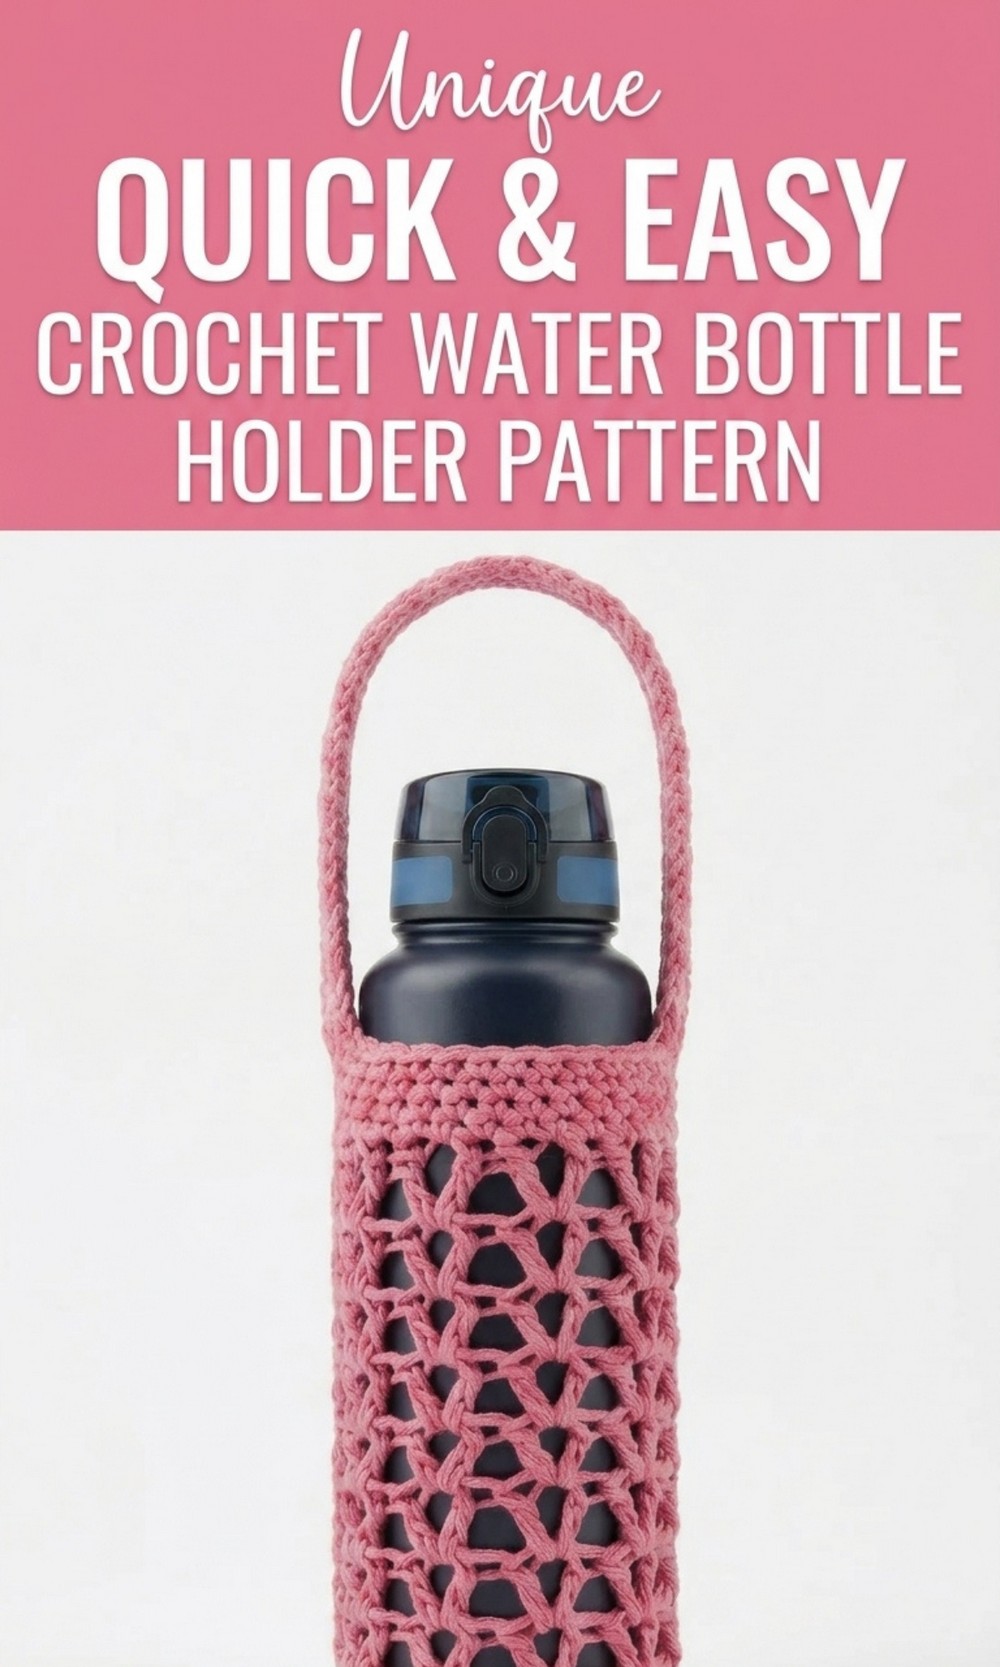
Free Crochet Water Bottle Holder Pattern That’s Easy and Cute
With only a small amount of yarn and a 4 mm crochet hook, you can create this pretty, durable, and reusable bottle holder. It is practical, fun to crochet, and a great way to stay hydrated in style.
This crochet piece features a lovely V stitch pattern, giving it a unique and airy look. Its compact size makes it comfortable to carry, and the long, sturdy strap lets you take it anywhere. Use it at school, on trips, or during outdoor adventures. The pattern can be customized to fit bottles of different sizes by adjusting the base or the height.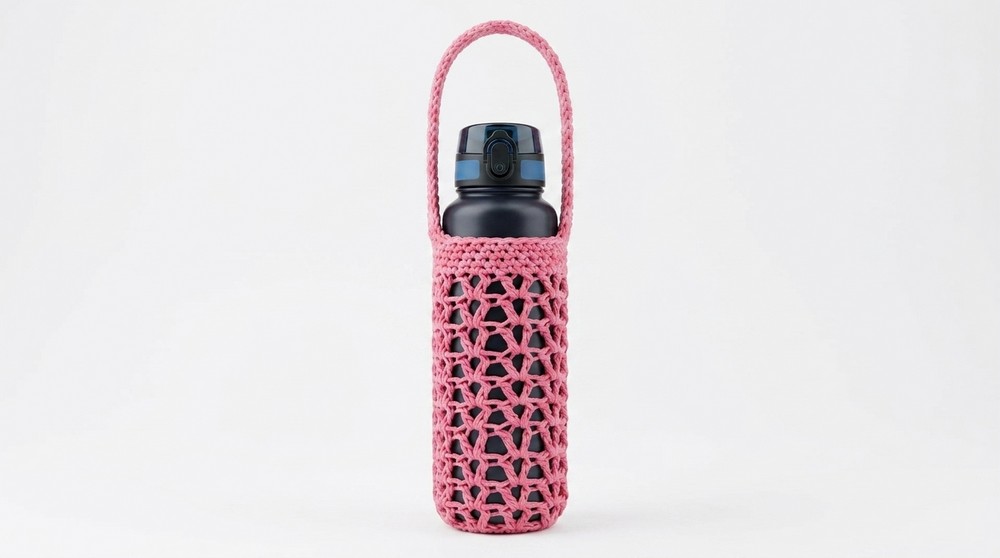 This free crochet water bottle holder pattern is perfect for everyone, even beginners. It is easy to make and uses cotton yarn, which is strong and eco friendly. The holder is designed to carry your water bottle while keeping your hands free. It stretches perfectly to fit your bottle and holds it securely.
Breezy Crochet Water Bottle Holder Pattern
Materials
- 50 g cotton yarn
- Approx. 75 m / 82 yards
- DK or light worsted weight cotton (as used in the video)
- 4 mm crochet hook
- Scissors
- Darning (tapestry) needle
- Stitch marker
This amount of yarn makes a holder for a small to medium water bottle. For a larger bottle, more yarn will be needed.
Abbreviations (US Terms)
- ch = chain
- st(s) = stitch(es)
- sl st = slip stitch
- sc = single crochet
- dc = double crochet
- MR = magic ring
- rep = repeat
- RS = right side
Special Techniques
1. Magic Ring
- Make a loop with the yarn, crossing the tail behind the working yarn.
- Insert the hook into the loop from front to back.
- Yarn over and pull up a loop.
- Ch 1 to lock the ring.
- Work the required stitches into the ring.
- Pull the tail to close the center.
2. V Stitch
All V stitches are worked into the chain 1 space of the V stitch from the previous round.
- V stitch: (dc, ch 1, dc) in the same stitch or space.
3. Starting Double Crochet (Alternative to Ch 3)
This replaces a ch 3 turning chain and looks more like a real dc.
- Pull up a loop to the height of a normal dc.
- Hold this tall loop against the hook with your thumb.
- Yarn over around that loop (as if it were a strand of yarn).
- Insert the hook into the stitch/space, yarn over, pull up a loop.
- Yarn over, pull through 2 loops.
- Yarn over, pull through the last 2 loops.
This counts as 1 dc.
4. Working Into Back Bumps of Chains (for Handle)
Turn the chain so you see the row of “bumps” along the back. Insert your hook under one bump at a time and work sc into each. This makes a strong and neat looking strap.
Pattern Instructions
1. Base of the Bottle Holder
Round 1
Make a MR.
Work 6 sc into the ring.
Pull the ring tight.
Do not join with a sl st in the usual way – instead:
Insert hook into first sc, pull up a loop, yarn over and pull through both loops to complete a sc join (this becomes the first stitch of the next round).
Place stitch marker in this stitch.
You now have 6 sc.
Round 2 – Increase
2 sc in each st around.
Move marker to the first st of the round.
At the end of the round you have 12 sc.
Round 3 – Increase
Pattern: (1 sc in next st, 2 sc in next st) around.
Move marker as you go.
At the end of the round you have 18 sc.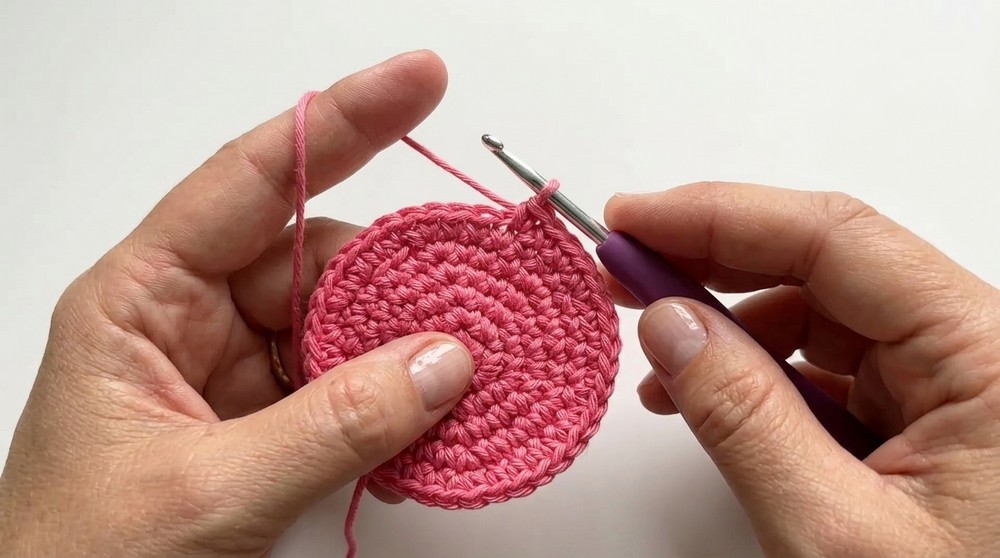
Round 4 – Increase
Pattern: (1 sc in next st, 1 sc in next st, 2 sc in next st) around.
At the end of the round you have 24 sc.
Round 5 – Increase
Pattern: (1 sc in next st, 1 sc in next st, 1 sc in next st, 2 sc in next st) around.
At the end of the round you have 30 sc.
This round creates the base for the bottle holder.
The base is about 2.5 inches / 6 cm in diameter. It will stretch, so this size suits a smaller bottle. For a larger bottle, you may add more increase rounds following the same pattern.
2. Transition Round (Straight Sides)
Round 6
Sc in each st around (30 sc).
Join with a sl st to the first sc of the round.
Remove stitch marker.
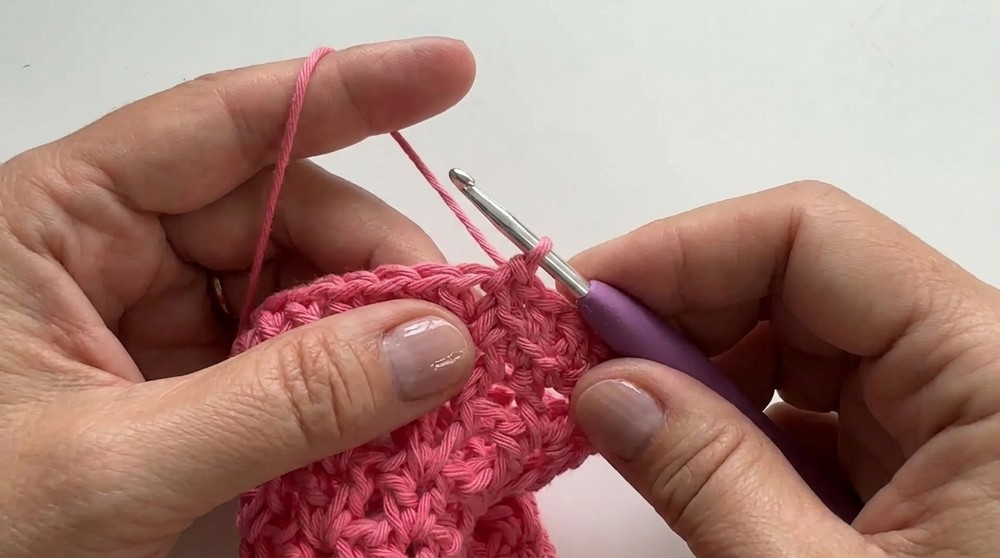
3. V Stitch Body of the Holder
From this point, you will work in joined rounds, using V stitches.
Round 7
- Ch 2 (this counts as the first dc).
- Ch 1 (this is the chain 1 space of the first V stitch).
- Dc into the same st as the ch 2.
- First V stitch made: (dc, ch 1, dc) in same st.
- Skip next 2 sts, V stitch in next st (dc, ch 1, dc in same st).
- Rep Step 4 around.
You should end with 10 V-stitches around.
Join with sl st to the top of the ch 2 (the second chain of the initial ch 2).
Sl st into the center (ch-1 space) of the first V-stitch.
All following rounds will start in the center of a V-stitch.
Round 8 and all V-Stitch Rounds (Up to 10 Rows Total)
You can begin each round in one of two ways:
Method A (simple)
- Ch 3 (counts as dc), ch 1, dc into the same V-stitch space.
Method B (as in the video, more polished)
- Make 1 starting double crochet in the V-stitch space, ch 1, dc in the same space.
Then:
- Work 1 V-stitch (dc, ch 1, dc) into each V-stitch space around.
- You will always have 10 V-stitches per round.
- Join at the end of the round to the top of the starting dc (or to the top of the ch 3) with a sl st.
- Sl st into the center of the next V-stitch to position for the next round.
Repeat V-stitch rounds until you have 10 rounds of V-stitches in total (counting from the first V-stitch round after the solid base).
The holder should cover about three quarters of your bottle height, because it will stretch when the bottle is full.
4. Top Solid Rounds Before Handle
When 10 V-stitch rounds are complete, you will close the top with solid sc rounds.
Round 1 (Top Edge)
- Sl st to the center of a V-stitch if not already there.
- Ch 1.
- Sc in same space (this goes into the first dc of the V).
- Sc in the ch-1 space of the V.
- Sc in the next dc of the V.
You will work 1 sc in each stitch and chain space around the top:
- 1 sc in each dc and 1 sc in each ch-1 space from the V-stitch below.
- This gives you a total of 30 sc around.
Join with a sl st to the first sc.
Round 2 (Top Edge)
- Ch 1.
- Sc in each st around (30 sc).
- Join with sl st to the first sc.
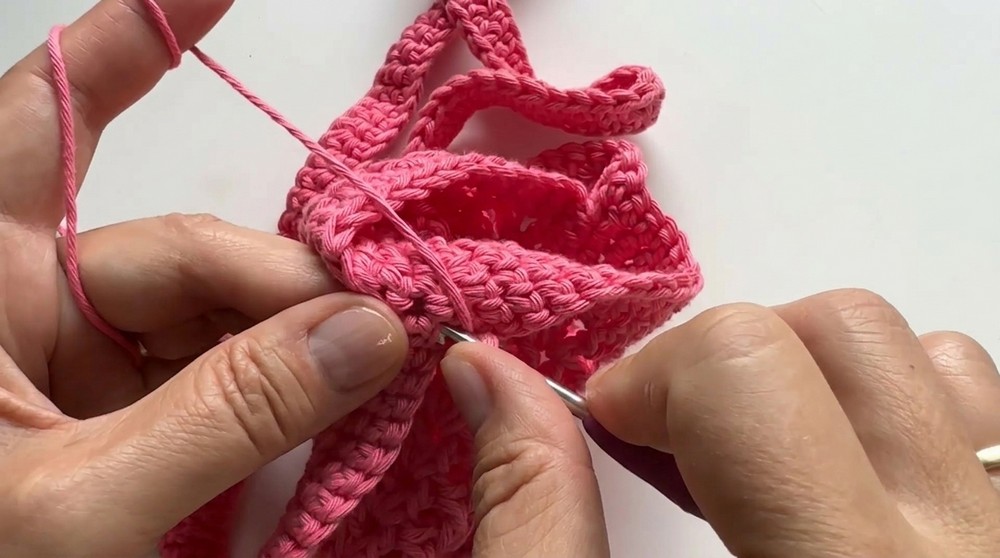
5. Handle / Strap
Foundation Chain for Handle
- After joining the second top sc round, ch about 120.
- This gives a handle length of approximately 30–35 inches / 76–89 cm.
- Adjust chain length if you want a shorter or longer strap.
Attach Chain to Opposite Side
- Lay the holder flat to find the halfway point opposite where the chain begins.
- Count 15 sts from the side where the chain began to mark the center on the opposite side (for 30 sts total around).
- Place a stitch marker in that opposite center stitch.
- Ensure the chain is straight (no twists).
- Sl st into the marked stitch to join the end of the chain to the top edge.
You now have a long loop that will become a strong strap.
6. Strengthening the Handle and Top Edge
You will now work sc along the chain and along the top edge to create a sturdy, double-layered handle.
First Row Along the Chain (Side 1 of Handle)
- From where the chain is attached on the opposite side, turn to work along the chain.
- Identify the back bumps of the chain.
- Starting at the first back bump next to the top edge, work 1 sc in each back bump all along the chain back to the starting edge.
- This makes one dense row of sc along the chain.
Join Back to Bag and Work Top Edge
- When you reach the other end of the chain, work 1 sc into the stitch on the top edge of the bag where the chain started.
- Continue to sc across the top of the bag until you reach the other side of the handle.
- This gives you one continuous row of sc around the top and along one side of the handle.
Second Row on the Same Side of Handle
- Continue around the top edge to reach the handle again.
- Work 1 sc in each sc of the handle (along the same side you just completed).
- Work all the way across this side of the strap, then back across the top edge until you are again at the other attachment point.
At this stage you have:
- Two rows of sc on one side of the chain (handle).
- Two rows of sc along the top edge of the bag on that side.
Move to the Other Side of the Handle
To avoid cutting the yarn, you will slip stitch across the inside of the bag to reach the other side of the handle.
- After completing the second row on this side and reaching the area below the handle on the inside of the bag, sl st into any convenient stitch inside the top edge.
- Sl st once or twice to move to the area under the other side of the handle.
- These slip stitches will later be hidden and secured when weaving in ends.
First and Second Rows on the Other Side of Handle
- Pull the handle up and locate the unworked side of the original chain.
- From the top edge, sc across the top of the bag to the base of the handle.
- Now work sc in each stitch of the handle on this other side, matching the first side.
- Work all the way along the handle and back down to the top edge.
- Sc across the top edge to complete this first row on this side.
- Work one more full round of sc: across the top edge and along the handle again, giving two rows of sc on this side of the handle as well.
At the end, you should have:
- Two rows of sc on each side of the handle (four rows total around the chain).
- A neat, reinforced top edge around the bag.
Finishing
- When you reach your starting point of the final round, work 1 last sc.
- Cut the yarn, leaving a tail of about 6–8 inches (15–20 cm).
- Thread the tail into the darning needle.
Invisible Join / Close
- Insert the needle from front to back under both loops of the next stitch on the round.
- Pull the yarn through gently.
- Insert the needle from back to front into the last stitch you made, going through the center of the “V” of that stitch.
- Pull the yarn snug to form a smooth “V” that looks like a regular stitch.
- This creates an invisible join.
Weaving In Ends
- Turn the holder inside out.
- Weave the yarn tail back and forth through several stitches inside the handle and top edge, catching the slip stitches you used to move across.
- Do not pull too tightly or distort the shape.
- Trim the excess yarn.
- Weave in the starting tail at the base in the same way.
Insert your bottle to shape the holder. The V-stitch pattern and cotton yarn will stretch to fit snugly around the bottle.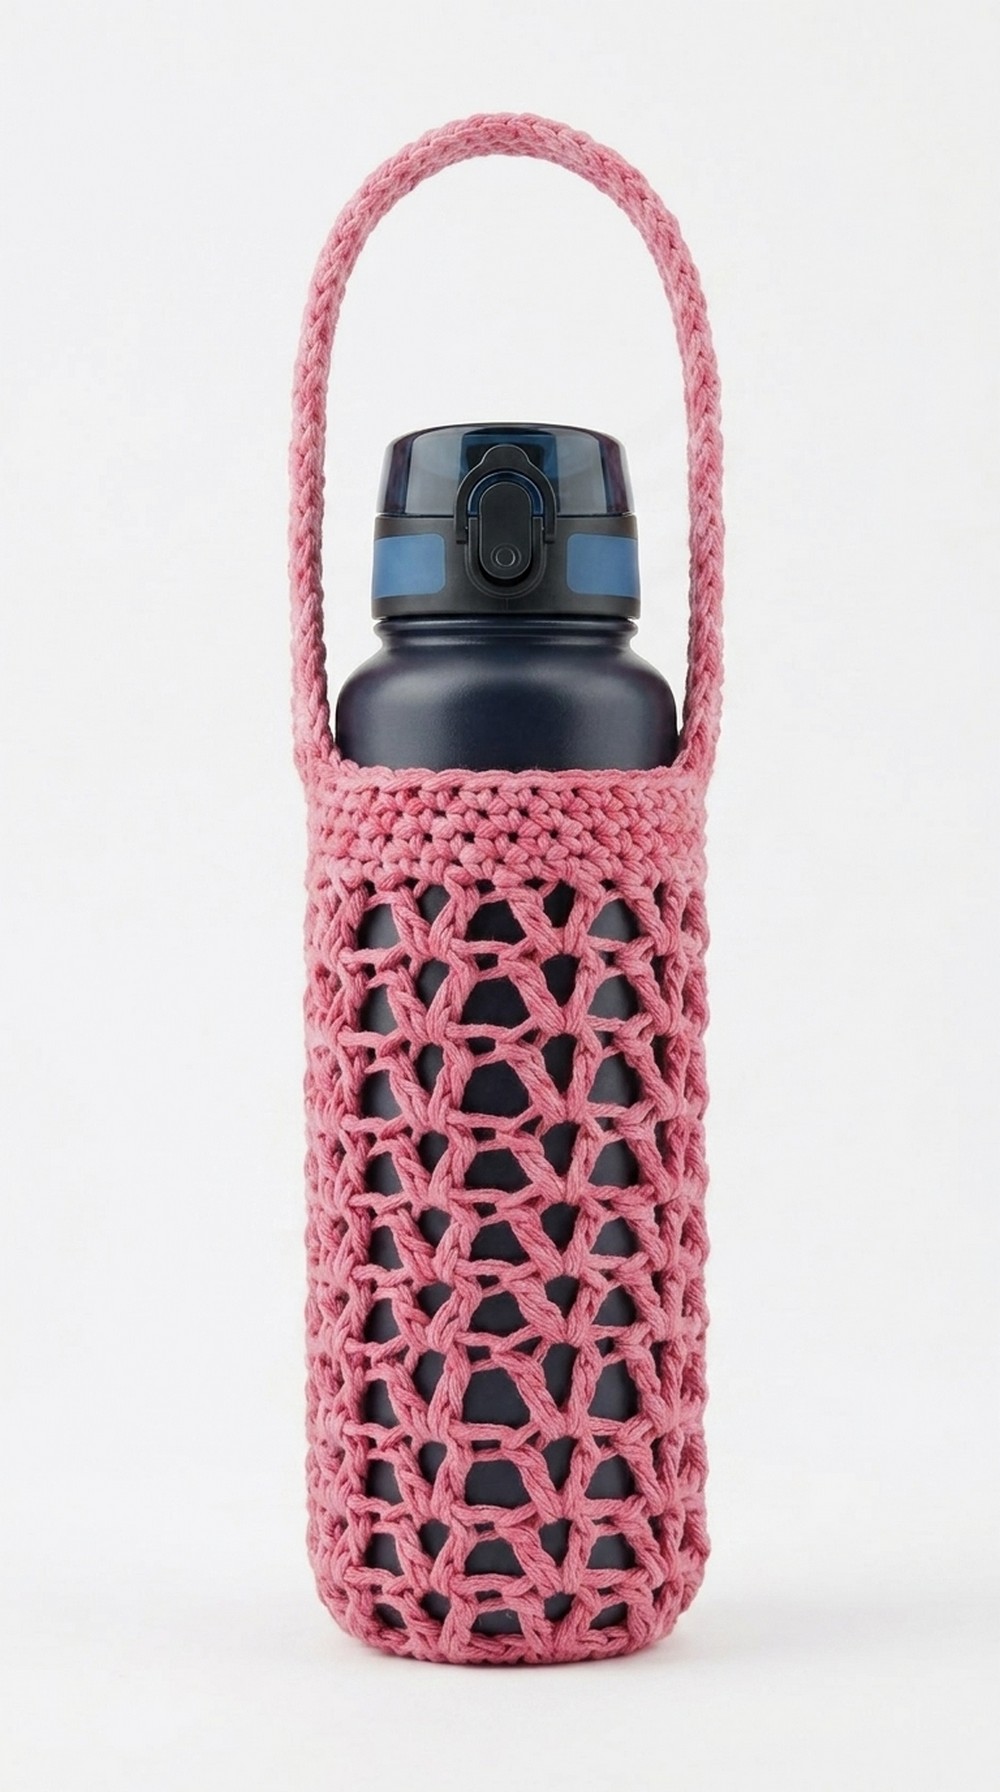
Suggestions and Notes on the Pattern
- Fit Adjustment:
If your bottle is wider, add more increase rounds at the base before working straight rounds. Always space increases evenly. - Height Adjustment:
Work more or fewer V-stitch rounds depending on the height of your bottle. Aim for about three quarters of the bottle height, as the holder will stretch. - Yarn Choice:
Cotton is recommended because it is strong, washable, and does not stretch too much when wet. - Hook Size:
If your fabric is too tight, go up to a 4.5 mm hook. If it is too loose and floppy, go down to a 3.5 mm hook.
Tips to Maintain the Water Bottle Holder
- Washing
- Hand wash in cool or lukewarm water with mild detergent.
- Gently squeeze out water; do not wring.
- Reshape and lay flat to dry.
- Stretch and Shape
- After washing, place an empty bottle or similar object inside while drying to keep the shape.
- Avoid Overloading
- Designed for a standard water bottle; avoid carrying very heavy items to preserve the handle strength and shape.
- Storage
- Store flat or hanging by the handle in a dry place.
- Keep away from sharp objects that may snag the stitches.
Final Words
This crochet water bottle holder is practical, attractive, and a good project for practicing basic stitches, V-stitches, and working in the round. The open V-stitch pattern gives a beautiful and airy look, while the sturdy strap with double sc rows makes it comfortable to carry. With cotton yarn and careful finishing, it will be durable and easy to maintain.
Enjoy using this pattern and feel free to adjust the base, height, or strap length to suit different bottles or personal style.