Freshen up your space instantly with this Free Crochet Bathroom Mat Pattern that adds softness, style, and function to your everyday floor routine.
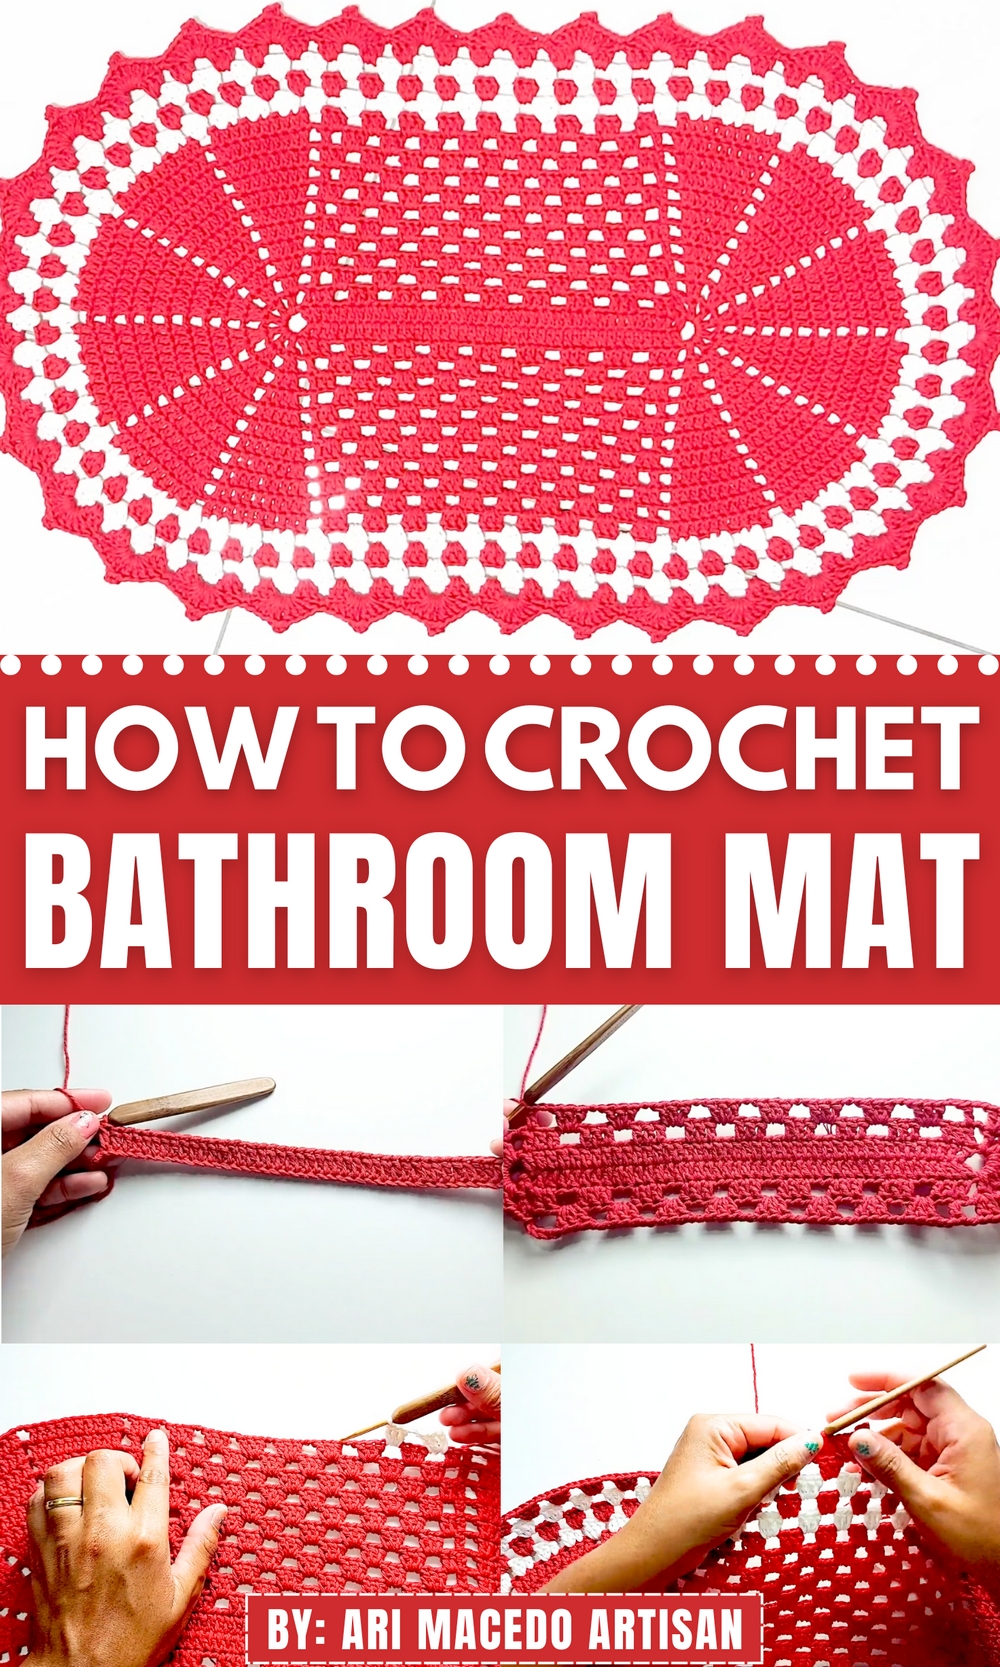
A carefully designed crochet bathroom mat can beautifully merge functionality with style, offering a charming yet practical addition to any bathroom setting. This red and off-white crochet bathroom mat is more than just a floor covering, it serves as an inviting layer of softness underfoot while also protecting your flooring from moisture and wear. With its intricate stitches and delightful color combination, it brings refinement and subtle elegance to your space.
Beginner-Friendly Crochet Bathroom Mat Pattern to Try
Incorporating this crochet bathroom mat into your home brings a variety of benefits, its handmade charm makes it a standout piece, its soft surface adds comfort, and its durable structure ensures it stands the test of time. Ideal for stepping out of a warm bath or shower, it provides both practicality and sophistication, enhancing your everyday routine while keeping your bathroom stylishly cozy.

Sink Mat Crochet Pattern
Finished Size
- Length: Approximately 64 cm (25 inches)
- Width: Approximately 38 cm (15 inches)
- Weight: Approximately 270 grams
Materials Needed
- Yarn:
- 6 strands of Red Yarn: Approx. 135 grams for red rows.
- Raw Cotton/Ecru Yarn: Approx. 135 grams for ecru rows.
- Crochet Hook:
- 3.5 mm crochet hook (Adjust hook size if needed based on yarn thickness and tension).
- Additional Tools:
- Scissors: Sharp and pointed for precise cuts.
- Finishing Needle: For weaving in ends.
Skill Level
- Intermediate to Advanced: You should be familiar with working in rows, creating blocks, picot edges, and performing increases evenly.
Key Abbreviations (US Terminology)
- ch: Chain
- sl st: Slip Stitch
- dc: Double Crochet
- sc: Single Crochet
- sp: Space
- picot: Picot stitch (chain 3, sl st into base stitch)
Special Notes
- Gauge Flexibility: Gauge is not critical for this project. Consistent tension ensures uniformity.
- Alternating Rows: You alternate between solid rows and rows containing blocks/spaces.
- Curve Adjustments: Extra increases are at the curve section to ensure it sits flat without rippling.
Step-by-Step Pattern
Foundation Chain
- Begin with 46 chains with red yarn.
- Starting in the 5th chain from the hook, work 1 dc.
- Continue along the chain by working 1 dc in each stitch. (43 dc in total).

- Turn your work: Begin the next row with 5 chains (3 chains act as 1 dc and 2 chains act as a spacer).
Base Rows
Row 1 (Full Rows of Double Crochet):
- Work dc across for each stitch in the row, ensuring there are 43 dc.
- At the end, chain 5 (3 for height + 2 for next-row space).
Row 2 (Block Rows):
- Start Row: Work 3 chains (counts as a dc), followed by 2 additional chains (space).
- Skip the next 2 base stitches and begin your first block:
- (dc, dc, dc) in consecutive stitches.
- Chain 2, skip 2 stitches, then repeat (dc, dc, dc) to create blocks.
- Continue until 9 blocks are completed.
Curve Section:
- Once you complete the straight section, alternate increases in the curve:
- 6 dc stitches, separated by 2 chains in the curve section.
- Keep repeating increases at the curve point to ensure it sits flat.

Continue Alternating Rows
- Repeat Rows: Alternate between full rows of dc and block rows until the mat reaches desired length.
- Full rows will have 43 dc in total.
- Block rows always begin with 5 chains to skip stitches and include spaces between blocks.
- Color Changes:
- After every few rows, alternate between ecru yarn and red yarn.
- Tie off old yarn and reattach the new yarn securely in the next working space.
- Curve Handling:
- Perform increases on each curve row at the edges:
- Begin with 2 dc in the first dc, continue with single dc on next stitches, and finish with another 2 dc in the last stitch of curve sections.
- Perform increases on each curve row at the edges:
Picot Border
Once you complete the mat’s base rows, begin adding a decorative border with the picot stitch:
- Step 1: Attach red yarn at any straight edge corner with a sl st.
- Step 2: Work 1 sc followed by:
- 4 dc in one space.

- Chain 3, sl st back into the base of the last dc (forms a picot).
- Work 4 more dc into the same space.
- 4 dc in one space.
- Step 3: Move to the next space:
- Work 1 sc.
- Repeat the process of 4 dc + picot + 4 dc.
- Handling Space Gaps: If work begins to pull (typically in curves), add a chain space between decorations to even out the tension.
Finishing
- Final Step: Once the border is completed all around:
- Slip stitch into the starting stitch.
- Cut yarn and pull through to secure.
- Weave Ends: Use a finishing needle to securely weave ends into the back of your stitches for neatness.
Conclusion
You’ve successfully completed your Red and Ecru Sink Mat! Alternating blocks and double crochet rows give the mat structure, while increases in the curves ensure a flat, even finish. The picot border adds an elegant touch, perfect for decorating your bathroom.
Pattern Corrections
- Curve Adjustments: If your work puckers or ripples heavily, adjust increases along the curve; slight rippling on earlier rows should settle during the final rounds.
- Uneven Edges: Use blocking techniques at the end of your project if needed.
Tips for Customization
- Color Combination: Use contrasting or complementary colors for unique designs.
- Size Adjustments:
- For a larger mat, increase the foundation chain count and the number of blocks in straight rows.
- Adjust curve stitches proportionally to maintain balance.
- Additional Decorations: Add tassels or beads to the border for enhanced texture.