Add a musical touch to your crochets with this free crochet guitar amigurumi pattern that is simple, fun, and perfect for creating adorable handmade treasures.

Turn Yarn Into Music with This Free Crochet Guitar Amigurumi Pattern
Small and cute toys always bring joy, and the Free Crochet Guitar Amigurumi Pattern is a fun way to create something special with yarn. This tiny guitar has a realistic shape, bright colors, and charming details like tiny strings, making it a delightful project for anyone who loves crochets.
The pattern is easy to follow, so both beginners and experienced crocheters can create it without stress. You can use this mini guitar as a thoughtful gift, a fun keychain, a creative decoration, or even a cool accessory for crocheted dolls. 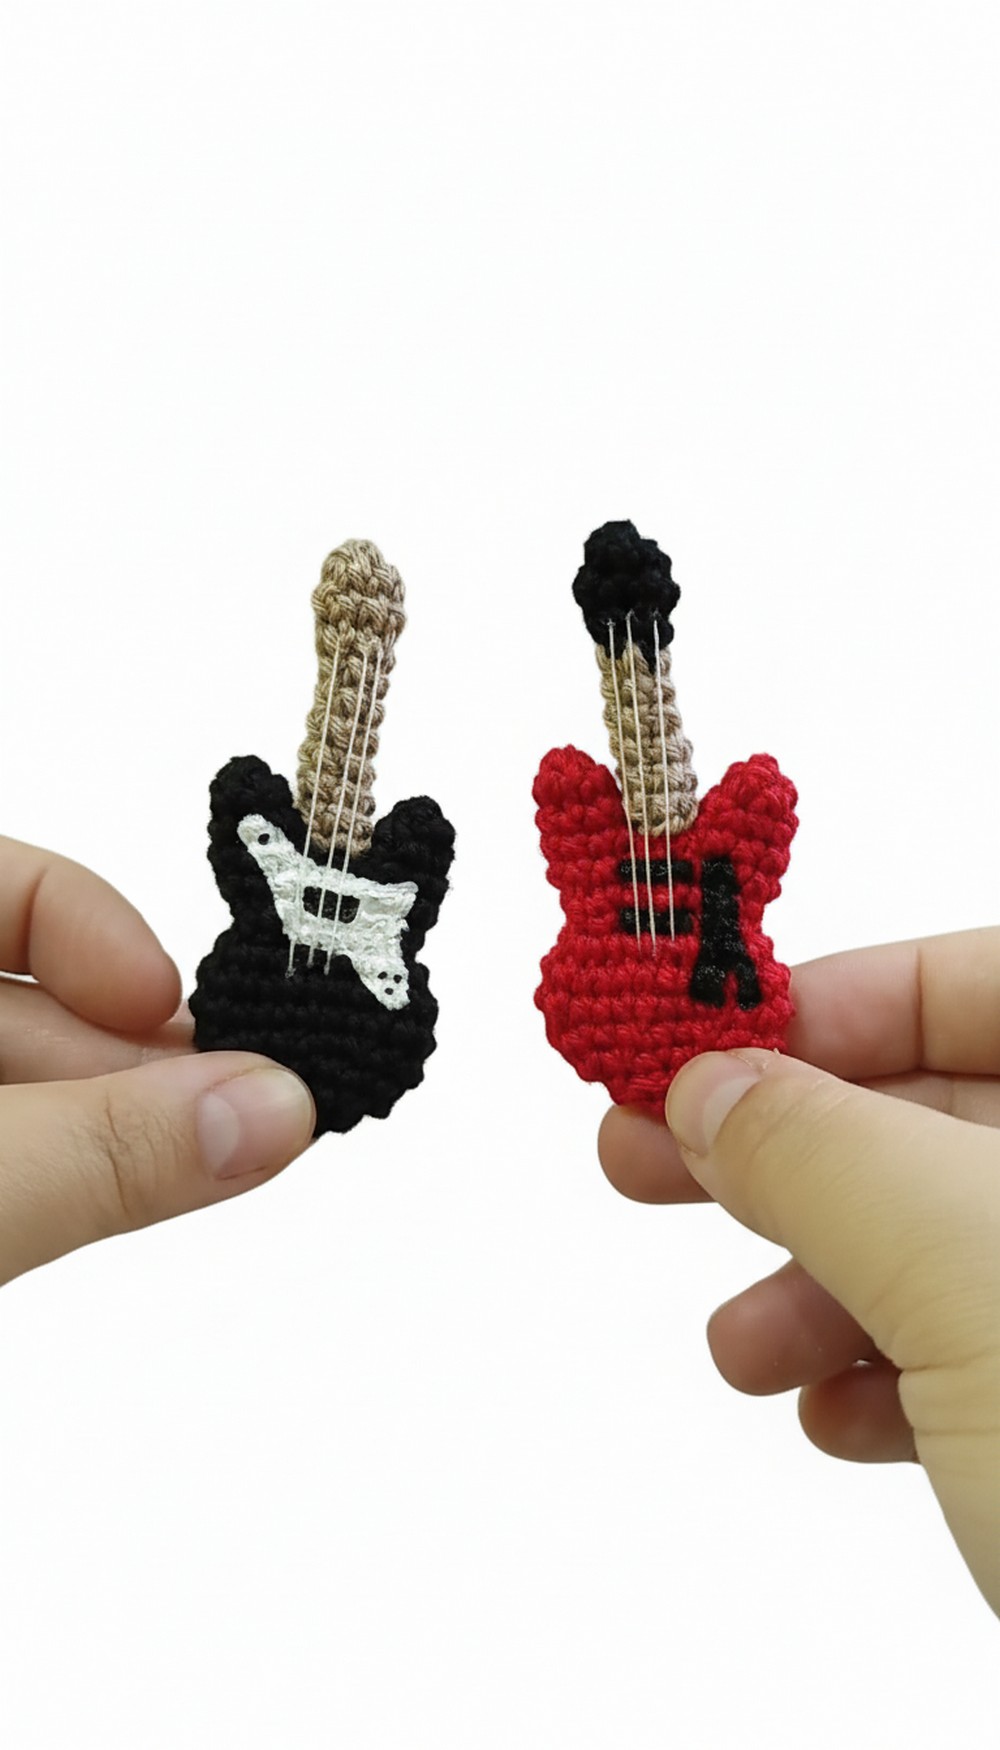
Making this crochet guitar is an exciting way to get creative, bring smiles, and add a handmade touch to your creations. Try it today and let your imagination rock.
Fun Crochet Guitar Amigurumi Pattern
Materials:
- Yarn in the following colors:
- Black (for the mast/top part of the guitar neck)
- Beige or any light yarn (for the bridge of the mast)
- Red (for the base body of the guitar)
- Crochet hook (size appropriate for your chosen yarn)
- Polyester stuffing or fiberfill (optional but helps in shaping the guitar)
- Acrylic paint (black, or chosen colors for decorative details)
- Thin thread or embroidery floss for guitar strings (such as white or silver)
- Yarn needle
- Scissors
- Stitch markers
- Glue (white craft glue)
Special Techniques:
- Magic ring/circle
- Single crochet (SC)
- Increase (INC): two SC into one stitch
- Decrease (DEC): combine two stitches into one
- Slip stitch (SS)
- Color-changing technique
- Sewing and embroidery techniques for final touches
Pattern Instructions:
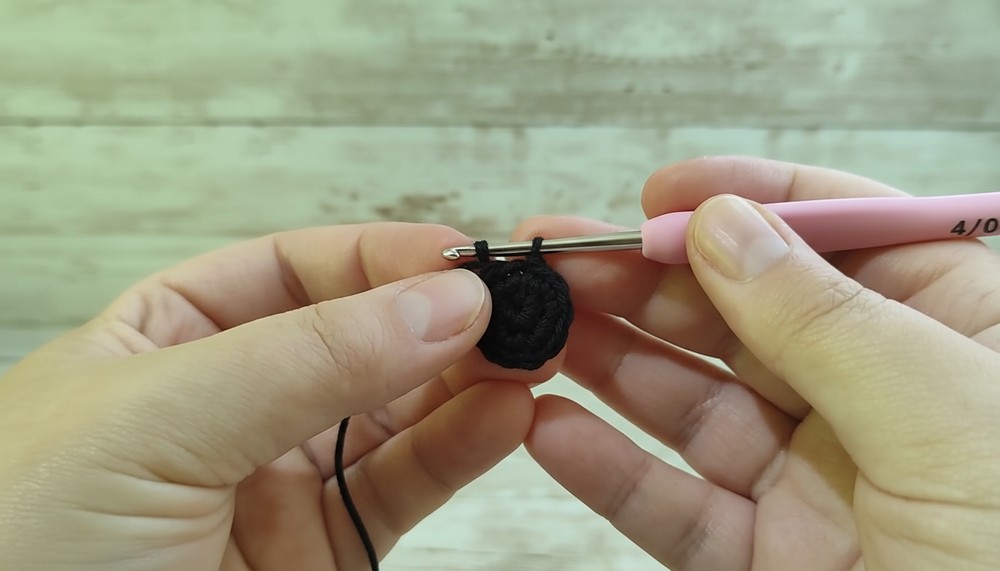
Part 1: The Mast
- Foundation:
- Start with black yarn and create a magic ring with 5 single crochet stitches (SC).
- Pull the yarn tightly to close the ring.
- Round 2:
- Crochet the sequence: 1 SC, 1 INC (increase), repeat twice.
- End with 1 SC.
- Total stitches: 7 SC.
- Round 3:
- Repeat 7 SC, one SC in each stitch across the row.
- Round 4:
- Crochet the sequence: 1 SC, 1 DEC (decrease), repeat twice.
- End with 1 SC.
- Total stitches: 5 SC.
- Color Change:
- Switch to beige yarn at the end of Round 4.
- Rounds 5-10:
- Crochet 5 SC per round for a total of 6 rounds.
- The mast neck will be narrow and straight. Adjust your tension for consistent stitches throughout.
- Finish:
- Slip stitch into the next point, leaving a long yarn tail for sewing.
- Flatten the mast slightly to shape it properly.
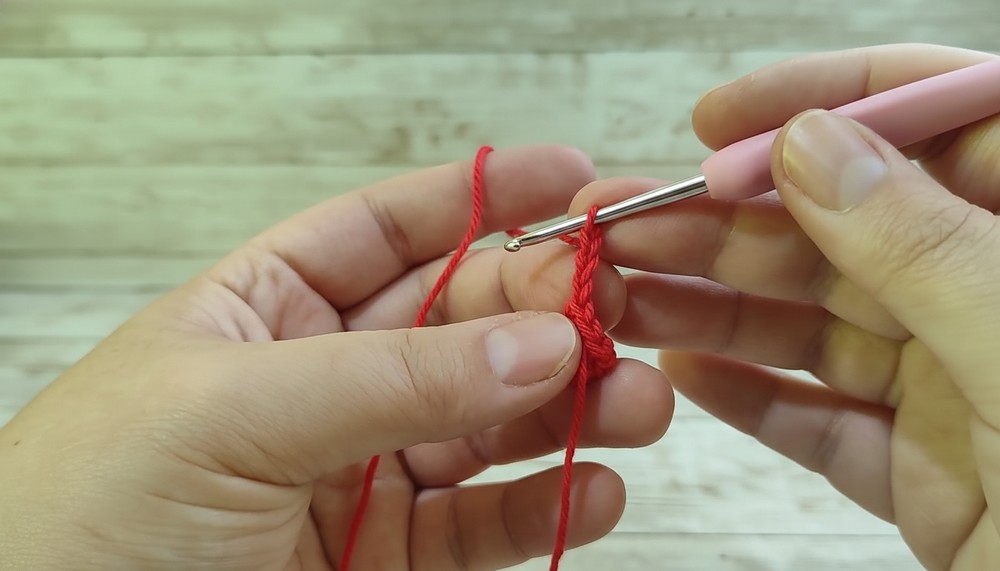
Part 2: Guitar Base
- Foundation:
- Start with red yarn. Create a magic ring with 6 SC. Pull tight.
- Round 2:
- Repeat 6 SC, one SC in each stitch.
- Round 3:
- Begin with 1 INC and 5 SC.
- Total stitches: 7 SC.
- Make a Duplicate Piece:
- Repeat the above steps to make two identical pieces. Cut the yarn from the first piece but leave the yarn attached in the second.
- Connect the Guitar Base Pieces:
- On the second piece (with yarn still attached):
- Crochet 3 chains in the air.
- Join the first piece by crocheting 7 SC around its edges.
- Crochet 3 SC in the chains created earlier, then 7 SC around the second base piece.
- End this step with 20 total stitches.
- On the second piece (with yarn still attached):
- Rounds 4 to 12:
- Follow these rounds with adjustments for decreasing and increasing, as mentioned:
- Gradual DEC sequences (e.g., 2 SC, 1 DEC) shape the body.
- Follow each round carefully, maintaining consistent tension.
- End with 6 DEC to close the piece.
- Follow these rounds with adjustments for decreasing and increasing, as mentioned:
- Flatten and Shape:
- Flatten the guitar base and adjust to form smooth edges and symmetry.
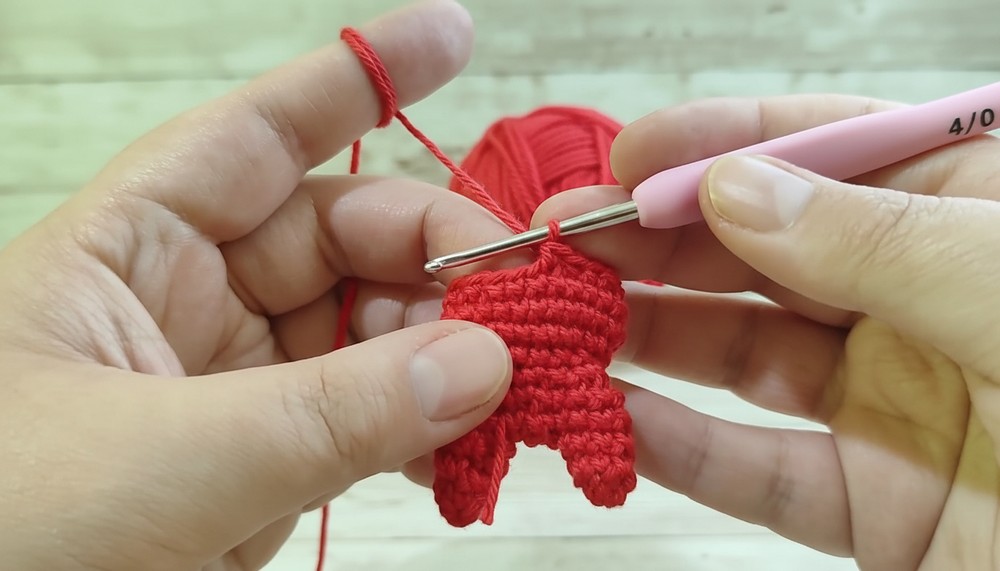
- Flatten the guitar base and adjust to form smooth edges and symmetry.
Part 3: Assembly
- Attach the Mast:
- Position the mast neck between the two top edges of the guitar body.
- Sew evenly along the edges, ensuring stability. Use small stitches for clean results.
Part 4: Paint and Decorations
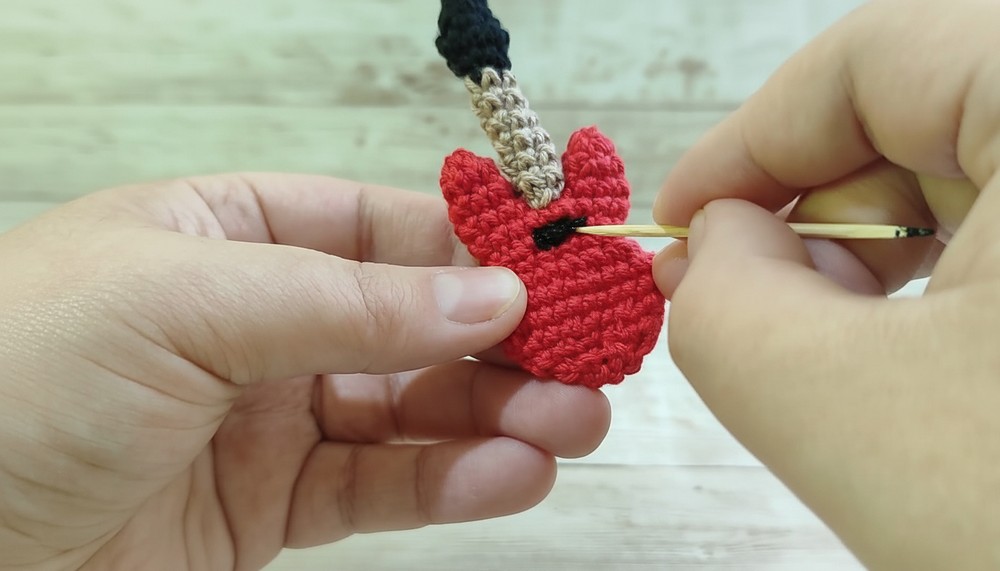
- Add Details with Paint:
- Use black acrylic paint on the guitar body:
- Paint a small line below the mast neck.
- Create additional patterns or markings (optional).
- Allow the paint to dry completely before continuing.
- Use black acrylic paint on the guitar body:
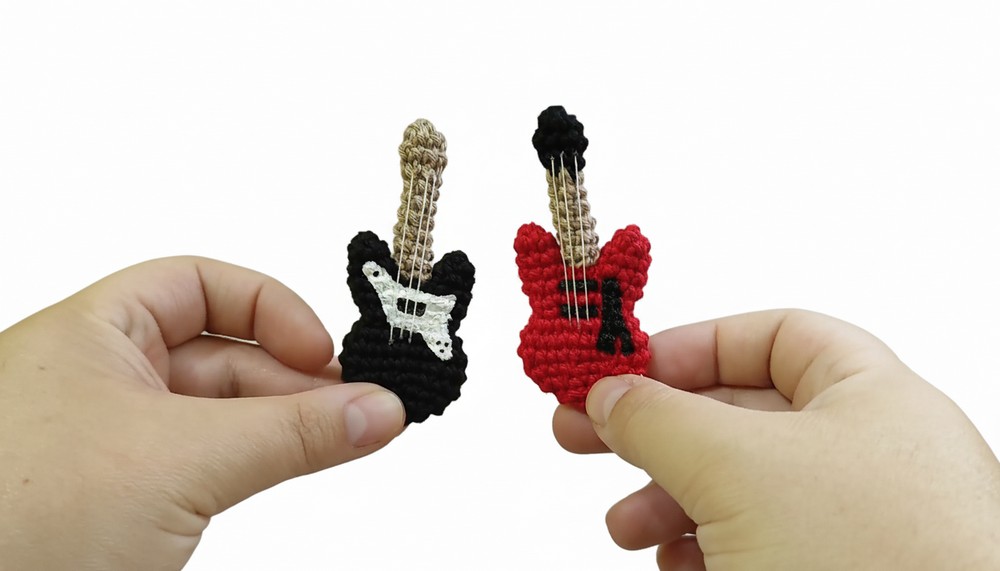
- Add Guitar Strings:
- Use thin embroidery thread or floss:
- Tie one end near the base of the mast neck and stretch it down towards the body.
- Separate three points on the guitar and attach strings, evenly spaced.
- Glue or tie the threads securely in place
- Use thin embroidery thread or floss:
Final Touches
- Apply glue (white craft glue) where strings connect to the body for added stability.
- Adjust the shape once more to create a clean and professional appearance.
Finishing the Pattern
Your miniature guitar is now complete. Clean up any loose threads, adjust as needed, and enjoy your finished piece. This accessory is ideal for amigurumis, hanging decorations, or keychains. The contrasting colors and delicate details will enhance its charm.
Tips to Maintain Your Guitar
- Use strong glue for added durability, especially if the guitar will be handled often.
- When painting, work carefully to avoid messy lines; use thin brushes or tools like sticks for precision.
- Store leftover yarn and threads for future projects.
- If the guitar becomes dirty, gently wipe it with a damp cloth—avoid soaking the entire piece.
Final Words
Crocheting Mafuyu’s guitar is a creative project that allows personalization. Feel free to experiment with different colors and patterns to make it uniquely yours.