Stay warm in style with this Free Crochet Beanie Hat Pattern, perfect for cozy, trendy headwear that adds charm to any winter outfit.
A chilly morning called for something warm and cozy on the head, and a simple handmade beanie became the perfect solution. The Crochet Beanie Hat pattern turns soft yarn into a snug, stylish accessory suitable for everyday wear. Its carefully constructed stitches create a gentle stretch, fitting various head sizes comfortably while retaining shape.
Cozy Vibes Crochet Beanie Hat Pattern You Will Love

Lightweight yet insulating, the beanie keeps warmth without feeling bulky, making it ideal for walks, errands, or casual outings. The texture adds subtle elegance, giving a refined look that pairs well with any outfit. Beyond its visual appeal, the pattern allows room for personalization—colors, yarn types, and small details can be adjusted to suit individual tastes. Soft and breathable, the beanie ensures comfort throughout the day, avoiding overheating while maintaining a cozy feel.
Its practical structure also makes it a thoughtful handmade gift, carrying a personal touch that stands out. Combining beauty, versatility, and comfort, this crochet beanie offers more than warmth: it adds a stylish, functional accessory to any wardrobe. Its simplicity and charm make it suitable for all skill levels, turning a straightforward project into a delightful, functional piece that enhances daily life with softness, style, and subtle sophistication.
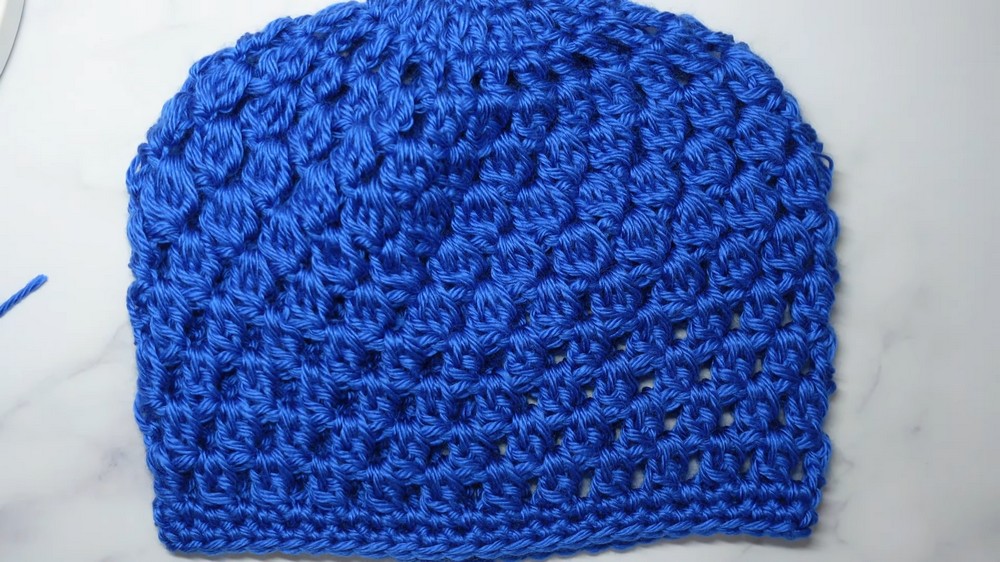
Special Features
- Tight and Well-Defined Texture: Utilizing stitches like double crochet, DC2 together, DC3 together, and DC4 together creates unique textural details and interesting open spaces for breathability and comfort.
- Customizable: You can modify the head size, stitch design, or the number of single crochet rounds at the end to suit personal preferences.
- Size Adjustment Options: The video explains how to increase the hat size for larger fits or adjust the pattern for smaller sizes.
- Tail as a Tag: The creator leaves a small yarn tail at the end of the hat, which doubles as a marker for the back of the hat.
Materials Needed
- Yarn: One skein of yarn (type and link available in the video description).
- Crochet Hook: I-USA size (5.5 mm).
- Darning, Weaving, or Tapestry Needle: For weaving in ends.
- Scissors: To cut the yarn cleanly.
- Stitch Markers (optional): Useful for beginners to mark stitches and track rounds.
Step-by-Step Instructions
1. Starting the Ring
- Wrap the yarn around two fingers, crossing over to create an “X.”
- Insert the crochet hook under the first strand and over the second one, pulling it through to create a starting ring.
- Chain 3 for the foundation.

2. Round 1: Creating the Base
- Put 12 double crochets into the ring.
- Pull the yarn tail to close the loop and fasten the stitches.
- Slip stitch into the third chain to complete the round.
3. Round 2: Increasing Stitches
- Chain 3 (does not count as a stitch).
- Put 2 double crochets into every double crochet from the first round (creating 24 stitches in total).
- Slip stitch into the third chain of the original chain 3.

4. Round 3: Chain Spaces
- Chain 4 (the fourth chain counts as a chain space).
- Put a double crochet into each stitch, chaining 1 between each double crochet.
- Slip stitch into the third chain of the chain 4 to finish the round.
5. Round 4: DC2 Together
- Chain 3, followed by a fourth chain to skip over to the chain spaces.
- Work a double crochet 2 together (DC2 together) into each chain 1 space, chaining 1 between each DC2 together.
- Finish by slip stitching into the third chain of the chain 3.

6. Subsequent Rounds: DC3 Together or DC4 Together
- As the pattern progresses, alternate between DC3 together and DC4 together. These stitches are worked into the chain spaces, with chain 1 added between each.
- Round adjustments include chaining additional stitches to skip over spaces when necessary.
7. Customizations
- You can choose to continue rounds of DC4 together for textural detail or decrease rounds back to DC3 together or DC2 together, depending on preference.
- Personalize the number of rounds to adjust for size or aesthetic choices.

8. Final Two Rounds: Single Crochet
- After completing your desired textured rounds, chain 1 and work single crochet stitches into every chain space and DC together stitch.
- Slip stitch at the end of each single crochet round.
9. Finishing
- Cut the yarn and fasten off.
- Use a tapestry needle to pull the yarn tail into the inside of the hat, leaving a small “tag” as a marker for the back of the hat.
Level of Difficulty
- Beginner-Friendly: The tutorial is straightforward and walks through stitches clearly, but it also introduces slightly advanced techniques like DC2/3/4 together, which require careful attention.
- Suitable for beginners who are ready to take on their first slightly challenging project and intermediate crocheters looking to refine their skills.
Tutor’s Suggestions
- Use Stitch Markers for Precision: Beginners are encouraged to use stitch markers to avoid losing track of the first stitch in each round.
- Experiment with Sizes:
- For larger hats, start with more than 12 double crochets in the center or add another increase round.
- For smaller hats, reduce the initial round count or skip one increase round.
- Feel Free to Customize: The creator emphasizes that you can design the hat to your liking by adjusting stitches or rounds.
Uses
- Practical Accessory: Ideal for cooler weather to keep warm while staying stylish.
- Fashion Statement: Openings and texture elevate the look of a simple hat into a chic wardrobe accessory.
- Gift Option: A thoughtful and personalized handmade gift for friends or family.
A Tip for Success
Consistency with tension is key. Make sure your stitches are uniform throughout the rounds to maintain a neat, cohesive texture. If you’re new to DC2/3/4 together stitches, practice them separately first.
Conclusion
This crochet beanie tutorial is a fantastic way to craft something both functional and stylish. With its textured stitches, chain spaces, and customizable size adjustments, it offers a blend of artistry and practicality. By following the detailed steps, crocheters can create a beautiful hat that fits comfortably and stands out aesthetically.