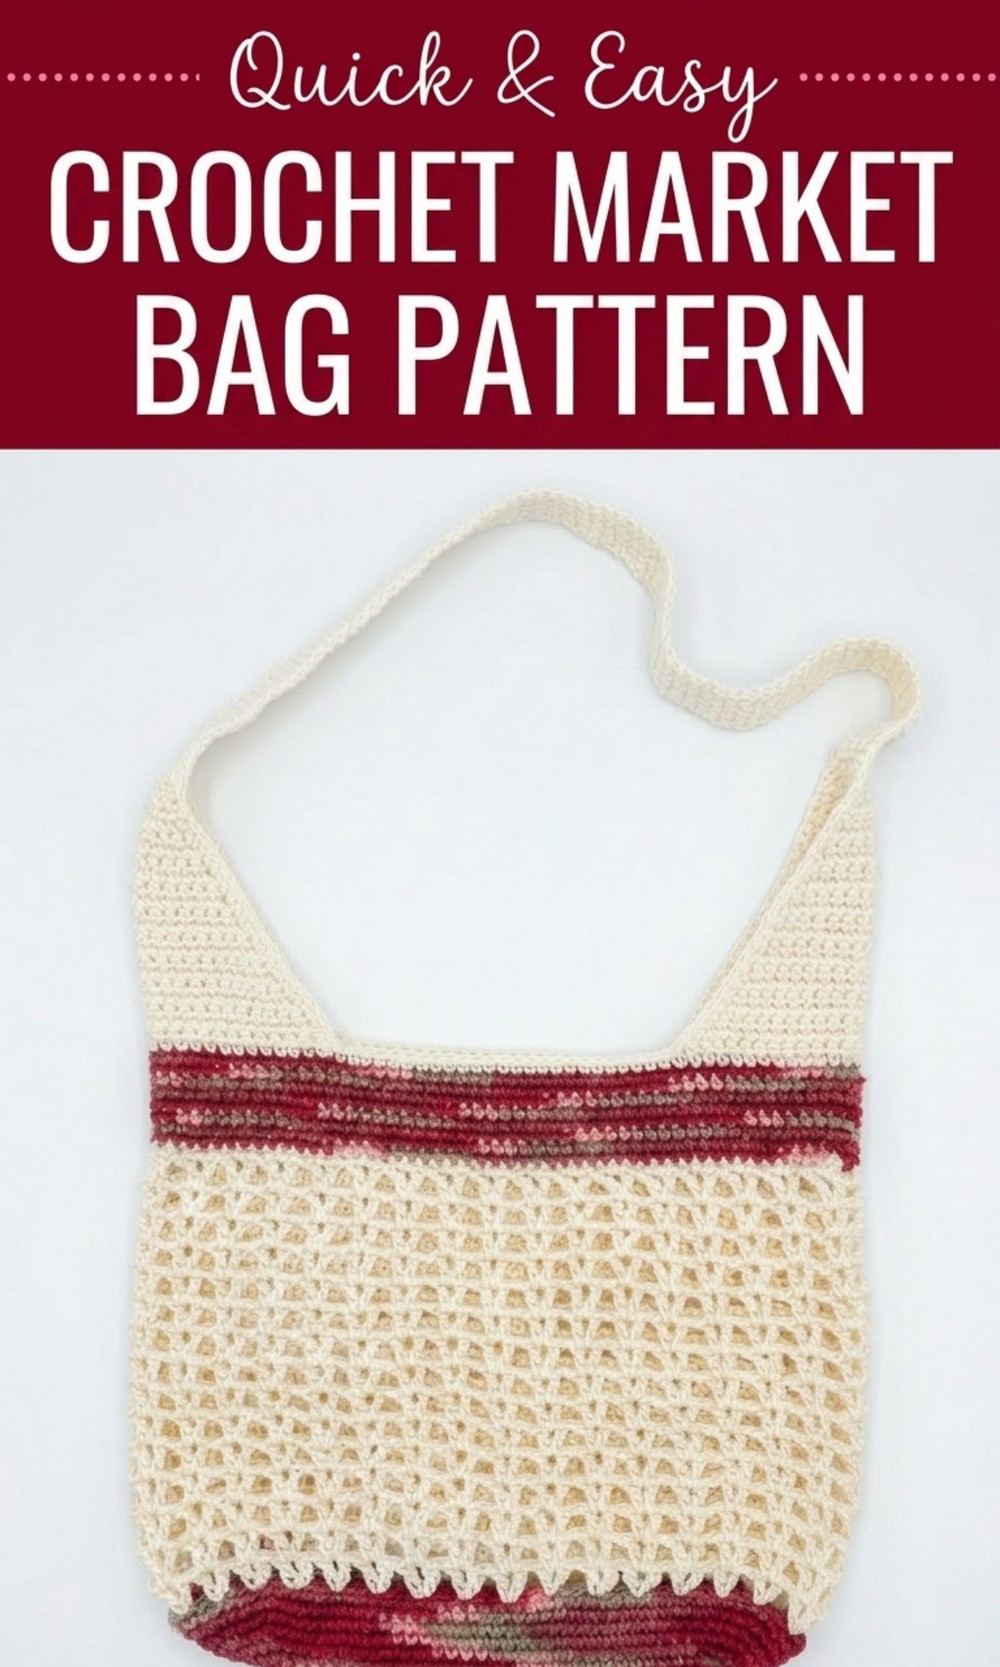
Make an easy and pretty crochet market bag with this free pattern that’s great for carrying groceries, veggies, or fun day out essentials.
Use Your Skills to Make This Free Crochet Market Bag
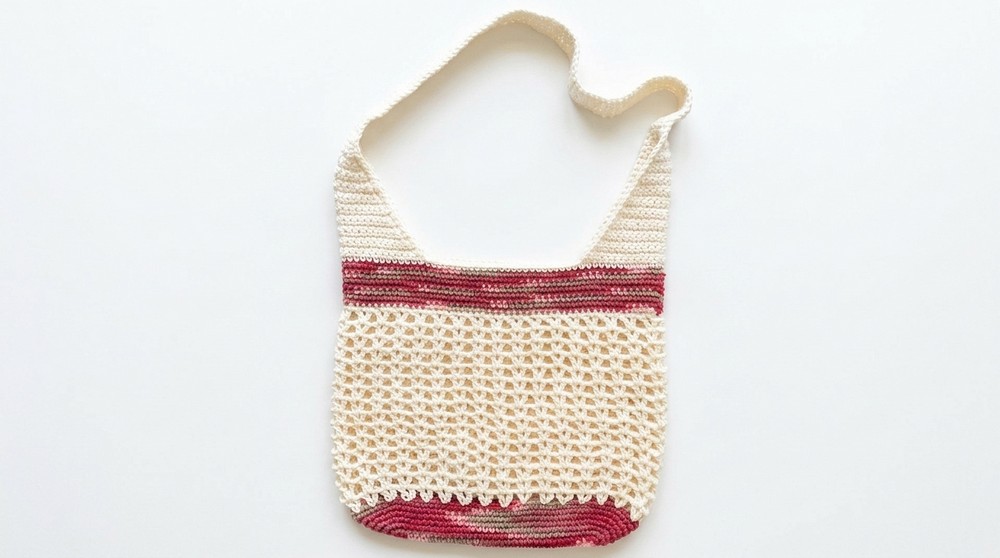
Designed with a sturdy oval base and airy v stitch sides, this bag effortlessly combines durability with elegance. Whether you’re new to crochet or an experienced crafter, this pattern is simple to follow and can easily be customized with your favorite colors and sizes, making each bag unique.
This charming bag is perfect for more than just groceries—it’s a fabulous companion for farmers’ markets, beach trips, or everyday shopping. Its lightweight yet super strong design holds plenty of items while remaining easy to carry, thanks to its comfortable, wide handles. Made with reusable cotton yarn, it’s a beautiful way to replace wasteful plastic bags while looking trendy.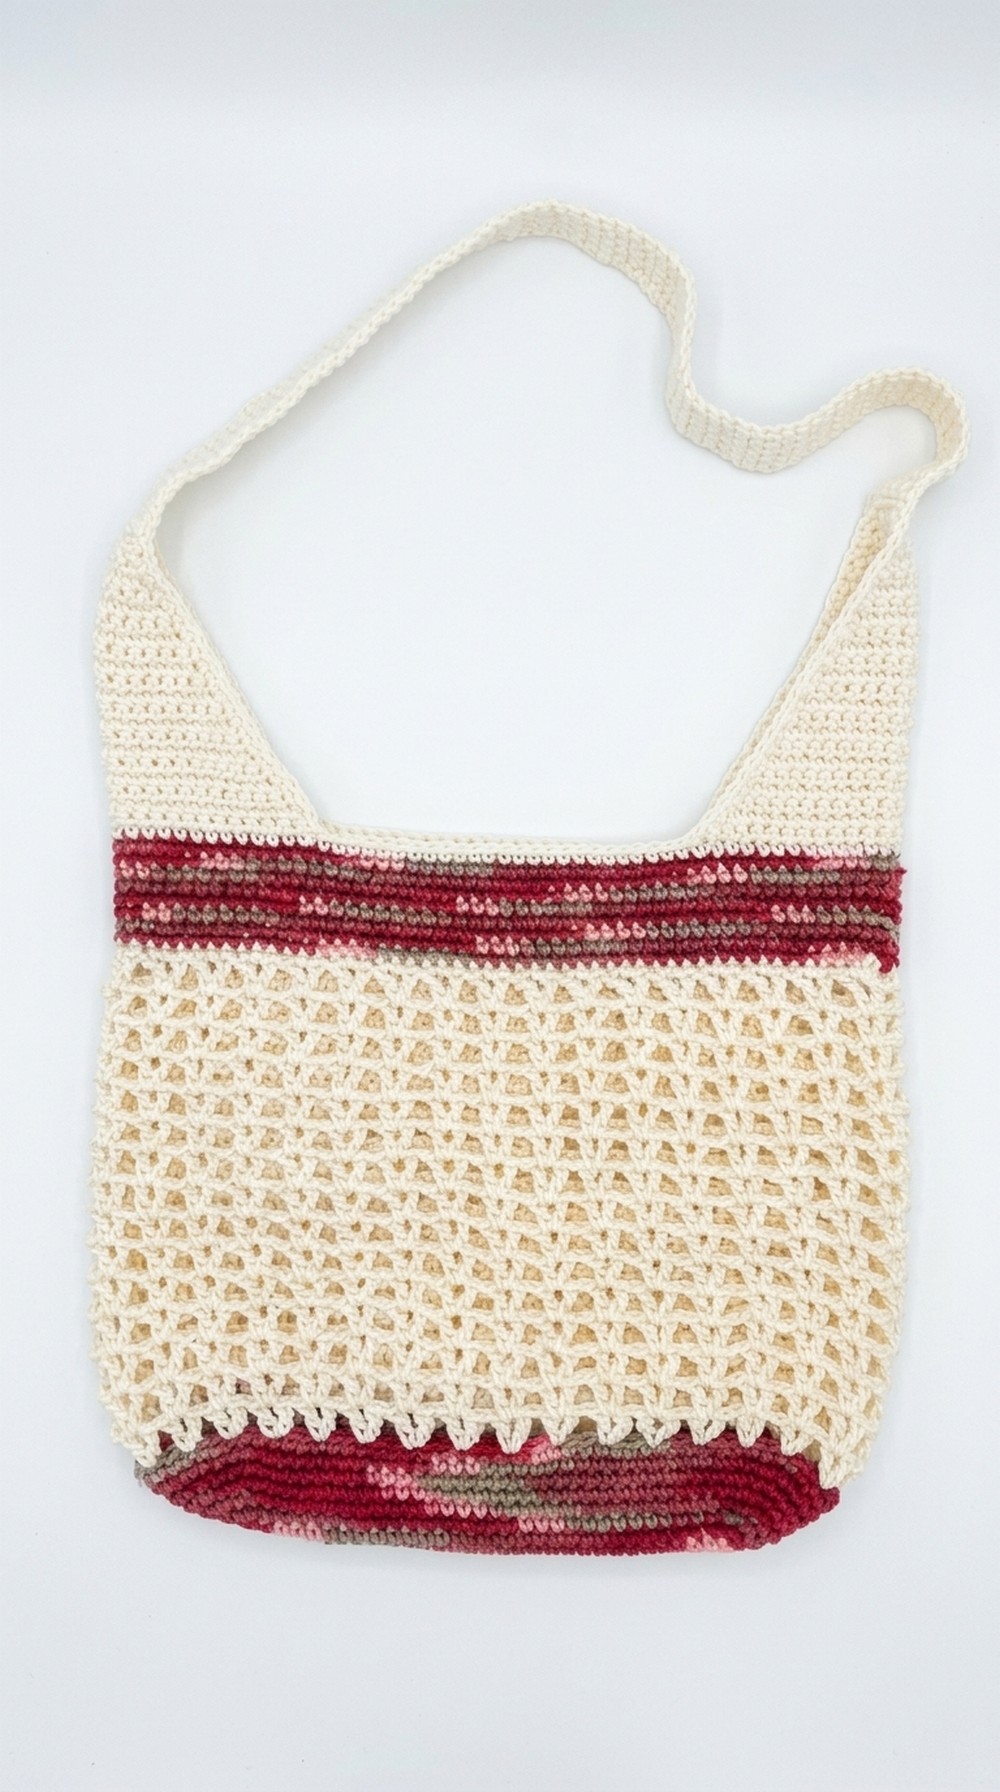 Get inspired to create this one of a kind market bag. It’s not just a project—it’s the perfect blend of function, fashion, and creativity that you’ll love to show off and use every single day.
Charming Crochet Market Bag Pattern
Skill Level
Advanced beginner to intermediate (you should be comfortable with single crochet, double crochet, increasing in the round, and basic shaping).
Materials
- Yarn:
- 100% cotton yarn
- Approx. 150–200 g total (5–7 oz)
- At least 2 colors are used in the video (one for base and body, one for top band and handle), but you may use one or more colors as desired.
- Hook:
- 5.0 mm crochet hook
- Notions:
- Scissors
- Darning (yarn) needle
- Measuring tape
- Stitch markers (very helpful for marking handle positions and corners)
Gauge and Finished Measurements
Gauge is not critical for this bag, but measurements from the video are:
- Base (oval) after 8 rounds:
- Length (longest side): approx. 13 in / 33 cm
- Width (short side): approx. 4.5 in / 12 cm
- Main bag body:
- Width (laid flat): approx. 15–15.5 in / 38–40 cm
- Height of open mesh (v stitch section): approx. 11 in / 28 cm
- Height of solid top band (single crochet rows): approx. 2 in / 5 cm
- Total bag height (main portion): approx. 13 in / 33–34 cm
- Handle:
- In the video, total handle length: approx. 36 in / 90 cm
- Recommendation: about 4 in / 10 cm shorter (approx. 32 in / 80 cm) for a more practical length.
Abbreviations (US Terms)
- ch = chain
- st(s) = stitch(es)
- sc = single crochet
- dc = double crochet
- sl st = slip stitch
- sc2tog = single crochet two together (single crochet decrease)
- rep = repeat
- RS = right side
- WS = wrong side
Special Techniques
1. Working into the Back Bump of the Chain
For the base, the initial row of stitches is worked into the back loop (back bump) of the foundation chain. This gives a neat, even bottom edge.
- Turn the chain so you see the small bumps along the back.
- Insert hook into the back bump of the chain, then work the indicated stitch.
2. V Stitch (for the Mesh Body)
A v stitch in this pattern is:
(dc, ch 1, dc) all in the same stitch or space.
The main body consists of v stitches worked into the v stitches of the previous round.
3. Single Crochet Invisible Join (Optional)
At some points, the video mentions finishing with an “invisible join.” The simplest form:
- Cut yarn, leaving a tail. Pull the yarn completely through the last loop.
- Thread the tail onto a yarn needle.
- Insert needle from front to back under the two top loops of the first stitch of the round.
- Then insert needle back into the last stitch (where yarn came from), under the back loop only, and pull through.
- Adjust tension so the join looks like a normal stitch, and weave in the end.
Pattern Instructions
A. Base of the Bag (Oval, Worked in Rounds)
Note: The base starts with 31 chains and is worked in an oval, increasing at both ends.
- Foundation Chain
- Ch 31.
- This measures approx. 8–9 in / 20–23 cm.
- Round 1
- Work into the back bump of each chain.
- Starting in the 2nd ch from hook:
- 2 sc in this first ch.
- Next 28 ch:
- 1 sc in each back bump (28 sc).
- Last remaining ch:
- 4 sc in that same ch (this forms the rounded end).
- Now work along the opposite side of the chain, into both loops of each chain (the “bottom” of the original chain):
- 1 sc in each of the next 28 sts (you are now mirroring the other side).
- Last st (the one that already has 2 sc from the start):
- 2 sc in this st again (now that st has 4 sc total across the round).
- Join with a sl st to the first sc.
- Round 1 complete.
- Round 2 – Increase Round
- Ch 1.
- In first st: 2 sc.
- In next st: 2 sc.
- Next 28 sts: 1 sc in each (28 sc).
- Corner at far end:
- 2 sc in each of the next 4 sts.
- Next 28 sts down the other side: 1 sc in each (28 sc).
- Last 2 sts of round: 2 sc in each.
- Join with sl st to first sc.
- Stitch count for Round 2: 72 sts.
- Round 3 – Increase Round
- Ch 1.
- Pattern at near end:
- 2 sc in first st.
- 1 sc in next st.
- 2 sc in next st.
- Next 30 sts down the side: 1 sc in each (30 sc).
- At far end (corner area):
- 2 sc in next st.
- 1 sc in next st.
- 2 sc in next st.
- (This is halfway around the oval.)
- Continue:
- 2 sc in next st.
- 1 sc in next st.
- 2 sc in next st.
- Next 30 sts down the other side: 1 sc in each (30 sc).
- End of round:
- 2 sc in next st.
- 1 sc in next st.
- 2 sc in next st.
- Join with sl st to first sc.
- Stitch count for Round 3: 80 sts.

- Round 4 – Increase Round
- Ch 1.
- Pattern at start:
- 1 sc in next st.
- 1 sc in next st.
- 2 sc in next st.
- Repeat this sequence (1, 1, 2) as established at that end, following the transcription.
- Down each long side, you will have 28 sc each side before and after the corner area.
- Around the corners, follow the pattern described in the transcription:
- Work “2 sc, 1 sc, 1 sc” twice on each corner half, then mirror it on the other side.
- Join with sl st to first sc.
- Stitch count for Round 4: 88 sts.
- Rounds 5 and 6 – Straight Rounds (No Increases)
- For each of these 2 rounds:
- Ch 1.
- 1 sc in each st around (88 sc).
- Join with sl st to first sc.
- Round 6 count remains 88 sts.
- For each of these 2 rounds:
- Round 7 – Increase Round
- Ch 1.
- Work the following at the start and along the round as the video states:
- At the ends: pattern of “2 sc, 1 sc, 1 sc, 2 sc, 1 sc, 1 sc, 2 sc” in the curved portions.
- Down each long side: 30 sc on each side.
- Follow the same corner pattern on both ends (as in the video):
- Around corners: “2 sc, 1 sc, 1 sc” repeated as demonstrated.
- Join with sl st to first sc.
- Stitch count for Round 7: 100 sts.
- Round 8 – Straight Round
- Ch 1.
- 1 sc in each st around (100 sc).
- Join with sl st to first sc.
- You now have 8 rounds total.
- Base measurement approx. 13 in by 4.5 in (33 cm by 12 cm).
B. Start of Bag Sides – V Stitch Section
At this point, the base is complete. You will now work upward in rounds using v stitches.
You may change color here (as in the video) or continue with the same color.
Round 1 of V Stitches
- Join new yarn (or continue with current) in any stitch of the last round.
- Ch 3 (counts as first dc).
- Ch 1 (this will be the v stitch chain space).
- Dc in the same stitch as the ch 3.
- You now have your first v stitch: dc, ch 1, dc in same st.
- Ch 1, skip 2 sts, in next st work (dc, ch 1, dc).
- This is the repeat:
- Ch 1, skip 2, v stitch in next st.
- This is the repeat:
- Continue this repeat around the bag.
Note:
- The video states there are 100 sts but v stitches are made in groups of 3 sts (skip 2, use 1), so you may end up with 1 extra stitch left at the end.
- In the video, the maker adjusts by skipping only 1 stitch in the last segment so that the final v stitch is centered and the spacing looks even.
- So near the end, if needed:
- Ch 1, skip 1 stitch (instead of 2), v stitch in next st.
- So near the end, if needed:
- At end of round:
- Ch 1, then join to the 3rd ch of the starting ch 3 (counting up from the bottom).
- Insert hook from back to front through that ch and sl st to join (this makes a neater join from the outside).

Round 2 of V Stitches (and All Following V Stitch Rounds)
- Sl st into the next ch 1 space of the first v stitch (this moves your starting point to the center of a v stitch).
- Ch 4:
- This counts as “dc + ch 1.”
- Dc into the same v stitch space.
- You have created your first v stitch of the round: (dc, ch 1, dc) with the ch 4 forming dc+ch1.
- Ch 1, in next v stitch space from previous round work (dc, ch 1, dc).
- Repeat step 4 in every v stitch space around.
- At the end of the round, join with a sl st to the 3rd ch of the starting ch 4, again inserting hook from back to front.
Number of V Stitch Rounds
- Work 15 rounds of v stitches in total (the video shows 15).
- Your mesh section height will be approx. 11 in / 28 cm.
C. Transition Band – Single Crochet Rounds at Top of Body
Once you have completed your desired number of v stitch rounds (e.g., 15):
Round 1 of Top Band
- Sl st to join the last v stitch round if not already done.
- Ch 1.
- You will now work single crochet into each dc and each ch 1 space of the v stitches:
- 1 sc into the ch 1 space of a v stitch.
- 1 sc into the first dc of that vstitch.
- 1 sc into the ch 1 between v stitches.
- 1 sc into the second dc of the v stitch.
- (The transcription describes going into each dc and each chain space of the v stitch, skipping only the outside chain spaces between v’s if present. The main idea: fill each v stitch with 3 sc, plus sc where there is a chain space.)
The video simplifies it as:
- sc into dc
- sc into chain space
- sc into next dc
and repeat around, resulting in a slightly higher stitch count than the original 100.
- Continue around, placing sc so that every dc and every v stitch chain space is filled with 1 sc.
- Join with a sl st to the first sc.
Note:
Because an extra v stitch was added earlier, the count in the video becomes 102 sc at this point.
Top Band Rounds 2–9
- Optionally change color at the start of Round 2.
- For each of these 8 rounds (for a total of 9 single crochet rounds including Round 1):
- Ch 1.
- 1 sc in each st around (keep stitch count consistent, e.g., 102 sts).
- Join with a sl st to first sc at the end of each round.
At the end of these 9 rounds, your bag body is complete.
D. Finishing Top Edge (Optional Invisible Join)
After the final single crochet round of the body:
- Cut yarn, leaving a short tail.
- Complete an invisible join as described in the Special Techniques, or simply sl st and fasten off.
- Weave in ends securely.
E. Handles
The bag uses a single continuous strap that is worked in two halves and joined at the top, then bordered.
1. Mark Positions for Handles
- Lay the bag flat, with the side seam positions (if any) aligned.
- Measure across the top front edge. In the video, this measures about 15 in / 38 cm.
- Divide the top edge into four equal sections:
- Left front section
- Right front section
- Left back section
- Right back section
- Place markers for the front handle positions:
- Approximately 4 in / 10 cm in from each side.
- The space between the two front markers is about 8 in / 20 cm, which corresponded to 26 stitches in the video.
- Mirror these marker positions on the back edge for the second handle attachment area.
You now have four handle points: two on the front and two directly behind them on the back.
2. First Half of Handle: Shaped from 26 sts Down to 4 sts
- Attach yarn at the first front handle marker.
- Ch 1.
- Work 26 sc across to the next front marker (this uses the marked stitches).
- Remove the marker as you reach it.
- After this row, you have 26 sc across the handle width.
Now work in rows (turning your work):
- Row 1 of Handle
- Ch 1, turn.
- Skip the very first st.
- Sc in next st and in each st across.
- You now have 25 sc.
- Row 2
- Ch 1, turn.
- Skip the first st.
- Sc in each remaining st across.
- You now have 24 sc.
- Continue this same method, decreasing 1 st at the beginning of each row:
- Ch 1, turn, skip first st, sc across.
- Work in this manner until you have 4 sc in a row. The video indicates that this occurs at Row 23 (but count your own rows to be sure; the main point is to reach 4 sts).
Your numbers will look something like:
- Start: 26
- Then 25, 24, 23, …
- Eventually: 5, then 4.
▸ When you reach a row of 4 sc, the first taper is complete.
3. Short Straight Section of 4 Sts
To form a short straight section at the top of the first half:
- With 4 sc in the last row:
- Row +1
- Ch 1, turn.
- Sc in first st (do not skip a stitch from now on).
- Sc in each of the remaining 3 sts (4 sc total).
- Row +2
- Ch 1, turn.
- Sc in all 4 sts again.
- Row +1
- After working these 2 rows of 4 sc without decreasing, cut yarn and fasten off.
- This completes the first side of the handle up to its midpoint.
4. Second Half of Handle Base (Back Side)
Now repeat the decreasing section on the back side of the bag.
- Go to the corresponding back markers directly behind the front handle.
- Attach yarn at one marker with a slip knot.
- Ch 1.
- Sc across 26 sts to the next back marker (remove markers as you go).
Then:
- Work rows as before:
- Ch 1, turn, skip first st, sc across.
- Each row decreases by 1 stitch.
- Continue until you reach a row with 4 sc.
At this point do not cut the yarn (unlike the first side). You will now use this 4 st-wide strap to span the distance to the other half.
5. Strap Extension Between the Two Halves
From one 4 st-wide side, you will work many rows to form the long strap that will eventually meet the first 4 st section you already made.
- With 4 sc on the hook:
- Ch 1, turn.
- Sc in all 4 sts.
- Repeat this row (4 sc across) until the strap reaches your desired length.
- In the video, 80 rows were worked, yielding about 36 in / 90 cm total handle length.
- The suggestion in the transcription is to work about 10 rows fewer (approx. 4 in / 10 cm shorter), so a length of about 32 in / 80 cm may be more practical.
- Once your strap is as long as you wish:
- Cut yarn, leaving a long tail (about 10–12 in / 25–30 cm) for sewing.
- Fasten off.
6. Joining the Two 4 St Handle Ends
- Lay the bag flat and make sure the strap is not twisted.
- Align the 4 sc at the end of the long strap with the 4 sc at the top of the first handle half (the one where you previously cut yarn).
- Thread the long tail onto a yarn needle.
- Sew the two 4 st sections together stitch to stitch (for example, using whip stitch or mattress stitch).
- Secure well and weave in the end.
You now have a continuous handle that starts from one side of the bag, goes up, over, and returns to the other side.
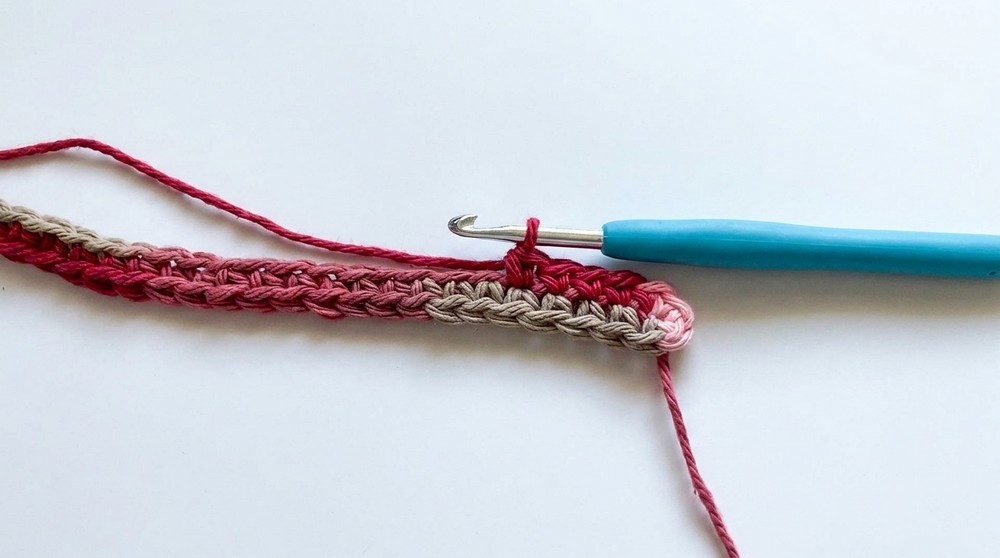
F. Edging the Handle (Border)
To give the handle a neat, sturdy edge, the video works a single crochet border around both edges of the strap.
You may use any color; often a contrasting color looks attractive.
First Edge of Handle
- Attach yarn to one corner of the handle at the bag edge.
- Ch 1.
- Work 1 sc into the end of each row along the edge of the handle.
- For each row of the handle, place 1 sc.
- Keep stitches evenly spaced; do not bunch or stretch.
- At the first top corner (where the strap turns around the top join area):
- Work a decrease (sc2tog) across the corner stitches to round it slightly:
- Insert hook into one corner point, pull up a loop.
- Insert hook into the next corner point, pull up a loop.
- Yarn over and pull through all loops on hook (sc2tog).
- Work a decrease (sc2tog) across the corner stitches to round it slightly:
- Continue along the top and down the other edge, again placing 1 sc at the end of each row, and use sc2tog at each corner where you want a smoother curve.
- When you reach back to your starting point, finish the edging with an invisible join if you wish, or sl st and fasten off.
Second Edge of Handle
- Repeat the same process along the opposite side of the handle.
- Work 1 sc into the end of each row all around, shaping the corners with sc2tog as before.
- Join neatly and weave in all remaining ends.
Finishing the Pattern
- Weave in all loose ends securely with a yarn needle.
- Check the handle join for strength; reinforce with extra stitches if needed.
- Gently shape the bag by folding along the base and sides.
- Optionally, wash the bag according to the yarn’s instructions and lay flat to dry to set the shape.
Tips and Suggestions
- Adjusting Bag Size
- To make a wider bag, start with more chains at the base (e.g., more than 31) and follow the same oval increase logic. Your sides will be longer; keep corner increases consistent.
- To make the bag taller, add more v stitch rounds before the single crochet band.
- Keeping Sides Vertical
- When working v stitches, do not add extra increases; keep the same number of v stitches each round.
- The piece may appear to flare outward at first, but as height increases, the shape will correct and form walls.
- Even V Stitches
- If your stitch count does not divide perfectly for v stitches, do as in the video: adjust at one point by skipping only 1 stitch instead of 2, so the spacing remains visually balanced.
- Handle Length
- Test the length before final joining: pin or clip the ends together and wear the bag over your shoulder to see how it hangs.
- Adjust by adding or removing rows of 4 sc.
- Reinforcement
- For extra strength, you may:
- Work a second layer for the handle (a second strap sewn to the underside), or
- Use a tighter gauge for the handle rows, or
- Use a slightly smaller hook size for the handle section.
- For extra strength, you may:
- Care Instructions
- Since the bag is made with 100% cotton:
- Hand wash or use gentle machine cycle in cool water.
- Lay flat to dry to maintain shape.
- Avoid heavy stretching when wet; cotton can grow.
- Since the bag is made with 100% cotton:
Final Words
This beach bag pattern produces a sturdy, practical, and attractive bag with an open mesh body and solid top band and handle. The base construction allows for easy size adjustments, while the v stitch body keeps the project light and suitable for beach or market use. By following the steps carefully and checking your measurements as you go, you can customise the width, height, colors, and handle length to your own preference.
With regular gentle care and proper drying, the bag will retain its shape and remain useful for many seasons.