Burst with charm using the Free Crochet Carrot Keychain Pattern, a playful and practical accessory perfect for brightening keys, bags, or thoughtful gifts.
Long before store-bought trinkets became the norm, small handmade charms carried personal meaning and often reflected the maker’s creativity. A miniature carrot keychain is a charming nod to that tradition, bringing together playful style and practicality. The Free Crochet Carrot Keychain Pattern offers a delightful way to shape a tiny carrot complete with textured stitches that mimic the vegetable’s natural form. Its bright orange body and leafy green top add a cheerful touch to your keys, bags, or gift packages, making it an eye-catching accessory wherever it’s placed.
Easy Steps to Crochet Carrot Keychain Pattern for Gift Giving


More than just decorative, this little carrot can be a thoughtful gift for garden lovers, farmers’ market enthusiasts, or anyone who enjoys whimsical accents. Because it’s lightweight and durable, it can withstand daily use without losing its appeal. Working on such a small project is also an excellent opportunity to practice new techniques or use leftover yarn in a purposeful way.
Whether you make it as a personal keepsake, a stocking stuffer, or a market stall item, the carrot keychain carries a unique charm that’s both functional and full of personality. This simple yet appealing project proves that even the smallest handmade items can bring joy and brighten everyday moments.

Step-by-Step Details
Materials Used
- Yarn: Cléia yarn (two threads worked together) or Anne Yarn (green yarn for carrot leaves).
- Crochet hook: 2MM size.
- Stuffing: Fiberfill for the carrot body.
- Keychain ring: To attach the finished carrot.
- Additional tools like scissors, a marker, and a needle.
Crocheting the Carrot Body
- Start with a magic ring:
- Create a magic ring and make 4 single crochet stitches into it.
- Increasing stitches row by row:
- Row 2: 1 single crochet in the first stitch, and an increase in the next stitch (repeat around).

- Row 3: 2 single crochet stitches followed by an increase (repeat around).
- Row 4: 3 single crochet stitches followed by an increase (repeat).
- Row 5: 4 single crochet stitches followed by an increase (repeat).
- Row 6: 5 single crochet stitches followed by an increase (repeat).

- Row 2: 1 single crochet in the first stitch, and an increase in the next stitch (repeat around).
- Maintaining the carrot body shape:
- Rows 7-9: Crochet stitch by stitch without increasing, maintaining 14 single crochet stitches in total.
- Adjustments and filling:
- Row 10: Crochet 6 single crochet stitches followed by an increase.
- Row 11: Stitch by stitch without increase (16 stitches).
- Row 12: Implement a decrease pattern: 2 single crochet stitches followed by a decrease.
- Add stuffing inside the carrot body using fiberfill, making sure to reach the tip of the carrot.
- Final decreases:
- Row 13: Make 6 decreases (front loop only), pull the yarn taut to close the opening, and finish off.
Creating the Carrot Leaves
- Attach green yarn to the top of the carrot body.

- Work seven chains and turn back, skipping a chain and creating single crochet stitches through the belly loop of the remaining chains. Repeat six times to form leaves.
- Secure the thread at the base stitch of the carrot, ensuring it is firmly fastened.
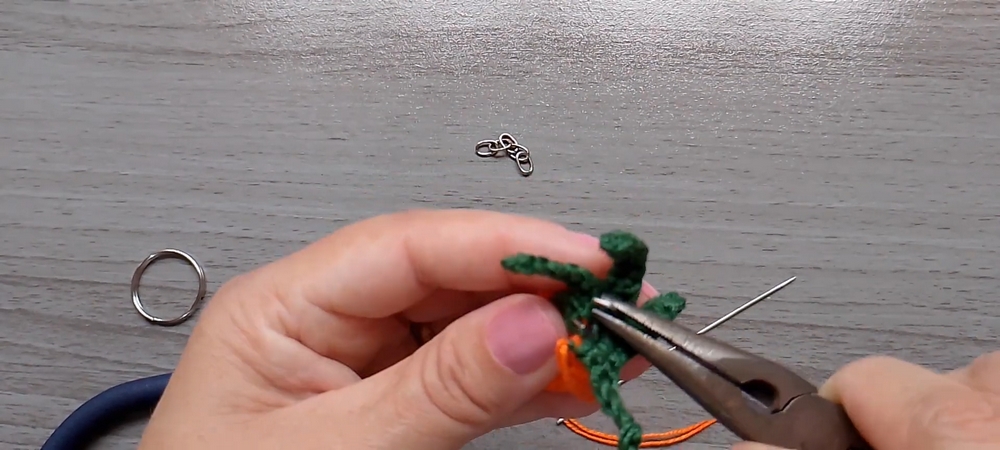
Adding the Keychain Ring
- Attach the keychain ring to the top of the carrot using a needle. Sew carefully to secure it in place.
- Optionally, use glue for added reinforcement.
Special Features
- High attention to detail: The carrot keychain design mimics a real carrot with textured leaves and a tapered body.
- Versatility: Can be used as a decorative item, gift, or accessory for bags and keys.
- Customizable: You can use various colors or additional embellishments.
Level of Difficulty
- Intermediate: The project is slightly challenging due to techniques like the magic ring, increases, decreases, and creating leaves with chains. Beginners can attempt this with patience and practice.
Tutor’s Suggestions
- Use two strands of Cléia yarn for better structural integrity. Alternatively, Anne yarn works for the leaves.
- Mark row beginnings to avoid losing track of stitch counts, especially during increases and decreases.
- Avoid crocheting chains too tightly to simplify the process of turning stitches.
- Stuff the carrot gradually for even filling, and adjust as needed before closing.
Uses
- A charming accessory for keys, bags, and backpacks.
- Great as a handmade gift for friends and family.
- Can be combined with other crochet designs, such as the bunny keychain, for themed sets.
Tip
When sewing the keychain ring, ensure that the thread is securely fastened by overlapping stitches or using glue. This will prevent the ring from loosening or coming off with regular use.
Conclusion
The adorable carrot keychain is a fun and creative crochet project that showcases both charm and practicality. The step-by-step pattern makes it accessible to intermediate crochet enthusiasts and encourages creativity with its customizable features. Whether you make this for yourself or as a thoughtful gift, this handmade item is bound to bring smiles and satisfaction.