Turn yarn into useful storage with this free crochet baskets pattern that lets you create neat and sturdy baskets to hold your small things in an easy and fun way.
Free Crochet Basket Pattern for Organizing Every Corner of Home
Ready to bring style and functionality together in one quick and creative project? This guide walks you through an easy free crochet basket pattern that’s perfect for beginners and experienced crocheters alike. With soft T shirt yarn and simple stitches, you can create a sturdy, modern basket that’s as practical as it is beautiful.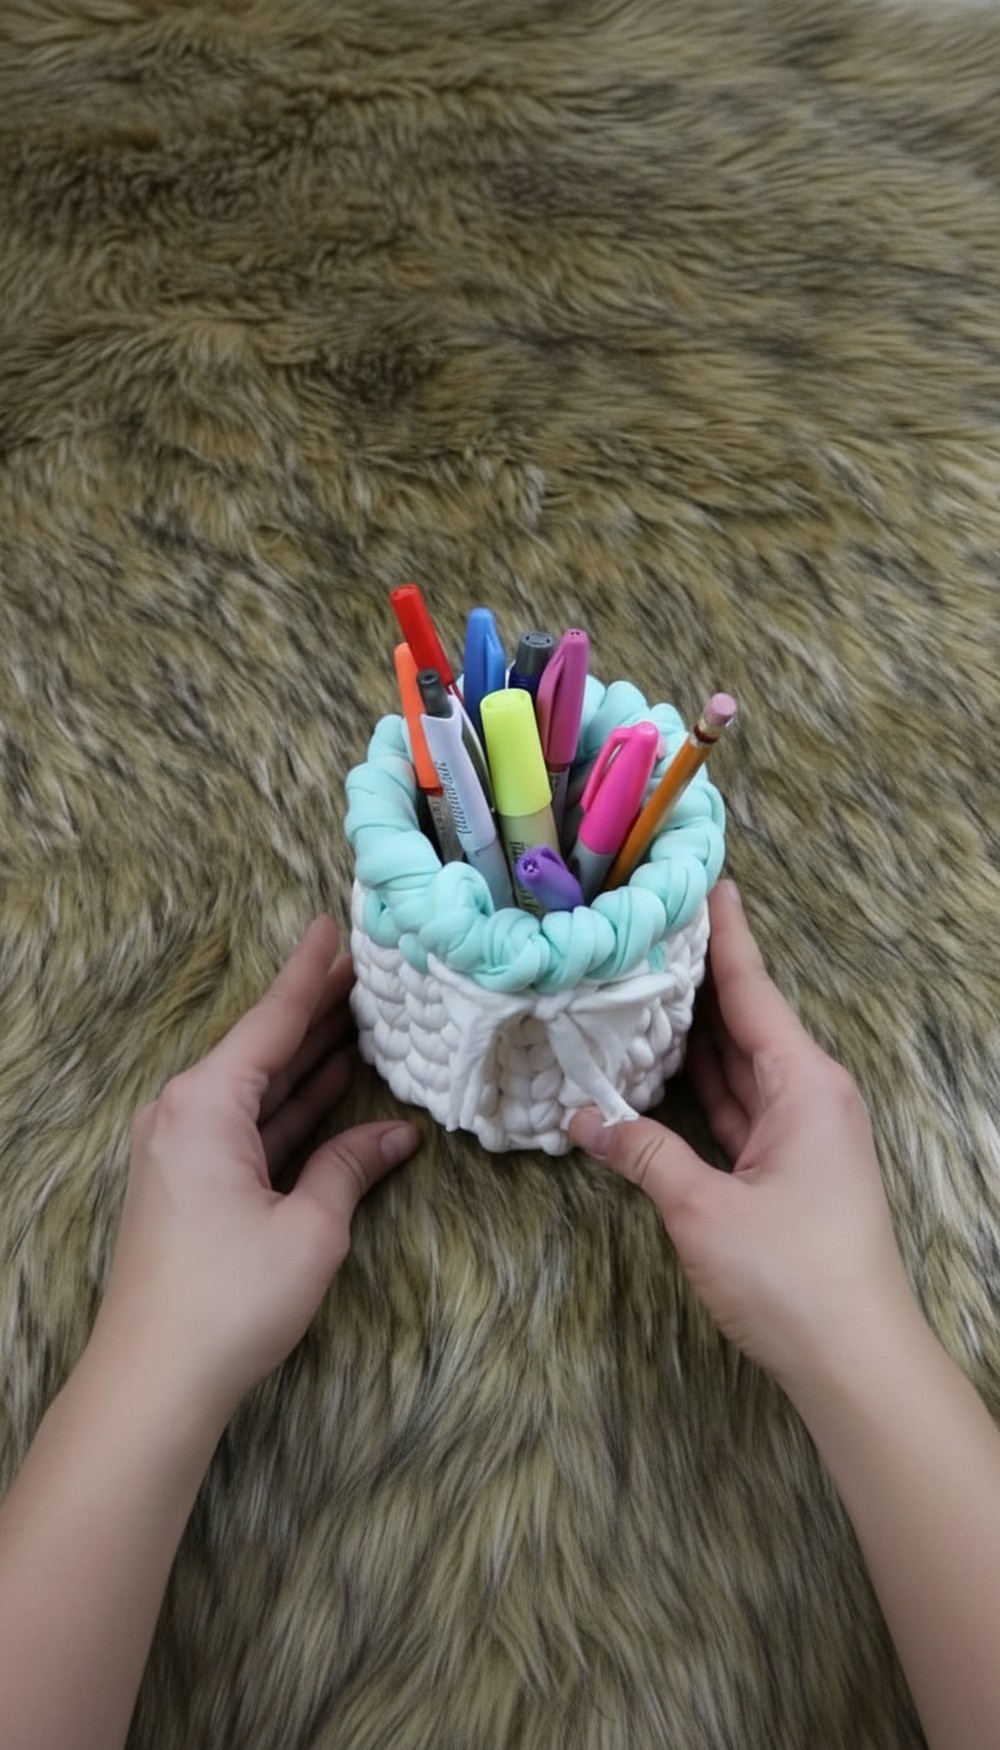
Imagine using this handmade piece to organize your keys, toys, makeup, or crochet supplies while adding a personal touch to your space. Customize it with your favorite colors or fun accents like bows, and watch your creation come to life. This ensures your basket will be sturdy, chic, and designed to impress.
Sturdy Crochet Basket Pattern
1. Materials
- Yarn: T shirt yarn
- Fiber: cotton
- Characteristics: slightly elastic and thick
- Hook: Crochet hook that matches your yarn thickness
- In the video: 10 mm crochet hook
- Stitch marker: 1 (or more if you prefer)
- Scissors
- Smaller hook (optional): about 7 mm for weaving in ends
2. Special Techniques Used
- Magic Ring (Magic Circle)
Used to start the base of the basket with a tight, closed center. - Single Crochet (sc)
Basic stitch used throughout the basket. - Central Single Crochet (centered sc)
- Instead of inserting the hook under the top two loops, the hook is inserted through the center of the “V” of the stitch (between the two vertical strands), so the hook comes out in the middle on the back as well.
- This creates a neat, dense fabric and a very tidy look.
- Increase (inc)
- 2 single crochets in the same stitch.
- Used to grow the circular base.
- Slip Stitch (sl st)
- Used to join the last row of the base and at the beginning of the side walls.
- Crab Stitch (Reverse Single Crochet)
- A single crochet worked backwards, i.e., to the right (for right handed crocheters) instead of to the left.
- Creates a decorative, twisted edging on the top of the basket.
- Color Change
- Performed at the end of a row while closing the round, switching from one color of T shirt yarn to another.
3. Abbreviations (US Terms)
- MR = Magic Ring (Magic Circle)
- ch = chain
- sc = single crochet
- centered sc = central single crochet (hook inserted through the center of the “V”)
- inc = increase (2 sc in the same stitch)
- sl st = slip stitch
- st(s) = stitch(es)
- Rnd = round (row worked in the round)
4. Basket Base – Step by Step
Round 1 – Magic Ring and First Single Crochets (6 sts)
- Make the Magic Ring:
- Place the T shirt yarn over your palm.
- Wrap it around to form an X on the front of your hand.
- Insert the hook under the first strand and over the second strand, pull the second strand through to form a loop.
- ch 1 – This counts as the first sc.
Place a stitch marker in this chain so you do not lose or hide it. - Work 5 more sc into the ring (since the ch 1 counts as the first sc, you will have a total of 6 stitches).
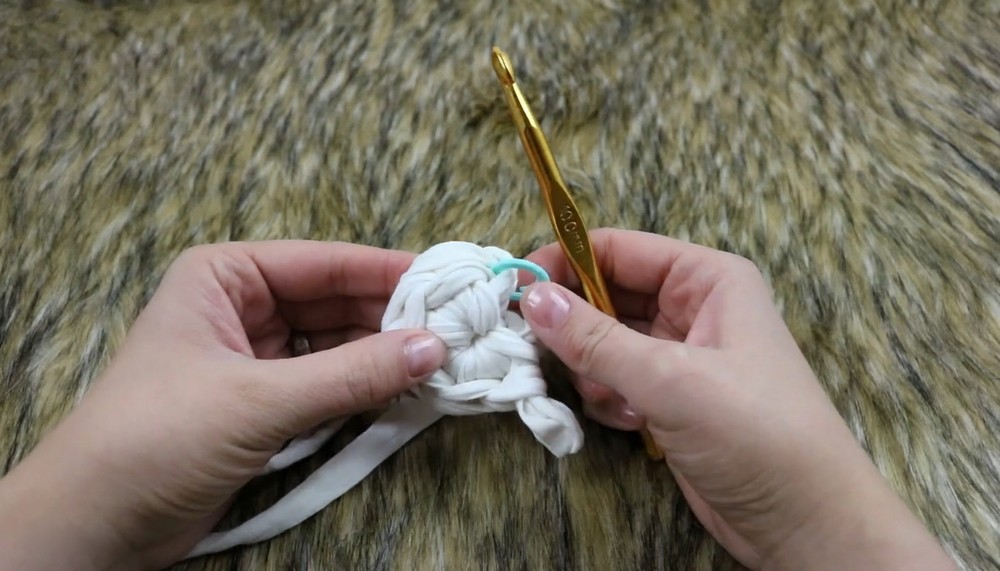
- Gently pull the tail of the magic ring to close the center tightly.
- You now have 6 sc in Round 1.
Closing Round 1 (Special Join)
The video uses a special invisible style join so the beginning of the round is less visible.
- Identify:
- The ch 1 with marker = counts as first sc.
- The next stitch = first “real” sc.
- Insert the hook into the first real sc (not the chain) from front to back.
- Yarn over with the working yarn and pull it through to create a loop.
- Keep a finger on this loop and adjust the surrounding yarn so the join sits flat.
- Insert the hook up through the chain with the marker.
- Place the loop (being held on your finger) on the hook and pull it through.
- Move the working strand to the front, holding the other strands at the back so they do not come forward.
- Remove the marker if needed, but you will soon place it again for the next round.
You have now a neatly closed Round 1 with 6 sc.
5. Increasing the Base
You will now create a flat circle by working centered single crochets with increases.
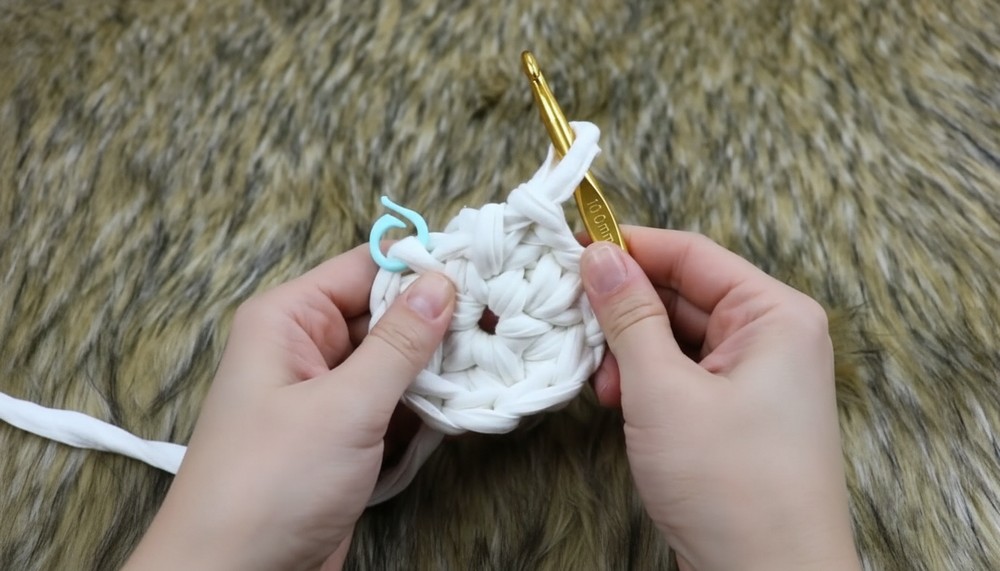
Round 2 – Increase in Every Stitch (12 sts)
- ch 1 – counts as 1st sc. Place marker in this chain.
- In the same stitch where the chain comes from, work 1 centered sc.
- This gives you your first increase (2 sc in the same stitch).
- Continue around:
- Work 2 centered sc in each stitch (an increase in every stitch).
- At the end of Round 2, you should have 12 sts.
- Close the round as before using the special closing method:
- Pull the center tail if needed to ensure the ring is fully closed.
- Join by inserting the hook into the first real sc, pulling up a loop, then joining to the chain with the marker.
- Bring the working strand to the front again, holding the other strands to the back.
Round 3 – Increases Every Other Stitch (18 sts)
- ch 1 – counts as the first sc. Place marker in this chain.
- In the same stitch where the chain comes from, work 1 centered sc to form the first increase.
- So the first stitch of the round is: ch 1 (counts as sc) + 1 centered sc in same stitch.
- Pattern for Round 3:
- [inc, 1 centered sc, inc, 1 centered sc…]
- In words: Increase in one stitch, then 1 centered sc in the next stitch, repeat around.
- Make sure:
- You start the round with an increase.
- You do not end with an increase. The last stitch should be a single centered sc only (no increase).
- At the end of Round 3, you must have 18 stitches (count them: remember that the initial chain counts as 1 stitch).
- Close the round again with the same invisible closure method.
If you want a larger basket, you continue increasing as follows (as shown in the video’s “image pattern”):
- Round 4: 2 centered sc, inc, 2 centered sc, inc, repeat around
- Round 5: 3 centered sc, inc, 3 centered sc, inc, repeat around
- Up to Round 8 if desired, always increasing evenly.

For the sample basket in the video, the base is kept small (approx. 3 rounds for about 10 cm). Another example basket uses 4 rounds for about 12 cm.
6. Forming the Walls of the Basket
Once your base is as wide as you want (for the video example, 18 sts total after Round 3 and about 10 cm in diameter):
Round to Turn Up the Sides
- After closing your last increase round, insert the hook into the next stitch as shown in the video and work a slip stitch (sl st) to finish that round neatly.
- Remove the marker.
- ch 1 – counts as the first sc.
- Work 1 sc in the outside of the chain / edge (on the top of the edge so the work starts to turn upward).
- From this point on, you will work centered sc in each stitch around, always maintaining the same stitch count as the last round of the base.
- In the sample: 18 stitches total each round.
- As you crochet, push the base so that it becomes flat and the sides stand up. If it seems “inside out,” simply turn it around so the right side faces outward.
Rounds for the Sides
- For each new round of the side:
- ch 1, place marker in the chain (counts as 1st sc).
- Work centered sc in each stitch around, always making sure you have the same number of stitches (e.g., 18).
- Close each round with the same invisible closure method used previously.
- Repeat this process until the basket reaches the height you want.
- In the video, the author makes about 7–8 rounds for the walls before changing color.
- At 8 rounds (before color change), the height is about 11 cm.
7. Color Change
When you want to change color (for example, after 8 rounds of one color):
- Work to the end of the round as usual.
- Cut the working yarn, leaving a short tail.
- Begin the closing of the round as usual, but instead of pulling through with the old color, introduce the new color yarn:
- Insert the hook for the closing as before.
- Pull through the new color to finish the join.
- ch 1 with the new color (this is your first stitch of the new round).
- Continue working centered sc around in the new color.
- As you crochet the first few stitches, carry and hide both tails (old color and new color) inside the stitches so they are neatly tucked in.
You may repeat color changes whenever you wish, always following the same method.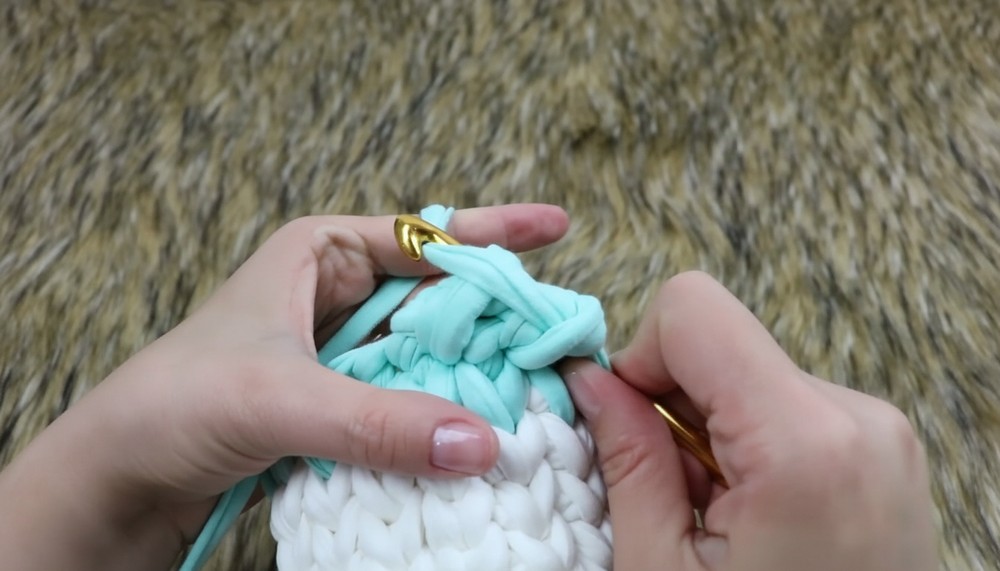
8. Decorative Top Edge – Crab Stitch
Once you have worked the desired number of rounds in the final color and are ready to finish the top edge:
- Work until the end of the second to last round.
- Close the round as usual with the special closure.
- sl st to secure.
- ch 1.
- Now work the crab stitch (reverse single crochet):
- Normally you crochet from right to left (for right handed people).
- For the crab stitch, you work from left to right.
- Insert the hook into the previous stitch (to the right), yarn over, pull up a loop, yarn over and pull through both loops – just like a normal sc but in the reverse direction.
- Work a crab stitch into each stitch around the top edge (you do not work centered here; you work into the normal top of the stitch).
- When you reach the last stitch, finish with a neat join (see Finishing below).
The crab stitch creates a twisted, rope-like decorative edge and gives the basket a firm and finished look.
9. Finishing the Basket
- At the end of the last crab stitch round:
- Cut the yarn, leaving a long tail.
- Pull the tail completely through the last stitch to secure it.
- Weave in ends:
- Use a smaller hook (around 7 mm) to weave the tail into several stitches on the inside of the basket.
- Hide the ends well so they do not come out.
- If you have any other yarn tails from color changes, weave those in the same way.
- Optional bow or braid:
- The video shows braiding a short length of T shirt yarn and tying it into a bow on the basket.
- Cut three equal strands, braid them together, tie into a bow, and attach it to the basket for decoration.
Your basket is now finished.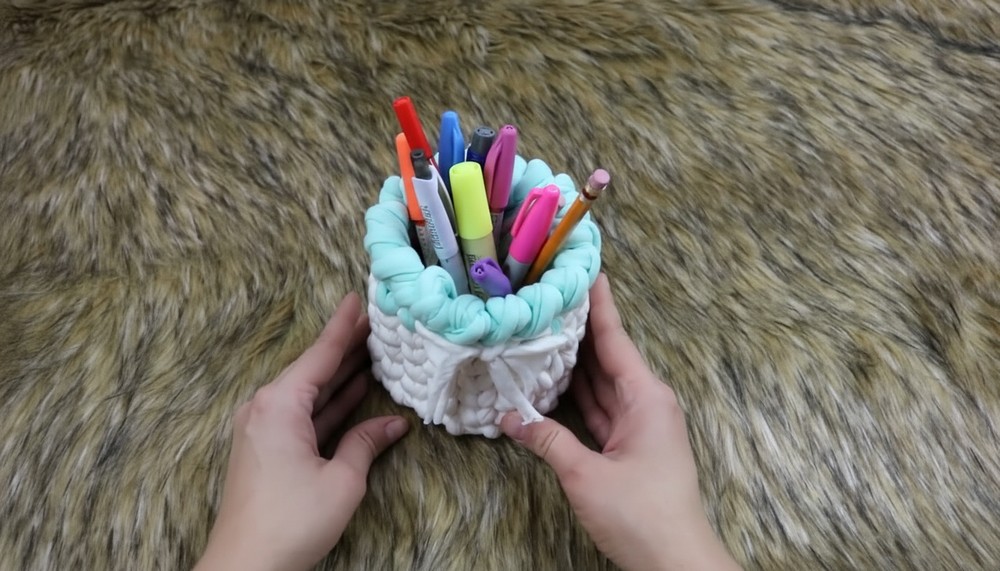
10. Suggestions and Tips for the Pattern
- Size adjustments:
- To make a larger base, continue adding rounds, following the pattern:
- Round 4: 2 centered sc, inc
- Round 5: 3 centered sc, inc
- Round 6: 4 centered sc, inc
- And so on, always increasing evenly.
- The more rounds with increases, the wider the base, and thus the larger the basket.
- To make a larger base, continue adding rounds, following the pattern:
- Use of the basket:
- Ideal for holding crochet hooks, knitting needles, makeup, small toys, keys, or other small household items.
- The T shirt yarn and tight stitches make it firm and sturdy.
- Stitch marker:
- Always use a marker in the first chain of the round; this makes the special closure more accurate and prevents losing the beginning of the round.
- Tension:
- T shirt yarn can be thick and slightly elastic.
- Keep your tension firm but not too tight, so your hands do not get tired and the fabric stays even.
11. Tips to Maintain the Basket
- Cleaning:
- Since it is cotton T shirt yarn, you can usually hand wash the basket in cool water with mild detergent.
- Gently squeeze out excess water, reshape the basket, and let it air dry completely.
- Shape keeping:
- While drying, stuff the basket with towels or paper to help maintain its shape.
- Store it empty or lightly filled so it does not stretch out of form.
- Avoid excessive stretching:
- Do not overload the basket with very heavy items.
- Overloading can deform the sides over time.
- Pilling and lint:
- If small lint balls form, you can gently remove them with scissors or a lint remover.
12. Final Words
This T shirt yarn basket is a practical, fast, and beginner friendly project. The thick, cotton yarn allows the basket to grow quickly, and the centered single crochet creates a neat, stylish texture. With optional color changes and a decorative crab stitch edging, you can customize the basket to suit any room or purpose. By following the step by step instructions above and maintaining consistent stitch count and tension, you will be able to produce a firm, beautiful, and long lasting multipurpose basket.