Learn how to crochet a stunning infinite scarf that combines style and comfort perfect for gifting or keeping warm while staying effortlessly fashionable.

Nothing says cozy and stylish like an infinite scarf, and this free crochet pattern lets you create a timeless accessory that’s perfect for any season. Whether you’re looking to add warmth to chilly winter outfits or a chic touch to breezy fall attire, the versatility of an infinite scarf makes it a wardrobe favorite.

Timeless Crochet Infinite Scarf Pattern You’ll Adore
Crocheted in an endless loop, this scarf offers a modern, seamless style that wraps elegantly around your neck. Not just functional, it’s a statement piece that pairs effortlessly with any outfit.
Perfect for gifts or personal use, this pattern combines comfort, creativity, and style—let’s get started!
Materials Needed
Essential Supplies
- Yarn:
- Cotton-Acrylic Blend: 51% cotton, 49% acrylic yarn in beige (or any color of your choice).
- Yarn weight: Suitable for size 4mm hook (classed as medium/light worsted).
- Approximate amount: 150–200 g, depending on scarf length and fringe size.
- Crochet Hook:
- 4mm hook (G/6 in US terminology).
- Buttons:
- Wooden buttons, 3.5 cm diameter (3 buttons recommended).
- Other Materials:
- Sewing needle and thread (in a matching color) for attaching buttons.
- Stitch markers (or paperclips) to mark important stitches.
- Scissors.
Skill Level
Intermediate to Advanced.
Key Abbreviations
- ch: chain
- sc: single crochet
- dc: double crochet
- dtr: double treble crochet
- sl st: slip stitch
- sp: space
- rep: repeat
Special Notes
- Yarn Tension: Maintain consistent tension for clean rows and even braids.
- Stitch Count: Ensure correct stitch count in each row to achieve a uniform braid alignment.
- Customizations: The width can be adjusted by increasing or decreasing the chain count, ensuring it remains a multiple of 84.
Pattern Instructions
Step 1: Foundation Chains
- Base Chain:
- Start with a slipknot, then chain 28 chains for the width of the scarf. Adjust the width by increasing or decreasing chains, ensuring your chain count is a multiple of 84.

- Start with a slipknot, then chain 28 chains for the width of the scarf. Adjust the width by increasing or decreasing chains, ensuring your chain count is a multiple of 84.
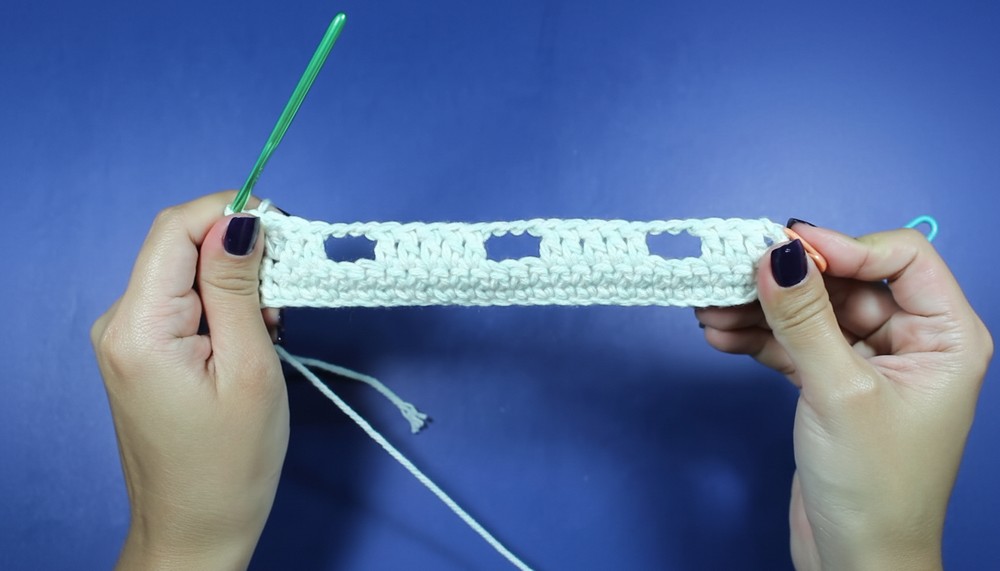
- Row 1 (Single Crochet Foundation):
- Insert the hook into the second chain from the hook and work 1 sc. Place a stitch marker on this first sc.
- Work 1 sc in each chain across the row (total: 27 sc for the sample).
Step 2: Base Rows
- Row 2:
- Ch 1, turn. Work 1 sc into each stitch across the row, marking the first sc to keep track.
- Ensure 27 sc is maintained.
- Row 3:
- Ch 3 (counts as the first dc), turn, and mark the top of the ch-3.
- Work 3 dc in the next three stitches, ch 3, skip 4 stitches of the previous row, and work 5 dc in the next stitch.
- Repeat the sequence of ch 3, skip 4 stitches, and then 5 dc until you reach the end.
- The row ends with 4 dc in the last stitches.
- Row 4:
- Ch 1, turn, and work 1 sc in each stitch across (total: 27 sc).
- Row 5 (High Relief Row):
- Ch 3 (counts as dc), turn. Work 1 dc in each stitch across (total: 27 dc).
- Row 6:
- Work a row of sc to complete the base rows.
Step 3: Braided Design
- Row 7:
- Ch 3 (counts as dc), turn. Work 2 dc in the next stitches.
- Braided Section:
- Yarn over twice, insert the hook behind the fourth dc in the second-to-last row, and work a dtr.
- Continue working dtr stitches behind the second and third dc in the second-to-last row.
- To form the cross-section of the braid, return to the first skipped dc and work a dtr, then work the last dtr at the next stitch.

- Separate braids with 3 dc and repeat a braided design two more times across the row.
- End the row with 3 dc, ensuring symmetry.
- Row 8:
- Work 1 sc in each stitch, starting with a chain, across the row to stabilize the braid.
- Row 9:
- Repeat the braided sequence, alternating relief designs.
- Row 10:
- Work a row of sc.
Step 4: Fringe and Button Details
- Repeat Rows for Length:
- Repeat rows 7–10 for the remainder of the scarf, working 79 repetitions of the braided and sc rows.
- End the scarf with three final rows of single crochet stitches for extra structure.
- Adding Buttons:
- Position buttons on the end with eyelets. Sew buttons into place using thread and sewing needle.
- Buttons should align with the opposite end of the scarf for closures.

- Fringe:
- Cut threads into strips of your desired length for fringes.
- Fold each strip in half and insert into ch-spaces on the braid rows only.
- Skip every other ch-space for a neat appearance.
- Secure each fringe using a lark’s head knot:
- Fold the strip into a U-shape.
- Insert the loop through the space, grab the ends, and pull through the loop.
Tips for Success
- Mark Stitches Carefully: For intricate rows with braids, use stitch markers to track skipped stitches and stitch count.
- Maintain Consistent Tension: Uneven tension can cause puckering or misaligned braids.
- Color Variations: Try a gradient or multiple-color design to highlight the texture of braids.

Conclusion
This beautifully crafted scarf features an intricate braid design framed by soft rows of single crochet. The buttons and fringe add functionality and charm, making this scarf perfect for everyday wear or gifting. Once completed, the scarf is a stunning piece that showcases your skill as an advanced crocheter.
Pattern Variation
- Width:
- For a wider scarf, increase foundation chains by multiples of 84.
- Length:
- Adjust the total number of rows to extend the scarf beyond 79 repetitions.
- Colors:
- Incorporate color transitions in braids for added visual interest. Try a striped pattern or a gradient yarn to enhance the design.