Delight tiny tots with this Crochet Baby Headband Pattern, creating soft, stylish, and charming handmade accessories for little ones.
Delicate accessories have a way of adding charm and personality to even the simplest outfits. A Free Crochet Baby Headband Pattern offers an elegant way to create soft, comfortable, and adorable headpieces that enhance a baby’s look while providing gentle support. These headbands are perfect for everyday wear, photo sessions, special occasions, or as thoughtful gifts for friends and family, instantly adding a touch of sweetness and style.
Grace Crochet Baby Headband Pattern Perfect for All Occasions

Beyond their visual appeal, these baby headbands provide practical benefits. The soft yarn ensures comfort for delicate skin, while the flexible fit allows for gentle wear throughout the day. Lightweight and breathable, they keep little heads comfortable without causing irritation or slipping, making them suitable for babies of all ages. Their versatility allows for customization in colors, sizes, or subtle decorative elements, ensuring each piece reflects personality and style.
Materials Needed
- Yarn: Medium-weight yarn for the headband, scrap yarn for the flower.
- Hook: 5mm crochet hook (or size appropriate for your yarn).
- Notions: Scissors, tapestry needle, stitch markers (optional).
 The fine texture and delicate design give a polished finish that enhances outfits without overpowering them, creating a charming balance between elegance and playfulness. Ideal for enhancing a baby’s wardrobe or adding a personal touch to gifts, these crochet headbands combine beauty, comfort, and versatility in one accessory. Their timeless appeal ensures they remain a cherished part of any little one’s collection.
Step-by-Step Details
1. Gather Materials
- Yarn: Baby B “Stork Struck Mint Charm” yarn (Hobby Lobby) for the headband; yellow and white scrap yarn for the flower.
- Crochet Hook: 5mm size hook (adjust depending on yarn weight).
- Additional Tools: Tapestry needle, scissors, and a small pair of trimming scissors (for neat finishing).
2. Begin with the Headband Base
Step 1: Start by making a slip knot.
- Wrap the yarn around your three fingers and pull the yarn through to create the knot.
2: Chain the foundation row:
- For this baby-sized headband, chain 10 stitches (customizable).
- Add +1 for the turning chain.
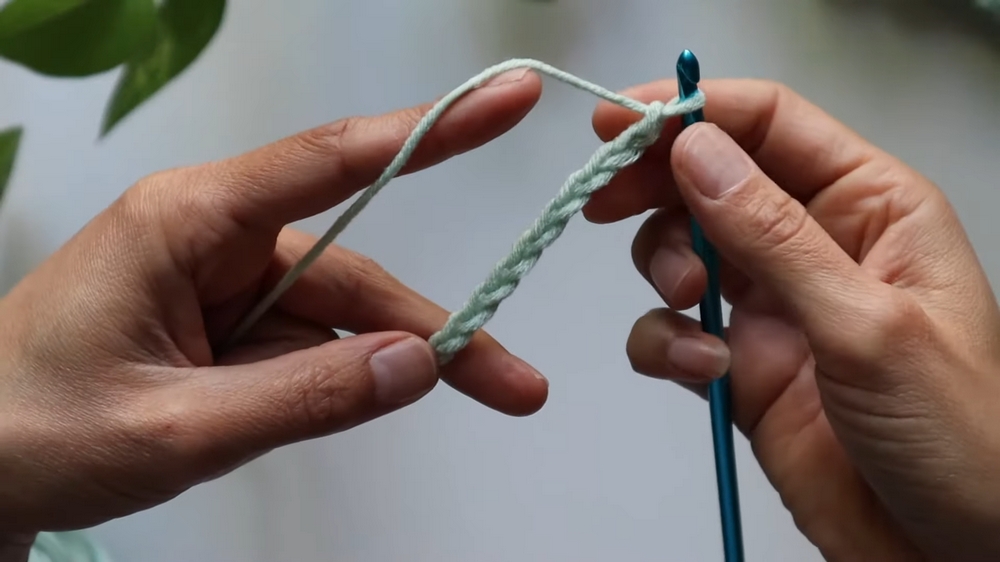
3: Work in a multiple of two plus one for the headband width.
3. Crochet the Foundation Rows
Step 1: After chaining, single crochet into the second chain from the hook.
- Yarn over, pull through, and complete the stitch (two loops on the hook → yarn over, pull through again).
- Chain 1, then skip one stitch, and repeat the single crochet pattern to the end of the row.
2: At the end of the row, turn the work and begin the pattern:
- Row 1: Chain one, single crochet in the first stitch. Repeat chain one and single crochet into each chain space.
4. Create the Puff-Stitch Pattern
Step 1: After completing the foundation row, begin the puff-stitch clusters:
- Chain two at the start of the row (this serves as the first half-double crochet).
- Yarn over, insert your hook into the chain space created in the single-crochet row. Keep pulling up loops until you have 9 loops on the hook.
2: Pull through all nine loops to create a puff cluster, then chain one.

- Work across all chain spaces, forming the puff stitches.
- For the last stitch in the row: Half-double crochet into the last stitch to complete the row.
5. Alternating Rows
Continue alternating between single crochet rows (chain 1, single crochet into chain spaces) and puff-stitch rows (chain 2, puff stitches across chain spaces).
- Adjust the length of the headband by adding or reducing rows based on the recipient’s head size (12 inches for a baby, longer for older children or adults).
6. Finish the Headband Base
- End with a single-crochet row for a polished edge.
- Leave a 12-15 inch yarn tail to sew the ends together with a whip stitch.
- Use a tapestry needle to stitch along the edges and secure the base of the headband.

7. Create the Flower Embellishment
Step 1: Make a Magic Ring
- Create a magic ring with yellow yarn.
- Chain 1, then work 5 half-double crochets into the ring.
- Pull the tail to tighten the magic loop, then slip stitch to the first stitch to close the circle.
2: Add the Petals
- Switch to white yarn for the petals.
- In each space of the magic ring, work the following sequence:
- Chain 4, 2 triple crochets into the same stitch, chain 4, slip stitch into the same space.
- Repeat this sequence 6-8 times to create your customized flower (total number of petals is up to your preference).
3: Secure and Neaten
- Leave a long yarn tail to sew the flower onto the headband. Use the long tails of both the yellow and white yarn to securely attach the flower to cover the seam of the headband.
- Tuck all loose ends inside using a tapestry needle for a clean finish.

Special Features
- Customizable Size: The headband and flower can be made in varying widths and lengths to fit anyone, from infants to adults.
- Textured Puff-Stitch Design: The alternating rows of single crochets and puff stitches create a beautiful, stretchy, textured look.
- Quick & Easy Gift: This project works up fast, making it an excellent go-to gift idea for baby showers or special occasions.
- Adorable Flower Add-On: The flower embellishment is a creative way to elevate the look of the headband and can be adapted for other crochet projects.
Level of Difficulty
This project is beginner-friendly, but it also introduces intermediate techniques like puff stitches, magic rings, and stitch alignment, making it perfect for those looking to expand their skills. The guidance in the tutorial makes it easy to follow along, even for first-timers.
Tutor’s Suggestions
- Stay Loose: Keep your tension loose when working the puff stitches to ensure they fluff out beautifully.
- Customize to Fit: Adjust the number of rows for the headband length or the number of petals on the flower for personalization.
- Use Scrap Yarn: The flower embellishment is a great way to use up leftover yarn from other projects.
- Practice Puff Stitches: If you’re new to puff stitches, try practicing them on a small swatch first.
Uses
- A stylish and comfortable hair accessory for babies and children.
- Perfect as a handmade gift for baby showers or birthdays.
- Can double as a photography prop for infants or young children.
Tip
When adding the flower, secure it with more stitches than you think are necessary. This prevents it from shifting or coming loose over time, especially since the headband may experience frequent handling.
Conclusion
The baby headband with a puff-stitch flower is a charming and versatile project that beginners and experienced crocheters alike will enjoy. With simple materials and step-by-step guidance, you can create a beautiful handmade item in no time. Its customizable size and decorative flower make it the perfect accessory or gift for any special occasion.