Use this free crochet rose top pattern to make a lightweight and gorgeous shirt with petals that look uniquely stylish for any occasion.
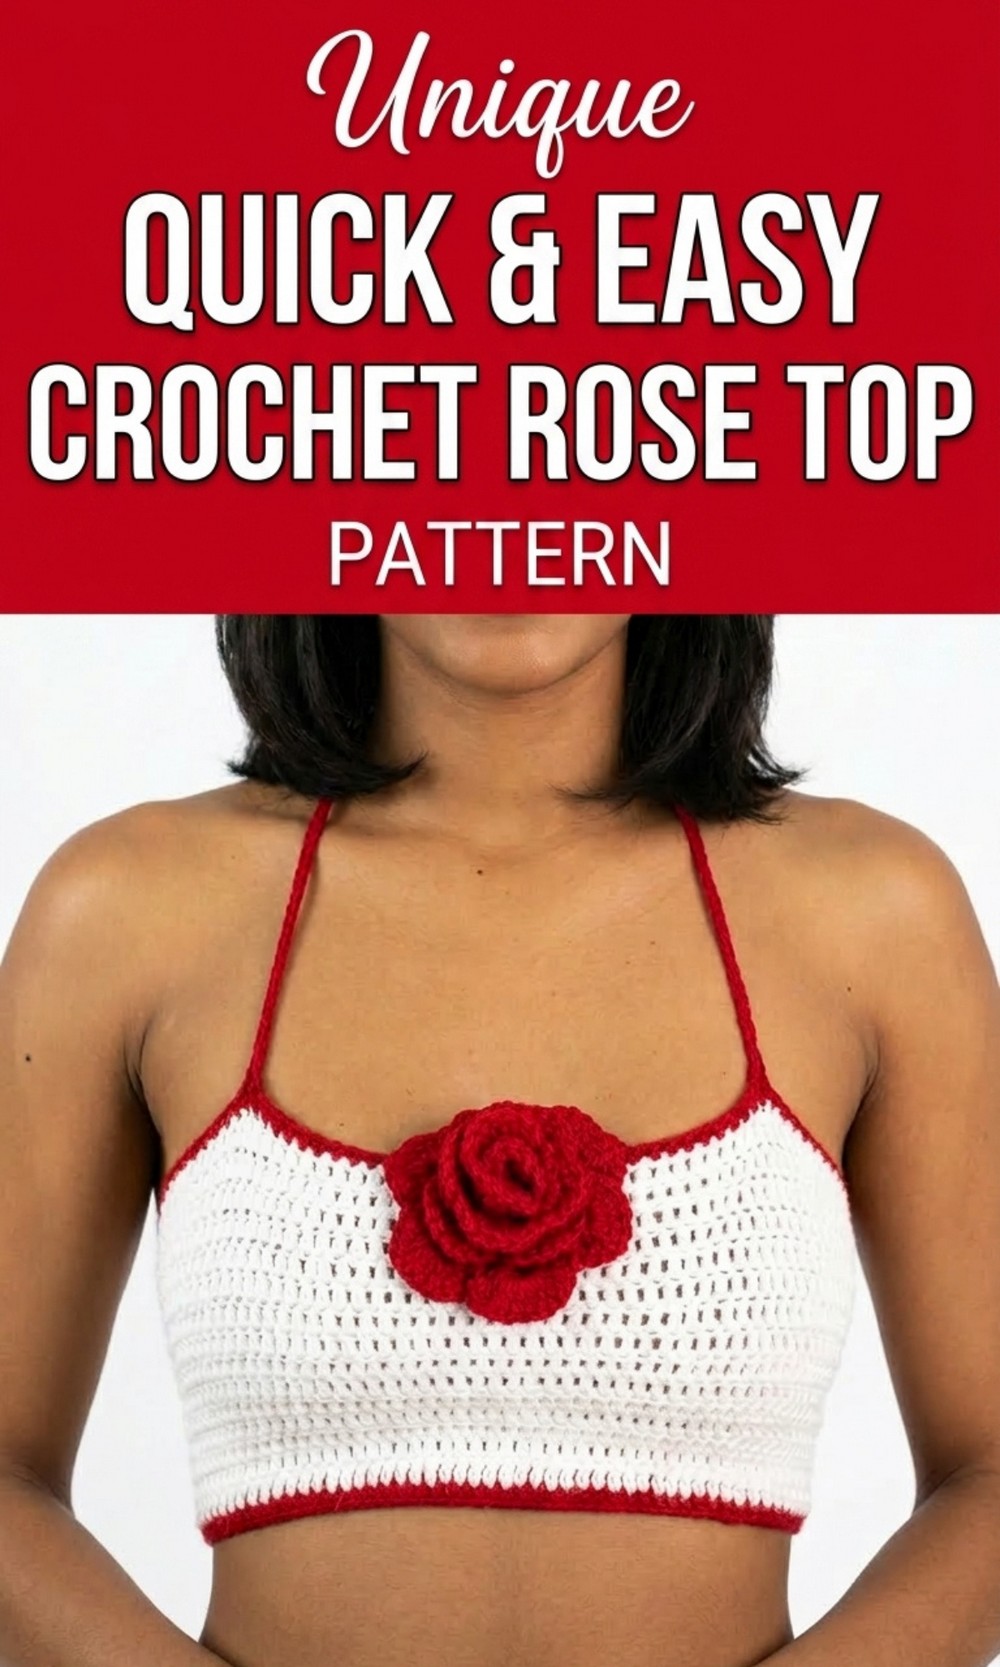
This Free Crochet Rose Top Pattern Will Be Your Summer Essential
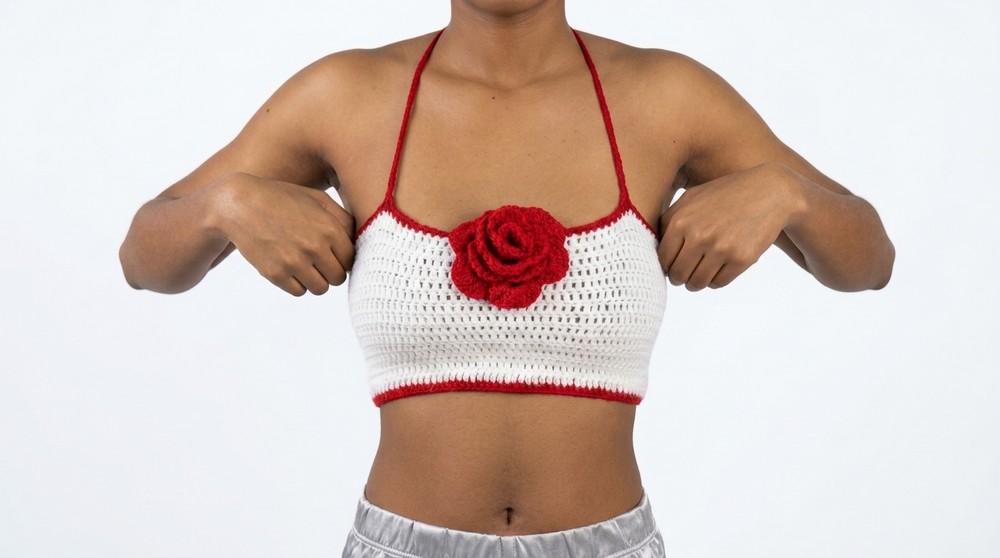
Surprise your friends with a stunning outfit by wearing a beautiful flower inspired top with this Free Crochet Rose Top Pattern. This gorgeous project transforms into a soft, oversized rose you can wear as a stylish and unique top for any sunny day. The beauty lies in the delicately layered petals that wrap around to give you an elegant and sophisticated look. Featuring thin, comfortable straps, this charming rose top provides a perfect fit that stays secure as you walk, dance, or twirl.
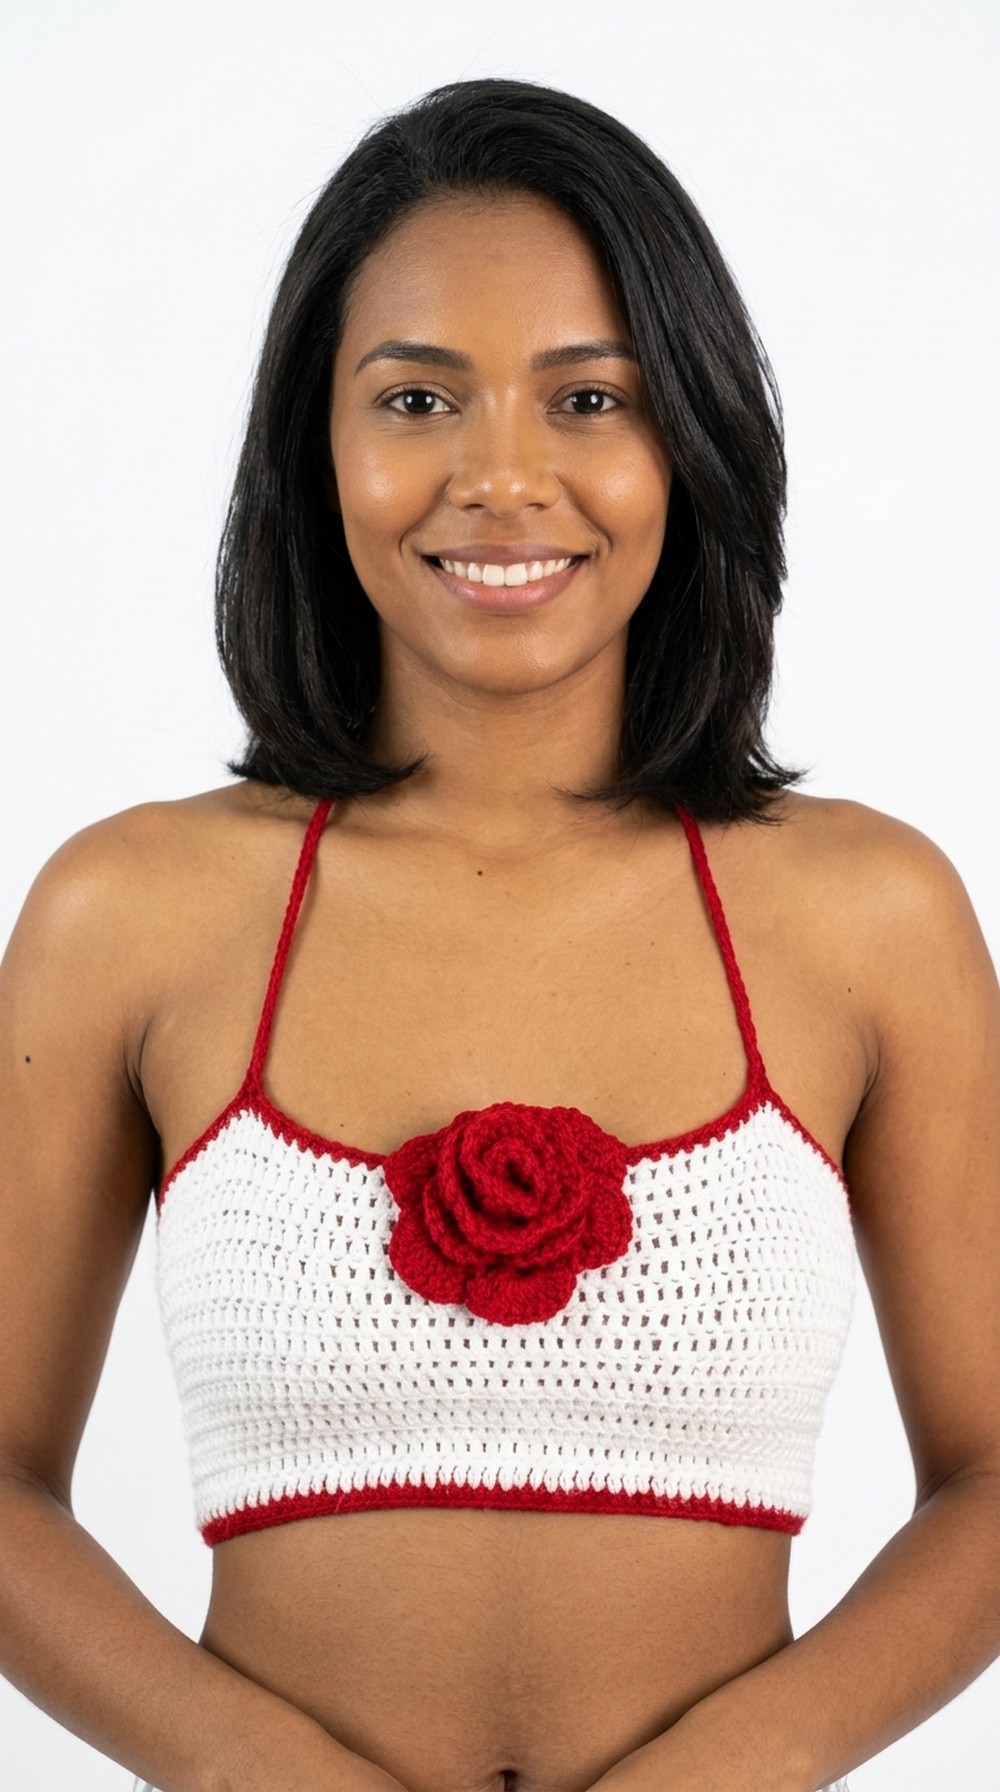
Perfect for parties, sunny outings, or even layered over a dress for school, this wearable piece is certain to turn heads. Its breathtaking 3D flower shape makes it look like a luxurious, high end boutique centerpiece.
Completing this fun and satisfying project will leave you with a one of a kind top that shows off your talent and personality in the most fashionable way possible.
Stylish Crochet Rose Top Pattern
1. Materials
- Yarn: 100% acrylic DK (double knit) yarn
- Main color: White
- Contrast color: Wine / dark red / cherry red (for edges and rose)
- Crochet hooks:
- 3.5 mm hook for the top
- 5 mm hook for the rose (you may use 4.5 mm for a smaller rose)
- Tapestry (yarn) needle for weaving in ends and sewing the rose
- Scissors
- Measuring tape
- Stitch markers (optional, useful for marking strap placement)
2. Measurements
You will need two basic measurements:
- Bust width for the top panel
- Measure around your bust where you want the top to sit,
- Do not include the part that will be laced up at the back.
- Leave a gap at the back so that the top can be tightened with crisscross straps.
- Bust height
- Measure from where you want the top to start (top edge) down to where you want it to end (bottom edge).
- You can adjust the height while crocheting by trying the panel on your body.
3. Gauge and Sizing Notes
- The video transcription uses:
- A starting chain of 100 + 2 for the base (for the specific bust size in the video).
- You can adjust:
- Width by increasing or decreasing the starting chain.
- Height by working more or fewer rows of double crochet before the final contrast color rows.
Because no exact gauge is provided, it is recommended to:
- Make a small swatch of double crochet with your yarn and hook.
- Measure how many stitches fit into 10 cm (4 in).
- Adjust your starting chain to match your bust measurement, minus some centimeters for the laced back gap.
4. Abbreviations (US Terms)
- ch = chain
- st = stitch
- sl st = slip stitch
- sc = single crochet
- hdc = half double crochet
- dc = double crochet
- RS = right side
- WS = wrong side
5. Special Techniques
- Color change at the end of a stitch
- When instructed to change color, work the last stitch of the row until the last yarn over,
- Yarn over with the new color and pull through to complete the stitch,
- Continue with the new color.
- Weaving in as you go
- When attaching a new color, the yarn tails can be held along the top of the stitches and crocheted over to secure them.
- Lace up back straps
- Long chains are used as straps that crisscross through the back edge of the top, using spaces between rows as “eyelets”.
PART A – Main Top Panel
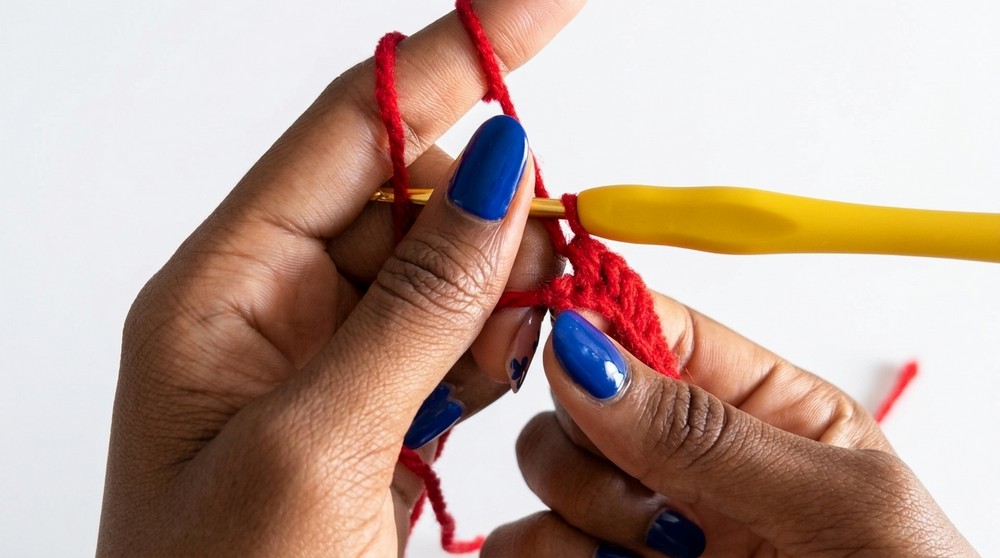
Step 1: Foundation Row (Contrast Color – Red)
- With contrast color (red), make a slip knot.
- Ch 100 + 2 (100 for the body + 2 turning chains).
- Skip the first 2 ch (these do not count as a stitch).
- Work 1 hdc in the 3rd ch from the hook.
- Work 1 hdc in each ch across the row.
- You should end with 100 hdc (for the given size).
This first row of hdc is more stable and less stretchy than a simple foundation chain, which helps the top hold its shape.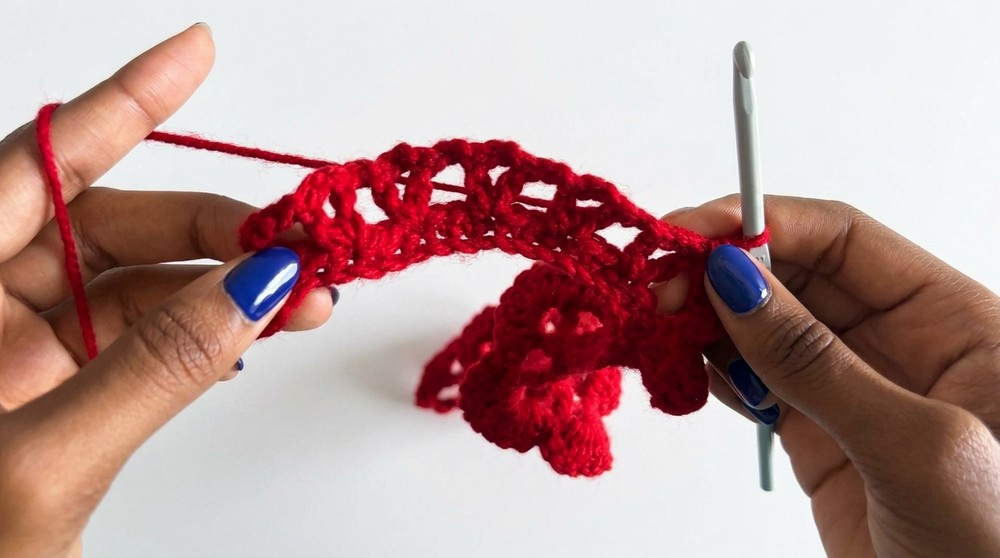
Step 2: Attach Main Color (White) and Begin Body
- You will have 1 chain left at the end of the red row (or simply be at the last stitch).
- Work the last hdc but do not complete the final yarn over.
- Drop the red yarn and pick up the white yarn.
- Yarn over with white and pull through to complete the hdc.
- Now work with white.
Row 1 (White):
- Ch 2, turn.
- The ch 2 does not count as a stitch.
- Work 1 dc in each stitch across the row.
Row 2 and onward (White):
- Ch 2, turn (ch 2 does not count as a stitch).
- Work 1 dc in each st across.
Continue repeating this dc row until you reach your desired bust height.
- In the transcription, she worked a total of 15 rows of dc in white.
- You can try the top on as you go by holding it against your body to check the height and coverage.
- To make it longer, simply add more rows of double crochet in white.
Step 3: Final Row in Contrast Color (Red)
When you are satisfied with the length:
- At the last dc of the final white row, work the dc but do not complete the final yarn over.
- Attach your red yarn as before: yarn over with red and pull through to finish the stitch.
Now the top will have a red band at the bottom.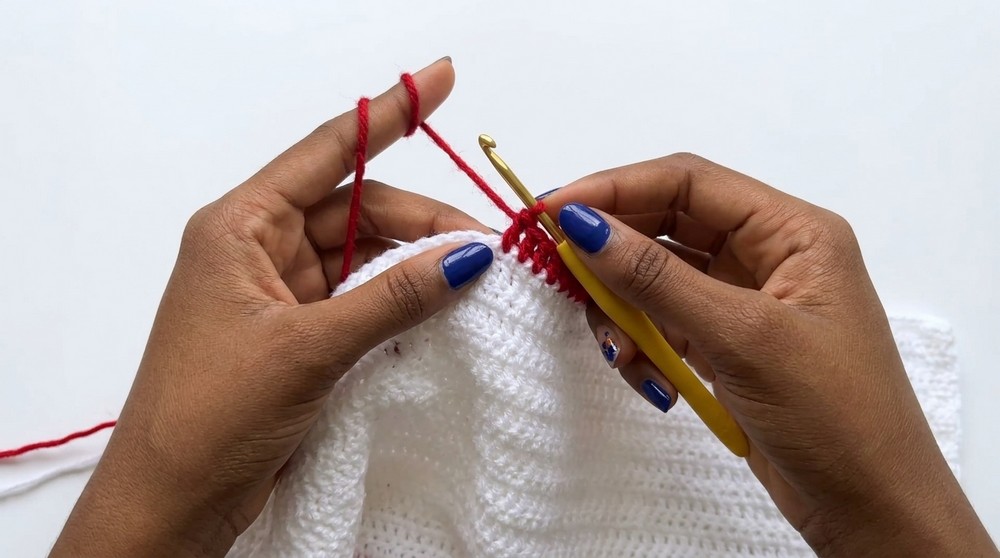
Final Row (Red, Hdc):
- Ch 1, turn.
- Work 1 hdc in each stitch across.
- Before fastening off, the designer suggests trying on the top to ensure the length and fit are satisfactory.
- Do not fasten off if you will use this yarn to begin the long back strap.
PART B – Straps and Back Lacing
There are two types of straps:
- Long back strap that crisscrosses.
- Two front straps that go over the shoulders.
Placement of straps can be adjusted. Stitch markers help mark locations.
1. Back Lacing Strap
You can use the red yarn at the edge of the top (after the last hdc row):
- From the corner of the back edge, ch a very long chain (the example used 200 chains, which was longer than necessary for her size).
- You may leave it as a simple chain or slip stitch back along the chain for a thicker cord, but in the transcription she does not do this for the back strap.
- Fasten off and leave a tail to weave in.
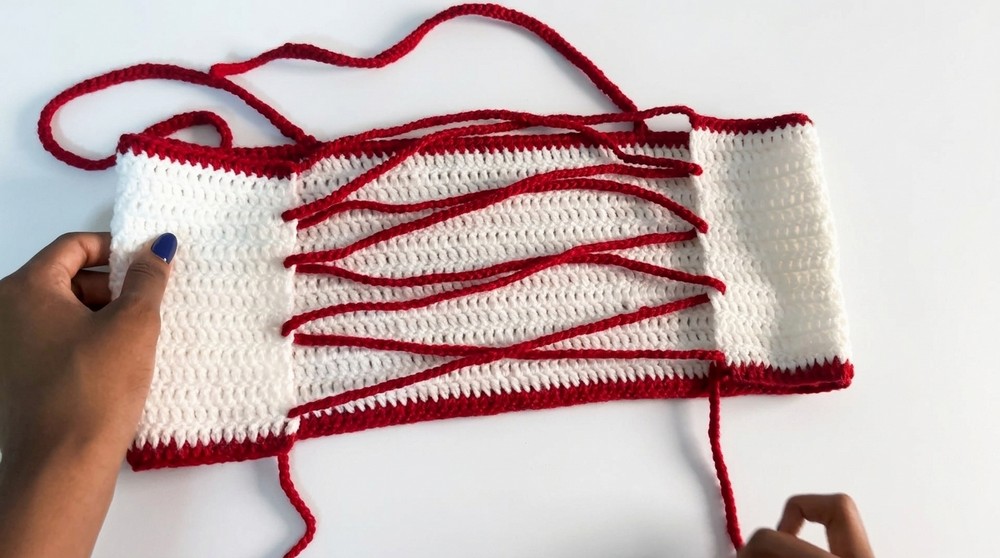
You will later weave this long chain through the back edge of the top in a crisscross fashion.
2. Front Shoulder Straps
The top has two front straps.
- With the top laid flat, put it on or hold against your bust and mark where you want the straps to attach at the front with stitch markers.
For each front strap:
- Attach red yarn at the marked stitch (front top edge).
- Secure it by tying a double knot if needed.
- Ch 71 for the strap length (for shorter straps, make fewer chains; for longer, make more).
- Turn; skip the first ch from the hook.
- Sl st into the second ch from the hook.
- Sl st in each ch down to the start.
- This makes a flat, sturdier strap.
- Attach the end of the strap to the top with a sl st either in the same stitch you started from or the next one on the top edge.
- Ch 1 and fasten off.
- Weave in ends if desired.
Repeat for the other front strap.
3. Second Back Lacing Strap
For the second back strap:
- Attach red yarn at the other back corner where you want the second lace strap.
- Secure the yarn.
- Ch a long chain again (similar length to the first back strap) to allow it to crisscross.
- Fasten off and weave in the starting tail if needed.
Crisscrossing the back straps:
- Along the back edge of the top, you will use the spaces at the ends of double crochet rows as “eyelets”.
- Using your hook (or your fingers), weave one strap in and out of the spaces across the back.
- Do the same from the opposite side with the second strap.
- Arrange them so the two straps crisscross neatly in the center of the back.
Tightening or loosening these laces will adjust the fit of the top.
PART C – Rose Appliqué
The rose is worked following Little John Yarns’ method. The transcription describes it as a large rose with three sets of petals (6 petal, 9 petal, and 12 petal sections).
You may adjust hook size and yarn weight for a smaller rose.
1. Rose Materials
- Contrast color yarn (red/wine).
- 5 mm hook (or 4.5 mm for a smaller rose).
- Tapestry needle for sewing.
2. Rose – Base Strip
- With red yarn, ch 59.
- Row 1:
- Skip the first ch,
- Sc in the second ch from the hook,
- Sc in each ch to the end.
- Row 2 (V stitches and chain spaces):
- Ch 5, turn.
- This counts as: dc + ch 2.
- Skip the first 2 sts.
- In the next st, work: dc, ch 2, dc (this forms a V stitch: dc, ch 2, dc in the same stitch).
- Ch 2, skip 2 sts, in the third st work: dc, ch 2, dc (V stitch).
- Repeat this sequence (ch 2, skip 2 sts, V stitch) across until you end with a total of 18 V stitches.
- After 18 V stitches, work 1 dc in the last stitch of the row.
- Ch 5, turn.
You should now have a strip with 18 V stitches separated by ch‑2 spaces and one dc at each end.
3. Rose – Petal Row
This row forms the petals by working different numbers of double crochets into each V stitch.
- Ch 1, turn.
- In each space or non‑V‑stitch area (the ch‑2 spaces between V stitches), you will work 1 sc.
- The 18 V stitches are divided into 3 groups of 6:
- First 6 V stitches: 6 dc in each V.
- Next 6 V stitches: 9 dc in each V.
- Last 6 V stitches: 12 dc in each V.
Detailed Pattern:
- First group (V stitches 1–6):
- In the first V stitch: work 6 dc into the V (into the space of the V).
- In the next ch‑2 space between V stitches, work 1 sc.
- Repeat 6 dc in the next V stitch, then sc in the ch‑2 space.
- Continue until you have worked 6 V stitches with 6 dc in each.
- Second group (V stitches 7–12):
- In each of the next 6 V stitches, work 9 dc.
- Work 1 sc in each ch‑2 space between them.
- Third group (V stitches 13–18):
- In each of the last 6 V stitches, work 12 dc.
- Work 1 sc in each ch‑2 space between them.
- At the end, work 1 sc, ch 1 and fasten off the working yarn.
This creates a long, ruffled strip of petals that will be rolled into a rose.
4. Rolling and Sewing the Rose
- On the side of the strip where there is no tail, attach a new length of yarn (same color) that will be used for sewing the rose together.
- Attach it securely and leave a long tail still attached to the ball.
- Weave in any short loose tails first if needed.
- Leave a long tail (cut the yarn from the ball but leave enough length) so you can sew from this end.
Forming the rose:
- Identify which side you want as the outside (petal side) and which is the inside.
- Start at one end and roll the strip in a spiral, forming the rose shape.
- Roll a bit, then sew; roll more, then sew, and so on.
- Using your tapestry needle and the long tail, sew through the base of the petals and through the layers of the rolled strip to secure.
- Work all around the base until the rose feels firm and does not fall apart.
- Weave in or trim any leftover ends.
5. Attaching the Rose to the Top
- Place the finished top flat.
- Position the rose where you prefer:
- Center front,
- Side,
- Or another spot that suits your look.
- Use pins or simply hold the rose in place.
- Thread a tapestry needle with matching yarn.
- From the inside of the top, bring the needle through to the base of the rose.
- Sew the rose securely:
- Insert the needle through the base of the rose and then back into the top,
- Repeat this several times around the base, catching different petals to keep it stable.
- Check that the rose is not wobbly and is firmly attached.
- When satisfied, weave in the yarn on the inside of the top and cut the excess.
Finishing the Top
- Weave in all loose ends
- On the inside of the top, use the tapestry needle to weave each yarn tail back and forth through the stitches to secure.
- Check straps and laces
- Make sure the front straps are equal length and firmly attached.
- Check that the back lacing is correctly crisscrossed and long enough to tie comfortably.
- Try on the top
- Put the top on and adjust the laces at the back for a snug fit.
- Ensure that the bust coverage is satisfactory and the straps sit comfortably on the shoulders.
- Block lightly if desired
- Since the yarn is acrylic, you can very lightly steam block (without touching the iron/steamer directly to the yarn) or lay flat and shape with hands.
Suggestions, Tips, and Care
Pattern Suggestions
- For a larger bust, increase the starting chain (in multiples that keep your stitch count comfortable for the strap placement) and add more rows of dc.
- For a smaller bust, decrease the starting chain and work fewer rows.
- You may make the top less cropped by adding more rows before the final red hdc row.
Working Tips
- Always remember that the ch 2 at the beginning of each dc row does not count as a stitch.
- Count stitches occasionally to ensure the panel remains straight and does not narrow or widen unintentionally.
- Try the top on at least twice:
- Once after a few rows of white to check width and height.
- Once before working the final red hdc row to adjust length.
Care and Maintenance
- Hand wash or gentle machine wash in cool water if your acrylic yarn allows.
- Do not use very high heat when drying or ironing; acrylic can melt or deform.
- Lay flat to dry to keep the shape and prevent stretching.
- Store the top folded rather than hanging to avoid stretching out the straps and lace.
- Check the rose occasionally to make sure it remains securely attached; if it loosens, add a few extra stitches with matching yarn.
Final Words
This rose crop top combines a simple, rectangular body with elegant straps, a laced back, and a bold rose appliqué. The body is straightforward, using half double and double crochet stitches, making it approachable even for confident beginners. The rose adds a special focal point and can be customized in size and color to suit your personal style. With careful measuring, patient stitching, and secure finishing, the finished top will be both beautiful and durable, ready to wear for many occasions.