Bring festive joy to your crochet time with this free crochet Hello Kitty Christmas pattern that lets you create a cute and cozy holiday piece for decor or gifts.
Fun Free Crochet Hello Kitty Christmas Pattern That’s Fun and Easy
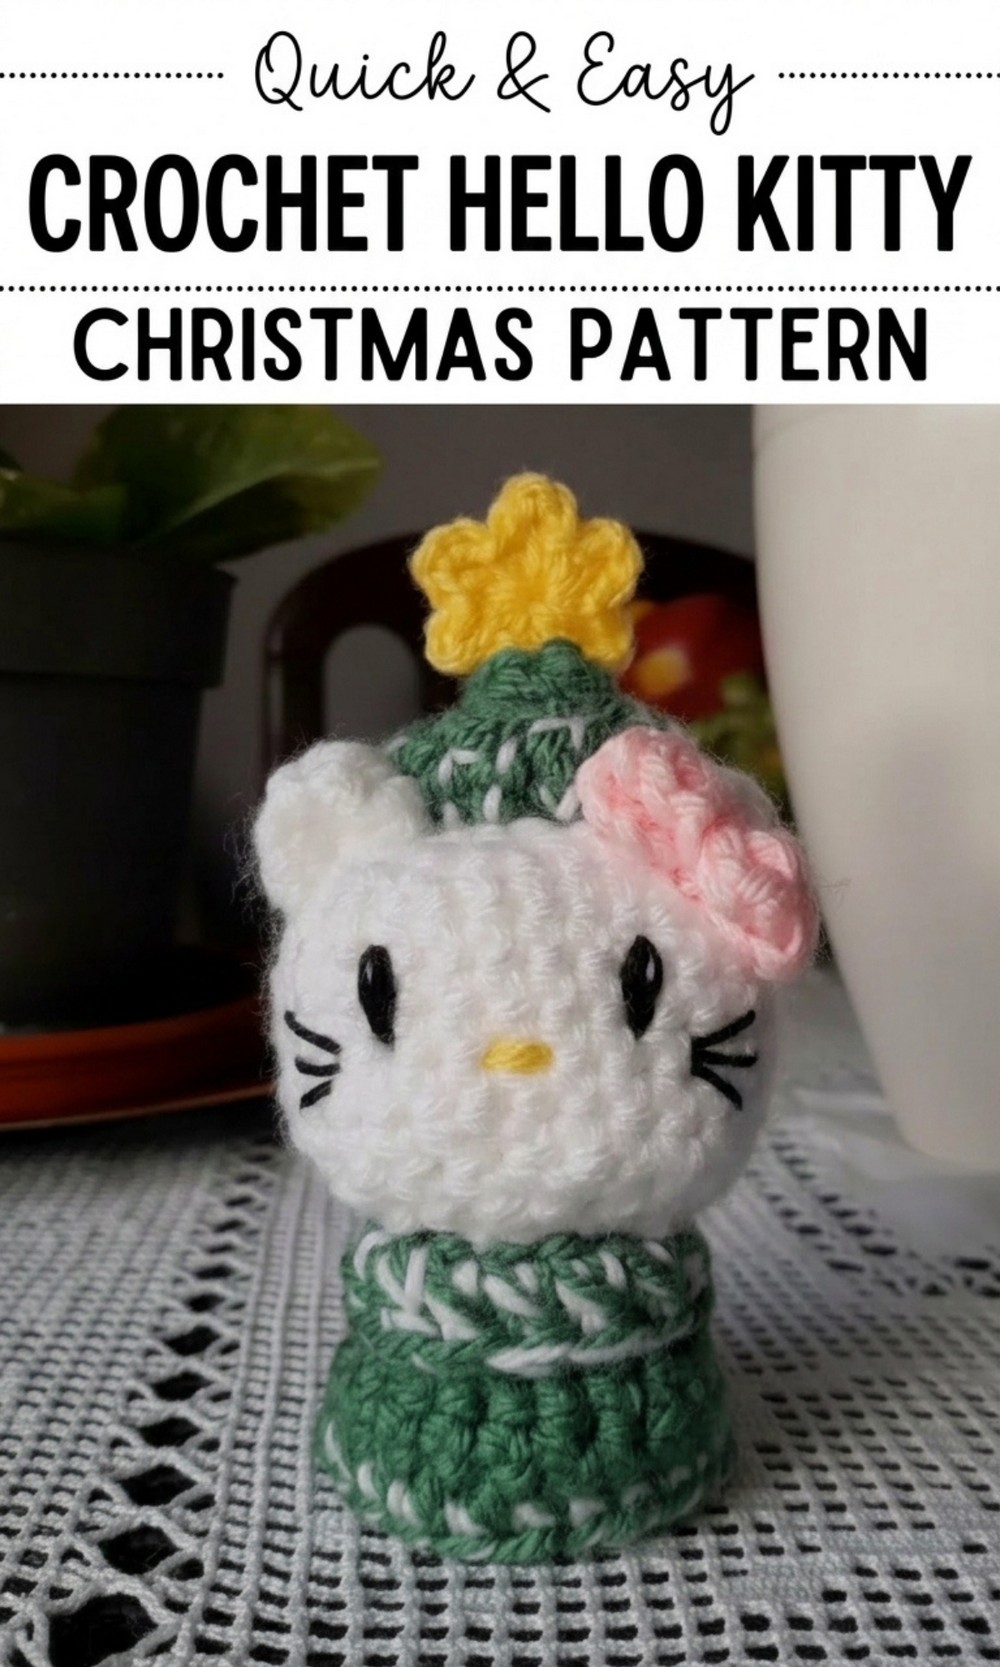
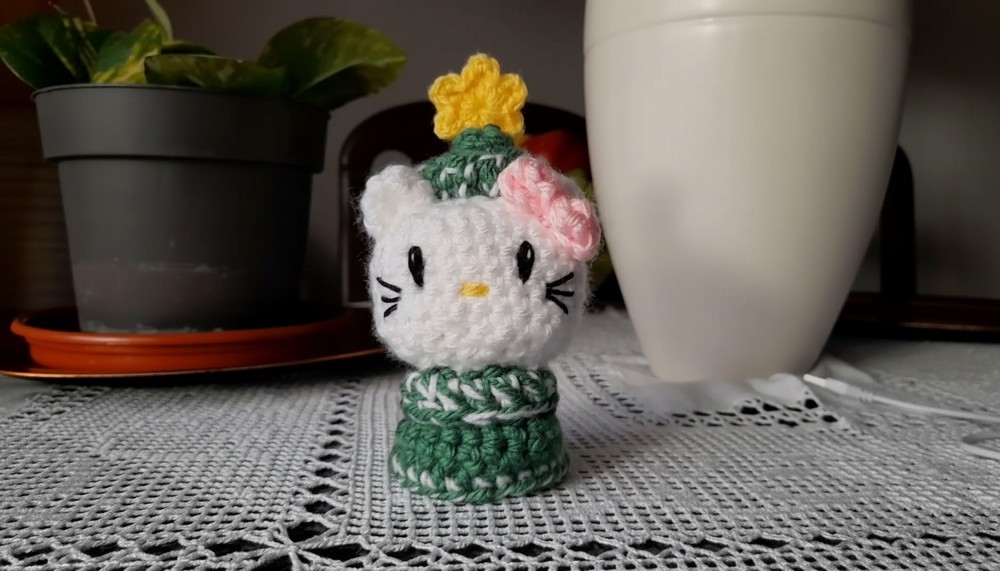
Make something fun and festive with the Free Crochet Hello Kitty Christmas Pattern, perfect for spreading holiday cheer. This pattern brings Hello Kitty to life with her signature bow, cute ears, and tiny whiskers, making her even more adorable with a bright Christmas tree hat.
The tree features a snow lined design, giving it a magical holiday look, and is topped with a little star for extra charm. It’s easy to follow, starting with simple stitches and building up in fun steps like making the head, sewing the ears, and adding details like the eyes and nose.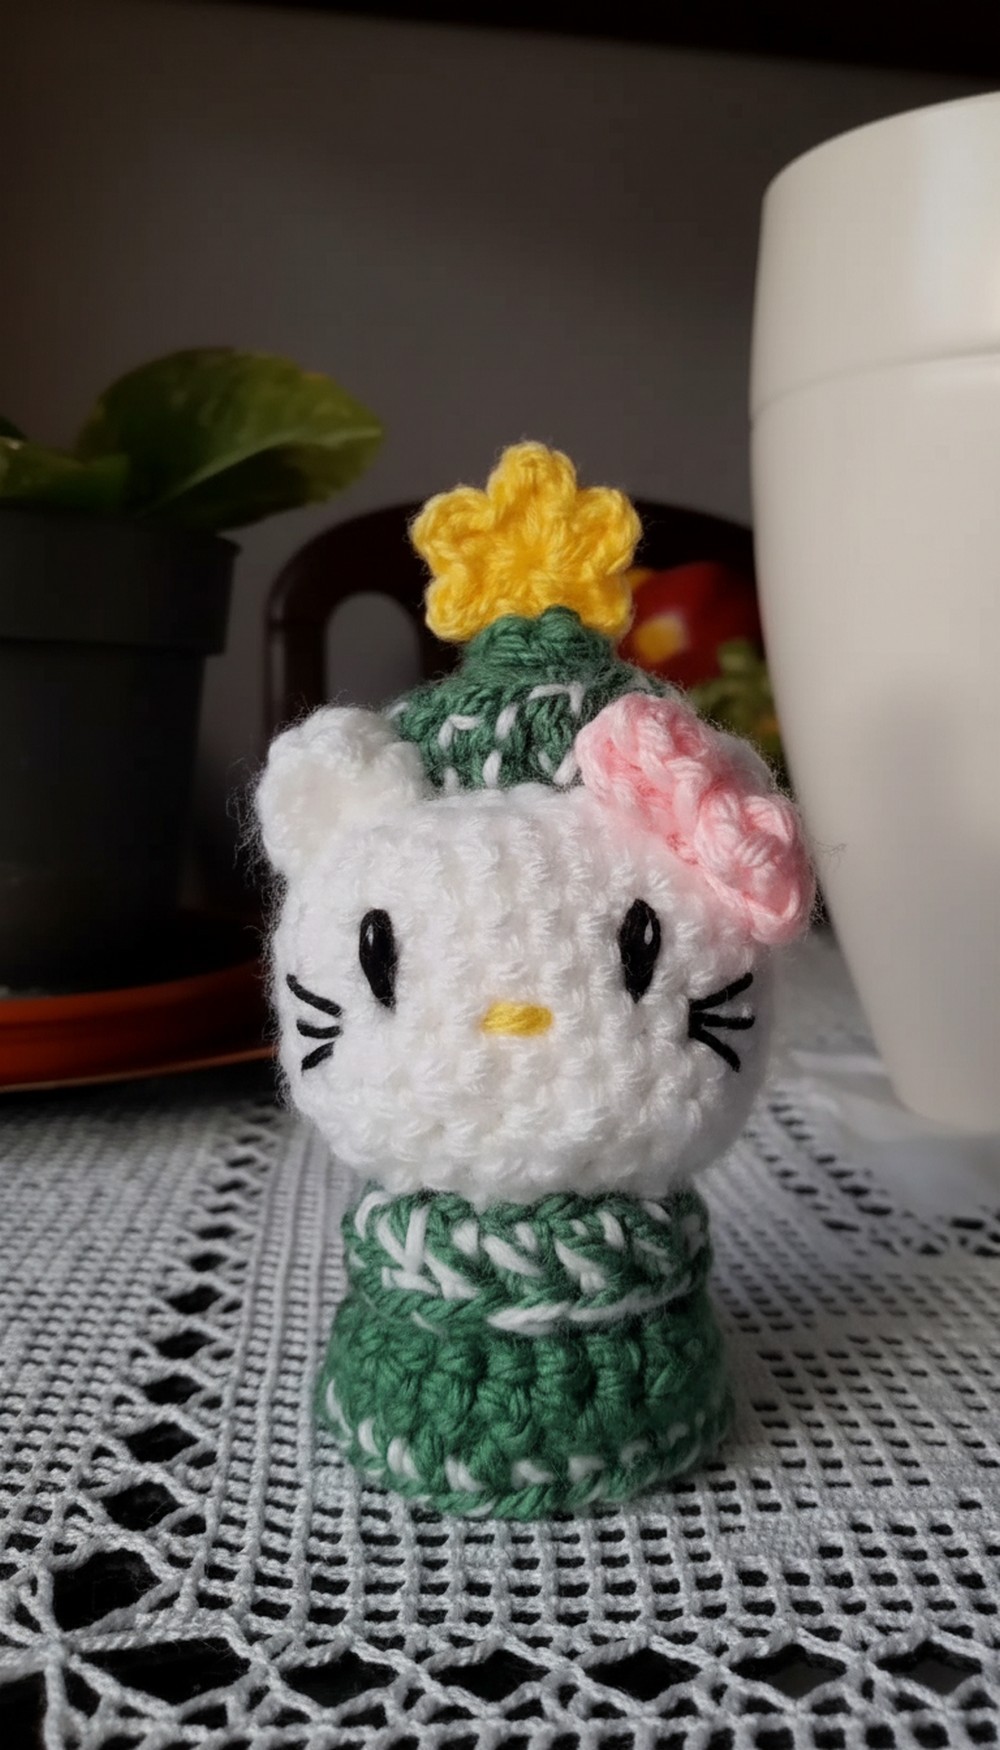
This pattern is great for decorating your home or giving a heartfelt handmade gift. You can also get creative by using leftover yarns for stuffing and adjusting colors. Children and adults alike will love how fun and playful this Hello Kitty project looks.
Crochet Hello Kitty Christmas Pattern
Materials Needed
- Yarn:
- Main colors: Green and white (for the Christmas tree hat).
- Additional colors: Yellow (for the star), red (for the bow), and black/any dark yarn for Hello Kitty’s eyes.
- Scarp yarn or fiberfill for stuffing.
- Crochet Hook: Size appropriate for the yarn used (typically 3.5–5 mm).
- Stitch Markers: To keep track of rounds.
- Yarn Needle: For sewing and finishing details.
- Scissors.
- Optional: Glue (for securing details or attaching parts).
Special Techniques
- Magic Ring: A tight, adjustable loop for the base.
- Single Crochet (sc): Basic crochet stitch.
- Double Crochet (dc): Taller stitch for smooth pattern decoration.
- Increase (inc): Work two stitches into the same stitch.
- Decrease (dec): Combine two stitches into one.
- Working in the Front Loop Only: To create lines for decoration.
- Stuffing: Using leftover yarn or fiberfill to give shape to 3D objects.
Step by Step Instructions
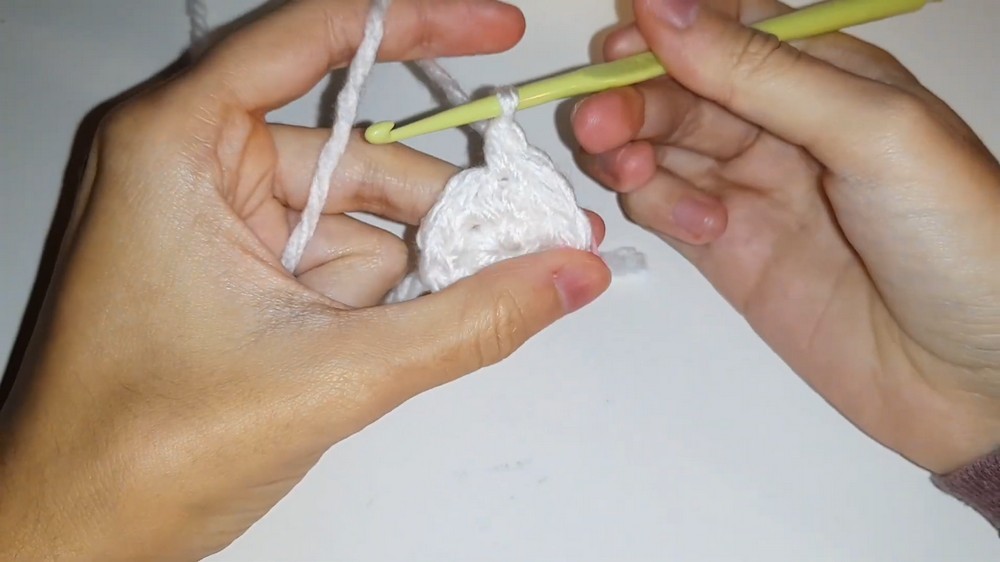
Part 1: Hello Kitty Head
- Foundation Round:
- Create a magic ring and crochet 6 single crochets into it.
- Tighten the ring and place a stitch marker in the last stitch.
- Round 1:
- Increase in each stitch. Work 2 single crochets (sc) into every stitch.
- Total: 12 stitches.
- Round 2:
- Alternate 1 single crochet and 1 increase.
- Continue around.
- Total: 18 stitches.
- Round 3:
- Work 1 single crochet in the first two stitches and 1 increase in the third stitch.
- Continue this pattern around.
- Total: 24 stitches.
- Round 4:
- Make 1 single crochet in the first three stitches, then an increase in the fourth stitch.
- Repeat around.
- Total: 30 stitches.
- Rounds 5–9:
- Make 1 single crochet in each stitch.
- Total: 30 stitches per row. Complete 5 rounds
- Round 10:
- Crochet 1 single crochet in the first three stitches, then 1 decrease (combine the next two stitches into one).
- Total: 24 stitches.
- Round 11:
- Alternate 1 single crochet and 1 decrease.
- Total: 18 stitches.
- Round 12:
- Alternate 1 single crochet and 1 decrease.
- Total: 12 stitches.
- Round 13 (Finishing):
- Decrease into every stitch until the opening is closed.
- Chain 2 and secure the yarn.

- Stuffing:
- Use scrap yarn, fiberfill, or leftover yarn to stuff the head. Shape it firmly but without stretching the stitches.
Part 2: Hello Kitty Features
- Eyes, Nose, and Whiskers:
- Use black yarn for the eyes (embroider small ovals).
- Use yellow yarn for the nose (embroider a small horizontal oval).
- Use black yarn for the whiskers (embroider three horizontal lines on each side).
- Ears:
a. Foundation Row:- Make a magic ring and crochet 4 single crochets (sc) into it. Tighten the ring.
b. Round 1: - Increase in alternating stitches:
- Work 1 single crochet in the first, increase in the second, 1 single crochet in the third, and increase in the fourth stitch.
- Total: 6 stitches.
c. Round 2: - Alternate 1 single crochet and 1 increase around the row.
- Total: 9 stitches.
d. Fold and Secure: - Pinch the ear, sew it into a triangle shape, and attach it symmetrically to the head using the remaining yarn.
- Make a magic ring and crochet 4 single crochets (sc) into it. Tighten the ring.
Part 3: Bow Pattern
- Foundation:
- Create a magic ring, chain 3, and work 2 double crochets (dc) into the ring.
- Middle:
- Chain 3 again and make a slip stitch into the ring.
- Repeat:
- Chain 3, work 2 double crochets into the ring, chain 3, and slip stitch.

- Chain 3, work 2 double crochets into the ring, chain 3, and slip stitch.
- Tighten the Ring:
- Pull the yarn end to close the bow.
- Attach:
- Secure the bow between Hello Kitty’s ears with glue or the remaining yarn.
Part 4: Christmas Tree Hat
- Foundation Round:
- Start with a magic ring and crochet 6 single crochets (sc) into the ring.
- Round 1:
- Work 1 single crochet in each stitch.
- Total: 6 stitches.
- Round 2:
- Crochet 1 single crochet in the first stitch and 1 increase in the second.
- Repeat this pattern all the way around.
- Total: 9 stitches.
- Round 3:
- Work 2 single crochets and 1 increase (in the third stitch).
- Repeat the pattern.
- Total: 12 stitches.
- Increase Rounds:
- Continue alternating between single crochets and increases, growing the tree’s base naturally:
- 3 single crochets, then increase → 15 stitches.
- 4 single crochets, then increase → 18 stitches.
- 5 single crochets, then increase → 21 stitches.
- Continue alternating between single crochets and increases, growing the tree’s base naturally:
- Front Loop Decoration:
- Work 1 single crochet in each stitch using only the front loops where visible lines are created.
Part 5: Star and Final Decoration
- Star:
- Make a magic ring. Inside the ring, alternate between double crochets and single crochets to create a 5 pointed star (5 sides). Pull the yarn tightly to shape it.
- Attach it securely to the top of the tree.
- Attaching to Head:
- Fold the bottom part of the tree inward to create a wider base. Attach the tree securely to Hello Kitty’s head using glue or sewing.
- Fold the bottom part of the tree inward to create a wider base. Attach the tree securely to Hello Kitty’s head using glue or sewing.
Final Words
This festive crochet project combines creativity and fun, making a personalized Christmas decoration or gift. The pattern is structured to be beginner friendly, but intermediate crocheters can enhance it with their personal touches. If you enjoyed this design, feel free to explore additional variations like adding beads or embroidery to the Christmas tree.
Tips for Maintaining Your Crochet
- Cleaning: Hand wash with mild soap. Let it air dry flat to preserve shape.
- Storage: Store in a clean, dry space to avoid stretching or fading.
- Customizing: Choose colors and embellishments that match your holiday theme.