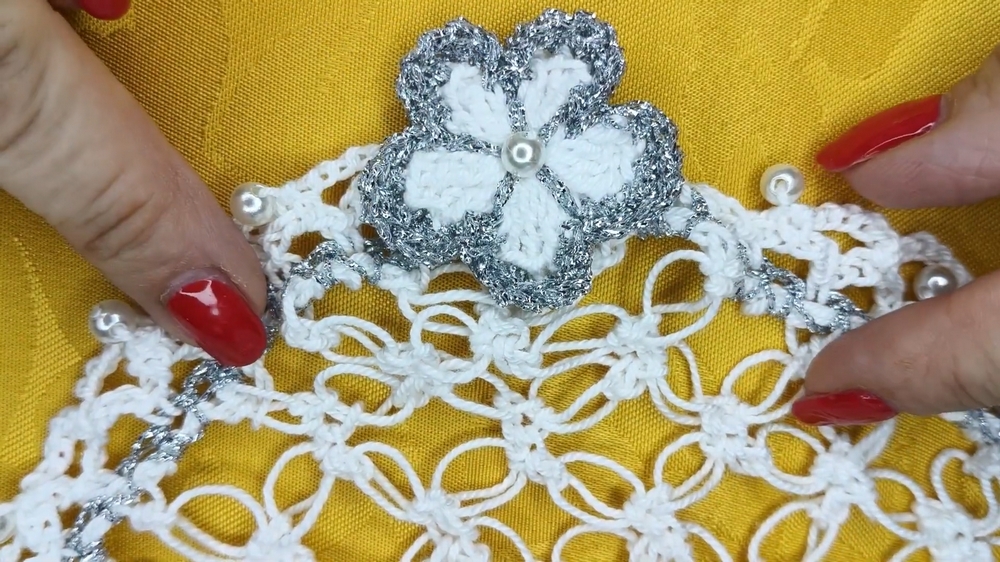
Freshen up your accessories or decor with this Free Crochet Flower Pattern that brings charm, color, and softness to every handmade detail.
Crochet artistry has long been a source of both relaxation and beauty, bringing together stunning designs and practical uses. In the realm of limitless creativity, crocheted flowers stand out for their charm and versatility, offering a simplified yet elegant option for enhancing your projects. Inspired by nature’s delicate blooms, this simple crochet flower brings together finesse and functionality, making it an ideal decorative element for shawls, bags, or other handmade treasures.
How to Crochet Flower Pattern to Making Anything

Whether used to accessorize your wardrobe or lend a personal touch to home decor, these floral wonders can elevate even the simplest designs to something extraordinary. This small yet impactful crochet flower opens up a world of opportunities.
From gracing a handmade shawl to being stitched onto bags, pillows, and other creations, its versatility knows no bounds. Whether gifted to someone special or kept as a personal decorative treasure, this timeless design holds the charm to brighten countless creations, all while offering the soothing joy of crochet.
Free Crochet Flower Pattern
Skill Level
- Beginner to Intermediate.
- Suitable for crocheters with basic knowledge of magic ring, chains, double crochet (dc), half double crochet (hdc), single crochet (sc), and slip stitches (sl st).
Finished Size
- Approximately 2-3 inches in diameter, depending on the yarn and hook used.
Materials
- Yarn:
- One main color (for the inner flower) and one secondary/contrasting color (for the outer petals).
- Lightweight or DK yarn works great for creating a delicate look. Metallic or shiny yarn (e.g., silver) enhances the design.
- Hook:
- 2.0 mm crochet hook as used in the tutorial.
- Adjust hook size according to yarn thickness for a larger or smaller flower.
- Other Supplies:
- Scissors.
- Darning needle (for weaving in ends).
Gauge
- Gauge is not critical for this project as the flower does not need to fit a specific size.
Key Abbreviations
- ch: Chain.
- sc: Single Crochet.
- hdc: Half Double Crochet.
- dc: Double Crochet.
- sl st: Slip Stitch.
- –: Range/Repeat.
Pattern Structure
- The flower consists of five petals worked from a magic ring.
- Each petal is crocheted in the first layer, followed by a second color for layered detail on each petal.
Pattern Instructions
First Layer (Inner Petals)
- Make a Magic Ring:
- Wrap yarn around two fingers and secure to form a loop.
- Insert hook into the loop, pull up a loop, and chain to secure the ring.
- (If this technique is unfamiliar, you may instead chain 4 and join into a circle with a slip stitch.)
- Begin First Petal:
- Ch 3 (counts as 1 dc).
- Work 3 dc into the ring, leaving the top loops of each stitch loose.
- Yarn over and pull through 2 loops at a time until all 3 dc are complete.
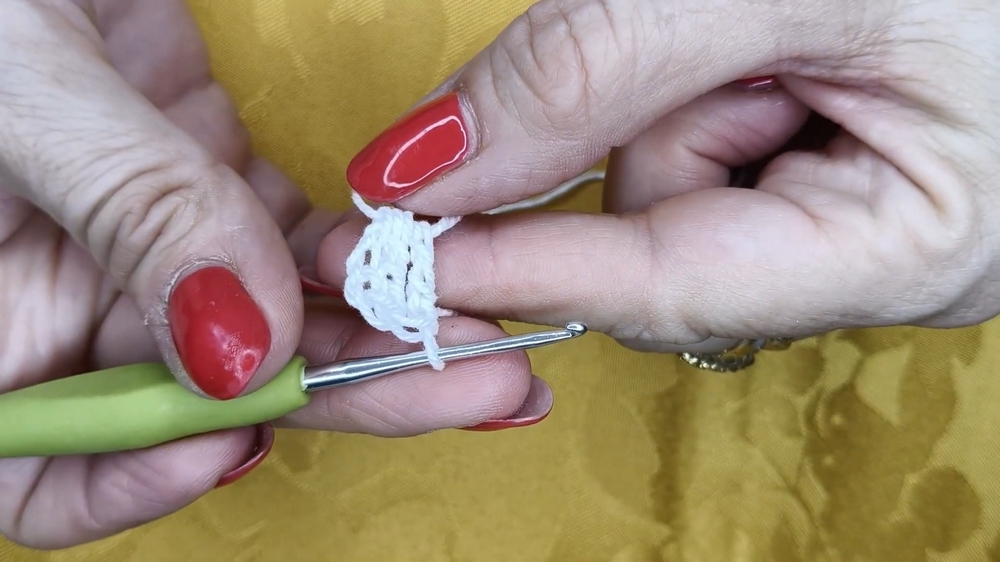
- Ch 3 Again:
- To close the petal, sl st into the magic ring.
- You now have your first petal.
- Repeat for Five Petals:
- Follow the same sequence (ch 3, 3 dc, ch 3, sl st into the magic ring) to make a total of 5 petals.
- Fasten Off:
- After completing the fifth petal, sl st into the ring and tighten the ring by pulling the tail.

- After completing the fifth petal, sl st into the ring and tighten the ring by pulling the tail.
Second Layer (Outer Petals in Contrasting Color)
- Attach New Color:
- Connect the new yarn in the space between two petals (sl st in the gap where petals meet).
- Work Around Each Petal:
- Secure with 1 sc in the first gap (between petals).
- Move to the first chain at the top of the petal. Work 1 sc into the second chain, followed by:
- 1 hdc, into the next chain at the top loop of the petal.
- In the following three top loops, work 2 dc into each st (total of 6 dc created for each petal).
- In the next chain loop, work 1 hdc, and then 1 sc.
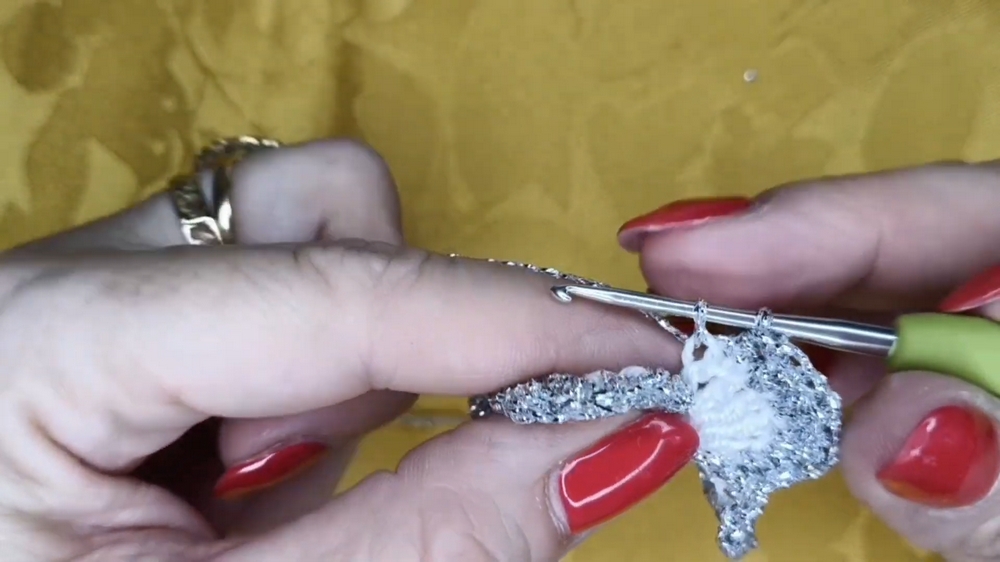
- Complete the Petal Detail:
- To finish the current petal, sl st into the petal base (the gap between the petals).
- This sl st attaches the row, creating a layered effect around the flower.
- Repeat Outer Petal Detailing:
- Repeat the sequence (sc, hdc, 2 dc in each of three sts, hdc, sc, sl st at base) for each remaining petal.
- Ensure that every stitch seamlessly connects around the base.
Finishing the Flower
- After completing all petals and connecting, sl st into the first sc of the round to secure the outer petals.
- Fasten Off:
- Chain 1 for tightening and cut the yarn.
- Use a darning needle to weave in all loose ends.

Customization Ideas
- Yarn Choice:
- Experiment with contrast by using self-striping yarn for petals or metallic thread for edging.
- Multiple Layers:
- Add a third row of smaller petals in different colors for more volume.
- Add Beads:
- Sew a bead or button into the center for added embellishment.
Special Tips
- Tight Ring:
- Ensure the magic circle is tightly secured to avoid gaps in the center.
- Counting Stitches:
- Always count your stitches in the second round of petals for uniformity.
- Blocking:
- Lightly block the flower if the petals curl or to flatten and shape the edges.
Conclusion
Congratulations on completing your crocheted layered flower! This versatile design is ideal for enhancing shawls, garments, bags, or home décor projects. The layered effect of the contrasting petals creates a stunning yet simple motif. Incorporate it into your projects to make them unique and elegant.
Final Remarks:
This crochet pattern, with its knit-like finish and layered details, is a timeless classic. With its versatility and ease of customization, it’s a great addition to any crocheter’s repertoire. Let your creativity blossom as you experiment with colors and embellishments.