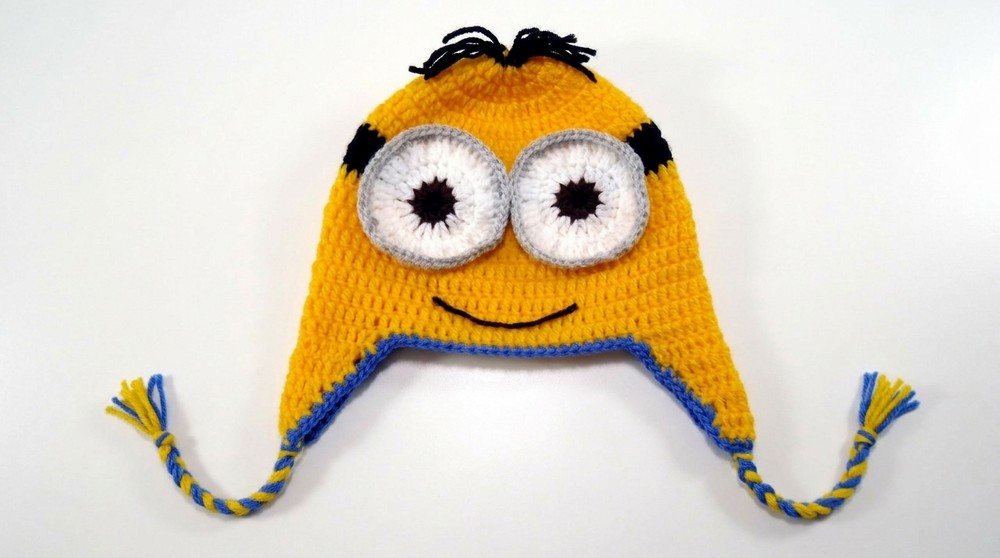
Learn how to make a crochet Minion hat pattern with easy to follow instructions, making a playful and cozy accessory for Minion lovers of all ages.
Stunning Free Crochet Minion Hat Pattern That Everyone Will Adore
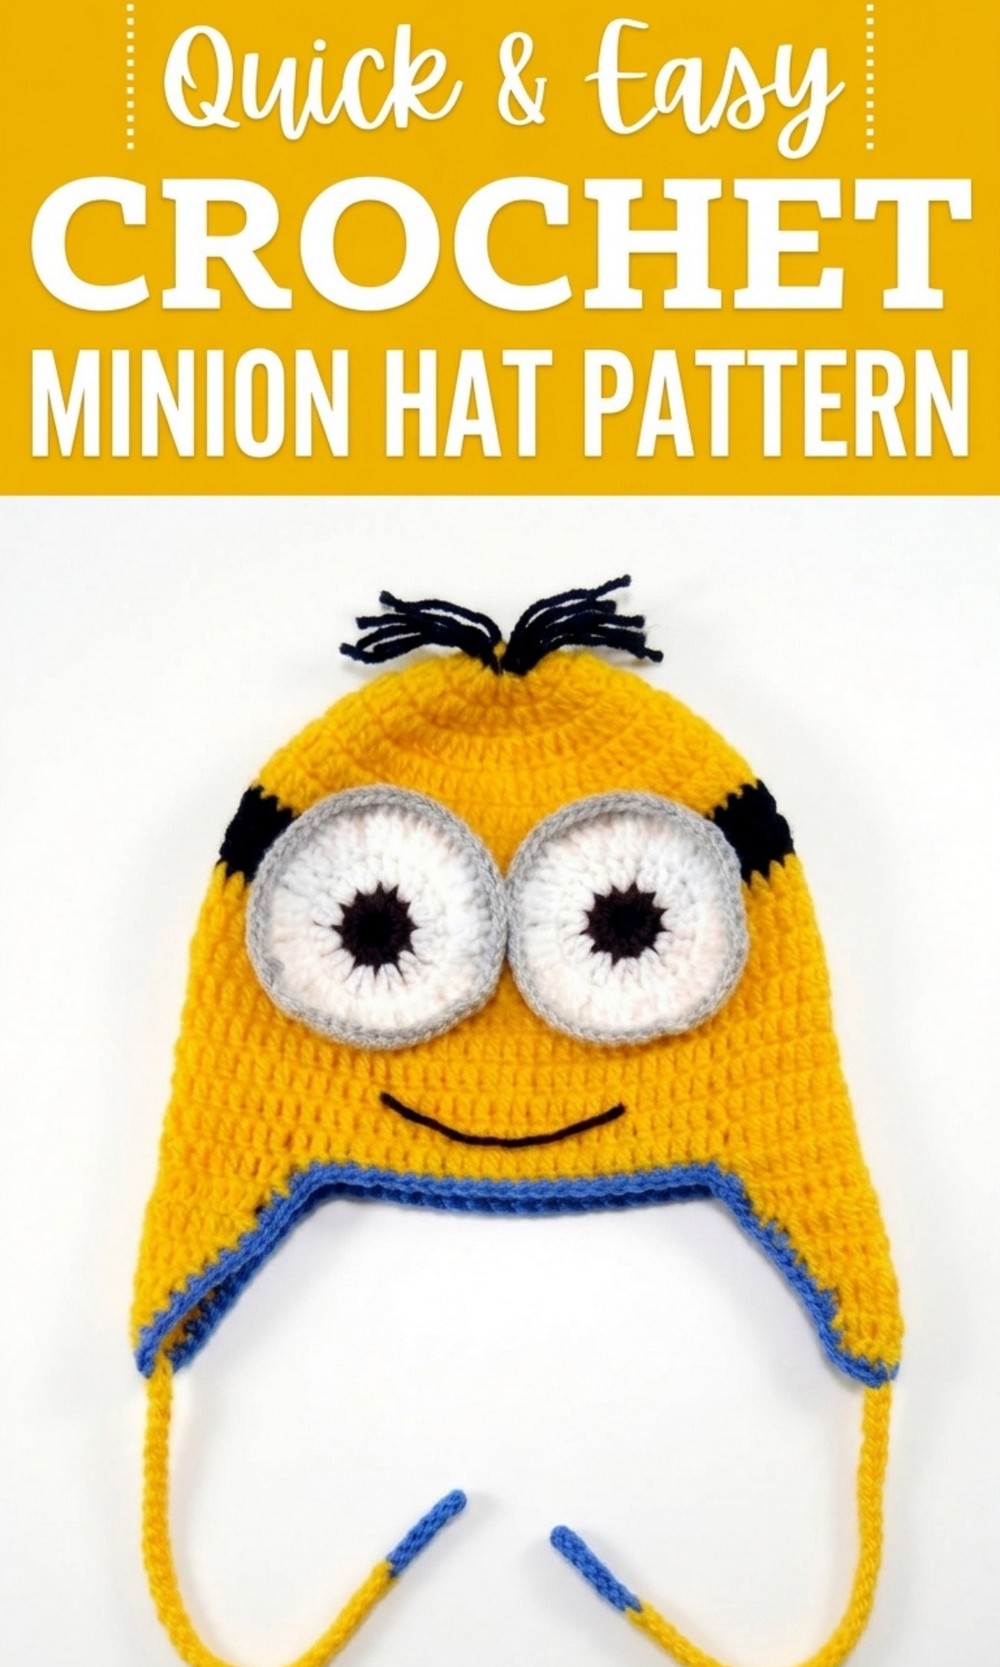
There’s something undeniably fun about bringing a favorite character to life, especially when it’s in the form of a cozy Minion hat. Bright yellow with a single, curious eye or a pair of mischievous goggles, this hat is full of playful charm.
It’s not just headwear—it’s a little pop of personality, perfect for keeping warm or adding some humor to a chilly day. From the tiny tuft of black hair on top to the unmistakable Minion grin, every detail makes it something special.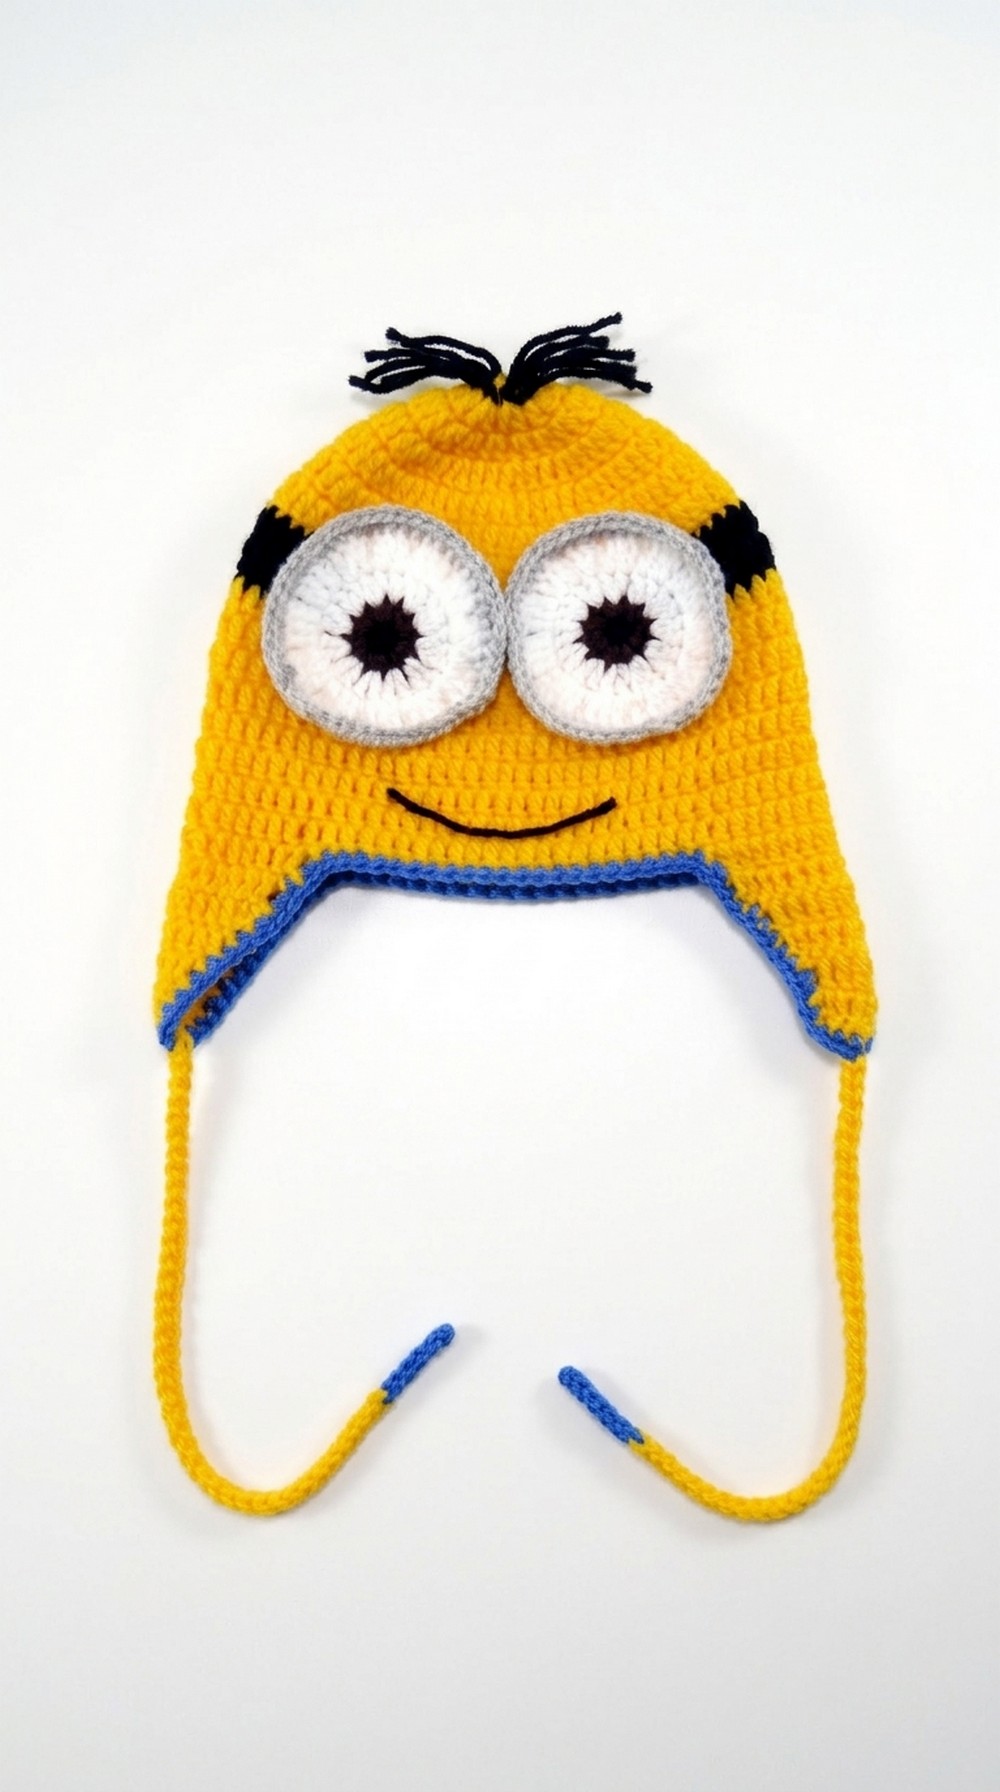 Whether it’s worn for fun, as a gift, or simply to stand out, this hat has a way of turning heads and sparking smiles wherever it goes.
Cheerful Crochet Minion Hat Pattern
Materials Required:
- Crochet hook: 3 mm
- Tapestry needle: Suitable to weave in your yarn
- Sewing needle: For manual stitching
- 40g skein of 100% acrylic yarn (yellow): Lightweight and suitable for baby projects
- Scrap yarn (100% acrylic): In colors — blue, gray, black, brown, and white
- Small decorative application (optional, such as buttons or felt)
- Sewing thread: Dark gray or black
- Scissors
Gauge:
- Gauge for hat body: 18 stitches x 18 rows = 10 cm x 10 cm in double crochet.
Finished Size:
- Hat circumference: 22.5 cm
- Hat length: 18 cm
- This size fits babies aged 6–12 months. For other sizes, adjust yarn weight and hook size or add/subtract rounds accordingly.
Pattern Notes:
- The hat uses basic crochet stitches such as chain (ch), slip stitch (sl st), double crochet (dc), half double crochet (hdc), and single crochet (sc).
- The increases are worked to achieve the correct circumference. Ensure your stitches are consistent.
- The character features are added after the hat body is completed.
Crochet Pattern: Minion Baby Hat
Step 1: Create the Hat Body (Yellow Section)
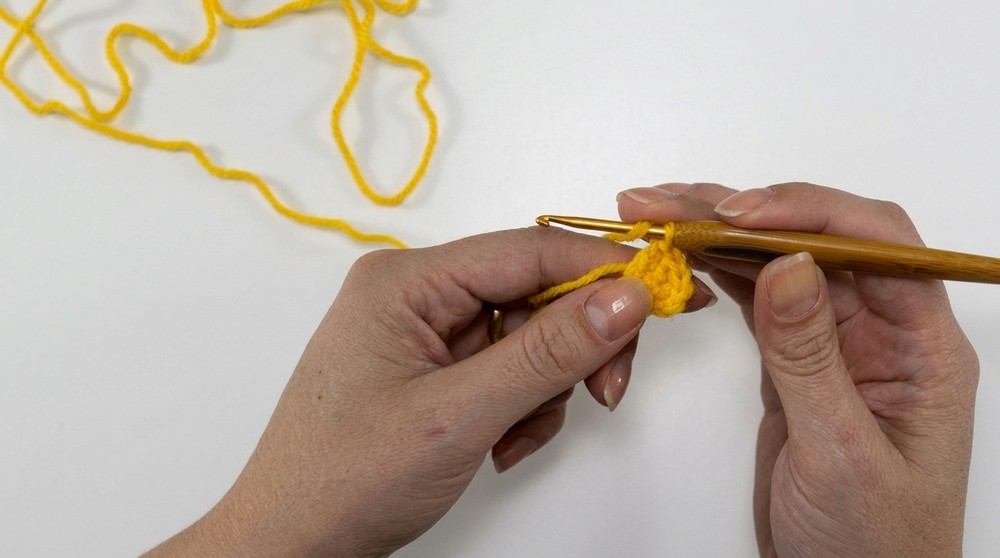
- Foundation Round:
- Start with 16 chains (ch).
- Join the chain into a loop with a slip stitch (sl st) in the first chain.
- Round 1:
- Work 3 chains (equivalent to the first double crochet).
- Crochet 15 more double crochets (dc) into the ring. (Total: 16 dc).
- Join with a slip stitch to the third chain.
- Round 2:
- Chain 3 (counts as the first dc), and make 1 dc in the same stitch.
- Then, work 2 dc in each stitch around. (Total: 32 dc).
- Finish the round with a slip stitch.
- Round 3:
- Chain 3 (counts as the first dc), make 1 dc in the next stitch, and then 2 dc in the next stitch.
- Repeat the sequence of [1 dc in the next 2 stitches, then 2 dc in the next stitch] around.
- When complete, join with a slip stitch to the third chain.
- Round 4 & 5:
- Chain 3 (counts as the first dc), then crochet 1 dc in every stitch around, increasing consistently as follows:
- Round 4: Work 3 dc between each increase.
- Round 5: Work 4 dc between each increase.
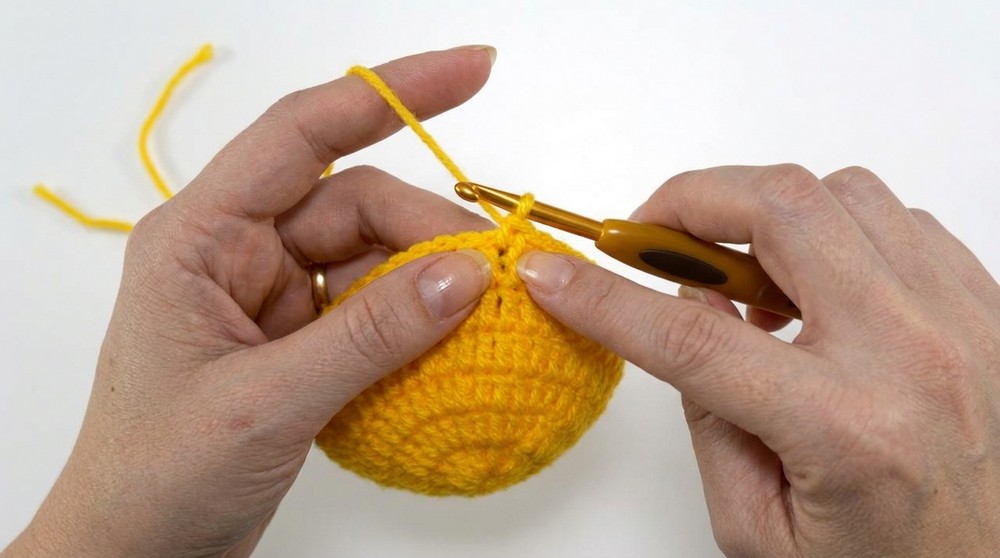
- Chain 3 (counts as the first dc), then crochet 1 dc in every stitch around, increasing consistently as follows:
- Rounds 6–13 (or until hat measures 18 cm):
- Switch to even rows of 1 dc per stitch — no more increases. Work these rounds until the hat reaches the desired length.
- Ensure the hat reinforces a rounded shape.
- Add the Black Band:
- Attach black yarn, and crochet 2 rows of 1 dc per stitch for the black band where you will attach the eyes.
- Bind off when complete.
Step 2: Crochet the Earflaps
- Mark Sections:
- Divide the hat into 4 equal parts:
- Use stitch markers to mark 20 stitches at the back, 20 for the front, and 17 stitches for each earflap on the sides.
- Divide the hat into 4 equal parts:
- Earflap 1:
- Reattach yellow yarn on one side where the earflap begins.
- Work 17 dc.
- Row 2: Ch 3, skip the first dc, and work 16 dc. (Decrease at each end).
- Continue working rows of dc with a decrease at the start and end of each row until you have 7 dc left.
- Bind off.
- Earflap 2:
- Repeat the instructions for the second earflap on the other marked side.
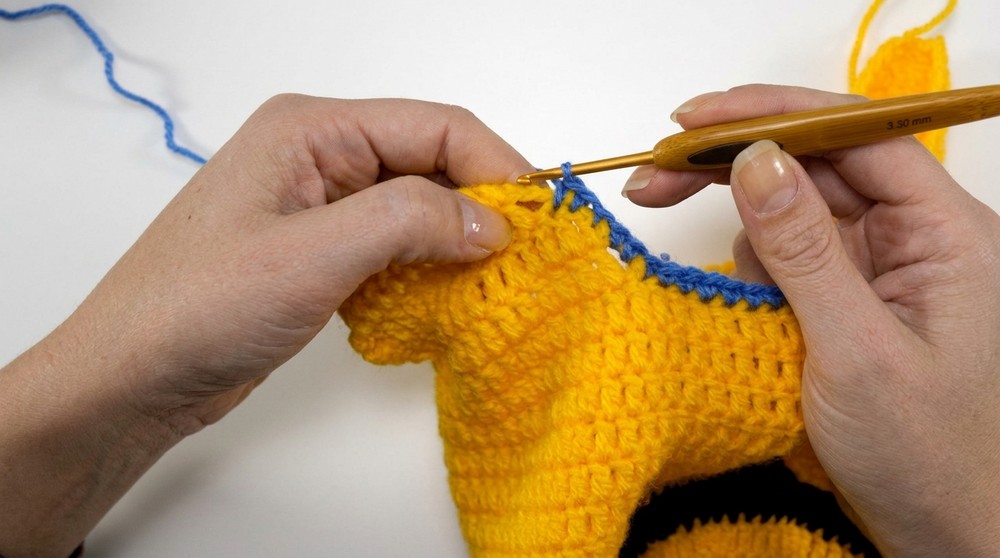
Step 3: Add Blue Trim
- Use blue yarn to crochet a single crochet (sc) border along the hat’s edge.
- Begin in the front center and work into each stitch around the edge, including earflap borders.
- Secure and weave in the ends.
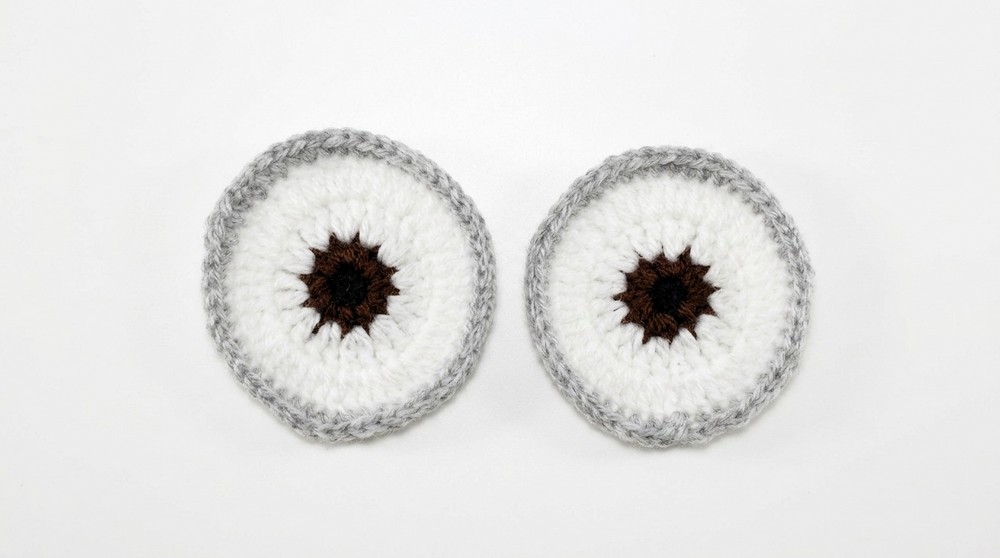
Step 4: Eyes and Face
Eye Instructions
- Black Center:
- Make a magic ring.
- Work 5 sc into the ring.
- Pull the ring tightly and join with a sl st. Break off yarn.
- Brown Circle:
- With brown yarn, attach to any stitch of the black round.
- Chain 2, work 2 hdc in each stitch around. (Total: 10 hdc).
- Break off yarn.
- White Outer Circle:
- Using white yarn, attach to the brown circle.
- Chain 3, work 2 dc in every stitch around. (Total: 20 dc).
- Bind off and attach a gray yarn border to the white circle, working 1 hdc per stitch around. Bind off.
- Sew the Eyes:
- Position the eyes on the black band, ensuring even placement and alignment. Sew securely using a sewing needle and a length of white yarn.
- Position the eyes on the black band, ensuring even placement and alignment. Sew securely using a sewing needle and a length of white yarn.
- Optional Detailing:
- Use gray yarn to add a small curved line between the eyes to create depth and ensure the eyes stay in place.
Mouth
- Cut 10 cm of black yarn for the mouth.
- Use a sewing needle to embroider a slight smile (or another facial expression) below the eyes.
- Stitch securely to prevent unraveling.
Step 5: Add Hair
- Cut 10 cm pieces of black yarn.
- To attach, fold each piece in half, and pull the loop through the top stitches of the hat.
- Thread the loose ends into the loop and pull tightly.
- Repeat this around the top of the hat, leaving desired spacing. Trim the hair to your desired length or style it as messy spikes.
Customization Tips
- Size Adjustments:
- To create hats for older kids or younger babies, adjust the foundation chain count and number of increase rounds.
- Use a larger or smaller crochet hook to alter the hat’s size easily.
- Color Variants:
- Personalize your Minion! Use various colors for the black band or the hat base and create your own unique design.
- Alternative Additions:
- For a quicker finish, consider attaching pieces of felt for the eyes and mouth instead of crocheting them.
Special Techniques
- Magic Ring:
- This adjustable loop is used to start the black center of the eyes. If you’re unfamiliar, check out online video tutorials for guidance.
- Joining Rounds:
- Always make slip stitches into the first stitch of the round to ensure a clean, seamless hat structure.
Conclusion and Final Tips
Congratulations, You’ve created a Minion inspired baby hat. The combination of adorable design elements like the single or double eyes, quirky hair, and cheerful colors makes this piece perfect for any occasion.
Important Remarks:
- Secure all loose threads tightly to ensure durability, especially if gifting to an infant or toddler.
- Add extra rows or detailing based on personal preference. Each hat can be unique.
- The soft acrylic yarn ensures a comfy and durable finish, but always double check that the yarn is baby safe.
Enjoy showcasing your finished piece—an adorable and creative keepsake that anyone will treasure.