Sport a breezy style with Crochet Summer Sun Top Pattern to enjoy a light comfortable outfit that adds elegance to your warm weather wardrobe.
This top is a gorgeous piece perfect for sunny days and outdoor adventures. Its light, airy texture keeps you comfortable, while its delicate floral-like style catches the eye effortlessly. Whether worn at the beach, during casual outings, or paired with skirts and jeans, it fits beautifully with any summer look.

Lovely Crochet Summer Sun Top Pattern for Summer Outings
The texture and flow give it an elegant touch, while soft colors make it versatile for any occasion. It’s a stylish yet practical choice, offering beauty and comfort in one. The top stands as a reflection of simplicity and charm, perfect for staying cool while looking effortlessly stunning.

This detailed crochet crop top pattern is written in US crochet terminology and is best suited for intermediate to advanced crocheters. The design features decorative petals, chain loops, and adjustable straps that ensure both comfort and elegance.
Follow the steps carefully for a stunning result.
Materials List
- Yarn: Medium weight (4) yarn or DK yarn (cotton works well for breathability).
- Hook Size: 3.75 mm (US F).
- Additional Items: Stitch markers, scissors, tapestry needle for weaving in ends, measuring tape.
- Optional: Blocking mats if you prefer a more polished shape.
Skill Level
Intermediate to Advanced
You’ll need a good understanding of crochet stitches and techniques such as working in rounds, clusters, slip stitches, and increasing/decreasing.
Key Abbreviations (US Terminology)
- CH: Chain
- SC: Single Crochet
- HDC: Half Double Crochet
- DC: Double Crochet
- TRC: Treble Crochet
- SL ST: Slip Stitch
- ST: Stitch
- SP: Space
Special Notes
- Work the base in rounds, then switch to rows.
- Use stitch markers to track petals and ensure symmetry.
- Adjust sizing by increasing/decreasing rows or chains for straps.
Pattern
Step 1: Create the Base Circle
- Begin with a slip knot on your hook.
- CH 6, then join with a SL ST into the first chain to form a circle.
- Work into the circle:
- CH 2 (counts as the first HDC).
- Make 11 HDCs directly into the center of the circle. You’ll have a total of 12 HDCs (including the initial CH 2).

- Close the round by SL ST into the top of the CH 2. Pull the excess yarn tail to tighten the center.
Step 2: Create Clusters
- CH 3 (counts as the first DC of your cluster).
- Work the first cluster:
- Yarn over, insert your hook into the next ST, pull through, yarn over and pull through two loops.
- Yarn over again, insert hook into the same ST, pull through, and yarn over to pull through the first two loops. Repeat until 3 loops remain on your hook. Yarn over and pull through all loops to complete the cluster.
 CH 3 after completing each cluster, then repeat the three DC clusters in every stitch around.
- Close the round by SL ST into the first cluster. You’ll now have 12 cluster spaces.
Step 3: Work Next Rows with Chain Loops
- Slip stitch into the CH 3 space from the previous round.
- CH 3, then create a 3 DC cluster in the CH 3 space.
- CH 3, then move to the next CH 3 space and make another 3 DC cluster.
- Repeat this across all CH 3 spaces in the round.
- Continue until you complete the row, and finish with a SL ST into the first cluster.
Step 4: Add Chain Spaces
- SC into the next CH 3 space, then CH 5.
- Into the next CH 3 space, make a SC.
- Repeat this process: CH 5, SC in the next space. Continue until the round finishes.
- At the end, SL ST into the first SC and fasten off.
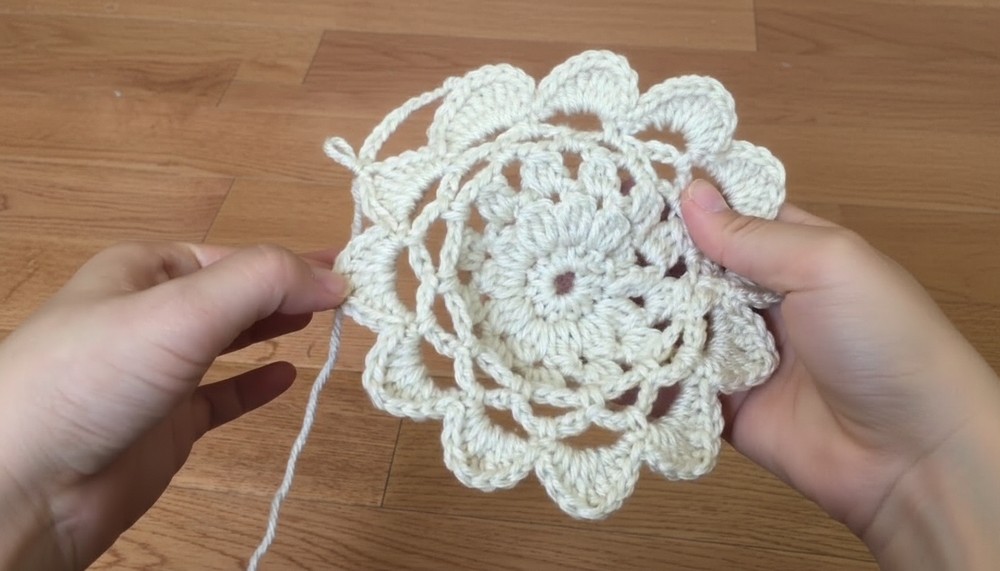
Step 5: Create Petals
In every CH 5 space:
- Start with CH 1.
- Work into the CH 5 space:
- SC
- HDC
- 2 DC
- TRC
- 2 DC
- HDC
- SC
- Repeat this process for each CH 5 space around to create petals.
Step 6: Add Decorative Loops for Petal Edges
- Slip stitch into the tip of the first petal (TRC).
- CH 16 and then SC into the next petal’s tip (TRC).
- Now CH 8 and attach with an SC into the next petal’s TRC.
- Repeat CH 8 and attach to the next petal TRC until you’ve gone around.
- After completing the last loop, SL ST into the starting SC to close.
Step 7: Fill Loops with Single Crochets
For each CH space:
- In 16 CH spaces, make 16 SCs.
- In 8 CH spaces, make 8 SCs.
Repeat this until all loops are filled with SCs. Then SL ST into the first SC to complete.
Step 8: Create Neck and Back Straps
Neck Strap:
- Slip stitch into the petal tip closest to the neck area.
- CH as many chains as needed to comfortably fit around the neck.
- Single crochet all the way back down the chain and attach with a SL ST to the starting point.
Back Straps:
- From a corner, CH until the strap fits around the body comfortably.
- Single crochet back along the chain and attach with a SL ST to the starting point.
- Repeat for the second back strap.

Step 9: Final Adjustments
- Buff the bottom edge:
- Alternate rows of DC and SC along the bottom edge.
- When working the corners, add 2 DCs per corner stitch for a smooth increase.
- Repeat until you achieve the desired length.

Conclusion
You’ve now completed the crop top! The finished product should feature neat petals, decorative chain loops, and adjustable neck/back straps. The fit can be customized simply by adding rows or chains.
Pattern Corrections
- Ensure consistent tension when working petals for uniformity.
- If the petals overlap unevenly, add SCs in TRC spaces to flatten them.
Tips
- Blocking the top with water or steam will give it a polished and professional look.
- Use stitch markers to keep track of rows or petals if needed.
- Regularly measure the straps to ensure a comfortable fit.