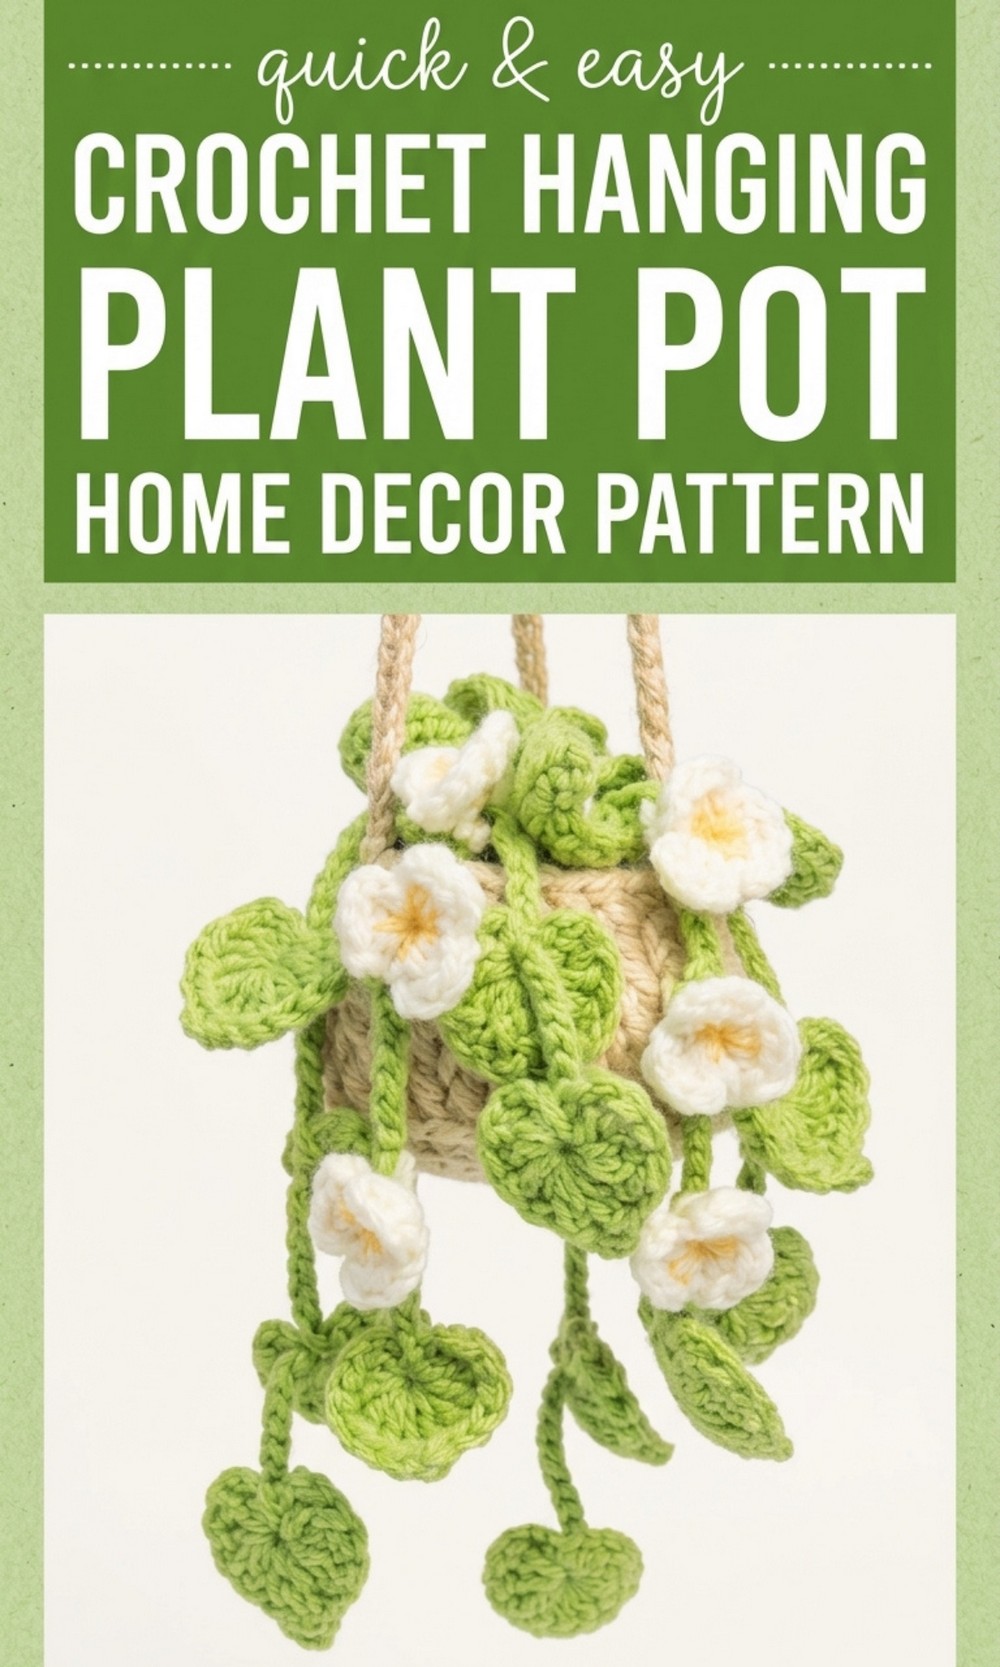
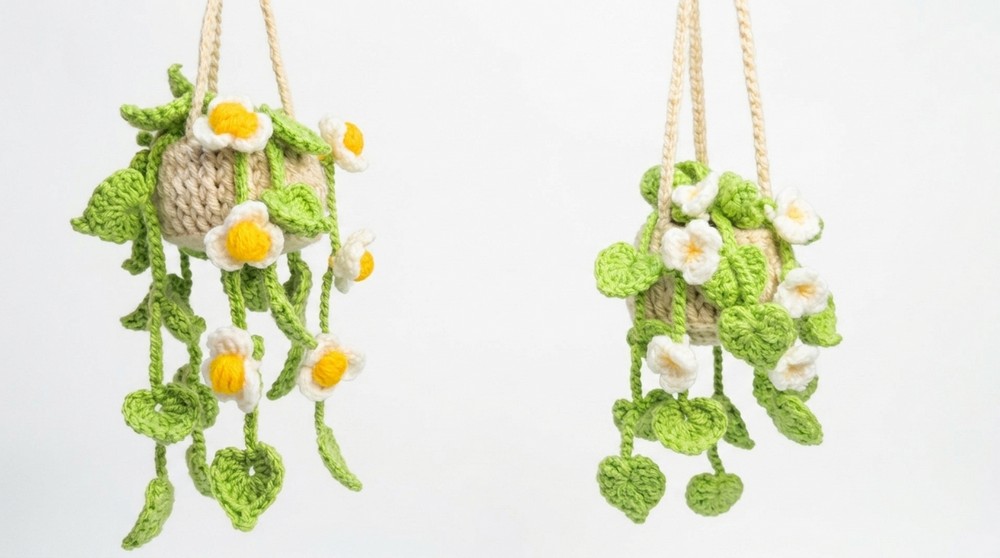
Use this free pattern to make a beautiful Crochet Hanging Plant Holder Pattern that’s simple, fun, and ideal for decorating small spaces with a charming twist.
Wonderful Free crochet hanging plant holder pattern for boho home use
Are you ready to make something fun and beautiful for your home? This free crochet hanging plant holder pattern is easy to follow and perfect for beginners. With just a few simple materials like yarn, a crochet hook, and some stuffing, you can create a stunning hanging plant holder that adds charm to any space.
Imagine a cute little pot with flowers in pretty colors like white and yellow, cozy soil made of soft yarn, and long green vines with leaves that flow naturally. This project not only looks amazing but is also useful. You can hang it in your living room, bedroom, or even near a sunny window to brighten up the space. T
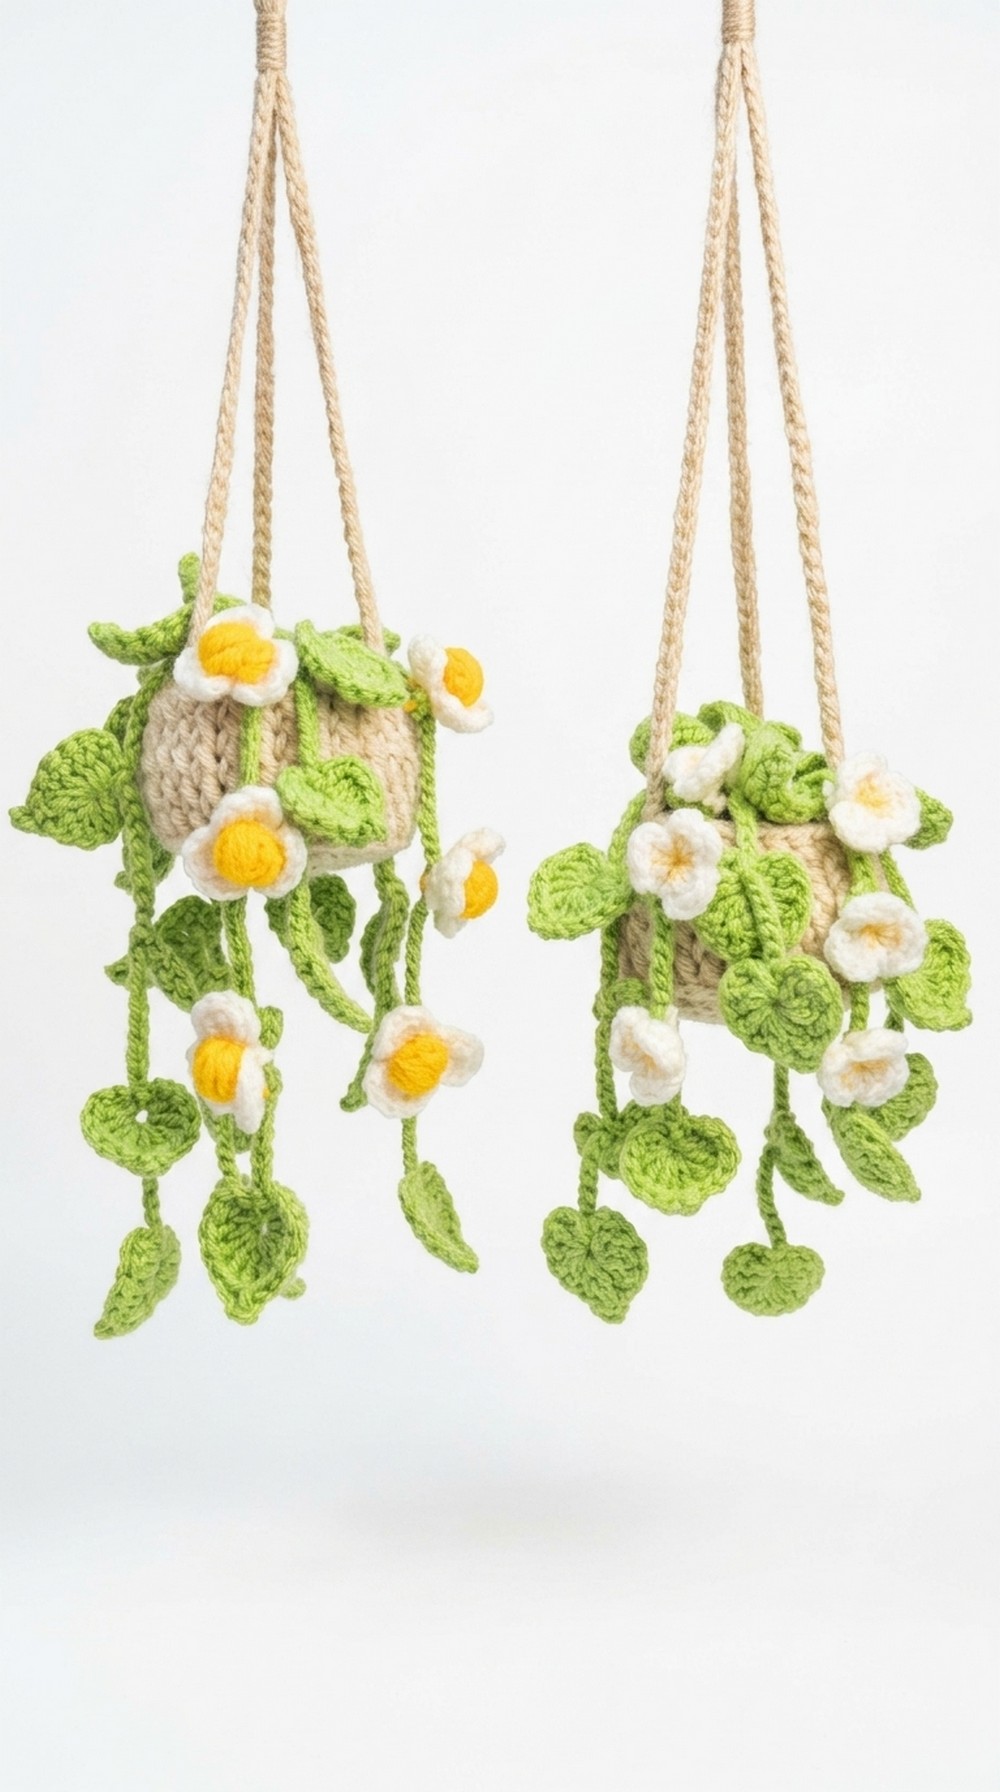 The pattern includes unique features like lifelike leaves, a detailed pot design, and flowers you can easily attach. Whether for home decor or a handmade gift, this crochet piece is sure to bring joy and life to your surroundings.
Joyful Crochet Hanging Plant Holder Pattern
Materials
- Yarn (4 ply):
- Beige: For the pot.
- Brown: For the soil.
- Green: For the vine and leaves.
- White: For flower petals.
- Yellow: For flower centers.
- Hook: 2.5 mm (or 3 mm, as stated).
- Tools & Accessories:
- Scissors.
- Darning needle.
- Stitch marker.
- Stuffing material (polyfill or similar).
Abbreviations (US Terminology)
- MR – Magic ring.
- ch – Chain.
- sc – Single crochet.
- hdc – Half double crochet.
- dc – Double crochet.
- tr – Treble crochet.
- fpdc – Front post double crochet.
- sl st – Slip stitch.
- st(s) – Stitch(es).
- yo – Yarn over.
- rep – Repeat.
Special Techniques
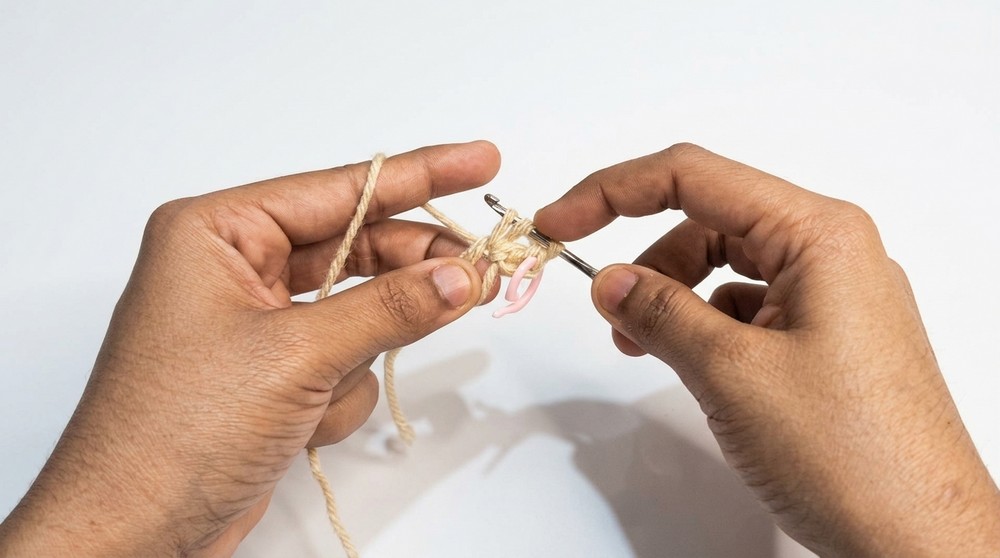
- Magic Ring (MR):
- Create a loose loop around two fingers.
- Insert hook into the loop, pull up a loop, and chain to secure.
- Front Post Double Crochet (fpdc):
- Insert the hook from front to back around the post of the stitch in the previous row instead of through the top loops.
- Invisible Decrease (dec):
- Insert hook into the front loop only of the next two stitches, yo, pull through both loops, yo, and pull through the remaining loops.
Step by Step Pattern
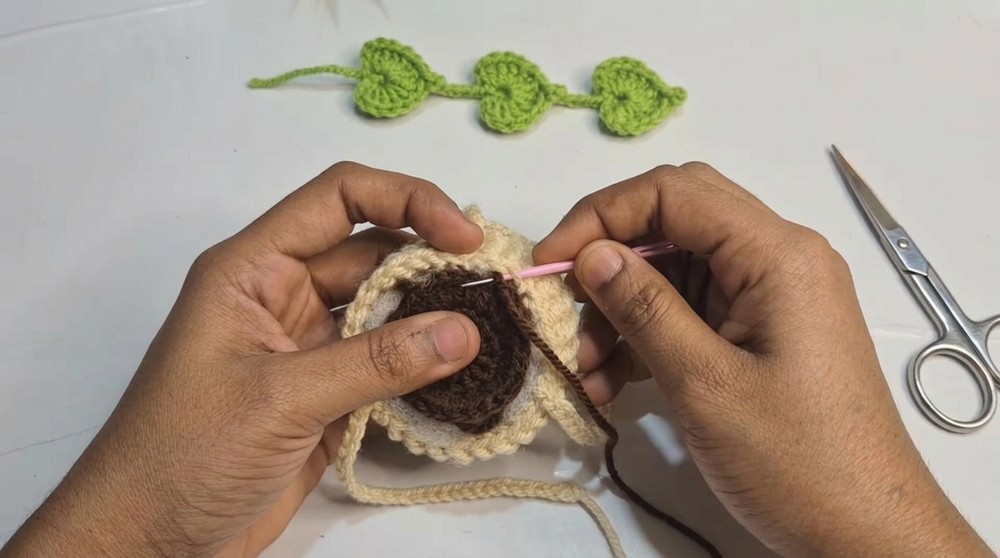
1. Pot
The pot begins with a flat circular base followed by vertical shaping.
Base (Rounds 1–2)
- Round 1:
- Start with MR.
- Ch 3 (counts as 1 dc).
- Make 13 dc into the magic ring (14 dc total).
- Pull the tail of the magic ring to close the circle tightly.
- Sl st to the first dc to join.
- Place a stitch marker in the first dc to mark the beginning of the round.
- Round 2:
- Ch 3 (counts as 1 dc).
- Work 2 dc into each stitch around (28 dc).
- Sl st to the first dc to join.
Wall of the Pot (Rounds 3–7)
- Round 3:
- Ch 3.
- To make the border, crochet fpdc around each stitch in the previous round (28 stitches total).
- Sl st to the first fpdc to join.
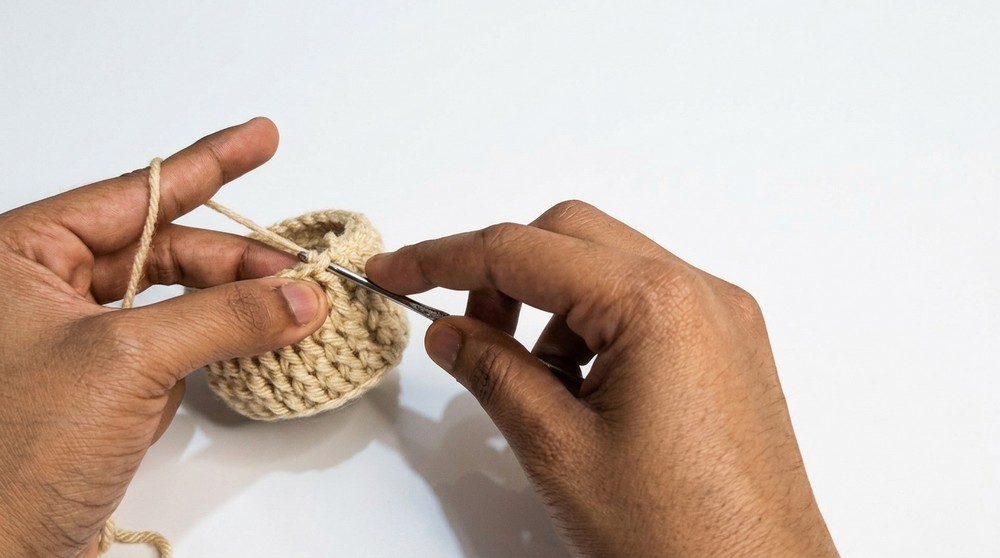
- Rounds 4–7:
- Ch 3. Work fpdc around each fpdc stitch from the previous round (28 fpdc per round).
- Sl st to the first fpdc at the end of each round.
Note:
- The base (Rounds 1–2) creates the flat bottom, and Rounds 3–7 build the pot’s vertical wall.
Strings for Hanging
- Choose a point on the top edge of the pot and reattach the beige yarn.
- Ch 30, then fasten off, leaving a long tail to tie later.
- Repeat this for two more strings, spacing each about 9 stitches apart from the previous one.
- You should have 3 evenly spaced strings for hanging.
2. Soil
The soil is a flat disk with a small hole left in the center.
Pattern
- Round 1:
- Start with MR.
- Ch 3 (counts as 1 dc).
- Make 13 dc into the ring (14 dc).
- Gently pull to close the hole slightly, leaving a small gap for the vines to be attached later.
- Sl st to the first dc to join.
- Round 2:
- Ch 2 (counts as 1 hdc).
- Work 2 hdc into each stitch around (28 hdc).
- Sl st to the first hdc to join.
NOTE: Fasten off, leaving a long tail for sewing. The small hole in the middle allows you to pull the vines through later.
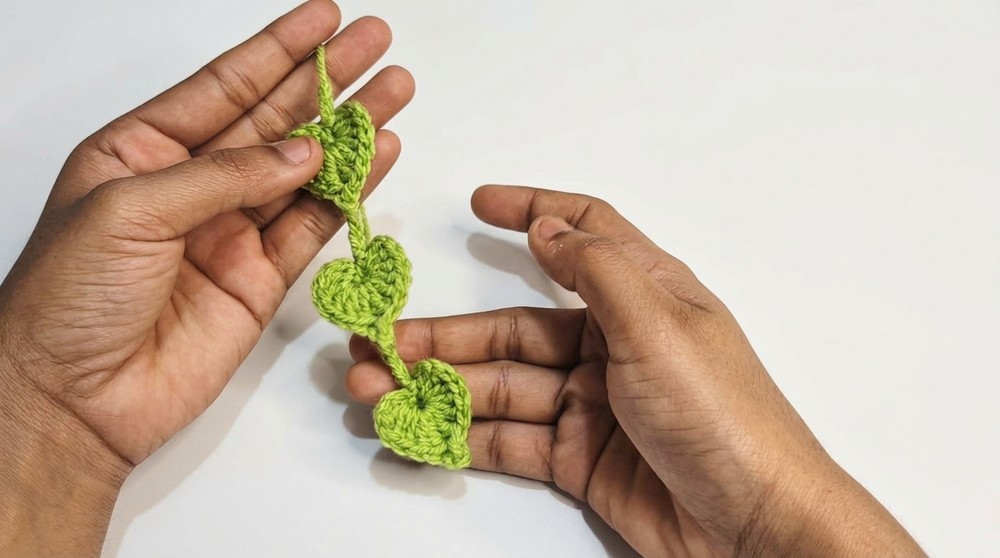
3. Vines and Leaves
The vines are made separately and attached to the soil.
Leaf Vine
- Start with a slip knot and leave a long tail for sewing.
- Ch 14.
- Leaf:
- Work into the 4th ch from the hook:
- 4 dc.
- 1 tr.
- Ch 2, sl st into the same st (forms a pico tip).
- 1 tr.
- 4 dc.
- Sl st into the same ch.
- Work into the 4th ch from the hook:
- Ch 14 to begin the next leaf and repeat the above process.
- Make 3–5 leaves per vine, depending on the desired length.
Loops for Flowers
If desired, create two vines with loops for flowers:
- Repeat steps 1–2 above.
- Instead of making a leaf, ch 14 and sl st into the 5th ch from the hook to form a loop.
- Repeat, making as many loops as you’d like.
4. Flowers
Each flower consists of 3 petals and a puff stitch center.
- White Petals:
- Start with MR and ch 3.
- Ch 3, 2 dc, ch 3, sl st into the ring (1 petal).
- Repeat two more times (3 petals total).
- Pull yarn to close the ring, and fasten off.
- Yellow Center:
- Make a slip knot and ch 1.
- Work 5 puff stitches into the loop:
- Yo, insert hook, pull up a loop; repeat 3 more times for a total of 5 loops.
- Yo, pull through all loops on the hook.
- Ch 1 to close the puff.
- Attach the center by pulling its tails through the center of the flower and knotting at the back.
Make 6 flowers in total and attach them to the loops or vines as desired.
4. Assembly
- Attach Vines to Soil:
- Arrange all vines (alternating lengths for a natural look).
- Tie them together securely at the top.
- Pull the tied end through the hole in the soil and knot at the back.
- Sew Soil to Pot:
- Place the soil inside the pot with the vines hanging through the center.
- Sew the soil to the pot along the inner edge, leaving no gaps.
- Attach Flowers:
- Tie flowers onto vine loops or sew them directly onto the vines.
- Final Knot:
- Gather the 3 hanging strings and tie them into a secure top knot.
- Gather the 3 hanging strings and tie them into a secure top knot.
Final Words and Tips
Congratulations! Your aesthetic hanging plant is now complete. Here are some tips and care instructions:
- Customization:
- Adjust the number of leaves, vines, and flowers based on your preference.
- Use other flower patterns for variety or change up the colors.
- Durability:
- For better stability, use hot glue on areas such as vine knots or flower attachments.
- Double check the strength of the knot on the hanging strings.
- Care:
- Gently hand wash if needed; reshape while damp and air dry.
- Keep away from direct sunlight for extended periods to avoid color fading.
- Display:
- Hang near a sunny window or in any space that could use some crochet greenery!
If you make this project, feel free to share your creation and experiment with adding your own creative touch, such as beads, different flowers, or longer vines.