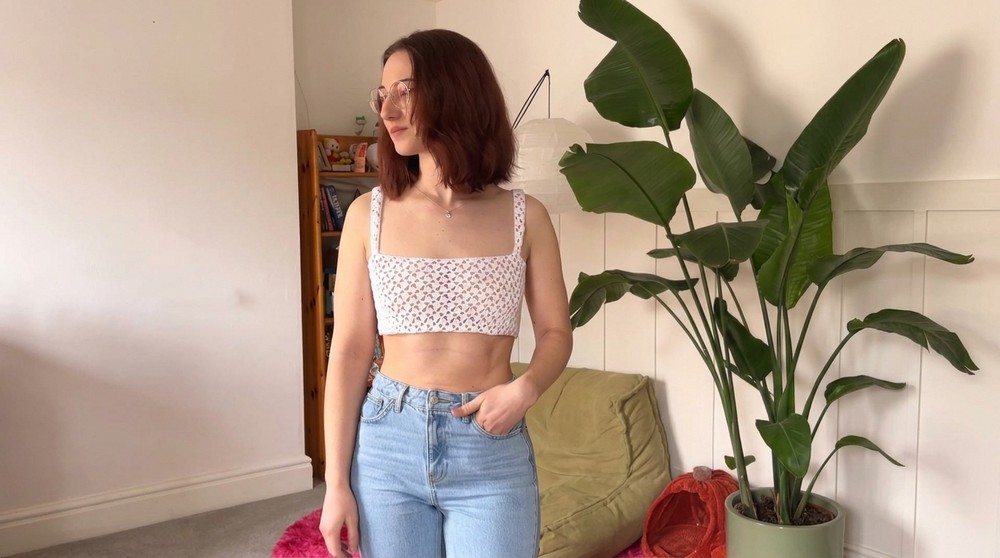
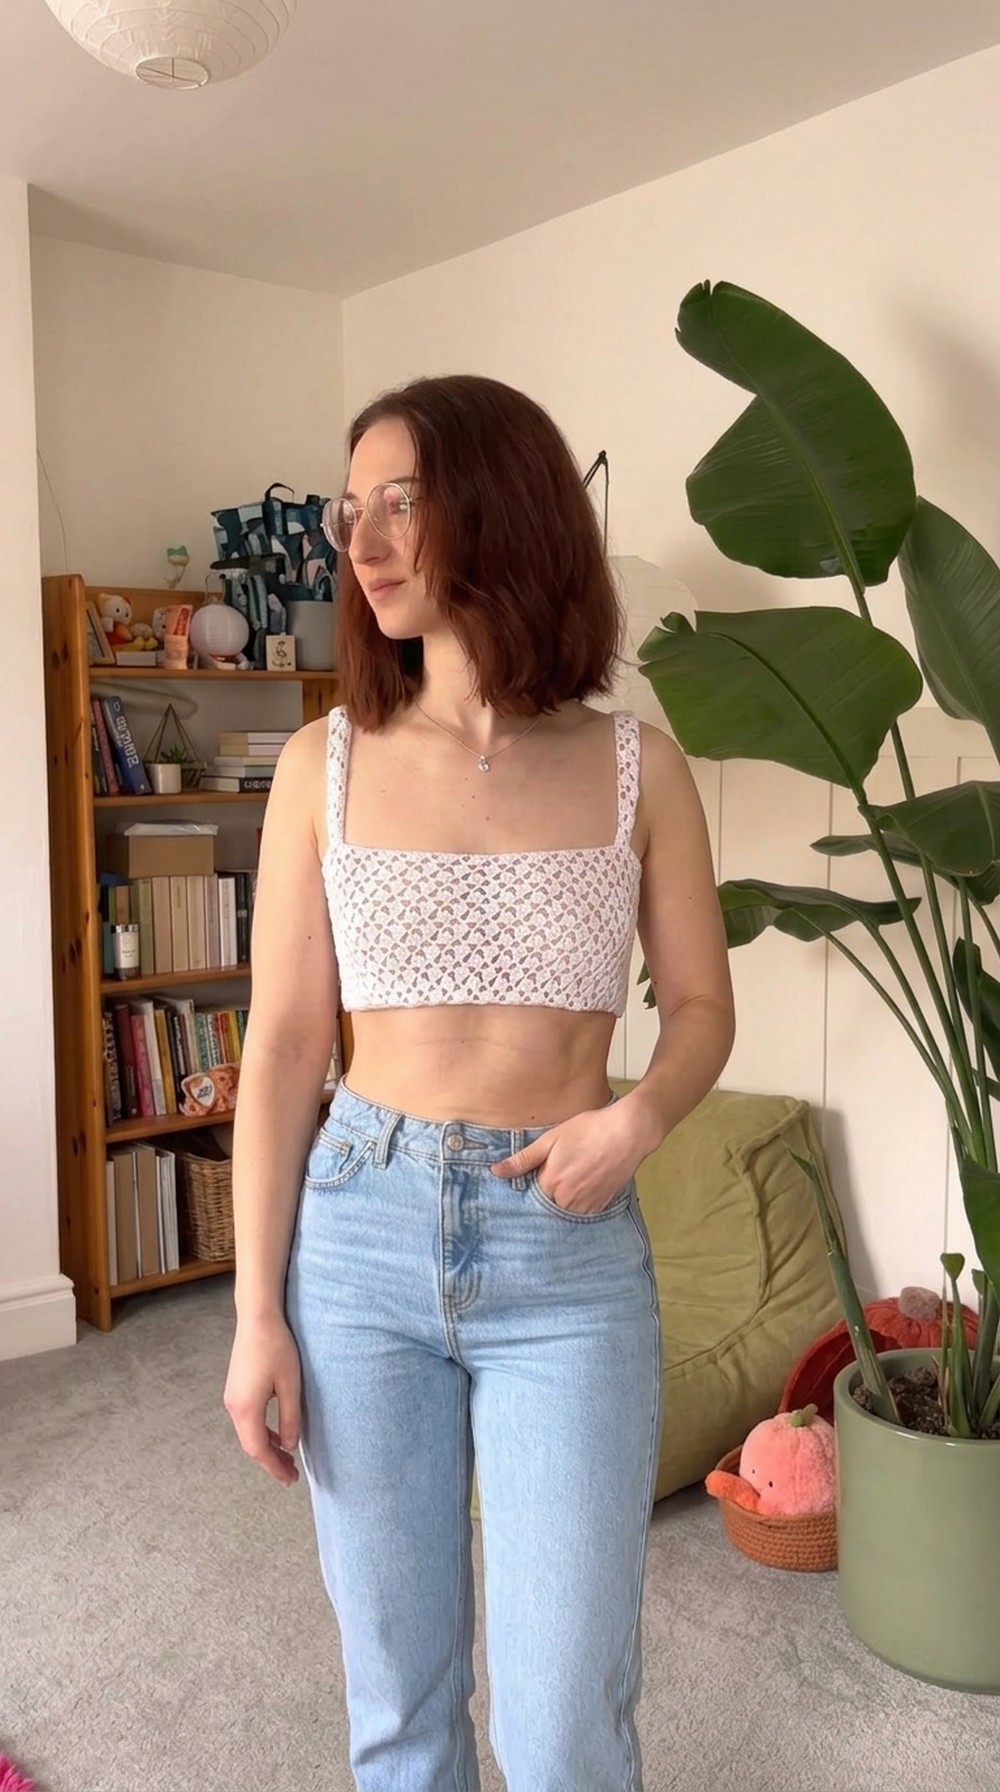
Turn heads with a stunning free crochet lace crop top that’s lightweight, breathable, and perfect for casual outings or layered looks with elegant charm.
Nothing feels worse than staring at your closet, feeling like you have nothing special to wear. That’s where a crochet lace crop top pattern comes to the rescue, bringing a blend of beauty, style, and uniqueness to your wardrobe. This stunning piece boasts an elegant lace design that feels light and breathable, perfect for warm days or layering in any season.
Free Crochet Lace Crop Top for Ultimate Style
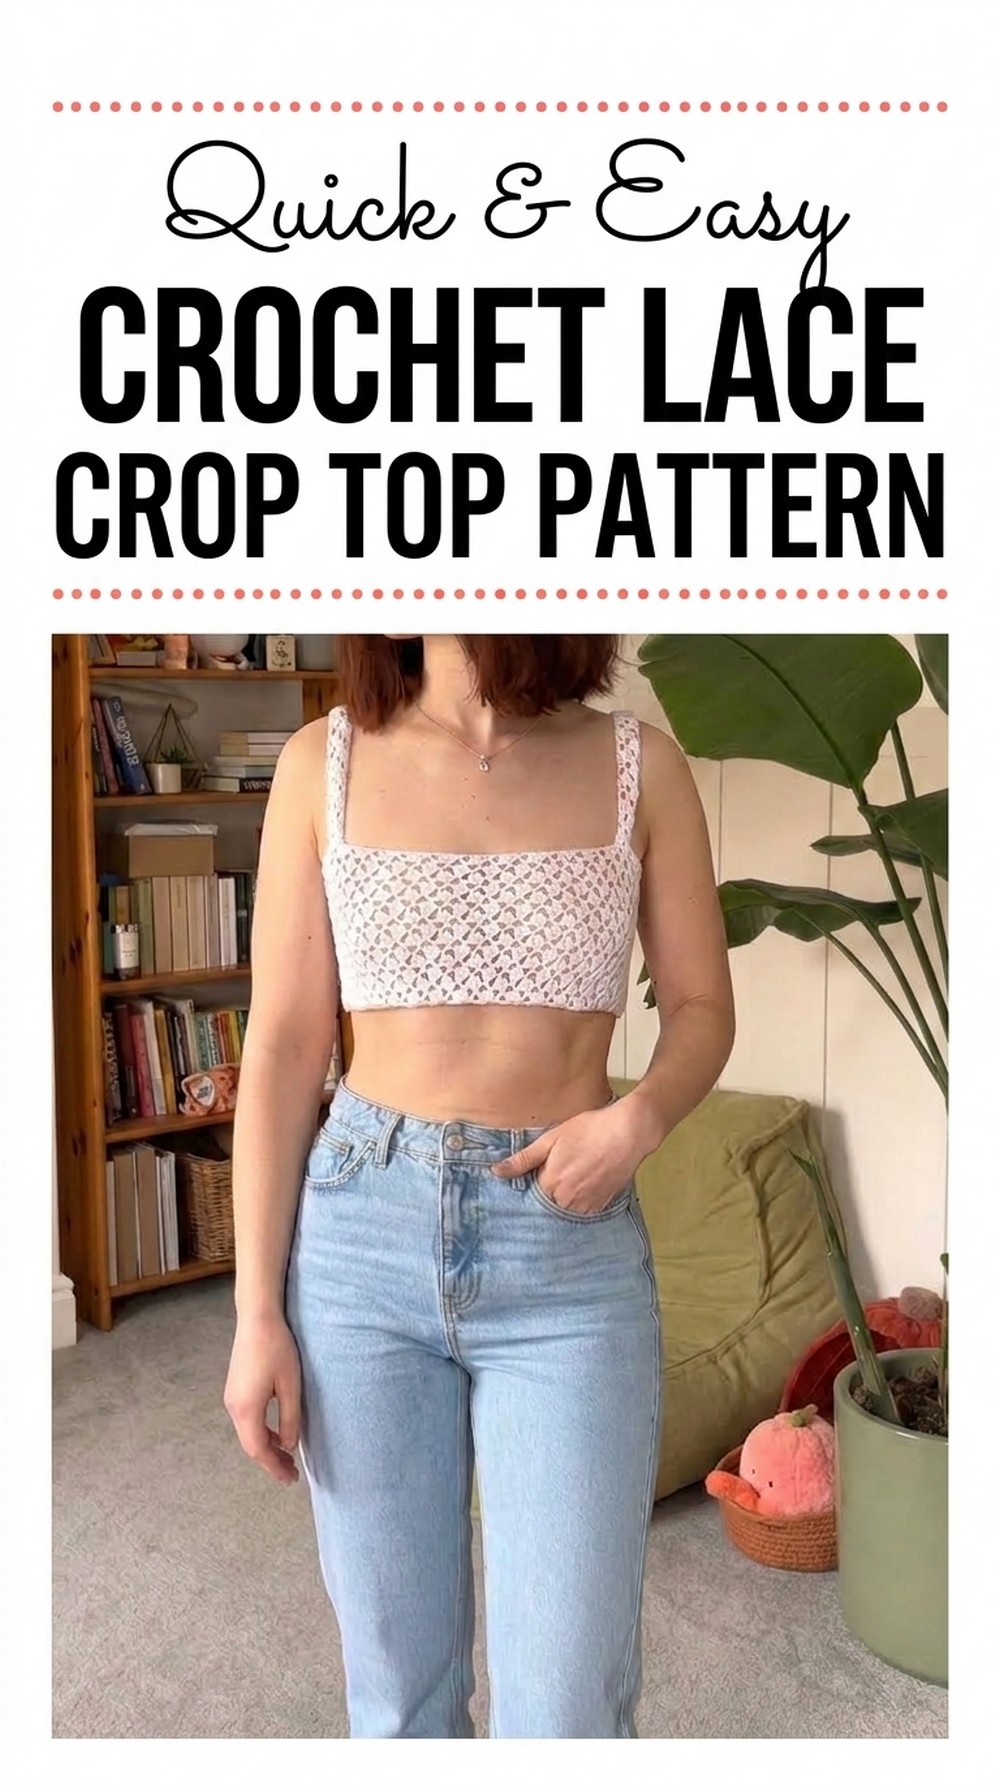
The cropped fit adds a trendy, playful vibe, making it easy to pair with high-waisted jeans, skirts, or even over a dress for a chic layered look. Its intricate texture and handmade charm make it a standout garment that feels one-of-a-kind. While it looks delicate, it’s surprisingly versatile, balancing femininity and functionality all at once. Whether you’re heading to the beach, a casual outing, or even just relaxing at home, this crochet lace crop top adds a touch of effortless style to any outfit.
Super Easy Crochet Lace Top Pattern
Materials
- Yarn:
- Cotton Yarn (recommended for comfort, breathability, and durability).
- Hook:
- 4.0 mm crochet hook.
- Additional Tools:
- Stitch Markers: To mark strap placements and starting points.
- Tapestry Needle: For sewing and weaving in ends.
- Scissors: For trimming yarn.
Gauge
- 4 double crochets x 2 rows = 1 inch in the lace stitch pattern.
(Achieving an exact gauge is not essential for this pattern. Gauge only helps achieve desired dimensions.)
Skill Level
Beginner to Intermediate – Basic crochet knowledge of chains, double crochets, and simple sewing is required.
Finished Size
The length and fit of this top are fully customizable.
- For a bralette-style top: 50 chains were used in the tutorial for the foundation.
- For a longer top, increase the chain count accordingly.
- The overall width depends on the number of rows stitched to achieve the preferred fit.
Notes
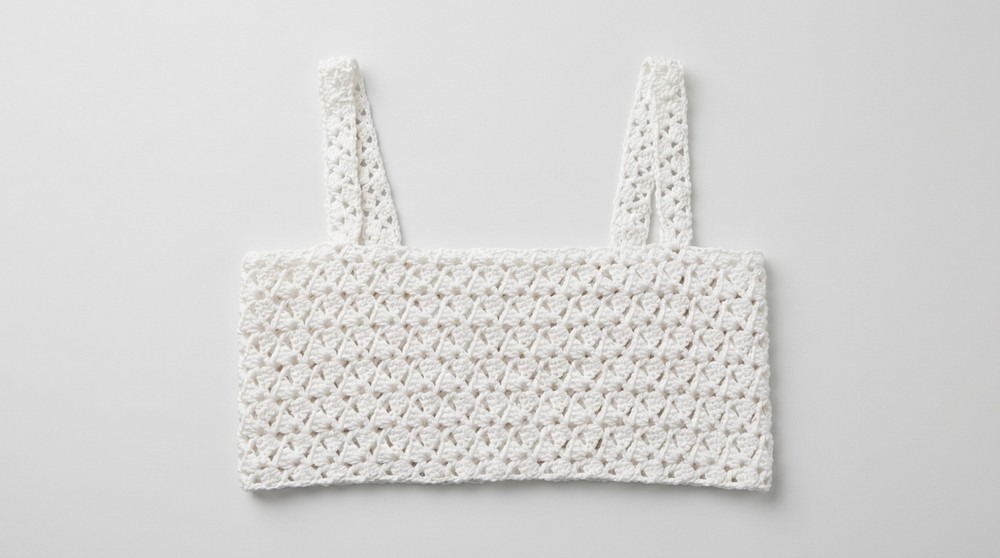
- The top is worked in a rectangular panel and later seamed to form a tube.
- The lace stitch is created with fans (clusters) of double crochets (dc) spaced apart in each row.
- Customization is easy by simply adjusting the foundation chain length for the top’s length and the number of rows for its width.
- Straps are made separately and sewn onto the panel.
Pattern Instructions
Step 1: Foundation Chain
- Begin with a slip knot:
- Loop the yarn to form a circle. Insert your hook into the loop, yarn over, and pull up a slip knot.
- Chain for the length of your top:
- For a bralette: chain 50.
- For a longer top, increase the number of chains to your desired length. (Example: Add increments of 10 chains for a longer top.)
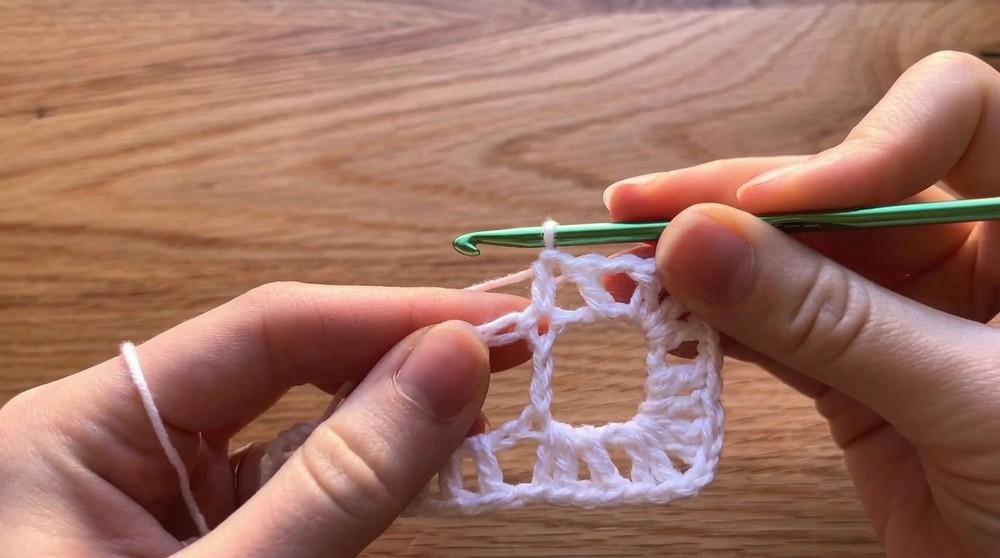
Step 2: Row 1 – First Row with Fan Pattern
- Locate the seventh chain from the hook: Skip the first six chains on your foundation chain.
- Into the seventh chain, do the following to create the first fan pattern:
- Yarn over, insert the hook into the chain, yarn over, and pull up a loop.
- Work a double crochet (dc): Yarn over, pull through two loops, yarn over again, and pull through the remaining two loops on your hook.
- Repeat this two more times into the same chain (total of 3 dc in the same chain).
- Chain 2, and add 1 more dc in the same chain.

This creates a fan cluster with three double crochets, a chain-2 space, and a final double crochet at the end.
- Into the seventh chain, do the following to create the first fan pattern:
- Skip 5 chains:
- After finishing the first fan, skip 5 chains on the foundation, and repeat the fan pattern (3 dc, ch 2, 1 dc) into the next chain.
- Continue along the foundation:
- Repeat the fan pattern (skipping 5 chains in between each fan) until you have 3 to 5 stitches remaining.
- Finish the Row:
- When you reach the end of the row, work 1 dc into the last chain to secure the row.
- When you reach the end of the row, work 1 dc into the last chain to secure the row.
Step 3: Row 2 – Continuing the Lace Pattern
- Chain 2 and turn your work:
- To start Row 2, chain 2, and then turn your work.
- Work the fan clusters into the chain spaces of Row 1:
- Into the chain 2 space of the first fan cluster from Row 1, work:
- 3 dc, ch 2, 1 dc.
- Into the chain 2 space of the first fan cluster from Row 1, work:
- Continue this across:
- Skip all other stitches in the row and directly work fan clusters into the chain-2 spaces created in the previous row.
- End the Row:
- When you complete the last fan, work 1 dc into the turning chain from the previous row to finish the row neatly.
Step 4: Continuing Rows
- Repeat Row 2 for as many rows as needed.
- The width of your top is determined by the total number of rows.
- Example: The tutorial shows 64 rows for a fitted top.
- For a looser top, increase the number of rows.
Step 5: Assembly
- Seaming the Sides:
- Once the rectangle is complete, cut the yarn, leaving a tail long enough for sewing.
- Fold the panel in half with the right sides facing each other.
- Use a tapestry needle to sew the two shorter edges together.
- For a clean finish, use a whip stitch or mattress stitch along the seam.
Step 6: Adding Straps
- Mark Strap Positions:
- Wear the top and mark where the straps should be using stitch markers.
- Position straps over the shoulders, aligning them with bra straps or based on personal preference.
- Crocheting the Straps:
- For a simple fan-style strap, attach the yarn to the marked point at the front.
- Follow the same lace fan pattern:
- Fan cluster (3 dc, ch 2, 1 dc) for the width of the strap.
- Repeat rows until the strap reaches the back point.
- Finish the strap with 1 row of single crochets.
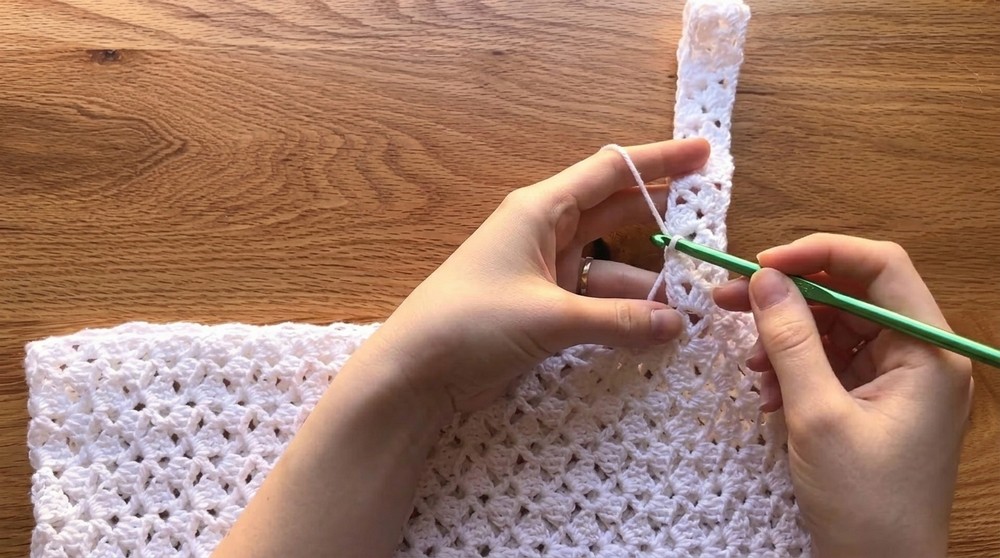
- Sewing the Straps:
- Sew the straps securely to the marked back position using a tapestry needle.
- Ensure seams are done on the inside/wrong side for a clean finish.
Finishing
- Weave in Loose Ends:
- Use the tapestry needle to weave in all yarn tails to secure the stitches neatly.
- Block the Top:
- Wet or steam block the top to even out the stitches and give it a more polished appearance.
- Wet or steam block the top to even out the stitches and give it a more polished appearance.
Customization Ideas
- Change Colors: Use multiple colors for the rows to make the lace pattern stand out.
- Modify Strap Design: Experiment with wider straps or criss-cross straps at the back for a unique look.
- Add Length or Trim:
- Increase the foundation chain for a longer top.
- Add a decorative scalloped border at the bottom edge for a stylish finish.
Conclusion
The Crochet Lace Top is a versatile project that can be adjusted to suit personal styles and needs. It’s light, comfortable, and perfect for summer wear. With its fan lace pattern, it’s quick to crochet and produces a stunning, handmade garment that can be completed in a single day.
Important Remarks
- The top can be customized for any size or fit, ensuring inclusivity.
- Always use blocking to achieve a professional look for lace patterns.