Brighten your bags with cozy crochet handles that add comfort and style, making every carry easier and turning heads wherever you go.
Handles are the important part of any bag that makes it easy to carry and adds to its look. Crochet bag handles bring a soft, handmade charm that beats plain straps. They can be thick or thin, long or short, fitting perfectly with all kinds of bags, from small purses to big totes. Their pretty loops and twists give bags a unique, cozy feel that stands out wherever you go.
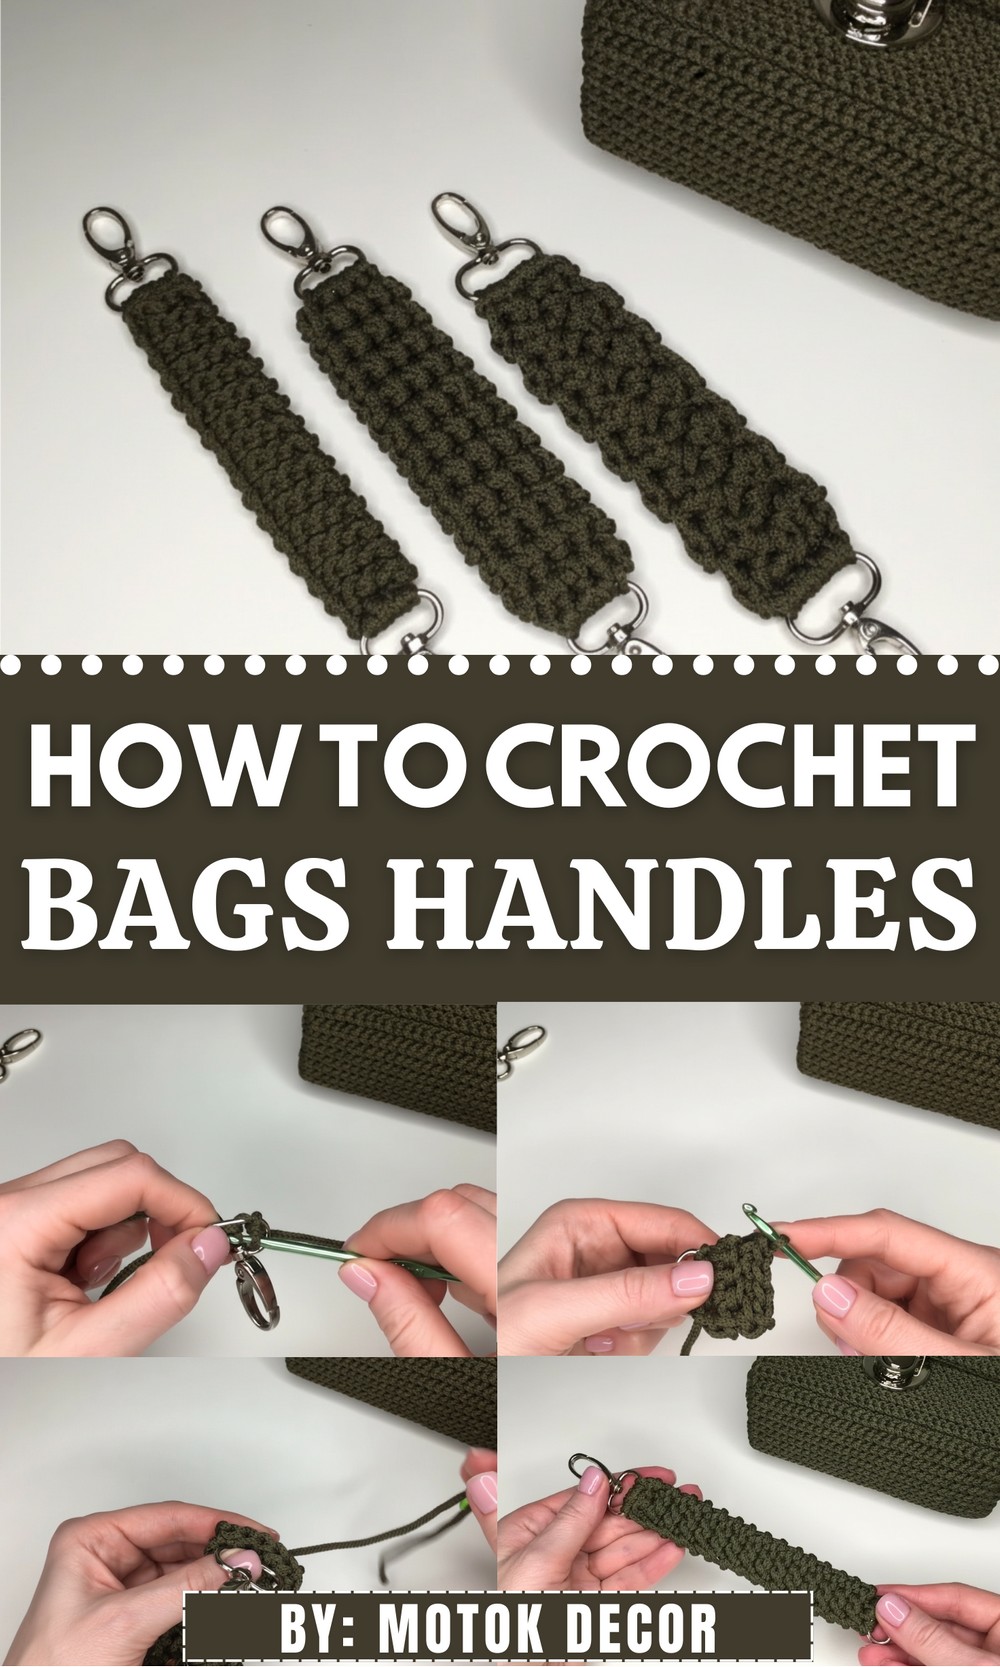
Cozy and Cute Crochet Handles to Personalize Your Bags
These handles don’t just look nice; they feel gentle on your hands, making carrying heavy stuff much easier. You can choose bright colors or simple shades that match your style. Plus, crochet handles last long and can be washed easily, keeping your bag fresh and tidy. Whether you want to fix an old bag or make a new one shine, adding crochet handles is a simple way to bring beauty and comfort together in one lovely accessory. Everyone notices a bag with charming, comfy handles!
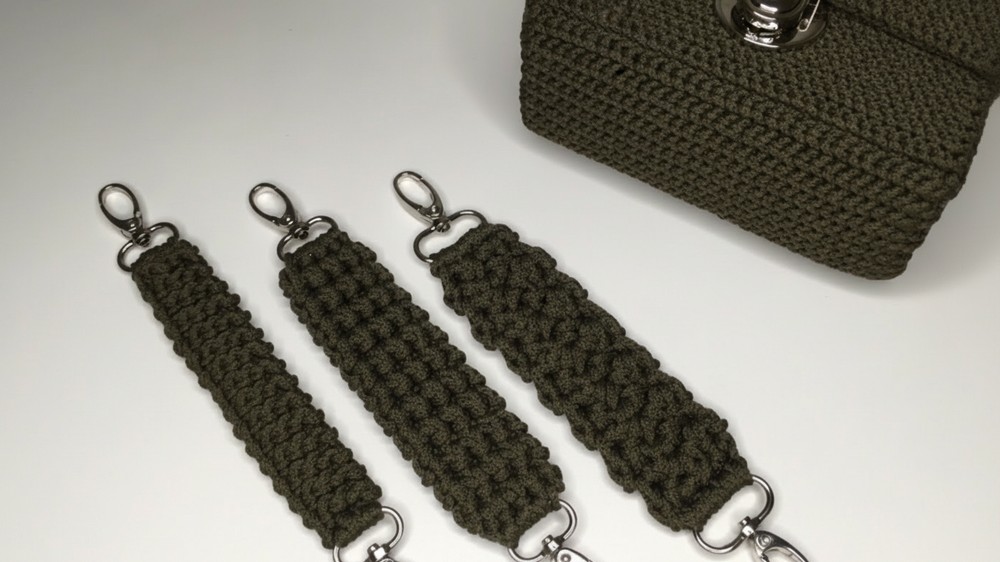
Crochet Handles – Three Stylish and Durable Options
Skill Level
Intermediate – Requires basic crochet skills (chain, single crochet), working around bulky cord, sewing techniques, and familiarity with slip stitches and tension control.
Materials
- Polyester cord, 3 mm thickness (~50–60 meters per handle)
- Crochet hook size 4
- Needle with large eye
- 25 mm carabiners (2 per handle)
- Scissors
Special Features
- Three unique handle designs with varying textures and stretching capabilities
- Flexible yet durable, suitable for heavy bags or backpacks
- Incorporates carabiner attachments for convenience
- Can be made from other materials depending on your main project
Step-by-Step Crochet Handle Patterns
Option 1: Dense, Non-Stretchy Handle
Step 1: Attach Yarn to Carabiner
- Loop the yarn onto the carabiner, pull a loop, and secure with a slip knot. Hide yarn tail inside.

Step 2: Crochet Row 1
- Work 4 single crochet (sc) stitches directly on the carabiner ring.
- Each stitch: Insert hook through carabiner ring, yarn over, pull up loop, yarn over, pull through 2 loops.
Step 3: Turn and Prepare for Next Rows
- Chain 1 (lifting chain), turn work.
Step 4: Crochet Following Rows with Relief Stitch Pattern
- For each row, skip the first loop, then crochet single crochets into the far loop (arch) and the regular loop alternately.
- Insert the hook behind the front loop arch from the previous row to create texture.
- Work 5 stitches per row total (matching the first row count).

Step 5: Repeat to Desired Length
- Continue repeating the relief stitch rows, maintaining texture and tension until reaching desired handle length (~1 m).
Step 6: Final Row and Finish
- On the last row, turn and work similar relief stitches to secure the end neatly.

Step 7: Attach Second Carabiner
- Thread yarn tail through a large-eye needle.
- Securely sew the second carabiner onto the other end of your handle with neat stitches, hiding ends inside the crochet work.

Option 2: Slightly Extensible Handle with Lounger Texture
Step 1: Begin at Carabiner
- Attach yarn as in Option 1.
Step 2: Crochet 5 Single Crochets (sc) on Carabiner
- Work 5 sc stitches directly on the carabiner ring.
Step 3: Chain 1, Turn and Continue
- Chain 1 to lift, turn your work.
Step 4: Work Rows with 2 Air Loops and Single Crochet Pattern
- For subsequent rows:
- Insert hook into second loop from hook, crochet sc behind both arches (braids) of previous row.
- After sc, make 2 air loops (chain 2), then sc into the next set of arches.
- Skip one loop between sc stitches to create a slightly looser, stretchier texture.
Step 5: Repeat to Desired Length
- Continue this alternating row pattern until you reach your desired handle length (~1 m).
Step 6: Secure Final Row
- Finish the last row with single crochets securing air loops.
Step 7: Attach Carabiner on Other End
- Attach and sew second carabiner like in Option 1, hiding yarn ends neatly.
Option 3: Thinner, Less Stretchy Handle
Step 1: Attach Yarn to Carabiner
- As in previous options, loop yarn and secure.
Step 2: Crochet 3 Single Crochets (sc) on Carabiner
- Work 3 sc onto the carabiner ring.
Step 3: Chain 1, Turn and Begin Pattern
- Chain 1 to lift, turn work.
Step 4: Crochet Rows with Relief Stitches and Regular Sc
- Insert hook in second loop from hook; crochet sc alternating behind braids/arches and normal stitches using a coordination similar to Option 1.
- Repeat using the textured stitches to form a tight, flexible strap.
Step 5: Repeat to Desired Length
- Continue until the handle length matches the intended measurement (~1 m).
Step 6: Finish and Attach Second Carabiner
- Bind off and sew the second carabiner securely.

Tutor’s Suggestions
- Maintain consistent tension to ensure the handle is flexible without becoming too loose or sagging.
- Practice the relief stitch technique on scraps if you’re unfamiliar.
- Use stitch markers to keep track of loops when working around carabiners.
- After finishing, gently shape the handles to relax the tension before final assembly.
Uses
- Perfect straps for DIY handbags, backpacks, or shoulder bags
- Durable, comfortable, and visually appealing handles for various projects
- Easily interchangeable with carabiner attachments
Tip
Before sewing carabiners, lay your handle flat and measure carefully to avoid surprises in final length. Sewing the carabiner securely inside the crochet stitches will greatly enhance durability.
Conclusion
This tutorial offers three functional and stylish handle patterns that combine durability with flexible design. Whether you need a dense, stretchier, or thinner handle, these step-by-step instructions will guide you to make professional-looking crochet handles.