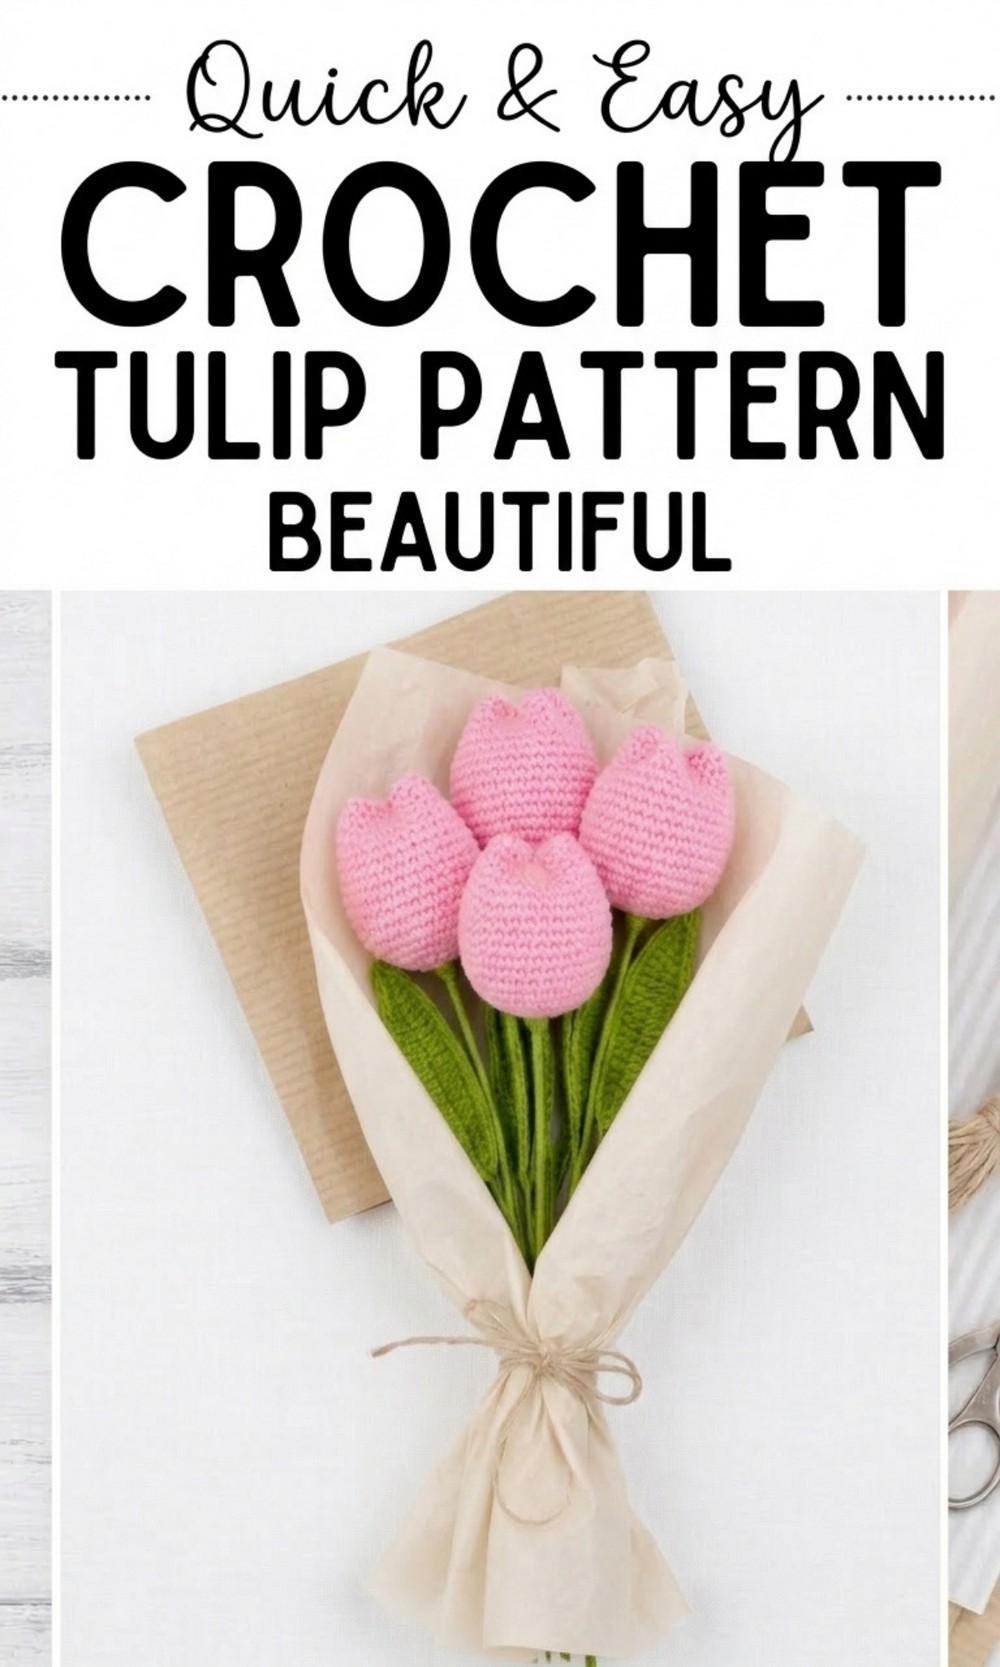
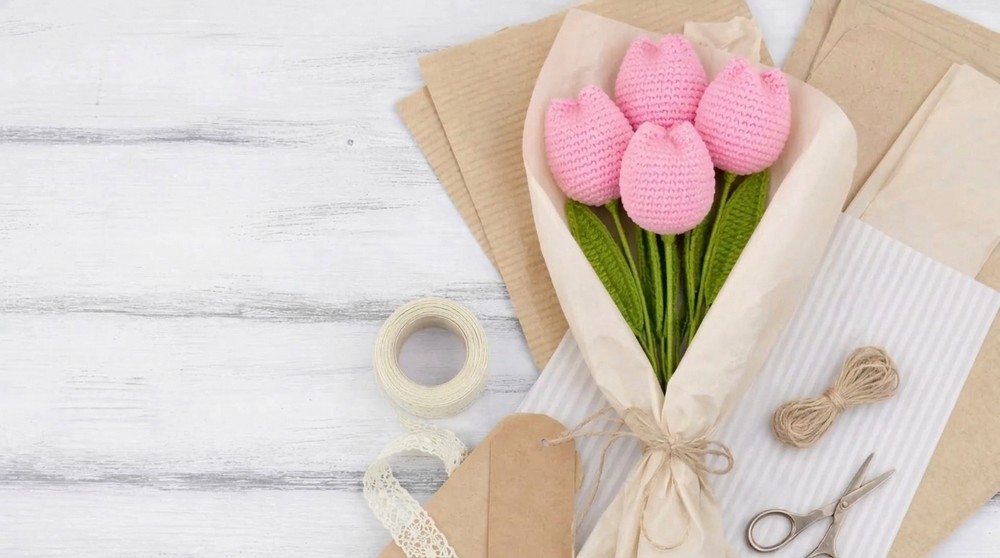
Feel the joy of flowers with this free crochet tulip pattern that lets you create a lifelike, soft, and beautiful tulip to brighten up your home and heart.
Charming Free Crochet Tulip Pattern You Can Use for Endless Joy
Bring happiness to your day with this Free Crochet Tulip Pattern, a soft and colorful flower that looks just like a real tulip blooming in the garden. Its bright pink petals gently fold around a soft white center, creating a realistic and cheerful look. The long green stem and delicate leaf can be shaped to add a natural touch, making it even more lifelike. 
Made with soft yarn, this tulip stays beautiful forever and is perfect as a thoughtful gift or a decoration for your home. You can place it in a vase to brighten up any space or share it with someone special.
The pattern is beginner friendly, with easy steps that let you finish it quickly. Creating this charming tulip is not just fun but also a lovely way to showcase your creativity and add a handmade touch of beauty to your world.
Cozy Crochet Tulip Pattern
1. Materials Needed
- Two colors of 4 ply acrylic yarn
- Color 1: Flower
- Color 2: Green (for stem and leaf)
- Crochet hook: 3 mm
- Scissors
- Stitch marker
- Yarn needle
- Glue (fabric or strong craft glue)
- Polyfiber stuffing
- Two types of wire
- Thick wire for stem
- Thin wire for leaf
2. Special Techniques Used
- Magic circle
- Chain (ch)
- Single crochet (sc)
- Half double crochet (hdc)
- Double crochet (dc)
- Slip stitch (sl st)
- Increasing stitches (2 stitches in same stitch)
- Working in rounds
- Working along both sides of a chain
- Stuffing with polyfiber
- Wrapping yarn around wire for the stem
PART A – Tulip Flower
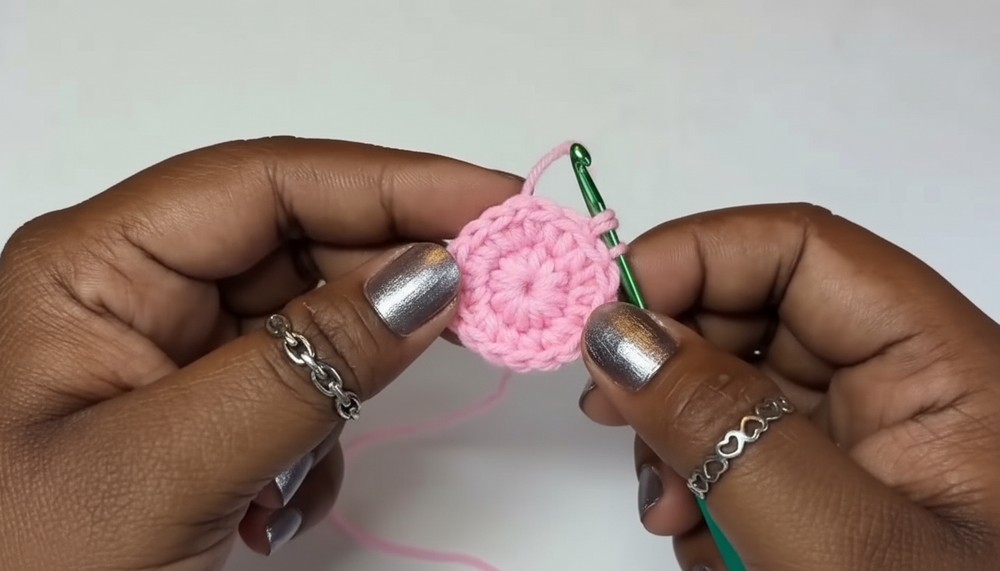
Round 1
- Make a magic circle.
- Work 6 single crochet (6 sc) into the magic circle.
- Pull the tail to tighten the circle.
- Join to the first sc with a slip stitch (sl st) to close Round 1.
Total stitches: 6 sc
Round 2
- Chain 1 (do not count this as a stitch).
- In each stitch around work an increase: 2 single crochet in each stitch.
- Place a stitch marker in the first stitch of the round.
Total stitches: 12 sc
Round 3
Pattern: 1 sc, then increase. Repeat.
- Chain 1.
- In the first stitch: 1 sc, place marker.
- In the next stitch: 2 sc in the same stitch (increase).
- Repeat: 1 sc in next stitch, then 2 sc in next stitch all the way around.
Total stitches: 18 sc
Close the round with a slip stitch in the first stitch.
Round 4
Pattern: 2 sc, then increase. Repeat.
- Chain 1.
- In the first stitch: 1 sc, place marker.
- In the next stitch: 1 sc.
- In the next stitch: 2 sc in the same stitch (increase).
- Repeat this sequence (sc, sc, increase) around the round.
Total stitches: 24 sc
Close the round with a slip stitch.
Round 5
Pattern: 3 sc, then increase. Repeat.
- Chain 1.
- Make 1 sc in each of the next 3 stitches, place marker in first sc.
- In the next stitch: 2 sc (increase).
- Repeat: 3 sc, then 2 sc in next stitch around.
Total stitches: 30 sc
Close the round with a slip stitch.
Round 6
Pattern: 4 sc, then increase. Repeat.
- Chain 1.
- Make 1 sc in each of the next 4 stitches, place marker in first sc.
- In the next stitch: 2 sc (increase).
- Repeat: 4 sc, then 2 sc in next stitch around.
Total stitches: 36 sc
Close the round with a slip stitch.
Round 7
- Chain 1.
- Work 1 sc in each stitch around (no increase this round).
- Use the marker for the first stitch.
Total stitches: 36 sc
Close with a slip stitch.
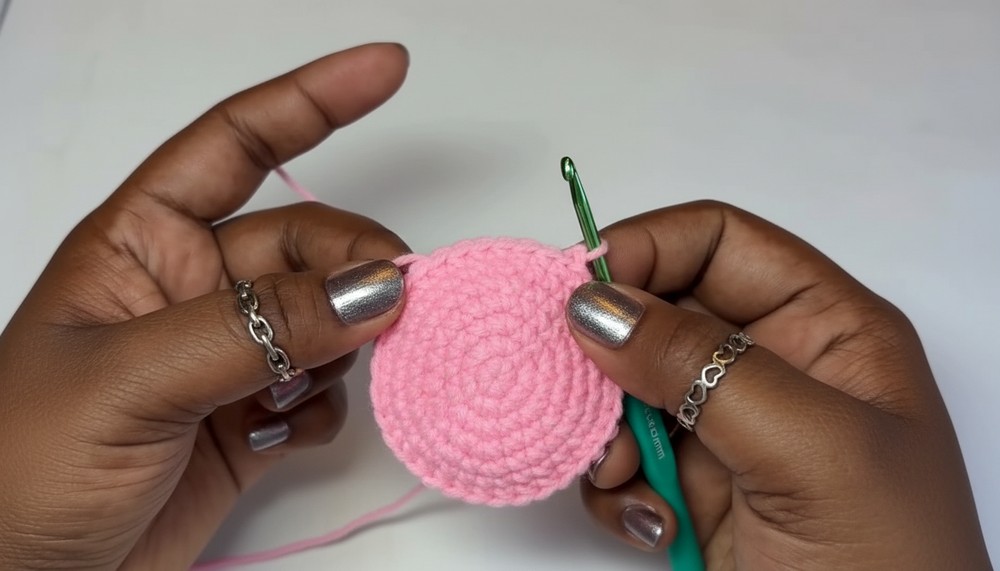
Rounds 8 to 18
- For each round from Round 8 to Round 18:
- Chain 1.
- Work 1 sc in each stitch around (36 sc each round, no increases).
- Close each round with a slip stitch.
You will now have a long cup shaped tube for the tulip.
Closing the Flower Top and Shaping the Tulip
- At the end of Round 18, close with a slip stitch and chain 1.
- Cut the yarn, leaving a long tail for sewing.
- Fill the flower tube with polyfiber stuffing. Spread the fiber lightly and fill it evenly.
- Thread the yarn tail into a yarn needle.
- Fold the open end of the flower tube in half so that the sides meet.
- Sew the open side edges together using the needle and yarn, making tight stitches.
- Pull the stitches tight so the top closes nicely.
- Shape the top by pulling and adjusting so that it looks like a tulip head.
- Knot the yarn to secure and hide the tail.
Your tulip flower is ready.
PART B – Leaf
Step 1 – Foundation Chain
- With green yarn, make a slip knot.
- Chain 25.
Step 2 – First Side of Leaf
Work into the chains starting from the 3rd chain from the hook.
- In the 3rd chain from hook: 1 sc. You can mark this stitch.
- In the next 2 chains: 1 sc in each
- You now have 3 sc in a row.
- In the next 3 chains: 1 half double crochet (hdc) in each
- Total: 3 hdc.
- In the next 10 chains: 1 double crochet (dc) in each
- Total: 10 dc.
- In the next 3 chains: 1 hdc in each
- Total: 3 hdc.
- In the next 3 chains: 1 sc in each
- Total: 3 sc.
- In the last remaining chain (at the end): work 3 sc into the same chain.
- Mark the middle of these 3 sc.
Now turn your work to crochet on the other side of the starting chain.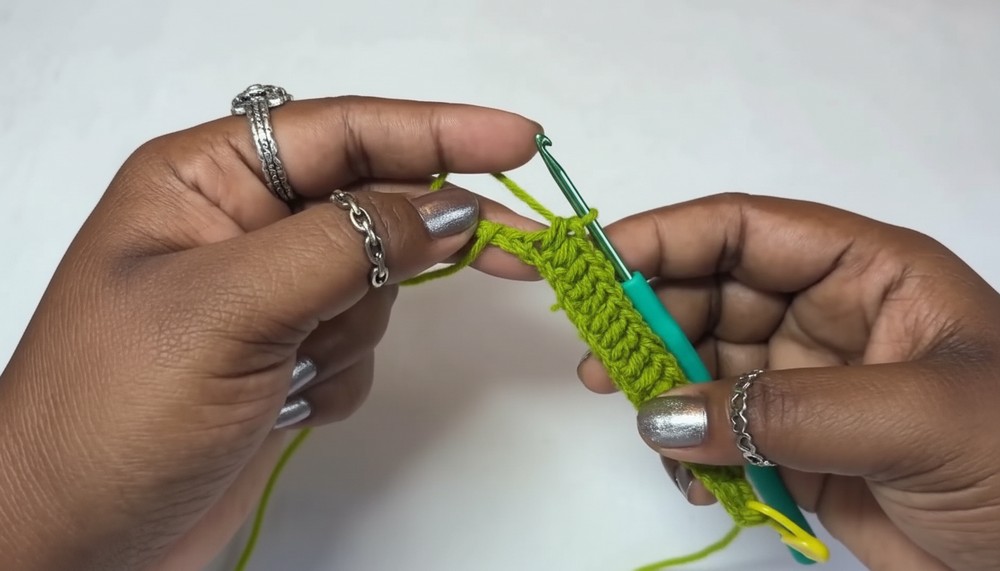
Step 3 – Second Side of Leaf
- Turn the leaf so that the free loops of the starting chain are now facing you.
- In the next 3 stitches: work 1 sc in each.
- In the next 3 stitches: work 1 hdc in each.
- In the next 10 stitches: work 1 dc in each.
- In the next 3 stitches: 1 hdc in each.
- In the next 3 stitches: 1 sc in each.
- In the middle point (where you marked earlier): make a slip stitch.
- Chain 1 (do not count as a stitch).
Your basic leaf shape is now complete.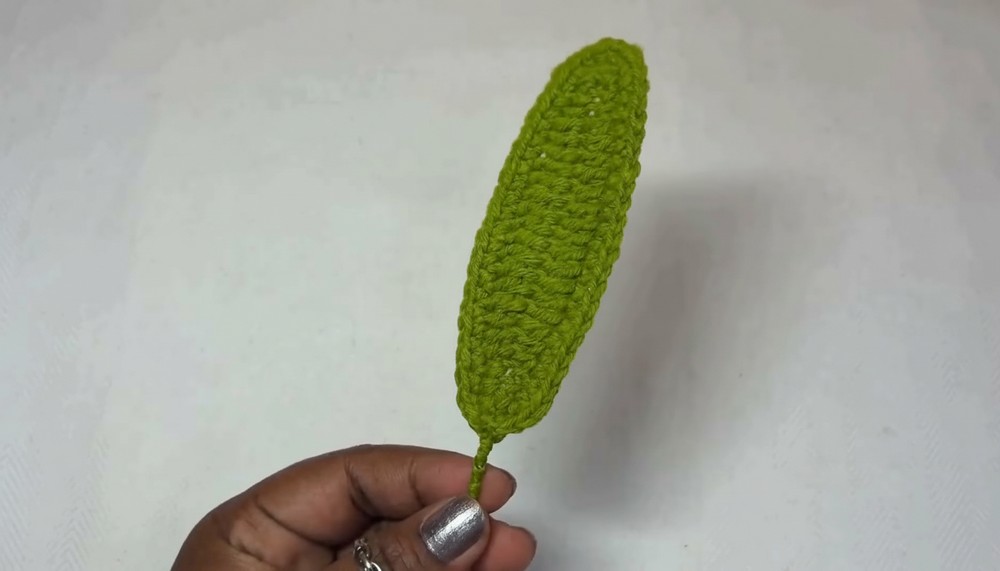
Step 4 – Adding Wire to the Leaf
- Take about 13 inches of thin wire.
- Place the wire along the edge of the leaf on the wrong side (back side).
- Insert hook into the next stitch along the leaf edge, catching the wire under the stitch.
- Make 1 sc in this stitch with the wire inside the stitch so it gets trapped and hidden.
- Continue to work 1 sc in each stitch around the leaf edge, always holding the wire along the edge and crocheting over it.
- Stop when you reach the marked middle point on the other side.
- Fold the extra wire inside near the tip and secure it by working 3 sc into that middle stitch again around the wire.
- Continue working sc along the other side of the leaf, covering the wire completely.
- When you reach the end, make a slip stitch, chain 1, cut the yarn leaving a tail, and pull through.
- Twist the two wire ends together at the leaf base to make it firm.
- Use the yarn tail to weave and hide it inside the stitches.
Now the leaf is ready. The wire is hidden inside and the leaf is shapeable.
PART C – Assembling the Tulip Flower with Stem
Step 1 – Preparing the Flower Stem
- Take the thick wire for the stem (length as per your choice).
- Insert a long piece of green yarn into the needle and bring it through the base of the tulip flower from the center bottom.
- Bring both yarn ends out at the base.
- Insert the thick wire into the base of the flower so that about 2 inches of wire go inside the flower.
- Add a little glue at the base around the wire and the bottom of the flower to fix it.
- Wrap the green yarn firmly around the wire and the flower base, forming a neat base for the tulip.
- Let the glue dry a little and cut the extra yarn if needed.
Step 2 – Wrapping the Stem
- Apply a thin layer of glue along the top part of the thick wire.
- Start wrapping green yarn tightly around the wire, just under the flower base.
- Wrap slowly and evenly, going down the wire.
- Cover around 8 cm first, then stop to add the leaf.
Step 3 – Attaching the Leaf to the Stem
- Place the leaf’s twisted wire base against the stem where you want the leaf to sit.
- Hold the leaf wire and stem together.
- Continue wrapping the green yarn around both the stem wire and the leaf wire to attach them tightly.
- Wrap firmly so the join looks neat and clean.
- Apply glue as you wrap to fix the yarn in place.
- Continue wrapping the yarn downwards until you reach the bottom of the stem.
- Cut the yarn and secure the end with a little glue.
- Let it dry and then trim any extra yarn.
Now bend the leaf gently into a natural shape.
Finishing the Pattern
- Adjust the tulip head by gently pressing and shaping the top.
- Shape the leaf as you like by bending the wire inside.
- Check that no wire is visible on front or back.
- Make more tulips in different colors to form a bouquet.
Tips to Maintain the Tulip
- Keep the tulip away from water and moisture to protect the glue and wire.
- Dust it gently with a dry cloth or soft brush.
- Do not pull hard on the leaf or flower, as it may change shape.
- If the stem becomes bent, gently reshape it by hand.
Final Words
This crochet tulip with leaf pattern is beginner friendly and uses simple stitches. It is beautiful for home decor and also works well as a handmade gift. You can create a bunch of tulips in many colors and place them in a vase or use them as decoration for special occasions. With patience and careful wrapping, you will get a neat and elegant finish.